Harbor Freight Tools 94771 Owner's manual
- Category
- Power tools
- Type
- Owner's manual

ASSEMBLY AND OPERATING INSTRUCTIONS
Visit our website at: http://www.harborfreight.com
Read this material before using this product.
Failure to do so can result in serious injury.
SAVE THIS MANUAL.
Copyright
©
2006 2010 by Harbor Freight Tools
®
. All rights reserved. No portion of this manual or any
artwork contained herein may be reproduced in any shape or form without the express written consent of
Harbor Freight Tools. Diagrams within this manual may not be drawn proportionally. Due to continuing
improvements, actual product may differ slightly from the product described herein. Tools required for as-
sembly and service may not be included.
For technical questions or replacement parts, please call 1-800-444-3353.
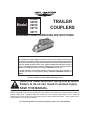
TRAILER
COUPLERS
WARNING! IMPORTANT INFORMATION
The installed Ball Coupler MUST be properly secured to the hitch ball of the towing
vehicle. After assembly and attachment, pull up and down on the Ball Coupler to make
sure the hitch ball is fitting snugly on the Hitch Ball. There must be no play between the
hitch ball and Ball Coupler. If there is play, tighten the Adjustment Nut until no play is
present. If the Adjustment Nut is too tight, the Handle will not lock. Carefully read and
follow the complete instructions in this manual BEFORE setup or use.
If the Ball Coupler is not secured properly, it could come loose while the trailer is
in motion, possibly causing property damage, SERIOUS PERSONAL INJURY, or
DEATH.
Model
67650
94768
94769
94770
94771

SKU 94768/69/70/71 For technical questions, please call 1-800-444-3353. Page 2
67650
SPECIFICATIONS
Model 94768
1-7/8” Ball Coupler, 9” (L) x 2-1/8” (H) x
3-1/4” (W); Fits 2” channel;
spring loaded collar, 2000 Lb.
GVWR*, weight: 2.9 Lbs.; Meets V5 and
SAE J684 standards Class I.
Model 94769
1-7/8” Ball Coupler, 9” (L) x 2-1/8” (H) x
3-3/8” (W); Fits 3” channel;
spring loaded collar, 2000 Lb.
GVWR*, weight: 2.8 Lbs.; Meets V5 and
SAE J684 standards Class I.
Model 94770
1-7/8” Ball Coupler, 9” (L) x 2-1/8” (H) x
3-3/8” (W); Fits 2-1/2” channel;
spring loaded collar, 2000 Lb.
GVWR*, weight: 2.8 Lbs.; Meets V5 and
SAE J684 standards Class I
Model 94771
2” Ball Coupler, 10-7/8” (L) x 2-1/4” (H) x
4-1/2” (W); Fits 2-1/2” channel;
spring loaded collar, 3,500 Lb.
GVWR*, weight: 4.4 Lbs.; Meets V5 and
SAE J684 standards Class II.
Model 67650
2” Ball Coupler, 11” (L) x 2-1/4” (H) x 3” (W)
Fits 3” channel; spring loaded collar,
3,500 Lb. GVWR*, weight: 4.3 Lbs.;
Meets V5 and SAE J684 standards Class II
* Gross Vehicle Weight Rating
UNPACKING
When unpacking, make sure that the item
is intact and undamaged. If any parts are missing
or broken, please call Harbor Freight Tools at the
number shown on the cover of this document as
soon as possible.
SAVE THIS MANUAL
You will need the manual for the safety warnings and
precautions, assembly instructions, operating and
maintenance procedures, parts list and diagram. Keep
your invoice with this manual. Write the invoice number
on the inside of the front cover. Keep the manual and
invoice in a safe and dry place for future reference.
SAFETY WARNINGS AND
PRECAUTIONS
WARNING!: When using tool, basic safety
precautions should always be followed to reduce
the risk of personal injury and damage to equip-
ment.
Read all instructions before using this tool!
Keep work area clean.1. Cluttered areas
invite injuries.
Keep children away. 2. Children must never
to allowed in the work area. Do not let them
handle machines, tools or extension cords.
Store idle equipment.3. When not in use,
tools must be stored in a dry location to in-
hibit rust. Always lock up tools and keep out
of reach of children.
Use the right Ball Coupler for the job4. . Do
not attempt to force a small Ball Coupler to
do the work of a larger industrial coupler.
There are certain applications for which this
product was designed. It will do the job better
and more safely at the rate for which it was
intended. Do not modify a Ball Coupler and
do not use one for a purpose for which it was
not intended.
Dress properly5. . Do not wear loose clothing
or jewelry as they can be caught in moving
parts.
Do not overreach6. . Keep proper footing and
balance at all times. Do not reach over or
across running machines.
Maintain tools with care7. . Keep tools sharp
and clean for better and safer performance.
Follow instructions for lubricating and chang-
ing accessories.
Stay alert8. . Watch what you are doing, use
common sense. Do not operate any tool
when you are tired.
Check for damaged parts9. . Before using
any tool, any part that appears damaged
should be carefully checked to determine
that it will operate properly and perform its
intended function. Check for alignment and
binding of moving parts; any broken parts or
mounting xtures; and any other condition
that may affect proper operation. Any part
that is damaged should be properly repaired
or replaced by a qualied technician.
Replacement parts and accessories10. .
When servicing, use only identical replace-
ment parts. Use of any other parts will void
the warranty. Only use accessories intended
for use with this tool. Approved accessories
are available from Harbor Freight Tools.
Do not operate tool if under the inuence 11.
of alcohol or drugs. Read warning labels if
taking prescription medicine to determine if
your judgment or reexes are impaired while
taking drugs. If there is any doubt, do not
operate the tool.

SKU 94768/69/70/71 For technical questions, please call 1-800-444-3353. Page 3
67650
Maintenance12. . For your safety, service and
maintenance should be performed regularly
by a qualied technician.
PRODUCT SPECIFIC SAFETY
PRECAUTIONS
Do not exceed the Gross Vehicle Weight 1.
Rating of the truck.
Before each use, always examine the 2.
trailer (not supplied) for: proper tire air
pressure, damaged tail lights, damaged side
running lights, loose bolts and nuts, struc-
tural cracks, bends, and any other condition
that may affect safe operation. Do not use a
trailer when minor damage appears.
Never allow adults, children, or pets to 3.
ride in the trailer.
B4. efore each use, always attach the safety
chains (not supplied) of the trailer to the
towing vehicle. Make sure the safety chain
is attached to the towing vehicle with the
same length for each side. Do not allow the
safety chain to drag on the ground.
Verify that the payload being transported 5.
is properly and safely secured in the
trailer. Load the trailer evenly from side to
side with 60% of the load forward of the Axle.
The towing vehicle must be capable of 6.
towing the trailer and its payload. Verify
that the towing vehicle hitch (not included) is
capable of towing the weight of the trailer and
its payload. The towing capacity of the hitch
is typically stamped on the Hitch drawbar.
M7. ake sure the Ball Coupler and the ve-
hicle’s ball hitch (not included) are of equal
mating size (see Specications on page 2),
and are rated equal to, or greater than, the
weight of the trailer and its payload.
Do not exceed 45 miles per hour when 8.
towing a trailer. Excess speed is a major
cause of vehicle-trailer accidents.
Whenever possible, park the trailer on a 9.
flat, level, paved, surface and chock both
tires to keep the trailer from accidently mov-
ing.
Industrial applications must follow osha 10.
requirements.
Warning: The warnings, cautions, and instructions
discussed in this instruction manual cannot cover
all possible conditions and situations that may
occur. It must be understood by the operator that
common sense and caution are factors which
cannot be built into this product, but must be
supplied by the operator.
OPERATION
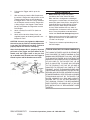
Place the Ball Coupler on the trailer Tongue 1.
(not supplied). See illustrations below and
on next page. The Tongue width (usually
marked on the Hitch) must exactly match
with width of the Ball Coupler (see Specifica-
tions on page 2); otherwise, do not use.
Match up the holes in the side of the Ball 2.
Coupler with the holes in the trailer Tongue.
See illustration on this page. If no holes are
present, use the Ball coupler as a template,
mark the Tongue through the holes and
drill. Be certain that the Ball Coupler is well
seated on the hitch before marking for drill-
ing.
Note: Before drilling, check for hidden wires in the
drilling path. If you are not familiar with drilling
and mounting the Ball Coupler, have a quali-
ed service technician do it.
Acquire two SAE Grade 5 or Metric Grade 3.
8.8 steel bolts the same diameter as the
holes in the Ball Coupler, and 1/2 inch longer
that the width of the Ball coupler. Also ac-
quire two flat washers, and two hex lock nuts.
(Hardware not supplied.)
Place the Bolts through the Ball Coupler 4.
holes (shown below), and secure from the
other side first with the flat washer, then the
hex lock nut. Securely tighten with a wrench
(not supplied).
To reduce friction between the Tongue ball 5.
and Coupler, apply a layer of heavy weight
grease over the Tongue ball. Refer to the
illustration on the next page.

SKU 94768/69/70/71 For technical questions, please call 1-800-444-3353. Page 4
67650
Pull up on the Trigger and lift up on the 6.
Handle.
With assistance, place the Ball Coupler over 7.
the vehicle’s Tongue ball and pull back on the
Trigger and push down on the Handle until
the Trigger locks in the slot. Pull up and down
on the Coupler to make sure the Tongue ball
is fitting snugly in the Coupler. There should
be no play between the Tongue ball and the
Ball Coupler.
Attach a Safety Pin and “R” Pin (both not 8.
included).
Attach each side of the Safety Chain (not 9.
supplied) equally to the towing vehicle’s rear
bumper or frame.
CAUTION: If there is play, tighten the Adjustment
Nut until no play is present. If the Adjustment Nut
is too tight, the Handle will not lock. Failure to
properly adjust can result in uncoupling.
After the Adjustment Nut is properly adjusted,
pull back on the Trigger and push down on the
Handle until the Trigger locks in the slot. Pull
up on Handle firmly to make sure the Trigger is
locked in place and the Handle cannot move.
MAINTENANCE
Before each use, 1. inspect the general
condition of the Trailer. Check for loose
Bolts and Nuts, misalignment or binding of
moving parts, cracked, bent, or broken parts,
excessively worn Safety Chain, damaged Tail
Lights/Side Running Lights/Wiring Harness,
loose Lug Nuts, loose Tongue connection,
and any other condition that may affect its
safe operation. If abnormal noise or vibration
occurs, have the problem corrected before
further use. Do not use damaged equipment.
Before each use check the Ball Coupler for a 2.
tight fit on the hitch ball as described in the
“Caution” on this page.
There are no customer replaceable parts on 3.
the Ball Coupler.
PLEASE READ THE FOLLOWING CAREFULLY
THE MANUFACTURER AND/OR DISTRIBUTOR
HAS PROVIDED THE PARTS DIAGRAM IN THIS
MANUAL AS A REFERENCE TOOL ONLY. NEITHER
THE MANUFACTURER NOR DISTRIBUTOR
MAKES ANY REPRESENTATION OR WARRANTY
OF ANY KIND TO THE BUYER THAT HE OR
SHE IS QUALIFIED TO MAKE ANY REPAIRS
TO THE PRODUCT OR THAT HE OR SHE IS
QUALIFIED TO REPLACE ANY PARTS OF THE
PRODUCT. IN FACT, THE MANUFACTURER AND/
OR DISTRIBUTOR EXPRESSLY STATES THat ALL
REPAIRS AND PARTS REPLACEMENTS SHOULD
BE UNDERTAKEN BY CERTIFIED AND LICENSED
TECHNICIANS AND NOT BY THE BUYER. THE
BUYER ASSUMES ALL RISK AND LIABILITY
ARISING OUT OF HIS OR HER REPAIRS TO
THE ORIGINAL PRODUCT OR REPLACEMENT
PARTS THERETO, OR ARISING OUT OF HIS OR
HER INSTALLATION OF REPLACEMENT PARTS
THERETO.

SKU 94768/69/70/71 For technical questions, please call 1-800-444-3353. Page 5
67650
LIMITED 90 DAY WARRANTY
Harbor Freight Tools Co. makes every effort to assure that its products meet high quality and durability
standards, and warrants to the original purchaser that this product is free from defects in materials and
workmanship for the period of 90 days from the date of purchase. This warranty does not apply to damage
due directly or indirectly, to misuse, abuse, negligence or accidents, repairs or alterations outside our facilities,
criminal activity, improper installation, normal wear and tear, or to lack of maintenance. We shall in no event
be liable for death, injuries to persons or property, or for incidental, contingent, special or consequential
damages arising from the use of our product. Some states do not allow the exclusion or limitation of incidental
or consequential damages, so the above limitation of exclusion may not apply to you. THIS WARRANTY
IS EXPRESSLY IN LIEU OF ALL OTHER WARRANTIES, EXPRESS OR IMPLIED, INCLUDING THE
WARRANTIES OF MERCHANTABILITY AND FITNESS.
To take advantage of this warranty, the product or part must be returned to us with transportation charges
prepaid. Proof of purchase date and an explanation of the complaint must accompany the merchandise. If
our inspection veries the defect, we will either repair or replace the product at our election or we may elect
to refund the purchase price if we cannot readily and quickly provide you with a replacement. We will return
repaired products at our expense, but if we determine there is no defect, or that the defect resulted from
causes not within the scope of our warranty, then you must bear the cost of returning the product.
This warranty gives you specic legal rights and you may also have other rights which vary from state
to state.
3491 Mission Oaks Blvd. • PO Box 6009 • Camarillo, CA 93011 • (800) 444-3353
-
 1
1
-
 2
2
-
 3
3
-
 4
4
-
 5
5


Harbor Freight Tools 94771 Owner's manual
- Category
- Power tools
- Type
- Owner's manual
Ask a question and I''ll find the answer in the document
Finding information in a document is now easier with AI
Related papers
-
Harbor Freight Tools 94795 User manual
-
-
-
-
Pittsburgh Automotive Item 61160 Owner's manual
-
-
-
-
-
Other documents
-
 HAUL MASTER 98487 Set Up And Operating Instructions Manual
-
 HAUL MASTER 96349 Set Up And Operating Instructions Manual
-
 HAUL MASTER 90153 Assembly And Operation Instructions Manual
-
 HAUL MASTER 94564 Assembly And Operating Instructions Manual
-
 Haul-Master 98019 Owner's manual
-
 Haul-Master Item 62647 Owner's manual
-
 Haul-Master Item 62671 Owner's manual
-
 Haul-Master 61625 Owner's manual
-
 Haul-Master Item 62648 Owner's manual
-
Miller KD343685 Owner's manual


