4
Contents
Chapter 1: Learning about the MFP .................................................................................. 8
Identifying the MFP .......................................................................................................................................... 8
Using the scanner ............................................................................................................................................8
Configured models ......................................................................................................................................... 10
Understanding the MFP control panel ........................................................................................................... 11
Using the LCD touch-screen buttons ............................................................................................................. 17
Menus ............................................................................................................................................................ 23
Chapter 2: Copying ........................................................................................................... 24
Quick copy ..................................................................................................................................................... 24
Multiple page copying .................................................................................................................................... 24
Using the flatbed ............................................................................................................................................ 25
Copy screens and options ............................................................................................................................. 25
Copying from one size to another .................................................................................................................. 26
Making transparencies ...................................................................................................................................27
Copying to letterhead ..................................................................................................................................... 27
Copying photographs .....................................................................................................................................27
Making copies using media from a selected tray ........................................................................................... 28
Copying mixed-sized media ...........................................................................................................................28
Setting the duplex option ...............................................................................................................................28
Reducing and enlarging copies ..................................................................................................................... 29
Adjusting copy quality .................................................................................................................................... 29
Setting collation options ................................................................................................................................. 29
Placing separator sheets between copies ..................................................................................................... 30
Setting paper saving options ......................................................................................................................... 30
Placing the date and time at the top of each page ........................................................................................ 30
Placing an overlay message on each page ................................................................................................... 31
Creating a custom job (job build) ................................................................................................................... 31
Canceling a copy job ..................................................................................................................................... 32
Copy tips ........................................................................................................................................................ 32
Chapter 3: E-mail .............................................................................................................. 33
Entering an e-mail address ............................................................................................................................ 33
Using a shortcut number ................................................................................................................................33
Using the address book ................................................................................................................................. 34
E-mailing to a profile ...................................................................................................................................... 34
Adding e-mail subject and message information ........................................................................................... 34
Changing the output file type ......................................................................................................................... 35
E-mailing color documents ............................................................................................................................ 35
Downloaded From ManualsPrinter.com Manuals
Learning about the MFP
8
1
Learning about the MFP
Identifying the MFP
For more information about installing input options, see Installing and removing options or the instructions that came
with the option.
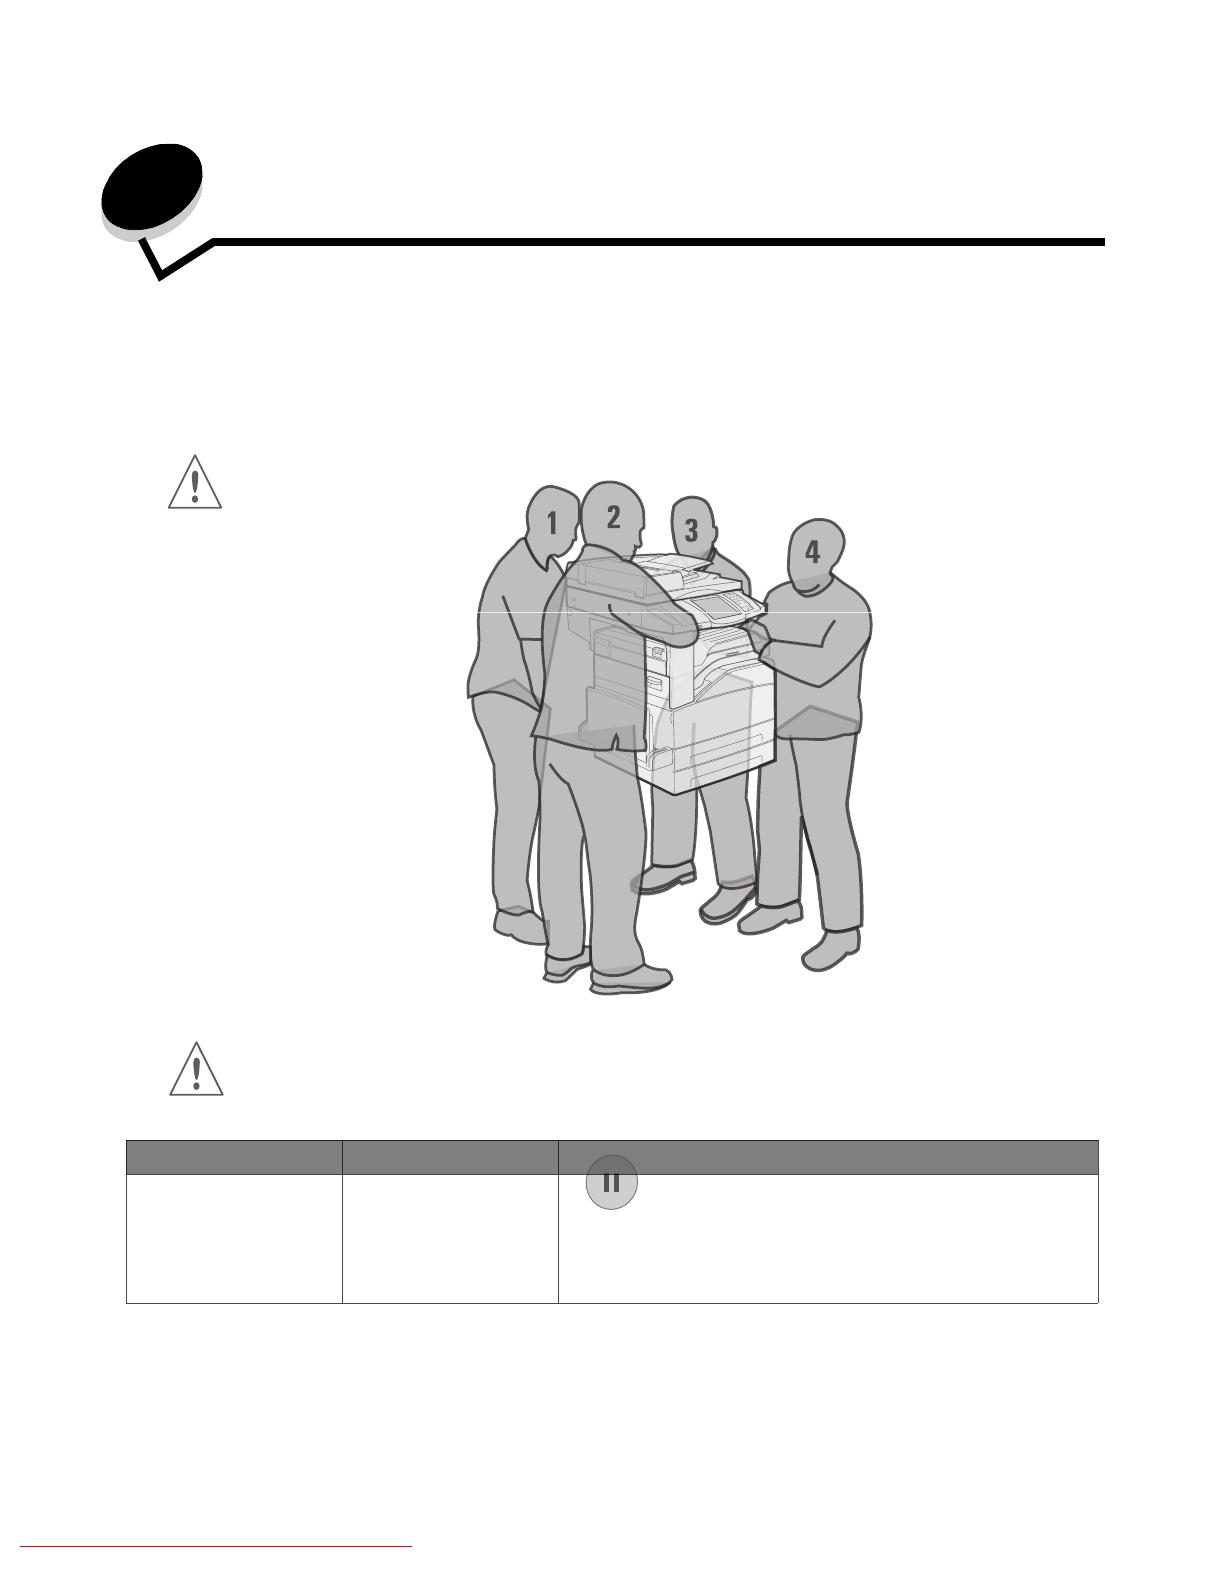
CAUTION: The MFP weighs approximately 154 lbs (70kg). Lifting the MFP safely requires four people.
CAUTION: Do not set up this product or make any electrical or cabling connections, such as the power cord
or telephone, during a lightning storm.
Using the scanner
Basic functions of the scanner
The MFP provides copy, fax, and scan-to-network capabilities for large workgroups. You can:
• Make quick copies, or change the settings on the control panel to perform specific copying jobs.
• Send an outgoing fax using the MFP control panel.
• Send an outgoing fax to multiple fax destinations at the same time.
• Scan documents and send them to your PC, an e-mail address, or an FTP destination.
Downloaded From ManualsPrinter.com Manuals
Copying
24
2
Copying
The following copy topics are available in this and other chapters.
Quick copy
1 Place the original document face up in the ADF or face down on the flatbed.
Adjust the paper guides when using the ADF.
2 Press Go on the numeric pad.
• If an LDSS profile has been installed, you may receive an error when attempting a quick copy.
Contact your system support person for access.
Multiple page copying
1 Place the original document face up in the ADF or face down on the flatbed.
Adjust the paper guides when using the ADF.
2 Touch Copy on the home screen, or use the numeric keypad to specify the number of copies you want.
After touching Copy or entering the number of copies, the touch screen will automatically change to the copy
settings menu.
3 Change the copy options to meet your requirements.
4 Touch Copy It.
Quick copy Reducing and enlarging copies
Multiple page copying Adjusting copy quality
Using the flatbed Setting collation options
Copy screens and options Placing separator sheets between copies
Copying from one size to another Setting paper saving options
Making transparencies Placing the date and time at the top of each page
Copying to letterhead Placing an overlay message on each page
Copying photographs Creating a custom job (job build)
Making copies using media from a selected tray Canceling a copy job
Copying mixed-sized media Copy tips
Setting the duplex option Solving copy quality problems
Downloaded From ManualsPrinter.com Manuals
E-mail
33
3
E-mail
The MFP can be used to e-mail scanned documents to one or more recipients.
There are four ways to send an e-mail from the MFP. You can type the e-mail address, use a shortcut number, use the
address book, or a profile. Permanent e-mail destinations can be created in the Manage Destinations link located under the
Configuration tab on the Web page.
For more information or detailed instructions, select one of the following:
Entering an e-mail address
1 Place the original document in the ADF face up or on the flatbed face down.
Adjust the paper guides when using the ADF.
2 Touch E-mail on the home screen.
3 Enter the recipient's address.
You can enter additional recipients by pressing next and then entering the recipient's address or shortcut number.
4 Touch E-mail It.
Using a shortcut number
1 Place the original document in the ADF face up or on the flatbed face down.
Adjust the paper guides when using the ADF.
2 Touch E-mail on the home screen.
Entering an e-mail address
Using a shortcut number
Using the address book
E-mailing to a profile
Adding e-mail subject and message information
Changing the output file type
E-mailing color documents
Creating an e-mail shortcut
Creating an e-mail profile
Canceling an e-mail
E-mail options
E-mail server setup
Address book setup
Downloaded From ManualsPrinter.com Manuals
Faxing
39
4
Faxing
Note: Faxing is not supported on all models.
The fax function lets you scan items and fax them to one or more recipients directly from the MFP. When you touch Fax, it
opens the fax destination screen. You enter the fax number and touch Fax It to send your fax. You can also change the fax
settings to fit your personal needs.
During initial MFP setup, you may be required to configure the MFP for faxing. For additional information, see Fax setup.
The following fax topics are available in this and other chapters.
Sending a fax
There are two ways to send a fax: enter the number using a numeric keypad or use a shortcut number. Use the instructions
below to send a fax using the keypad, or see Using fax destination shortcuts to fax your documents using a shortcut.
1 Load the original document in the ADF face up. Labels on the ADF show how to load the paper based on its size.
2 Adjust the paper guides.
3 Touch Fax on the home screen.
4 Enter the fax number using the numbers on the touch screen or keypad.
Add recipients by touching next and then entering the recipient's telephone number or shortcut number, or search
the address book.
Note: To place a two-second dialing pause within a fax number, use the Dial Pause button.
The dial pause will appear as a comma in the Fax to: box. Use this feature if you need to dial an outside line first.
5 Touch Fax It.
Sending a fax Adjusting the Darkness setting
Using fax destination shortcuts Sending a fax at a later time
Using the address book Canceling an outgoing fax
Sending faxes from a computer Fax tips
Creating shortcuts Fax setup
Fax options Solving fax quality problems
Changing the fax resolution Viewing a fax log
Downloaded From ManualsPrinter.com Manuals
FTP
47
5
FTP
The MFP scanner lets you scan documents directly to a File Transfer Protocol (FTP) server. Only one FTP address may be
sent to at a time.
Note: FTP must be enabled from the function access menu before it can be used. See Restricting
Function Access for more information.
Once an FTP destination has been configured by your system administrator, the name of the destination becomes available
as a shortcut number or listed as a profile under the Held Jobs icon. An FTP location could also be another PostScript
printer: for example, a color document can be scanned and then sent to a color printer. Sending a document to an FTP
server is similar to sending a fax. The difference is that you are sending the information over your network instead of the
phone line.
For more information or detailed instructions, select one of the following:
Entering the FTP address
1 Place your original document in the ADF face up. Labels on the ADF show how to load the paper based on its size.
2 Adjust the paper guides.
3 Touch FTP on the home screen.
4 Enter the FTP address.
5 Touch Send It.
Using a shortcut number
1 Place your original document in the ADF face up. Labels on the ADF show how to load the paper based on its size.
2 Adjust the paper guides.
3 Touch FTP on the home screen.
4 Press #, and then enter the FTP shortcut number.
5 Touch Send It.
Using the address book
1 Place your original document in the ADF face up. Labels on the ADF show how to load the paper based on its size.
2 Adjust the paper guides.
Entering the FTP address Using the address book
Using a shortcut number FTP tips
Downloaded From ManualsPrinter.com Manuals
Scanning to a PC or USB flash memory device
51
6
Scanning to a PC or USB flash memory device
The MFP scanner lets you scan documents directly to your PC or a USB flash memory device.
Your computer does not have to be directly connected to the MFP for you to receive Scan to PC images. You can scan the
document back to your computer over the network by creating a scan profile on your computer and then downloading the
profile to the MFP.
For more information or detailed instructions, select one of the following:
Create a scan to PC profile
1 Type the IP address of the MFP in the address line of your browser, and then press Enter.
If the Java applet screen appears, click Yes.
2 Click Scan Profile.
3 Click Create Scan Profile.
4 Select your scan settings, and then click Next.
5 Select a location for saving the scanned output file somewhere on your computer.
6 Enter a profile name.
The profile name is the name that will appear on the Scan Profile list on the MFP control panel.
7 Click Submit.
8 Review the instructions on the Scan to PC screen.
A shortcut number was automatically assigned when you clicked Submit. You can use this shortcut number when
you are ready to scan your documents.
a Go to the MFP, and place your original document in the ADF face up, long edge first.
b Press # followed by the shortcut number on the keypad, or touch Profiles on the home screen.
c After you enter the shortcut number, the scanner will scan and send the document to the directory or
application you specified. If you touch Profiles on the home screen, locate your shortcut on the list.
9 Return to your computer to view your file.
Your output file is saved in the location you specified or launched in the application you specified.
Create a scan to PC profile
Understanding scan to PC options
Scanning to a USB flash memory device
Scanning tips
Downloaded From ManualsPrinter.com Manuals
Printing
54
7
Printing
This chapter covers information about sending a job to print, printing confidential jobs, canceling a print job, printing a menu
settings page, a font list, and a directory list. This chapter also provides information on printing folio and statement size
media. For tips on paper jam prevention and print media storage, see Avoiding jams and Storing print media.
Sending a job to print
An MFP driver is software that lets your computer communicate with the MFP. When you choose Print from a software
application, a window representing the MFP driver opens. You can then select the appropriate settings for the specific job
you are sending to the MFP. Print settings selected from the driver override the default settings selected from the MFP
control panel.
You may need to click Properties or Setup from the initial Print dialog to see all of the available MFP settings you can
change. If you are not familiar with a feature in the MFP driver window, open the online Help for more information.
To support all the MFP features, use the Lexmark custom drivers supplied with the MFP. Updated drivers, as well as a
complete description of the driver packages and Lexmark driver support, are available from the Lexmark Web site.
To print a job from a typical Windows application:
1 Open the file you want to print.
2 From the File menu, select Print.
3 Select the MFP in the dialog. Modify the MFP settings as appropriate (such as the pages you want to print or the
number of copies).
4 Click Properties or Setup to adjust MFP settings that were not available on the first screen, and then click OK.
5 Click OK or Print to send the job to the MFP.
Printing from a USB flash memory device
A USB Direct interface is located on the control panel so you can insert a USB flash memory device and print the following
types of documents:
• Portable Document Format (PDF) [.pdf file]
• Joint Photographic Experts Group (JPEG) [.jpeg or .jpg file]
• Tagged Image File Format (TIFF) [.tiff or .tif file]
• Graphics Interchange Format (GIF) [.gif file]
• Basic Multilingual Plane (BMP) [.bmp file]
• Portable Network Graphics (PNG) [.png file]
• PiCture eXchange (PCX) [.pcx file]
• PC Paintbrush File Format [.dcx file].
Printing a document from a USB flash memory device is similar to printing a held job.
Note: You cannot print encrypted files or files without printing permissions.
Downloaded From ManualsPrinter.com Manuals
Installing options
89
9
Installing options
CAUTION: If you are installing memory or option cards sometime after setting up the MFP, turn the MFP off and
unplug the power cord before continuing.
You can customize the MFP memory capacity and connectivity by adding optional cards. The instructions in this section
help you install any of the following options:
• Memory cards
– Printer memory
– Flash memory
• Firmware cards
– Bar Code
– Forms
– IPDS and SCS/TNe
– PRESCRIBE
– PrintCryption™
• Other options
– External Serial Adapter
– Tri-Port Adapter
– Infrared Adapter
– USB/Parallel 1284-C interface card
– Coax/Twinax Adapter
– Internal print servers (also called internal network adapters or INAs)
Downloaded From ManualsPrinter.com Manuals
Maintaining the MFP
96
10
Maintaining the MFP
Periodically, you need to complete certain tasks to maintain optimum print quality. These tasks are covered in this chapter.
If several people are using the MFP, you may want to designate a key operator to do the setup and maintenance of the MFP.
Refer printing problems and maintenance tasks to this key operator.
In the U.S., contact Lexmark at 1-800-539-6275 for information about Lexmark Authorized Supplies Dealers in your area. In
other countries or regions, visit the Lexmark Web site at www.lexmark.com, or contact the place where you bought the
MFP.
Storing supplies
Choose a cool, clean storage area for the MFP supplies. Store supplies right side up in their original packaging until you are
ready to use them.
Do not expose supplies to:
• Direct sunlight
• Temperatures above 35°C (95°F)
• High humidity (above 80%)
• Salty air
• Corrosive gases
• Heavy dust
Downloaded From ManualsPrinter.com Manuals
Clearing jams
101
11
Clearing jams
By carefully selecting print media and loading it properly, you should be able to avoid most paper jams. For more
information on avoiding paper jams, see Avoiding jams. If jams do occur, follow the steps outlined in this section.
To resolve the paper jam messages, you must clear the entire paper path, and then touch Continue to clear the message
and resume printing. The MFP prints a new copy of the page that jammed if Jam Recovery is set to On or Auto; however,
the Auto setting does not guarantee the page will print.
Identifying jams
If the MFP jams, the appropriate jam message will be displayed on the touch screen Print status message bar.
Copy
Fax
E-mail
FTP
Status/
Supplies
200.01 Paper jam, [x] pages
jammed. Leave paper in bin.
Menus
Downloaded From ManualsPrinter.com Manuals
Administrative support
126
12
Administrative support
Adjusting control panel brightness
Brightness
1
2 Menus
3 Settings
4 General Settings
5
6
–
7 Submit
8 Home
Restoring factory default settings
factory default setting
user default setting
Warning:
1
2 Menus
3 Settings
4 General Settings
5
6
•
•
Downloaded From ManualsPrinter.com Manuals
Troubleshooting
136
13
Troubleshooting
Understanding MFP messages
Menus and Messages Software and Documentation
Online technical support
www.lexmark.com
Checking an unresponsive MFP
•
•
•
•
•
•
Printing multiple language PDFs
Symptom Cause Solution
1
2
3 Print as image
4 OK
Downloaded From ManualsPrinter.com Manuals
5
Index
A
B
C
Downloaded From ManualsPrinter.com Manuals


