
-
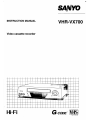
INSTRUCTION MANUAL
Video cassette recorder
s
lytlMio
VHR=VX700
Hi-Fi
G-coDE” ~
PAL NTSC443

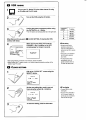
k EVERYTHING IN
THE BOX ?
For Australia
OR
For New Zealand
L-
Warranty card
[
\
Power cord
\
Aerial output cable
\
/
Remote control unit
.@.
/
2 “AA (IEC R6)” size,
1.5-voltbatteries
Batteries insertion
QUICK SETUP GUIDE
Thank you very much for choosing this SANYO Video Cassette Recorder.
This guide will enable the quick and easy setup of your new VCR.
For further details of features please refer to the full instruction manual.
m CONNECT TO TV AS INDICATED
Tv Antenna
@ All connection
We recommend that you use an
AV-cable (sold separately) as
indicated.
You can get a higher quality of
picture and sound during playback.
If you are an AV-cable user, go to @ VCR TUNING.
If you are not an AV-cable user, start from ~ VIDEO CHANNEL SETTING.
~ VIDEO CHANNEL SETTING
1
g
Turn on your TV and set your TV to “VCR” or the position
designated for VCR use (always a position where no TV
programme is received).
9
Turn off the VCR using the (!)/1 button.
A
w //
3
Press the PRESET button for at least 3 seconds.
● The VCR display shows the RF output channel.
4
n
p:
Tune the UHF channel on the TV to the displayed RF output
.,
$~
~,;.
channel. (37 or 36)
● The test pattern will appear. This is your video channel.
Test pattern
If the test attern is
disturbed or replaced by a TV station, go to step 5 in
+onpa~e6-
E
To store the channel, rxess the PRESET
u
. .
button.
● The VCR is turned off.
,.
This completes the video channel setting.

~ VCR TUNING
1
~
Turn on your TV. Set the TV to the video channel. If using
an AV-cable, set it to AV mode.
Turn on the VCR using the 0/1 button.
3
.*
Confirm the preset programme position using
the CH/TRACK (+ or -) button.
>.+
● The TV stations are already preset as in the right table.
When this is ok for you, go to @ CLOCK SEl?_lNG. If retuning this VCR,
continue with step4.
4
When retuning this VCR, press both the
/
CHANNEL (+ and -) buttons on the VCR
e’
simultaneously for at least 3 seconds.
● Auto tuning will start. It will take a few minutes, please be patient.
● When finished, the TV station preset to the lowest programme position number will be
tuned on your TV screen.
~ CLOCK SETTING
Call up the “CLOCK SET” screen using the
MENWTV button.
CLOCK SET
mm. YY
HH:MM
I
[0-91 +INPUT
[CLEAR1●TO CORRECT
[MENUI ●TV
I
Set the now setting (day, month, year and
time) using the numeric (O-9) buttons.
I
CLOCK SET
I
01.12.1999
15:00
I
[CH-/+l+Tl ME SHIFT
[CLEAR1●TO CORRECT
[OK I+ ENTER
I
3
To store the setting, press the OK button.
a
%
7
AS CH7
9
AS CH9
10
/ AS CH1O
28
AS CH28
A Auto tuning
● Duringthe autotuning
operations,pleasedo not
pressanyof the buttonsor
controls ontheVCRor remote
control.
● Autotuning is not possibleif
the VCRis setto external
input mode.
● Theskip function will be
automaticallysetfor all
position numberswhereno
TVstation hasbeenpreset.
A year display
● Theyear2000, isset by
entering00.
● Theyearwill bedisplayedin
full, on screen,however,to
setthe yearyou onlyneedto
enterthe lasttwo digits.

CONTENTS
1
Precautions ............................................................................ 2
CONTROLS................................................................................ 3
INTRODUCTION
2
PREPARATION
Connections ............................................................................
SwitchingtheVCRpoweron/standby...................................................
Savingenergy(ECOmode)...................................................................
SETUP......................................................................................
~ Videochannelsetiing...........................................................................
~ VCRtuning...........................................................................................
~ ClockseHing.........................................................................................
Powerinterruption................................................................................
SortingtheTVstations.........................................................................
Channelpreset......................................................................................
ON-SCREENMENUS.....................................................................
5
5
5
6
6
7
7
7
8
8
9
VCRPRESE~lNG ........................................................................ 10
Selectingthefunction........................................................................... 10
Revisingtheclock................................................................................. 10
3
PUYBACK ................................................................................. 11
Hi-RStereo/Bilingualprogrammedsoundselection............................. 11
BASICOPERATION
Vatiableplaybackmodes...................................................................... 11
Playbackofa NTSCtape....................................................................... 11
Pictureadjustments.............................................................................. 12
Recording WPROGRAMMES ....................................................... 13
QuickStati Recordingtimer ................................................................. 13
4
TIMERRECORDINGOPTIONS.......................................................... 14
Notesontimer recording...................................................................... 14
TIMERRECORDING
JUSTREC.function.............................................................................. 14
G-coDETIMERRECORDING............................................................. 15
Programmingon-screen....................................................................... 15
ProgrammingusingtheVCRdisplay.................................................... 15
MANUALTIMER RECORDING.......................................................... 16
TIMER RECORDINGWITHOUTUSINGTHEREMOTECONTROL.................. 17
CONFIRMATION/CANCELLINGAPROGRAMMEDTIMERRECORDING.......... 18
5
TAPELIBRARYDELUXESYSTEM...................................................... 19
TAPELIBRARYDELUXETIMERRECORDING........................................ 20
ADVANCED
Newrecordingprogramming................................................................ 20
OPERATION
RecordingprogrammingreusingtheTAPELIBRARYDELUXEdata..... 21
Matinganewrecordingontheblank potiion ofthetape..................... 21
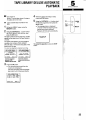
TAPELIBRARYDELUXEAUTOMATICPLAYBACK................................... 22
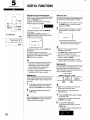
USEFULFunctions ..................................................................... 23
Displaythetape remainingtime ........................................................... 23
Endlessplay.......................................................................................... 23
Returnto Zero...................................................................................... 23
lndexsearch......................................................................................... 23
TAPECOPY................................................................................ 24
Synchrodubbing.................................................................................. 24
Manualdubbing.................................................................................... 24
AUDIODUBBING.......................................................................... 25
6
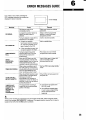
ERRORMESSAGESGUIDE.............................................................. 26
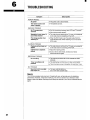
Troubleshooting ..................................................................... 27
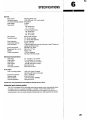
SPECIFICATIONS......................................................................... 26

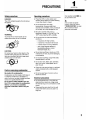
PRECAUTIONS
Safety precautions Operating precautions
DANGER:
This VCR contains live parts. Do not remove
the cabinet.
WARNING:
To prevent fire or shock hazard, do not
expose this product to rain or moisture.
CAUTION:
Do not put your hand or other objects in the
cassette loading slot because of the risk of
injuty or an accident. Be sure to keep small
children away from the VCR.
Caution concerning condensation
Be careful of condensation
Condensation can form inside a VCR when it
is suddenly moved from a cold place to a
warm, humid one, or when a heater has been
turned on to quickly heat the room.
Do not insert a video cassette if you use
this VCR in areas subject to condensation.
Wait for l; to 2 hours to completely
eliminate condensation before using the
VCR.
Place the VCR on a flat, stable, level
surface. Never subject it to violent shaking
or any other shock or impact.
Do not expose the unit to high
temperatures. Excessive heat (heat
sources such as heaters, ovens, closed car
on hot days, etc.) may damage the unit.
Be sure to use this VCR only in a
temperature range of 5°C to 40°C (41 “F to
105°F) and at less than 80% humidity.
Do not use the unit under the following
conditions:
– in locations with high humidity
—
in presence of excessive dirt or dust
—
in areas subject to strong vibrations
– near strong magnetic fields (e.g.
transmitting antennas, motors,
fluorescent lights, etc.)
Do not stack anything on top of your VCR,
or block the air vents, to prevent damaging
or overheating.
Do not place anything, except VHS video
cassette tapes, in the unit.
Do not allow rain, steam, dew, salt water,
sand, oily smoke, metal objects, etc. to
enter the unit.
Clean with a dry and soft cloth, or soft cloth
slightly moistened with a mild detergent
solution.
Do not use any type of solvent, such as
alcohol or benzine.
Electrical precautions
●
●
Do not forget that even in the power off
state there is an electrical voltage inside
the VCR as long as it is connected to a wall
socket.
Disconnect the mains lead from the wail
socket if the VCR is not to be used for a
long time.
INTRODUCTION
Onlycassettes marked ~ can
be usedwith this VCR.
A
If the unit does not operate
properly, switch it off, refer to
“TROUBLESHOOTING’(seepage
27) or contact your Sanyo
authorized service agent.
2

1
INTRODUCTION
~
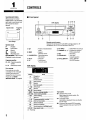
CONTROLS
Superimposeddisplay
When pressing the function
buttons shown in the table below,
eachmode is superimposed over
the TV screenfor about 2
seconds.
Operationmode
Programme
position
f-+ II
u
●
02?
...............................
.............................
1
Errormessage
Operationmode
b
:
Playback
: Fast-forward
: Rewind
●
: Recording
●11
: Recording pause
WO:OO:OO+: Return to Zero
(Displayed in centre of screen)
Programmeposition
01-88:
Programme position
number
L1, L2 : External input mode
Error message
If you make an error when
controlling the VCR,messages
indicating the problem are
displayed for about 3 seconds.
Pleaserefer to “ERROR
MESSAGESGUIDE” on page26.
3
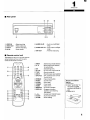
■ Front panel
Remote control sensor
Operate the remote control unit within a range of approx. 30”
and approx. 6m (20 ft.) from the front of the VCR.
6)
(!)/1
: Power on/standby/ECO
mode
@ REW
: Rewind
Reverse search
@ PAUSE/STILL: Recording pause
Still picture
@l PLAY
: Playback
B FF
: Fast-forward
Forward search
VCR display
+“
Display
Mode
*
D ~,[- Still picture
REC Record
REC> ~- Record pause
~REt2~-
Synchro dubbing standby
DREC~,~- Audio dubbing standby
DREC
Audio dubbing
n Timer on
1-88
Programme position number
L1. L2 IExternal inout mode
ST IStereo broadcast
BIL
~Bilingual broadcast
LR ~Sound selection (LeWRight track)
LP, EP Tape speed mode
(;~;: Flashing)
@ AV INPUT
: Audio/Video input plugs
0 CHANNEL (+, -) : Programme selection
Picture adjustment
@ REC
: Recording
@l STOP/EJECT
: Tape stop
Cassette ejection
@ TAPE LIBRARY : TAPE LIBRARY
DELUXE function
Tape speed
SP: Standard Play mode
Best image and sound quality. (No
LP/EP indicator)
LP: Long Play mode
Recording or playback times are double
the SP mode.
EP: Economic Play mode (NTSC long play)
NTSC playback times are triple the SP
mode.

■ Rear panel
@ VIDEO IN : Video input plug
@ VIDEO OUT : Video output plug
@ ANT IN : Antenna input plug
@AC lN- : Power socket
■ Remote control unit
The buttons on the front of the unit have the
same functions as those with the same
names on the remote controller.
m
TYPE
—=
‘r5-
SPAPREMNNRESET-0-
—znnc—
y\
cm Plus
A-DUB AUDIO
—3
~;-
($(!3 b
@ AUDIO IN UR : Audio input Left/Right
plugs
@ AUDIO OUT UR : Audio output Left/Right
@ ANT OUT
@)INPUT
@o-9
~ OK
@ G-CODE
~ TYPE
@ SPILP
@ DPC PIuS
@ REMAIN
Q RESET
@ CLEAR
@ PRESET
@ INDEX
(@MENU/TV
(&l DISPLAY
@
+0+
@
AUDIO
@ A-DUB
plugs
: Antenna output plug
External input mode selection
Direct programme selection,
for various input
Data/settings entry
G-CODE timer programme set
Recording type set
Recording tape speed selection
DPC (Digital Picture Control)
function onloff
Tape remaining time
Counter reset
Clears data
Tuner preset
Index search
On-screen operation
Programme position,
day/time, tape remaining
time display
Counter zero (“0:00:00) return
Sound track selection
Audio dubbing
1
INTRODUCTION
Remote control batteries
insertion
1 Openthe lid.
2 Insert 2 “AA (IECR6)” 1.5
volt batteries (supplied)
according to the@ and@
signs.
3 Replacethe lid.
4

2
PREPARATION
@$ AV connection
We recommend that you usean
AV-cable (sold separately) as
indicated, You can get a higher
quality of picture and sound
during playback.
5
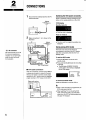
CONNECTIONS
1
2
Disconnect the antenna lead from the TV
antenna terminal.
Antenna
‘7-
Make connections 0 to@ shown in the
illustration.
Antenna
L4N-R
@@@@
1.
To a wall socket
(4]~ Power cord
IT
■ Hi-Fi audio connection
If the TV is monaural, connect an AV-cable to
a stereo sound system to enjoy Hi-Fi sound.
And you can obtain a dynamic sound output
through your Hi-Fi system when you playback
a tape recorded in Hi-Fi stereo on this VCR.
Stereo audio system
Audio-cable
(IIOt SUDDlif3d)
I
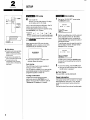
Switching the VCR power on/standby
Power is switched onloff by pressing the 0/1
button on the remote control or on the VCR.
VCR display
Standby mode (O)
● Only the clock is displayed.
Power on mode(1)
● The clock and the programme position are
displayed.
Saving energy (ECO mode)
The ECO mode reduces the electricity
consumption by turning off the VCR display
and other components while the VCR is in
standby mode.
To set the ECO mode
1
Press the 0/1 button to turn the VCR
standby mode.
2 Press and hold the 0/1 button for more than
3 seconds.
● The 0/1 button (ENERGY SAVER)
comes green. And nothing is displayed
on the VCR display.
-m
To cancel the ECO mode
Press the 0/1 button to turn the VCR on.
A
When a timer recording is programmed, the
ECO mode cannot be set.
When watching TV, do not set the ECO
mode. If the ECO mode is set, the aerial
output from the VCR will deteriorate giving
very poor TV reception.

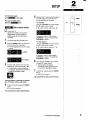
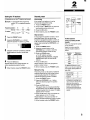
SETUP
2
PREPARATION
For AV-cable users
Go to ~ on next page.
For non AV-cable users
Start from ~
below.
~
Video channel setting
L!
1
2
3
Turn on the TV.
Set the TV to “VCR, or the position
designated for VCR use (always a
position where no TV programme is
received).
Turn off the VCR using the 0/1 button.
Press the PRESET button on the remote
control for more than 3 seconds.
● The VCR display shows the RF output
channel.
nlnlm-”us’’a’ia
lEllHRm”Newzea’and
Tune the UHF channel on the TV to the
displayed RF output channel (37 or 36).
● The test pattern (below) wiil appear.
if necessary, adjust the tuning on the TV
so that the test pattern is ciear.
5
Change the RF output channei number on
the VCR display to a vacant channei
number applicable to your area.
For Australia
Using the CH~RACK (+) button change
the RF output channel number.
● RF output channel range is 28 – 69.
If necessary, return to “28” using the
CH~RACK (-) button. Then press the
CH~RACK (+) button.
For New Zeaiand
Using the CH~RACK (–) button change
the RF output channel number.
● RF output channel range is 21 – 69.
If necessary, return to “28 using the
CH~RACK (+) button. Then press the
CH~RACK (-) button.
6
Tune the UHF channel on the TV to the
changed RF output channel.
● The test pattern wiii appear.
If necessaty, adjust the tuning on the
TV so that the test pattern is ciear.
T To store the channel, press the PRESET
button.
● The VCR is turned off.
This completes the video channei setting.
If the test pattern is disturbed or repiaced
by a TV station, continue with step 5.
4 To store the channel, press the PRESET
button.
● The VCR is turned off.
This compietes the video channel setting.
U=Continued on next page.
-PRESET
CH/TRACK
(+,-)

2
PREPARATION
*
000
CLEAR
o-9
000
OK
o
WI
CHITRACK
(+,-)
7
MENU/lV
CHANNEL(-, +)
A Auto tuning
●
●
●
7
Duringtheautotuningoperations,
pleasedonotpressanyofthe
buttonsorcontrolsontheVCR or
remotecontrol.
Autotuningisnotpossibleifthe
VCRissetto external
input mode.
The skip function will be
automatically
setfor all position
numberswhere noTV station has
beenpreset.
SETUP
~ VCR tuning
❑ Turn cm the TV.
Set the TV to the video channel. If using
an AV-cable, set it to AV mode.
Turn on the VCR using the 0/1 button. The TV
stations are already preset as follows.
Confirm this preset programme position using
the CHITRACK (+ or -) button.
Programme
‘,2,,
“7,,
“y,
position
“lo”
“28”
TV station ASCH2 ASCH7 ASCH9ASCH1OASCH28
When the reset channel tuning is ok for you,
9oto*.
When retuning this VCR, press the both
CHANNEL (+ and -) buttons on the VCR
simultaneously for at least 3 seconds.
E
NOW SEARCH I NG
PLEASE WAIT
●
Auto tuning will start. It will take a few
minutes, please be patient.
Auto tuning
This VCR has a built-in tuner capable of
tuning up to 88 TV stations.
The TV stations available in your area will be
automatically preset in order starting from
programme position number “01”.
Tuning confirmation
Confirm the channel tuning has been
performed using the CHITRACK (+ or -)
button. And to sort the TV stations, refer to
“Sorting the TV stations” on page 8.
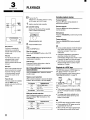
~ Clock setting
1
2
Call up the “CLOCK SET” screen using
the MENLUTV button.
CLOCK SET
DD. MM. YY HH :MM
I
[0-91 +INPUT
[ CLEAR 1●TO CORRECT
[MENU I ●TV
I
Set the now setting (day, month, year and
time) using the numeric (O– 9) buttons.
For a single digit number, first press the
numeric Obutton, then press the button of
the desired number.
To set the year you only need to enter the
last two digits, however, the year will be
displayed in full , on screen.
CLOCK SET
01.12.1999
15:00
[CH-/+l+Tl ME SHIFT
[CLEAR 1●TO CORRECT
[OK 1●ENTER
In case of error, press the CLEAR button
to erase the wrong setting, then enter the
correct one.
To store the setting, press the OK button.
● Seconds will start counting from “00” as
the OK button is pressed.
A
Year display
The year 2000, is set by entering 00.
Power interruption
If the power to the VCR has failed or has been
disconnected for more than 1 hour, all data
except the tuner preset memory should be
reset.
First set the clock, then set any function again.

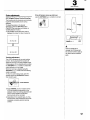
Sorting the TV stations
Channel preset
It is possible to sort the TV stations as desired.
~xarnple: To change TVl from programme
position “03 to programme position
“01”.
Programma
position 01
(Before) TV3 .
TV station ‘is
(After) [~jw2”’””-”-’ TV3
1
2
3
4
Press the PRESET button.
Using the CH/TRACK (+ or –) button
select the desired TV station (e.g. TV1 ).
(
Using the numeric (O– 9) buttons, enter the
target programme position number (e.g.
‘01”).
m
Press the OK button.
Repeat steps 2 to 4 to change another TV
station programme position number.
s When finished, press the PRESET button.
Fine tuning
If the tuning is not optimum, it can be
improved by manual fine tuning.
1 Press the PRESET button.
2 Press the FF or REW button to obtain the
best possible picture and sound.
3 Press the OK button.
4 When finished, press the PRESET button.
Skip function
If only programme position numbers 1 to 30
have been preset, you can set the skip
function for programme position numbers 31
to 88, so that only the preset TV stations will
appear when pressing the CH/lRACK (+ or
-) button.
1
2
3
4
Press the PRESET button.
Using the numeric buttons or the
CH/TRACK (+ or –) button, select the
programme position number to skip.
Press the CLEAR button.
● The “S indicator will light.
To cancel the skip function, press the
CLEAR button again to erase the “S”
indicator.
Press the OK button.
Repeat steps 2 to 4 for every programme
position number to skip.
5 When finished, press the PRESET button.
Manual tuning
This tuning mode can be used to modify the
settings entered by the Auto tuning function,
or to manually preset the TV stations to
particular programme position numbers.
1
2
3
4
Press the PRESET button.
Using the CHTfRACK (+ or -) button,
select the desired programme position
number.
Press the PLAY button.
If the search stops on a broadcast other than
the one desired, press the PLAY button again
until the broadcast from the desired TV station
appears on the lV screen.
Press the OK button when the desired TV
station appears on the TV screen.
Repeat steps 2 to 4 to preset another TV
station to another programme position number.
5 When finished, press the PRESET button.
2
*
PRESET
000
CLEAR
o-9
000
OK
o
CHITR.;~l
REW
iF
PLAY
or New Zealand
uning or presetting the VCR
hannels
his is very important for correct
I-CODEoperation.
~eally for simpler operation,
hannels should be preset as
IIlows:
*
Television Programma
station
position number
TV 1 1
TV 2
2
TV3
3
TV4
4
Prime
5
or additional channels in your
rea it is over to you to select the
lost logical channel position to
lace them.
When you usethe G-COOEfunction
to programme a recordingfrom a
certain channelfor thefirst time, it
will askyouthe programme
positionnumber that channelwas
presetto. That
setting will be
memorized andautomaticallyset
the nexttime the same channelis
selected.

2
PREPARATION
OK
4
CHfl~C~
,-
G-COOE
MENU/TV
TYPE
J==-4
TAPE LIBRARY
Multicolored on-screen display
For easier viewing, the menu
colours have the following
appearance.
Menu title:
White letters on magenta
background
L!!!!!%;,
VCR SETUP
CLOCK SET
TAPE LIBRARY DELUXE
(1~
Operation indications:
White letters on blue
background
●The buttons that can be used
with each menu are displayed
at the bottom of the screen.
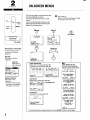
ON-SCREEN MENUS
The VCR can easily be programmed by using
❑ Turn on the TV.
the menus displayed on-screen.
The menus are controlled from the remote
Set the TV to the video channel. If using
control.
an AV-cable, set it to AV mode.
If you memorize the basic operations, each
setting can easily be made by following the
steps of the concerned menu.
G-coDE
o
*
G-m -ER
---------
[O-91*INPUT
[OK 1●ENTER
[CLEAR 1*TO CORRECT
[G-CODE] *TV
TYPE
o
TVPE+-----
[TYPE 1●TYPE
[CLEAR1-CANCEL
[OK 1●ENTER
@
TAPELIBRARY
MENU
PROG SET / CLEAR
VCR SETUP
CLOCK SET
TAPE L ISRARV OELUXE
ICH-/+ 1+SELECT
[OK 1●ENTER
[MENU1*TV
01.12.1999
13:30
CHITRACK
m
4
OK
o
PROG. SET/CLEAR
Manual timer recording (See page 16)
Confirmation/canceliing (See page 18)
I
PR DATE START END
II
PR OATE START END
-- DD. ~ HH:MM HH:W W 01 01.12 WK21 :30 23:15 W
-- -- _- -_ :-_ -_ :--
02 25.12 09:30 11:00 1P
I
-- --,.- --:-- --:--
II
---_,-_--:__
__:--
----,----:----:--
------__:-_
__:_-
----,--
__:----:_-
------__:-_
--:--
-- _- -- __:_- _-:_-
11
----,.---:----:--
[CH-/+ 1●SELECT
[0-91 +INPUT
[CLEAR 1●CANCEL
[MENu]*Tv
[MENU1●TV [ TYPE 1●TYPE
VCR SETUP
Selecting the function (See page 10)
N I CAM
OAUTO OFF ~ New
Zealand only
HTSC PB @PAL-TV NTSC443
CH I LO LOCK
OFF TIMER COF?’2HR’WR
I
[CH- /+ 1*SELECT
[OK I+ ENTER [MENU1+1”
I
(
J
CLOCK SET
Revising the clock (See page 10)
CLOCK SET
01.12.1999
15:00
I
[CH-/+l*Tl ME SHIFT
[CLEAR 1●TO CORRECT
[DU 1●ENTER
I
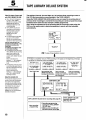
TAPE LIBRARY DELUXE
Timer recording (See page 20)
Automatic playback (See page 22)
TAPE L I BRARY DELUXE
V I RGIN TAPE I S DETECTED.
I
NEW T I MER PROGRAME BY
TAPE L I BRARY OELUXE
WILL BE STARTED.
[OK 1●ENTER
[MENU1*TV
TAPE L I BRARY DELUXE
THIS TAPE HAS CONTENTS
L I ST FOR BOTH RECORDING
& PLAYBACK.
I
SELECT THE DES I RED
PROGRAWE FCfl REC. IX! PB
[OI(I*SEARCH
[MENU1●TV
TAPE L I BRARY DELUXE
THIS TAPE HAS CONTENTS
L I ST FCfl PLAYBACK ONLY.
SELECT THE DES IRED
PRDGRHE FOR PLAYBACK.
[0S 1●SEARCH
[MENU1*TV
TAPE L I BRARY DELUXE
THIS TAPE HAS NO
CONTENTS L I ST
PLEASE CHANGE TO
ANOTHER TAPE
[WEHUI*TV
● If a wrong sub-menu has been selected, press the MENUMI button and start again.

2
I
PREPARATION
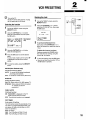
VCR PRESETTING
❑ T.monthe TV.
Set the TV to the video channel. If using
an AV-cable, set it to 14Vmode.
Selecting the function
1
2
3
4
5
Call up the “MENU” screen using the
MENWTV button.
Using the CH/TRACK (+ or -) button
select the VCR SETUP line, then press
the OK button.
N I CAM OAUTO OFF
NTSC PB *PAL-TV NTSC443
CHILD LOCK
OFF TIMER OOF~2~”%
[CH-/+l*SELECT
[OK 1●ENTER [MENU 1●TV
Revising the clock
– New Zealand
only
3
1
2
I
I
I
i
Call up the “MENU” screen using the
MENU/TV button.
Using the CH/TRACK (+ or -) button
select the CLOCK SET line, then press
the OK button.
Using the CHflRACK (+ or -) button
select the changing line.
Press the OK button to set the desired
delay.
To set a mode, make sure the symbol “O”
is displayed to the left of the desired
setting.
To store the setting, press the MENU~V
button.
NICAM (New Zealand only)
NICAM broadcasts setting
AUTO: To record NICAM stereo broadcasts
and bilingual broadcasts.
OFF: To record the normal sound (FM mono).
NTSC PB
NTSC playback system
PAL-TV: When using a PAL (B/G) system TV.
NTSC443: When using an NTSC4.43 system
TV. (Please use the AV
connection.)
CHILD LOCK
Child lock function
ON: “BLOCKED is displayed on the TV
screen and the sound is muted.
OFF: The child lock function is not engaged.
OFF TIMER
Auto power off setting
The VCR will be turned off automatically if it is
not used for a programmed period time. (The
auto power off delay is timed after any VCR
action or operation.)
OFF: Not active
2HR: The VCR will go off after 2 hours
6HR: The VCR will go off after 6 hours
CLOCK SET
01.12.1999
15:00
[CH-/+l.Tl ME SHIFT
[ CLEAR 1+TO CORRECT
[OK I+ ENTER
To set Summer/Standard time:
Each press of the CH/TRACK (+ or -)
button will advance or retard the clock by
1 hour.
To delete the incorrect numbers:
Continue pressing the CLEAR button,
then enter the new settings using the
numeric (O– 9) buttons.
To store the setting, press the OK button.
Seconds will start counting from “00 as
the OK button is pressed.
l!!
000
CLEAR
o-9
000
OK
o
CHITUACK
(+,-)
MENUITV
I
I

3
BASICOPERATION
I
1
PLAY
*
PA&E[
REW
FF
STOP
AUDIO
EJEC1
Auto power on
The Dower is automatically
switched on as a cassette-is
inserted while the VCR is in the
standby mode.
Auto play
The VCR will play backa tape
automatically when a video
cassette is inserted whose
erasure-prevention tab has been
removed.
Auto eject
When a video cassette without an
erasure-prevention tab is played
to the end of the tape, the tape
will beautomatically rewound
and then the cassettewill be
ejected.
Power off eject
The video cassettewill be ejected
when the EJECTbutton is
pressed, even when the
VCR is in
standby mode.
11
PLAYBACK
❑ Turn cm the TV.
Set the TV to the video channel. If using
an AV-cable, set it to AV mode.
1 hwerta recorded videocassette.
m Cassette loading
Gently push the centre of the cassette
until it is loaded automatically.
Erakure-Prevention tab
2 Press the PLAY button.
stop
Press the STOP button.
Eject the cassette
Press the STOP/EJECT button on the VCR.
Rewind
Press the REW button during stop or play for
reverse search operation.
Fast-forward
Press the FF button during stop or play for
forward search operation.
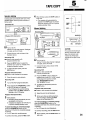
Hi-Fi Stereo/Bilingual programmed
sound selection
Using the AUDIO button, select the desired
sound to listen.
Stereo sound selection
When a stereo broadcast is received, the stereo
indicator “ST’ illuminates on the VCR display.
VCR disolav Selected sound
“~~n
ILeft and Right tracks
“L “
]Left track
“ R“
Right track
No indicator
I Normal track
Bilingual sound selection
When a bilingual broadcast is received, the
bilingual indicator “BIL illuminates on the
VCR display.
VCR display
Selected sound
“LR”
Main and Sub
“L “
Main
“ R,,
ISub
No indicator
Main
.’?-
Variable playback modes
Forward search
Press the FF button during playback or
fast-forward operation.
Reverse search
Press the REW button during playback or
rewind operation.
Still picture
Press the PAUSEBTILL button during normal
playback.
Frame advance
Press the PAUSEBTILL button during still
picture.
A
●
●
●
During variable playback modes the picture
may contain some noise or vibration that
cannot be corrected. This is not a
malfunction.
If still picture playback is continued for
about five minutes, the VCR will
automatically change to stop mode in order
to prevent the tape from being damaged.
This VCR will not cwarantee the variable
playback modes p;cture quality of tapes
recorded in LP mode.
Playback of a NTSC tape
This VCR can playback a NTSC tape on a
PAL (B/G) or NTSC 4.43 system TV.
For NTSC playback system setting, refer to
“Selecting the function” on page 10.
NTSC
a OrNH
When you playback a NTSC tape on a PAL
TV,
●
●
If the image is unstable, rolling vertically,
use the TV vertical hold button to stabilize
the image.
The imaqe mav shrink vertically and a
black ba;d may appear at the ~op and
bottom of the screen.
A
● A NTSC tape cannot be copied normally.
● Picture quality of NTSC tapes cannot be
guaranteed with this VCR.
● When a NTSC Hi-Fi tape is played back,
the monaural sound only will be heard.

Picture adjustments
DPC (Digital Picture Control) function
This function sets the sharpness automatically
to give the best possible picture during
playback.
To adjust the picture to the desired
sharpness, press the DPC Plus button.
(The DPC Plus mode does not function in
variable playback modes.)
● The condition of the DPC Plus mode is
displayed on-screen for about 3 seconds.
1
DPC PLUS ON
I
-
+
n
DPC PLUS OFF
Tracking adjustment
This VCR is equipped with an auto tracking
function. During playback this function will
adjust the tracking to the best possible image.
If noise appears in the playback picture, press
the CH~RACK (+ or -) button, to reduce the
noise interference in the image.
When the tracking is adjusted using the
CHflRACK (+ or -) button, the auto tracking
mode is cancelled.
To return to auto tracking mode, eject the
cassette (press the STOPIEJECT button),
then reload it again.
Noiseinterference
● If the CHANNEL (+ and -) buttons on the
VCR are pressed simultaneously in the
playback mode, the tracking adjustment will
move to centre position and the auto
tracking mode will be cancelled.
● Depending on the cassette tape, you may
find that some noise interference cannot be
completely corrected using the tracking
controls.
If the still picture moves up and down
Use the CH~RACK (+ or -) button, to correct.
3
m
BASICOPERATION
DPCPlus
CHANNEL(+,-)
EJECT
IA
nce the cassettetape is
nloaded, the VCRis reset and
]e next time the VCRis usedyou
lay needto do the corrections
gain.
12

3
BASICOPERATION
%
INPUT
o-9
000
000
0
OK
CHITRACK
PAUSE/
(+,-)
STILL REC
STOP
TYPE
Tt
sP/LP
1
To record from an external
source
At stepl,
Press the
INPUTbutton.
“11” or “L2” is displayed instead
of the programme position
number.
“LI”: AUDIO/VIDEOIN (Rear)
‘(L2”: AV INPUT(Front)
Mis-erasure prevention eject
The cassette will automatically be
ejected if recording is attempted
on a video cassette without an
erasure-prevention tab.
Auto rewind
The
VCR automatically rewinds
the tape when it reaches
the end.
This function does not operate
with timer recording or Quick
Start Recording timer.
Erasure-prevention tab
To preventaccidental erasure,
remove thetab after recording.
To recordagain, coverthe hole
with vinylta~e.
13
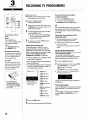
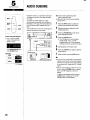
RECORDING TV PROGRAMMED
❑ Turn on the TV.
Set the TV to the video channel. If using
an AV-cable, set it to AV mode.
Load a cassette tape with
erasure-prevention tab.
Using the numeric (O– 9) buttons, or the
CFVTRACK (+ or -) button, select the TV
station to be recorded.
If desired, select the long play recording
using the SP/LP button.
● The ‘(LP appears on the VCR display.
The recording time is double the SP
(Standard Play) mode.
If necessary, press the TYPE button to
set the recording type.
Setting the recording type
If a recording type is selected, it will be
displayed and make programme selection
easier when listing the tape recordings data.
It can be used to easily find a desired recording.
(Refer to ‘TAPE LIBRARY DELUXE
AUTOMATIC PLAYBACK’ on page 22.)
@)Press the TYPE button repeatedly until the
desired type is displayed.
@When the desired tvPe has been selected,
press the OK button.
● The selected recordir
the VCR is turned off
the cassette tape is e
m
~yp~+::-::::} ............. ...
.........
The letter in brackets
(e.g. (F)) shows the display
on the VCR display.
I type is cancelled if
standby mode) or if
?cted.
FILM (F): Film
SP’ORT(S):
sPofiS
D~AMA (d): Drama
MklC (M): Music
N;WS (n): News
A;IMA (A): Animation,
cartoon
EI$UC.(E): Educational
programme
G~ME (g): Game
T;RIL
(t):Thriller
C;MED (c): Comedy
4
5
Press the REC button.
Stop the recording using the STOP button
If you wish to avoid recording
unwanted material
1
Press the PAUSERTILL button.
2 To continue recording, press the
PAUSER3TILL button or REC button.
A
If the record pause mode continues for about
five minutes, the VCR will automatically go
into the stop mode in order to prevent damage
to the tape.
Recording one programme while
watching another
1 Start recording the desired TV station
2
programme selected on the VCR.
Select on the TV receiver the TV station
you want to watch.
If using an AV-cable, set the TV to the TV
mode.
Quick Start Recording timer
Timer recording is simple.
You can start a recording and then
programrne when the VCR will automatically
stop recording and go into standby mode.
1
Press the REC button twice.
2 Set the recording end time by using REC
and CHffRACK (+ or –) buttons.
REC: Units of 30 minutes
CH/TRACK (+, -): Units of 1 minute
● The timer indicator (D) will light after the
recording end time is set.
RmllRll
To stop the recording at any time, press the
STOP button.
Checking/Changing
When the REC button is pressed during Quick
Start Recording, the recording end time will
blink.
The recording end time can be changed by
pressing REC and CH/TRACK (+ or -)
buttons.

TIMER RECORDING OPTIONS
This VCR can be programmed using the
following methods.
● You can set up to 6 programme to be
recorded upon a period of up to 1 year.
N G-CODE
timer recording
Simple way to programme a timer recording
by simply entering the G-CODE programming
number (1 to 9 digits) indicated next to the
programmes listed in TV guides, newspapers,
TV programme lists, etc. published for your
area.
■ Manual timer recording
Can be programmed using the PROG. SET/
CLEAR menu displayed on-screen. All the
settings can be entered directly in the
on-screen menu.
, Timer recording without the use of
the remote control (can be entered
using the buttons on the VCR only)
If the remote control batteries are dead or if it
is not available, a timer recording
programming can be entered using the
buttons on the VCR only.
A
Using this method you will not be able to set
the recording type, weekly or daily recording.
Notes on timer recording
The (~) indicator will flash if no video
cassette is loaded when going into timer
standby mode.
The (D) indicator will flash and the video
cassette is ejected if a video cassette with
no erasure-prevention tab is loaded.
Daily recording starting on a Saturday or
Sunday is not possible.
Even if a timer recording has been preset,
the VCR can be used as usual up to the
programmed start time. When finished
using the VCR, do not forget to return it to
timer recording standby mode.
Programme priority
If several timer recordings have overlapping
recording time, the recording with the earliest
start time will be recorded first, until the end.
19:00 20:00 21:00
22:00 23:00
, ,
T
~
These portions will not be recorded.
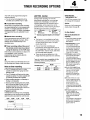
JUST REC. function
During a timer recording, the VCR will
automatically calculate the remaining tape
duration and, if necessary, will switch the
recording speed from SP (standard play) to
LP (long play), so the programme can be
recorded entirely, without reaching the end of
the tape before recording is completed.
SP mode
LP mode
Approx.
Approx. ~
150 minutes 60 minutes
*
Desired programme length is 210 minutes
A
●
●
●
This feature is not available during Quick
Start Recording, and will not work properly
on tapes longer than E-240 or on tapes
shorter than E-1 80.
If two or more timer recordings are
programmed, all the programmed may not
fit on a single tape. In that case, make sure
the JUST REC. mode is not set, and select
the recording speed manually.
There may be some interference in the
image where the speed has been switched.
Types of cassette tapes compatible with the
JUST REC. timer recording mode and
recording durations
TIMERRECORDING
ERRORMESSAGE:
“TIMER MEMORYFULL”
If the VCRtimer memory is full,
this messagewill be displayed.
Solution:
Deleteone of the 6 programmed
already entered. See page 18.
ForNew Zealand
Note on sky decodersand
recording
● There are at present two types
of sky decoders available in
NewZealand.
1. Bass BandDecoder(noremote
controlsupplied,oldertype).
You cannot successfullyrecord
G-Code programmed usingthis
type of decoder. (Unless your
video is modifiedinternallyfirst.)
ContactSky TV for details.
2. IRD Decoder (suppliedwith Sky
Remote andwith UHFoutput).
This decoderallows youto
programme recordingsusingthe
G-Codefunction. You can usethe
Sky CODENUMBERS to record
Sky TV programmed with your
VCR. However, pleasenotethe
followinglimitations.
(a)The Sky CODENUMBERS used
with the VCR can notchangethe
channelsonthe Sky Decoder.
This means you must first
preselectthe Sky channelyou
want to record (movies, sport,
news)
(b)The VCR willthen turn onand
recordthe programme position
which has beensetfor Sky. (e.g.
programme position“6”).
The Sky channelyou record
(movies, sport, news) will depend
onwhich channelthe decoderwas
left on.
(c)Remember the first time you use a
Sky CODENUMBER,the
programme positionnumber
(’(PR”)onthe video needsto be
set the same for allthree Sky
channels.
Thiswilldependonthe programme
positionnumberyou allocatedfor
Sky intheset up.ie programme
positionnumber“6”.

%!l
000
CLEAR
o-9
000
OK
o
CH/l~~C~
!-
G-COOE
TYPE
MENU/TV
SPILP
In case of error, press the CLEAR
button
to erase the wrong setting,
then enter the correct one.
Additional settings
After pressing the
OKbutton at
step 3,
Recording tape speed/
JUST REC.mode setting
Pressthe SP/LP button
repeatedly to display the
desired
mode.
5P: Standard Play mode
LP: Long Play mode
A
JUST REC.mode
(Onthe VCR display)
No LP: Standard Play mode
LP: Long Play mode
AUTO: JUST REC.mode,
Daily/Weekly recording
Press the MENWTV button
repeatedlyto display the
desired recording
mode.
Blank: for once
M-F: for daily recording
(Monday through Friday)
WK for weekly recording
(the same programme
every week)
Changingthe endtime
Each press of the
CH~RACK (+
or-) button will change the
recording end time by units of
10 minutes.
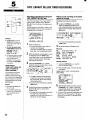
G-CODE TIMER RECORDING
This VCR has a built-in G-CODE system.
Programming timer recordings is now as
simple as entering a G-CODE programming
number (1 to 9 digits) listed next to each
programme in your local TV guide or
newspaper TV programme listing.
❑ Turn on the TV.
Set the TV to the video channel. If using
an AV-cable, set it to AV mode.
Programming on-screen
1
2
3
Call up the “G-CODE” screen using the
G-CODE button.
Using the numeric (O – 9) buttons, enter the
G-CODE programming number for the
programme you want to record. (e.g. 489135)
I
G-CODE NUMBER
(4a9j:3:5::;:+:;
Press the OK button.
1
If the programme position number (PR)
displays ‘–-”:
Enter the programme position number the TV
station has been preset to.
● That setting will be memorized and set the
next time
the same TV station is selected.
If desired, make “Additional settings” on the
left to
your timer recording.
o When allthesettings areas desired,
press the OK button.
You can programme another recording by
repeating steps 2 to 4.
- Insert a video cassette with
erasure-prevention tab.
Make sure the tape is longer than the total
recording time.
5
Set the timer sandby mode using the
G-CODE button.
● The timer indicator (~) will light on the
VCR display.
Programming using the VCR display
You can programme or confirm a G-CODE
timer recording on the VCR display even if the
TV is turned off.
The settings are the same as when
programming on-screen.
1
2
3
Press the G-CODE button.
m
Enter the G-CODE programming number
-
Press the
OK button.
If the programme position number (PR)
displays “--”:
Enter the programme position number the TV
station has been preset to.
● That setting will be memorized and set the
next time the same TV station is selected.
If desired, make “Additional settings” on the
left to your timer recording.
o Press the OK button.
You can programme another recording by
repeating steps 2 to 4.
~ Insert a video cassette with
erasure-prevention tab.
Make sure the tape is longer than the total
recording time.
5
Set the timer standby mode using the
G-CODE button.
● The timer indicator (n) will light on the
VCR display.
G-CODE is registered trademarks of
Gemstar Development Corporation.
The G-CODE system is manufactured
under license from Gemstar
Development Corporation.
Newspaper or TV guide
G-CODE programming number

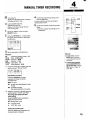
MANUAL TIMER RECORDING
Turn on the TV.
Set the TV to the video channel. If using an
AV*able, set it to AV mode.
Load a cassette tape with
erasure-prevention tab.
Make sure the tape is longer than the
total recording time.
Call up the “MENU” screen using the
MENWTV button.
Usin!J the CH/TRACK (+, –) button select
the 6ROG. SET/CLEAh line, then press
he OK button.
PR DATE START END
-- DD. MM HH:MM HH:MM W
-- .-,-- --:--
-_ :-_
-- ,-- -. :--
-_ :-_
--
-- -----
-_ :---- :--
-- -- ---
-- : --
-- : --
-- -_, --
__ :-_
__ :__
[0-91 *INPUT
[MENU1●TV
3 Set the recording as indicated below.
Examp/e:
PR
: Programme position number... 02
DATE : Date... 25 December
START : Starl time... 09:30
END
: End time... 11:00
SPEED : Tape speed... LP
TYPE
: Recording type... FILM
Using the numeric (O– 9) button enter the
desired setting in “PR” and “DATE.
m
Daily/Weekly recording
Press the CH/TRACK (+) button
repeatedly to display the desired
recording mode.
Blank for once
M-F: for daily recording (Monday through
Friday)
WK: for weekly recording
(the same programme every week)
Using the numeric (O– 9) button enter the
desired setting in “START” and “END.
Recording tape speed/JUST REC.
mode setting
Press the SP/LP button repeatedly to
display the desired mode.
SP: Standard Play mode
LP: Long Play mode
A: JUST REC. mode
Setting the recording type
Press the TYPE button repeatedly until
the desired type is displayed.
4 Confirm the programming settings, then
press the OK button.
You can programme another recording by
repeating step 3 and 4.
5
Set the timer standby mode using the dI/1
button.
● The timer indicator (B) will light on the
VCR display.
TIMERRECORDING
7!
INPUT
CLEAR
o-9
000
000
0
OK
0
WI
CHflflW~
TYPE
MENUITV
SPILP
letting tip:
In case of error, pressthe
CLEARbutton to erasethe
wrong setting, then enter the
correct one.
To record from an external
source (AUDIOMDEO IN on
the rear panel use), pressthe
INPUTbutton to display “11”
under “PR”.

TIMER RECORDING
(!)/1
FF
1
REW1
CHANNEL(+,-)
RECd I
ERRORMESSAGE
“NO CASSETTE”
When the RECbutton is pressed,
this messagewill be displayed.
Solution:
It can be ignored becausethis
special method requires that no
tape be loaded the VCR,
Setting tip:
In case of error, press the
REWbutton to erasethe
wrong setting, then enter the
correct one.
To record from an external
source (AUDIO/VIOEOIN on
the rear panel use), press the
CHANNEL(-), button to
display “L1” under “PR”.
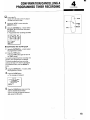
TIMER RECORDING WITHOUT USING THE
REMOTE CONTROL
If the remote control batteries are dead or if it
is not available, a timer recording
programming can be entered using the
buttons on the VCR.
Using this method you will not be able to set
the recording type, weekly or daily recording
or PDC recording.
A
If a cassette is loaded in the VCR (the
cassette indicator (m) shown on the VCR
display), press the EJECT button to eject it
before starting the procedure below. If a
cassette is loaded in the VCR when the REC
button is pressed, recording mode will start.
1 Press the O/1 button tot.rnthe VCR
power on.
2 Call up timer programming screen using
the REC button for about 5 seconds.
3 Set the recording as indicated below.
Examp\e:
PR : Programme position... 02
DATE : Date ...25 December
START : Start time... 09:30
END : End time... 11:00
SPEED : Tape speed... SP
Setting method
@)
Using the CHANNEL (- or +) button on
the VCR, enter the desired setting.
@ Press the FF button to move to the next
entry space.
Repeat steps O and@, enter all the other
settings.
● When the tape speed is entered using the
CHANNEL (+ or -), the timer recording is
set.
m
I
----,----:--
--:--
I
[RECI+TV [CH-+/b*/4+1
To make further timer recordings, repeat step 3.
4 Confirm theprogrammingsettings, then
press the REC button.
m Load a cassette tape with
erasure-prevention tab.
Make sure the tape is longer than the
total recording time.
s Set thetimer standby mode using the(!)/1
button to.
● The timer indicator (D) will light on the
VCR display.
A
●
●
If the REC button is pressed before
programming is completed, the timer
recording setup mode will be cancelled.
Once a programme timer recording has
been set, it cannot be confirmed or erased
using the buttons on the VCR front panel.
(Only possible using the standard method
with the remote control.)
Page is loading ...
Page is loading ...
Page is loading ...
Page is loading ...
Page is loading ...
Page is loading ...
Page is loading ...
Page is loading ...
Page is loading ...
Page is loading ...
Page is loading ...
Page is loading ...
-
 1
1
-
 2
2
-
 3
3
-
 4
4
-
 5
5
-
 6
6
-
 7
7
-
 8
8
-
 9
9
-
 10
10
-
 11
11
-
 12
12
-
 13
13
-
 14
14
-
 15
15
-
 16
16
-
 17
17
-
 18
18
-
 19
19
-
 20
20
-
 21
21
-
 22
22
-
 23
23
-
 24
24
-
 25
25
-
 26
26
-
 27
27
-
 28
28
-
 29
29
-
 30
30
-
 31
31
-
 32
32


Ask a question and I''ll find the answer in the document
Finding information in a document is now easier with AI
Related papers
Other documents
-
Racelogic 3 Wideband Quick start guide
-
 LabSat 3 Wideband Quick start guide
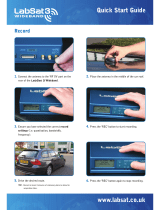
-
Panasonic NVFJ760B Operating instructions
-
-
-
-
Hitachi vt fx 860 evps Owner's manual
-
-
Sony SLV-AV100UX User manual
-
