
INSTRUCTION MANUAL
C3 Auto Whip
Clad Cable Cutter
Read and understand all of the instructions and
safety information in this manual before operating
or servicing this tool.
Register this product at www.greenlee.com
52084851 REV1 © 2019 Greenlee Tools, Inc. 10/19
Patents Pending
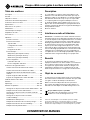
Español ..........40-78
Français ....... 79-116

C3 Auto Whip Clad Cable Cutter
Greenlee Tools, Inc. 4455 Boeing Dr. • Rockford, IL 61109-2988 USA • 815-397-7070
2
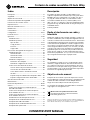
KEEP THIS MANUAL
Table of Contents
Description .................................................................... 2
Safety ............................................................................ 2
Purpose of this Manual ................................................. 2
Important Safety Information .....................................3–7
Grounding Instructions .................................................. 8
Specications ................................................................ 8
Access System Menu .................................................... 9
Identication ................................................................ 10
Features ....................................................................... 10
Setup ......................................................................11–12
Access Door ................................................................ 12
Operation ................................................................ 13–24
Login Screen ............................................................ 13
Operation Screen ..................................................... 13
Cable Type .......................................................13–14
Whip Conguration ..........................................14–15
Accuracy ............................................................... 15
Load Cable .......................................................15–17
History Screen .......................................................... 17
Whip History ......................................................... 17
Blade History ........................................................ 17
Alarm History ........................................................ 18
Setup Screen.......................................................18–19
Machine Parameters ............................................. 19
User Setup Screen ................................................ 20
Desktop Software Instructions ................................. 20
Create Whip Processing File ................................ 21
Create Cable Material File .................................... 22
Edit an Existing Cable Material File ................. 22–23
Import Cable Type from USB ............................... 23
Import Whip Conguration from USB .............23–24
Cable Reference Guide ............................................... 25
Emergency Stop Disengagement ................................ 25
Maintenance ................................................................ 26
Troubleshooting ......................................................27–28
Service .................................................................... 29–37
Feed Wheel Set Screws Tightening ......................... 30
Feed Roller Replacement ......................................... 31
Cut Off Weldment Set Screw Tightening ................. 32
Notch Weldment Set Screw Tightening ................... 33
Circuit Breaker Reset ............................................... 34
Cut off Saw Blade Replacement .............................. 35
Notching Saw Blade Replacement .......................... 36
Thrust Bearing Replacement ................................... 37
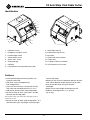
Description
The Greenlee C3 Auto Whip Clad Cable Cutter is a fully
automated machine that cuts and strips armored steel
and aluminum MC cable that has an OD of 1/2" to 1".
The C3 Cable Cutter will also cut steel and aluminum
exible metallic conduit (FMC) that has an OD of 1/2” to
1”. The C3 has an HMI touch screen for programming
the desired cable length, strip lengths, and quantity
of whips.
Patent pending.
Radio and Television Interference
NOTE: This equipment has been tested and found
to comply with the limits for a Class A digital device,
pursuant to Part 15 of the FCC rules. These limits are
designed to provide reasonable protection against
harmful interference when the equipment is operated in
a commercial environment. This equipment generates,
uses and can radiate radio frequency energy and, if not
installed and used in accordance with the instruction
manual, may cause harmful interference to radio com-
munications. Operation of this equipment in a residential
area is likely to cause harmful interference in which case
the user will be required to correct the interference at his
own expense.
Safety
Safety is essential in the use and maintenance
of Greenlee tools and equipment. This instruction
manual and any markings on the tool provide
information for avoiding hazards and unsafe
practices related to the use of this tool. Observe
all of the safety information provided.
Purpose of this Manual
This manual is intended to familiarize all personnel with
the safe operation and maintenance procedures for the
Greenlee C3 Auto Whip Clad Cable Cutter.
Keep this manual available to all personnel.
Replacement manuals are available upon request at no
charge at www.greenlee.com.
Do not discard this product or throw away!
For recycling information, go to www.greenlee.com.
All specications are nominal and may change as design
improvements occur. Greenlee Tools, Inc. shall not be liable for
damages resulting from misapplication or misuse of its products.

C3 Auto Whip Clad Cable Cutter
Greenlee Tools, Inc. 4455 Boeing Dr. • Rockford, IL 61109-2988 USA • 815-397-7070
3
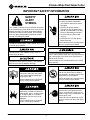
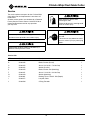
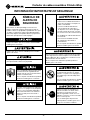
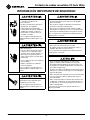
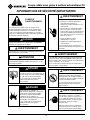
IMPORTANT SAFETY INFORMATION
SAFETY
ALERT
SYMBOL
This symbol is used to call your attention to hazards
or unsafe practices which could result in an injury or
property damage. The signal word, dened below,
indicates the severity of the hazard. The message
after the signal word provides information for pre-
venting or avoiding the hazard.
Immediate hazards which, if not avoided, WILL result
in severe injury or death.
Hazards which, if not avoided, COULD result in
severe injury or death.
Hazards or unsafe practices which, if not avoided,
MAY result in injury or property damage.
Read and understand all of the
instructions and safety information
in this manual before operating or
servicing this tool.
Failure to observe this warning will
result in severe injury or death.
Do not use this tool in a hazardous
environment. Hazards include am-
mable liquids, gases, or other materi-
als. Using this tool in a hazardous
environment can result in a re or
explosion.
Failure to observe this warning will
result in severe injury or death.
Electric shock hazard:
• Inspect the power cord before
use. Repair or replace the cord if
damaged.
• Connect the power cord to a
120 volt, 15 amp receptacle on a
ground fault protected circuit only.
Refer to “Grounding Instructions.”
• Do not modify the power cord
or plug.
• Disconnect the unit from power
before servicing.
Failure to observe this warning could
result in severe injury or death.
For continued protection against risk of re and
electric shock, replace ONLY with same manufacturer,
type, and rating of fuse. Refer to the “Maintenance”
section of this manual.
Failure to observe this warning could result in severe
injury or death.
Do not use in dangerous environment.
Do not use power tools in damp or
wet locations, or expose them to rain.
Keep work area well lighted.
Failure to observe this warning could
result in severe injury or death.
Always use safety glasses. Everyday
glasses only have impact resistant
lenses; they are NOT safety glasses.
When using in dusty environment, use
face or dust mask.
Failure to wear eye protection could
result in serious eye injury from ying
debris.

C3 Auto Whip Clad Cable Cutter
Greenlee Tools, Inc. 4455 Boeing Dr. • Rockford, IL 61109-2988 USA • 815-397-7070
4
IMPORTANT SAFETY INFORMATION
• Keep guards in place and in
working order.
• Do not tamper or attempt to bypass
safety switches.
• Remove any tools from cutter
before operating. Form habit of
checking to see that all tools are
removed from cutter before turning
it on.
Failure to observe these warnings
could result in severe injury or death.
Extension cords:
• Use only three-wire, 12 AWG exten-
sion cords that have three-prong
grounding-type plugs and three-
hole receptacles that accept the
tool’s plug.
• Do not use extension cords that are
longer than 30 m (100').
• Repair or replace damaged exten-
sion cords.
Failure to observe these warnings
could result in severe injury or death.
Cutting hazard:
Keep hands away from the cutting
blades when cutting.
Failure to observe these warnings
could result in severe injury or death.
• Reduce the risk of unintentional starting. Make sure
switch is in off position before plugging in.
• Turn power off. Do not leave tool until it comes to a
complete stop.
• Disconnect tool when changing feed roller or
Notching Blade, or cut off blade. Accidental start-
up could result in serious injury.
Failure to observe these warnings could result in
severe injury or death.
• Never stand on tool. Serious injury could occur if
the tool is tipped.
• Do not overreach. Keep proper footing and balance
at all times.
Failure to observe these warnings could result in
severe injury or death.
• Wear proper apparel. Do not wear loose clothing,
gloves, neckties, rings, bracelets, or other jewelry
which may get caught in moving parts. Nonslip
footwear is recommended. Wear protective hair
covering to contain long hair.
• Do not force rollers or alter tool. It will do the
job better and safer at the rate for which it was
designed.
• Use right tool. Do not force tool or attachment to do
a job for which it was not designed.
• Use this tool for the manufacturer’s intended
purpose only. Use other than instructed in this
manual can result in injury or property damage.
Failure to observe these precautions may result in
injury or property damage.

C3 Auto Whip Clad Cable Cutter
Greenlee Tools, Inc. 4455 Boeing Dr. • Rockford, IL 61109-2988 USA • 815-397-7070
5
IMPORTANT SAFETY INFORMATION
• Keep work area clean. Cluttered areas and benches
invite accidents.
• Keep children away. All visitors should be kept at a
safe distance from work area.
• Make workshop kid proof with padlocks, master
switches, or by removing starter keys.
Failure to observe these precautions may result in
injury or property damage.
• Inspect the cutter before use. Replace worn,
damaged, or missing parts with Greenlee
replacement parts. A damaged or improperly
assembled component could \ and strike nearby
personnel.
• Maintain tools with care. Keep tool clean for best
and safest performance. Follow instructions for
lubricating and changing accessories.
• Check damaged parts. Before further use of the
tool, a guard or other part that is damaged should
be carefully checked to determine that it will
operate properly and perform its intended func-
tion. Check for alignment of moving parts, binding
of moving parts, breakage of parts, mounting, and
any other conditions that may affect its operation.
A guard or other part that is damaged should be
properly repaired or replaced.
• Use recommended accessories. Consult the
instruction manual for recommended accessories.
The use of improper accessories may cause risk of
injury to persons.
• Some cutter parts and accessories are heavy
and may require more than one person to lift
and assemble.
Failure to observe these precautions may result in
injury or property damage.
Note: Keep all decals clean and legible, and replace
when necessary.

C3 Auto Whip Clad Cable Cutter
Greenlee Tools, Inc. 4455 Boeing Dr. • Rockford, IL 61109-2988 USA • 815-397-7070
6
IMPORTANT SAFETY WARNINGS
Read all safety warnings, instructions, illustrations
and specications provided with this power tool.
Failure to follow all instructions listed below may
result in electric shock, re and/or serious injury.
Save all warnings and instructions for
future reference.
The term power tool in the warnings refers to your
mains-operated (corded) power tool or BATTERY
operated (cordless) power tool.
Work Area Safety
• Keep work area clean and well lit. Cluttered or dark
areas invite accidents.
• Do not operate power tools in explosive
atmospheres, such as in the presence of ammable
liquids, gases or duct. Power tools create
sparks which may ignite the dust or fumes.
• Keep children and bystanders away while
operating a power tool. Distractions can cause
you to lose control.
Electrical Safety
• Power tool plugs must match the outlet. Never
modify the plug in any way. Do not use any
adapter plugs with earthed (grounded) power tools.
Unmodied plugs and matching outlets will reduce
risk of electric shock.
• Avoid body contact with earthed or grounded
surfaces, such as pipes, radiators, ranges and
refrigerators. There is an increased risk of electric
shock if your body is earthed or grounded. Do not
expose power tools to rain or wet
conditions. Water entering a power tool will
increase the risk of electric shock.
• Do not abuse the cord. Never use the cord for car-
rying, pulling or unplugging the power tool. Keep
cord away from heat, oil, sharp edges or moving
parts. Damaged or entangled cords increase the
risk of electric shock.
Electrical Safety (con't)
• When operating a power tool outdoors, use an
extension cord suitable for outdoor use. Use of a
cord suitable for outdoor use reduces the risk of
electric shock.
• If operating a power tool in a damp location is
unavoidable, use a RESIDUAL CURRENT DEVICE
(RCD) protected supply. Use of an RCD reduces the
risk of electric shock. NOTE: The term RESIDUAL
CURRENT DEVICE (RCD) may be replaced by the
term ground fault circuit interrupter (GFCI) or earth
leakage circuit breaker (ELCB).
Personal Safety
• Stay alert, watch what you are doing and use
common sense when operating a power tool. Do
not use a power tool while you are tired or under
the inuence of drugs, alcohol, or medication. A
moment of inattention wile operating power tools
may result in serious personal injury.
• Use personal protective equipment. Always wear
eye protection. Protective equipment such as dust
mask, non-skid safety shoes, hard hat, or hearing
protection used for appropriate conditions will
reduce personal injuries.
• Prevent unintentional starting. Ensure the switch
is in the off-position before connecting to power
source and/or BATTERY pack, picking up or carry-
ing the tool. Carrying power tools with your nger
on the switch or energizing power tools that have
the switch on invites accidents.
• Remove any adjusting key or wrench before turning
the power tool on. A wrench or a key left attached
to a rotating part of the power tool may result in a
personal injury.
• Do not overreach. Keep proper footing and balance
at all times. This enables better control of the power
tool in unexpected situations.

C3 Auto Whip Clad Cable Cutter
Greenlee Tools, Inc. 4455 Boeing Dr. • Rockford, IL 61109-2988 USA • 815-397-7070
7
Personal Safety
• Dress properly. Do not wear loose clothing or
jewelry. Keep your hair, clothing and gloves away
from moving parts. Loose clothes, jewelry or hair
can be caught in moving parts.
• If devices are provided for the connection of dust
extraction and collection facilities, ensure these are
connected and properly used. Use of dust collec-
tion can reduce dust-related hazards.
• Do not let familiarity gained from frequent use of
tools allow you to become complacent and ignore
tool safety principles. A careless action can cause
severe injury within a fraction of a second.
Power Tool Use and Care
• Do not force the power tool. Use the correct power
tool for your application. The correct power tool will
do the job better and safer at the rate for which it
was designed.
• Do not use the power tool if the switch does not
turn it on and off. Any power tool that cannot be
controlled with the switch is dangerous and must
be repaired.
• Disconnect the plug from the power source and/
or remove the BATTERY pack, if detachable, from
the power tool before making any adjustments,
changing accessories, or storing power tools. Such
preventative measure reduce the risk of starting the
power tool accidentally.
• Store idle power tools out of the reach of children
and do not allow persons unfamiliar with the power
tool or these instructions to operate the power
tool. Power tools are dangerous in the hands of
untrained users.
• Maintain power tools and accessories. Check for
misalignment or binding of moving parts, break-
age of part and any other condition that may affect
the power tool's operation. If damaged, have the
power tool repaired before use. Many accidents are
caused by poorly maintained power tools.
IMPORTANT SAFETY WARNINGS
Power Tool Use and Care (con't)
• Keep cutting tools sharp and clean. Properly main-
tained cutting tools with sharp cutting edges are
less likely to bind and are easier to control.
• Use the power tool, accessories and tool bits etc.
in accordance with these instructions, taking into
account the working conditions and the work to
be performed. Use the power tool for operations
different from those intended could result in a
hazardous situation.
• Keep handles and grasping surfaces dry, clean
and free from oil and grease. Slippery handles and
grasping surfaces do not allow for safe handling
and control of the tool in unexpected situations
Service
Have your power tool serviced by a qualied repair
person using only identical replacement parts. This
will ensure that the safety of the power tool
is maintained.

C3 Auto Whip Clad Cable Cutter
Greenlee Tools, Inc. 4455 Boeing Dr. • Rockford, IL 61109-2988 USA • 815-397-7070
8
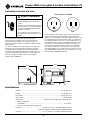
Grounding Instructions
Electric shock hazard:
• Do not modify the plug provided
with the tool.
• Connect this tool to a grounded
receptacle on a 15 amp ground
fault protected circuit.
Failure to observe these warnings
could result in severe injury or death.
This tool must be grounded. In the event of a malfunc-
tion or breakdown, an electrical ground provides a path
of least resistance for the electric current. This path of
least resistance is intended to reduce the risk of electric
shock.
This tool’s electric cord has a grounding conductor and
a grounding plug as shown. Do not modify the plug.
Connect the plug to a corresponding GFCI-protected
receptacle that is properly installed and grounded
in accordance with all national and local codes and
ordinances.
Do not use an adapter.
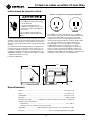
15 Amp/120 Volt
Plug and Receptacle
ReceptaclePlug
Plug Receptacle
Do not modify the plug provided. If it will not t the
outlet, have the proper outlet installed by a qualied
electrician. Improper connection of the equipment-
grounding conductor can result in a risk of electric
shock. The green insulated conductor with or without
yellow stripes is the equipment-grounding conductor.
If repair or replacement of the electric cord or plug is
necessary, do not connect the equipment-grounding
conductor to a live terminal. Check with a qualied
electrician or service personnel if the grounding instruc-
tions are not completely understood, or if in doubt as to
whether the tool is properly grounded.
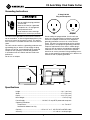
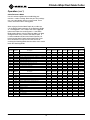
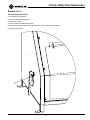
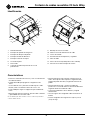
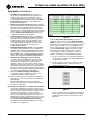
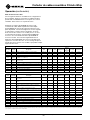
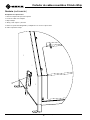
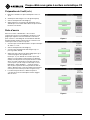
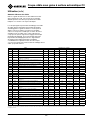
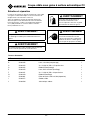
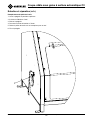
Specifications
Height ....................................................................................................19.1" (48.5 cm)
Width .....................................................................................................27.3" (69.3 cm)
Depth .....................................................................................................22.6" (57.4 cm)
Mass/Weight ............................................................................................. 170 lb (77 kg)
Power Supply ........................................ 120 VAC, 15 amp GFCI-protected receptacle
Operating Conditions
Temperature ........................................................................................ 32 °F to 90 °F
Intended for Indoor Use Only
Capacity ................................................OD of 1/2" to 1", AC, BX, MC and FMC cable
Accuracy ........................................................................... ±2" and ±3% of whip length
22.6"
27.3"
19.1

C3 Auto Whip Clad Cable Cutter
Greenlee Tools, Inc. 4455 Boeing Dr. • Rockford, IL 61109-2988 USA • 815-397-7070
9
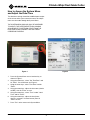
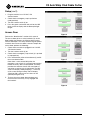
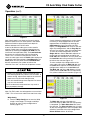
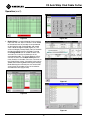
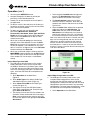
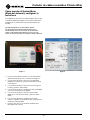
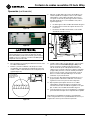
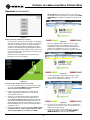
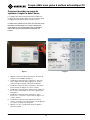
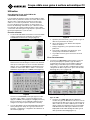
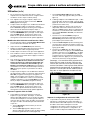
How to Access the System Menu
and Adjust the Date/Time
The date/time settings should be modied upon receipt
of the unit to reect your current time zone. this adjust-
ment must be made through the System Menu.
THE SYSTEM MENU SHOULD ONLY BE ACCESSED
TO MODIFY THE DATE/TIME SETTINGS; MAKING
ADJUSTMENTS TO SETTINGS OTHER THAN THE
DATE/TIME COULD PREVENT THE UNIT FROM
OPERATING PROPERLY.
1. Press the System Menu access function key as
shown in Figure 1.
2. Using the arrow keys, select "Set Time/Date" and
hit "Enter". You should now see Figure 2.
3. Using the arrow keys, select "Time Zone" and hit
"Enter".
4. Using the arrow keys, adjust the time zone (relative
to GMT), then hit "Enter" to save.
5. Using the arrow keys, select "Time" under "Local
Time" and hit "Enter".
6. Using the arrow keys, adjust the time (hours,
minutes, seconds in 24-hour format), then hit
"Enter" to save.
7. Press "Esc" twice more to exit System Menu.
Figure 1 Figure 2

C3 Auto Whip Clad Cable Cutter
Greenlee Tools, Inc. 4455 Boeing Dr. • Rockford, IL 61109-2988 USA • 815-397-7070
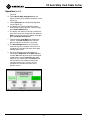
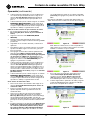
10
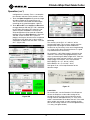
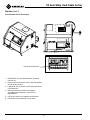
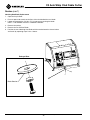
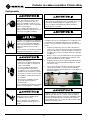
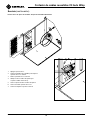
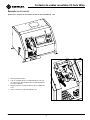
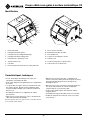
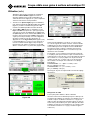
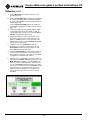
1. HMI touch screen
2. Emergency stop push switch
3. Lockout/tagout switch
4. Yellow release switch
5. Green "start" switch
6. Green pilot light
7. USB port
8. Polycarbonate viewing shield/access door
1
2
3
4
5
6
7
8
12 14
13
15
9
10
11
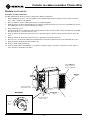
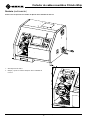
9. Removable chip tray
10. Cable feed tensioner lever
11. Input horn
12. Handle and safety interlock
13. Output tube
14. Lift points (Chip tray removed)
15. Circuit breaker access panel
Features
• Automated notching and cutting stations with
automatic cable feed.
• HMI touch screen for programming
whip congurations.
• *Cuts steel and aluminum clad type AC. BX, MC,
FMC cable with outside diameter of 1/2" to 1".
• USB port to upload custom whip conguration.
• Memory to store up to 48 "cable types" of cable
diameter and notching depth.
Not intended for PVC coated clad cable, liquid-light conduit, or
flexible PVC conduit.
• Memory to store up to 96 "whip congurations" of a
specied cable type, whip length, lead strip length,
and tail strip length.
• Memory to sore and run a production job with up to 96
whip ends of different lengths from one reel of cable.
• Cuts up to 9,999 whips of a given diameter
and length.
• Keeps track of cable length remaining on the reel.
• Produces whip lengths from 1' (.3 m) to 83'
(25 m) long.
Identification

C3 Auto Whip Clad Cable Cutter
Greenlee Tools, Inc. 4455 Boeing Dr. • Rockford, IL 61109-2988 USA • 815-397-7070
11
Setup
Always use safety glasses. Everyday
glasses only have impact resistant
lenses; they are NOT safety glasses.
When using in dusty environment, use
face or dust mask.
Failure to wear eye protection could
result in serious eye injury from ying
debris.
Do not use this tool in a hazardous
environment. Hazards include am-
mable liquids, gases, or other materi-
als. Using this tool in a hazardous
environment can result in a re or
explosion.
Failure to observe this warning will
result in severe injury or death.
Electric shock hazard:
• Inspect the power cord before
use. Repair or replace the cord if
damaged.
• Connect the power cord to a
120 volt, 15 amp receptacle on a
ground fault protected circuit only.
Refer to “Grounding Instructions.”
• Do not modify the power cord or
plug.
• Disconnect the unit from power
before servicing.
Failure to observe this warning could
result in severe injury or death.
Cutting hazard:
Keep hands away from the cutting
blades when cutting.
Failure to observe these warnings
could result in severe injury or death.
Disconnect tool before changing feed roller, Notching
Blade, or cut off blade. Accidental start-up could
result in serious injury.
Failure to observe this warning could result in severe
injury or death.
Use safe lifting techniques.
Refer to the “Identication” section of this manual.
The C3 Cutting Machine is equipped with cutting blades
already installed and was thoroughly tested at the
factory including cuts in MC cable. Cutting chips will be
present in the unit.
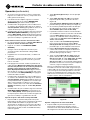
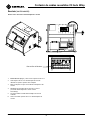
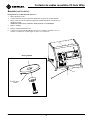
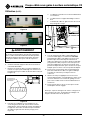
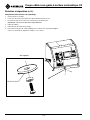
1. Secure the cutting machine on a level workbench,
table, or cart so there is sufcient room to feed
cable into and out of the machine. Each foot on the
cutting machine has a Ø9/32” hole for securing the
machine.
2. The workbench, table, or cart must be secured from
moving as the cutting machine pulls the cable from
a reel or coil.
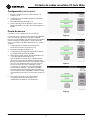
3. Make sure the reel or coil is free spinning so that the
force required to dispense the cable is less than 25 lb.
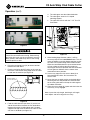
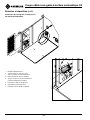
4. Position the reel so the cable leaving the reel is
level with the input horn on the cutting machine and
approximately 7 ft. away (see gure 3).
Be sure the wire reel is properly secured to the ground
so that it does not tip over when the machine pulls
the cable in. Monitor the amount of wire remaining on
the spool so that the wire can be separated from the
spool at the end. Failure to monitor remaining cable
could result in serious injury.
Figure 3

C3 Auto Whip Clad Cable Cutter
Greenlee Tools, Inc. 4455 Boeing Dr. • Rockford, IL 61109-2988 USA • 815-397-7070
12
Setup (con’t)
1. Plug the machine in to 110 VAC, 15A
electrical outlet.
2. Check that the emergency stop is pulled out
(ready position).
3. Turn the Lockout switch (3) on.
4. Press the green start button and wait for the HMI
touch screen to display and the Green pilot light
to light.
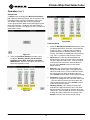
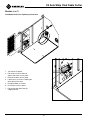
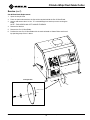
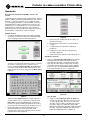
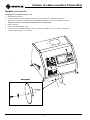
Access Door
Refer to the “Identication” section of this manual.
The access door (8) has a safety interlock (12) on the
door handle that prevents the machine from running
with the door open. The safety interlock requires power
to unlock when the access door is closed. To open the
access door, perform the following:
1. Check that the machine is plugged in to 110 VAC,
15A electrical outlet.
2. Turn the Lockout switch (3) on.
3. Check that the emergency stop switch (2) is pushed
in (stop position).
4. Press and hold the yellow release button (4) and lift
the access door handle.
Note: there is a 60 second delay after the
emergency stop switch (2) is pushed (stop position)
before the access door can be opened. The delay
provides the sufficient time for the saw blades to
stop when a cutting cycle is interrupted. The HMI
screen will display "Safety Stopping..." at the top
of the screen during the delay and will display
"Machine Safe" when the access door can be
opened (see figures 4–6).
5. To close the access door, lower the door and
check that the switch key is fully engaged into
the interlock.
Figure 4
Figure 5
Figure 6

C3 Auto Whip Clad Cable Cutter
Greenlee Tools, Inc. 4455 Boeing Dr. • Rockford, IL 61109-2988 USA • 815-397-7070
13
Operation
Description of HMI Touchscreen and User Controls
The human machine interface (HMI) touchscreen is
used to input parameters for the desired whip and
controls the operation on the C3 Cable Cutter. To input
parameters, touch the screen at the designated areas
to access a touch keypad. The cycle start and cycle
stop buttons are displayed after the required whip
parameters are programmed into the machine. Pushing
the red emergency stop button on the front panel will
also stop the machine cycle.
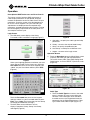
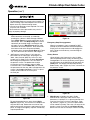
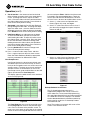
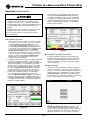
Login Screen
1. The HMI touch screen displays User Name,
Password, LOGIN, and Select Language (Figure 7).
Figure 7
Select your language preference and enter your user
name and password. For rst time users, touch the
User Name box to access the touch keypad. Type
“admin” for your User Name and then press Enter
(Figure 8).
Figure 8
Touch the Password box to access the keypad
and type “admin” as your Password and then press
Enter. Press Login. (See instructions for User Setup
to change password after rst login.)
2. The Main Menu on the HMI touch screen
displays Operation, History, Setup, User Setup,
and Logout (Figure 9).
Figure 9
a. Operation – to specify the cable type and whip
parameters.
b. History – to review the whip or blade history.
c. Setup – to specify the production job.
d. User Setup – to add up to 24 different users.
e. Logout – to return to the Login screen.
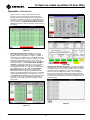
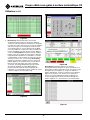
Operation Screen
3. Touch the Operation box on the Main Menu screen
to specify the cable type and whip parameters.
The screen shows Cable Type, Whip Cong, Load
Cable Inspect 1st Piece ON/OFF, Cycle Start, and <
(Figure 10).
Figure 10
Cable Type
a. Touch the Cable Type box to access the cable
types in memory or create a new cable type.
To create a new cable type, touch the box in
the table to access the keypad and enter the
parameters for the Cable Manufacturer, Cable
Type, Cable Armor, Notch Depth (Figure 11).

C3 Auto Whip Clad Cable Cutter
Greenlee Tools, Inc. 4455 Boeing Dr. • Rockford, IL 61109-2988 USA • 815-397-7070
14
Figure 11
Note: Notch depth is the distance the notch cutting
blade will advance from its home position. See Cable
Reference Guide for approximate notch depth for
different diameter sizes of MC cable.
A total of 48 different cable types can be stored in
memory. Cable types can also be imported from the
USB port by touching the Import from USB box (see
instructions for Import from USB). The Load Selection
box enters the selected cable type into Operation
screen. The < will return to the previous screen. To
select the cable type, touch the Cable # box adjacent to
the desired cable type and press Load Selection. The
Cable # box will turn yellow and the Load Selection
box will momentarily turn yellow to indicate the
selection. Press the < to return to the previous screen.
• Inspect wire insulation inside cut armor for nicks.
The Notching Blade may contact wire insulation. To
reduce nicking, adjust notch depth to the minimum
depth necessary to break through armor.
• Use anti-short bushings where required. Cut armor
may nick wire insulation.
Failure to observe these precautions may result in
injury or property damage.
Note: For FMC cable, the cable type box must end with
"FMC". This will notch the cable at the end of the whip.
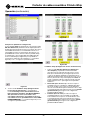
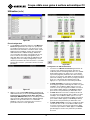
Whip Config
b. Touch the Whip Config box to enter the Whip
Length, Lead Length, Tail Length, and Whip
Quantity or select a whip conguration in
memory (Figure 12).
Operation (con’t)
Figure 12
A total of 96 whip congurations can be stored
in memory. A whip conguration can also be
imported from the USB port by touching the
USB Import box (see instructions for USB
Import). The Page Down box accesses the next
eight whip congurations and the Page Up box
accesses the previous eight whip congurations.
To select one whip conguration, touch the
Single Job box and the Job # box adjacent to
the desired whip conguration and touch the
Load Jobs box. Both boxes will turn yellow and
the Load Jobs box will momentarily turn yellow
to indicate the selection (Figure 12).
To select multiple whip congurations of the
same cable type, touch the Multi Job box and
the Job # boxes adjacent to the desired whip
congurations and press the Load Jobs box.
The Multi Job and all the Job # boxes will turn
yellow and the Load Jobs box will momentarily
turn yellow to indicate the selections (Figure 13).
Figure 13
The Multi Job selection will produce in
numerical order by Job # after the whip quantity
is completed. The Clear Selections box clears
the selection. The Select All Jobs box will select
all (96) whip congurations that have proper data
entered in each eld of the whip conguration.
Delete All Data deletes all 96 whip

C3 Auto Whip Clad Cable Cutter
Greenlee Tools, Inc. 4455 Boeing Dr. • Rockford, IL 61109-2988 USA • 815-397-7070
15
Operation (con’t)
congurations in memory. Press < to complete
the selection and return to the previous screen.
c. Touch the Spool Length box to enter the length
of cable available on the spool (Figure 14).
The C3 machine will monitor the cable length
remaining on the spool throughout a job run.
d. Touch ON or OFF in the Inspect 1st Piece box
to toggle between ON and OFF. ON is indicated
by the yellow ON and an OFF selection is not
yellow. If Inspect 1st Piece is ON, only one
whip conguration will be made for inspection
purposes when the Cycle Start box is pressed.
The HMI screen will show the 1st piece in
progress and inspect & measure the completed
whip (Figure 14A). When the 1st piece whip is
completed, the HMI screen will show “1st Piece
OK? " (Figure 14B).
Figure 14
Figure 14A
Figure 14B
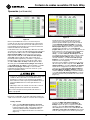
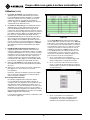
Accuracy
The accuracy of the C3 is ±2" and ±3% of the
desired whip length. This accuracy applies after the
programmed whip length has been modied to
account for any inaccuracy in the actual lengths being
cut. Using the rst piece inspection feature is a good
way to determine this inaccuracy.
For example, if a 60" Whip Length is desired, but the
machine is consistently cutting approximately a 65"
whip, try decreasing the Whip Length to 55". After this,
the accuracy of the machine will be ±2" and ±3% of
Whip Length. For example, a 60" whip could be:
MAX LENGTH: 60 + (2 + 60*.03) = 63.8")
MAX LENGTH: 60 - (2 + 60*.03) = 56.2")
See gure 15 for a visual representation of the
tolerance range.
Figure 15
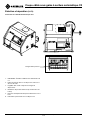
Load Cable
For smaller coils, use the Greenlee 37218 Dispenser.
Locate the Dispenser so the cable leaving on the
outside of the coil is level with the inlet horn on the
cutting machine and approximately 7 ft. away. If the
cable is removed from the inside of the coil, use a cable
roller, spindle, and stands so cable entering the inlet
horn on the cutting machine is level and approximately
7 ft. away (see gures below).

C3 Auto Whip Clad Cable Cutter
Greenlee Tools, Inc. 4455 Boeing Dr. • Rockford, IL 61109-2988 USA • 815-397-7070
16
Operation (con’t)
Figure 16
Figure 17
Securely fasten the spindle to the two stands and
secure the two stands from moving. Cable leaving
the inside of the coil may be twisted and cause the
roller, spindle, and stands to tip over as the cutting
machine pulls the cable.
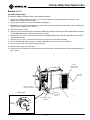
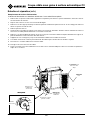
6. Raise the tensioning lever (10) to remove tension
between the feed rollers.
7. Examine and orient the MC cable, so the seam on
the armor is toward the tailing edge when the cable
is feed into the machine (see gure 18).
SEAM ON ARMOR
IS ON TAILING SIDE
Figure 18
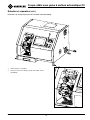
8. Feed the cable into the input horn (11) on the left
side of the machine, between the two feed rollers,
between the notch clamping plate and V-shaped
support and stop when the end of the cable is ush
with the cut off blade (see gure 19).
a. The cable goes over the rubber feed roller
b. The cable goes across the V shaped
notching support
c. The cable end is ush with the 7-1/4” Cut Off
Saw Blade.
Figure 19
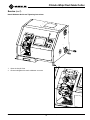
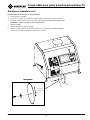
9. When loading large diameter cables, it will be
necessary to press the Load Cable button. This will
move the blades up to their highest position so that
the cable can be fed through without obstructions.
When the Load Cable button is pressed the button
will turn yellow to indicate that the motors are
returning to their home position and then the button
will turn green to indicate that the motors have
reached their home position.
10. If necessary, open the clear access door (8) to
help feed the MC cable. See instructions for
Access Door.
11. Lower the lever to apply tension to the feed rollers.
Lowering the lever will provide the sufcient force
on the steel guide roller to clamp the cable against
the rubber feed roller.
12. Close the access door (8) if open and check that the
switch key is fully engaged.
Note: Inspect the whip length, lead length, tail length,
notch depth, and notch length for accuracy.
1
2
3
4
1
2
3
4
D
C
B
D
C
B
A
5
- NOTICE -
This drawing is the property of Greenlee and
embodies a confidential proprietary design in which
Greenlee retains all patents, patents pending and
other rights, including exclusive right of use,
manufacture and sale. It is submitted under a
CONFIDENTIAL relationship for a specific purpose
and the recipient agrees, by accepting this drawing
and information, not to supply or disclose any
information regarding it to any unauthorized person.
Nor may any part of it be copied, exhibited or
furnished to others, nor may photographs be taken of
any article fabricated or assembled from this drawing
without the consent of Greenlee. This drawing must
be returned on request.
C
2016 GREENLEE TEXTRON
GREENLEE TEXTRON INC. IS A SUBSIDIARY OF TEXTRON INC.
(PRODUCT, CATALOG NUMBER)
DRAWING UNITS
INCH
THIRD ANGLE
PROJECTION
DO NOT SCALE DRAWING
OLD NO.
00
DATE
1:3
REV.
C
SIZE
SIMILAR TO
DRAWN BY
SCALE
CAGE CODE
PRINT & MFG NO.
INITIAL USE:
PART NAME / TITLE
- MATERIAL -
SHEET 4 OF 4
52081125_extra views
GEOMETRIC DIMENSIONING & TOLERANCING PER ASME Y14.5M
TOLERANCES UNLESS OTHERWISE SPECIFIED
REV
DESCRIPTION
BY
DATE
ECO NO.
ENGINEER
INCH TOLERANCES
.XX = ± .03
.XXX = ± .010
ANGLES = ± 0° 30'
DEBURR HOLES AND SHARP EDGES
A
5
HEAT TREAT

C3 Auto Whip Clad Cable Cutter
Greenlee Tools, Inc. 4455 Boeing Dr. • Rockford, IL 61109-2988 USA • 815-397-7070
17
Operation (con’t)
Figure 21
Emergency Stop Disengagement
When the emergency stop is engaged DO NOT
attempt to pull the knob from the locked position.
Simply twist the stop clockwise to disengage the
lock. Pulling on the knob may cause damage to
the device.
History Screen
History displays the history on the last 16 Whip
Jobs completed and the history on Notching and
Cutting blades. To access the History screen, go to
the Main Menu on the HMI (Figure 9) and touch the
History box. The display will show Whip History,
Blade History, and < (Figure 22). Press < to return to
the previous screen.
Figure 22
1. Whip History will display the Job #, Cable
Manufacturer, Cable type, Cable Armor, whip
parameters, # of Whips, if 1st piece inspection was
used, the User, Date, run time, Page Down, Page
Up, and the < (Figure 23). The last 16 job numbers
will be stored in memory. Press the < to return to the
previous screen. Pressing the red Delete All Data
button will clear the last 16 whips stored in memory.
• Inspect wire insulation inside cut armor for nicks.
The Notching Blade may contact wire insulation. To
reduce nicking, adjust notch depth to the minimum
depth necessary to break through armor.
• Use anti-short bushings where required. Cut armor
may nick wire insulation.
Failure to observe these precautions may result in
injury or property damage.
Making corrections
Make corrections to the whip as needed by
touching the 3 boxes in Make Changes Needed.
Press Cable Type box to make corrections to the
notch depth. Press the Whip Config box to make
corrections to the whip length, lead length, and
tail length. Press the Mach Params box to make
corrections to the mach params. After corrections
have been made to the whip and veried by
inspection, press the green Cycle Start box (Figure
19). The HMI screen will show the Job Progress.
4. Job Progress screen (Figure 21) will show the
parameters for the cable type, whip lengths, the
Job #, Jobs Queued, Whip Qty. Left to run, and
Length Left On Spool. Press the green Cycle Start
box to begin the production. The < will return to
the previous screen. The production of whips
will continue until the quantity shown in Whip
Parameters box is zero. If Multi Job was selected,
the parameters for the next Job # will appear on the
screen. If the Inspect 1st Piece is ON, a 1st piece
sample will be made for each new job in
the multi-job.
Figure 20
To stop the production run, press the red Cycle
Stop box (Figure 20). The machine will complete the
whip and then stop. Production can also be stop
ped by pushing the emergency stop button the front
panel. Pushing the emergency stop will immediately
stop the production.

C3 Auto Whip Clad Cable Cutter
Greenlee Tools, Inc. 4455 Boeing Dr. • Rockford, IL 61109-2988 USA • 815-397-7070
18
Figure 24A
Figure 23B
Alarm History is a record keeping le that records
machine errors and issues. The le will show the date
and time that the error occurred and a brief description
of the error (Figures 24 and 25). To view previous alarms,
touch the screen to bring up an alarm viewer. Press
the up or down arrows to page up or down through the
alarms. Press escape to close the alarm viewer window.
Press the < to return to the previous screen.
Figure 25
Figure 26
Operation (con’t)
Figure 23
2. Blade History is a record keeping le that requires
input from the user. Up to 14 entries can be added
to record and save the number of cuts performed
on the Notching and Cutting Blades and record
when a blade change occurred (Figure 24). The
screen will display Current Blade # of Cuts for both
the Notching Blade and Cut Off Blade. Pressing
the Change Blade box will record the date, time,
and # of Cuts in the rst available row in the
corresponding table. The Current Blade # of Cuts
will reset to zero. The red Clear History box will
clear all entries in the table. Press the < to return to
the History Menu screen. A numerical value can be
added to the Notching Blade Warning and Cutting
Blade Warning that will notify the user on the HMI
screen when the number of cuts has reached or
exceeded the value (Figure 23A).
Figure 24

C3 Auto Whip Clad Cable Cutter
Greenlee Tools, Inc. 4455 Boeing Dr. • Rockford, IL 61109-2988 USA • 815-397-7070
19
Operation (con’t)
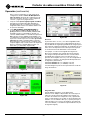
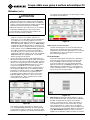
Setup Screen
8. Setup screen will display the Machine Parameters
box where the Notching Tension, Cut off Tension, Feed
Rate,Notch Rate, Saw Rate, Hold Down Offset, and
Saw Depth can be adjusted. To access the Setup
screen, go to the Main Menu on the HMI (Figure 9) and
touch the Setup box. The display will show Machine
Parameters and the < (see gure 26). The < will return to
the previous screen..
Figure 27
9. Touch the Feed Rate Setup box and the screen
will display Notching Tension, Cut off Tension,
Feed Rate, Notch Rate, Saw Rate, Saw Depth,
DEFAULT ALL, and the < (see gure 28). The < will
return to the previous screen.
Figure 28
Figure 28A
Feed Rate Setup
1. Touch the Machine Parameters box and the screen
will display Notch Rate, Saw Rate, and Feed Rate
(Figure 27). Press > to display the next page of
machine parameters: Notching Tension, Cut off
Tension, Saw Depth, and Hold Down Offset (Figure
27A). Press < to return to the previous screens.
2. Notch rate is the rate the Notching Blade will
plunge into the armor on the MC cable. To change
The rate, adjust the slider scale - raise the slider to
Increase the rate or lower the slider to decrease
the rate. Press default to return to the factory
default Setting.
3. Saw rate is the rate the Cut Off Saw Blade will
plunge through the MC cable. To change the rate,
adjust the slider scale - raise the slider to increase
the rate or lower the slider to decrease the rate.
Press default to return to the factory default setting.
4. Feed rate is the rate the cable will feed into the
machine. To change the rate, adjust the slider Scale
- raise the slider to increase the rate or lower the
slider to decrease the rate. Press default to return
to the factory default setting.
5. Notching tension is the amount of tension the
feed roller will apply to remove slack in the armor
during notching. To change the tension, adjust the
slider scale - raise the slider to increase the tension
or lower the slider to decrease the tension. Press
default to return to the factory default setting.

C3 Auto Whip Clad Cable Cutter
Greenlee Tools, Inc. 4455 Boeing Dr. • Rockford, IL 61109-2988 USA • 815-397-7070
20
6. Cut off tension is the amount of tension the feed
roller will apply to remove slack in the armor during
cut off. To change the tension, adjust the slider
scale – Raise the slider to increase tension or lower
the slider to decrease the tension. Press default to
return to the factory default setting.
7. Saw depth is the depth the Cut Off Saw Blade will
plunge through the MC cable. To change the depth,
adjust the slider scale – raise the slider to increase
the depth or lower the slider to decrease the depth.
Press default to return to the factory default setting.
8. Hold Down Offset is an adjustment to the depth
at which the hold down mechanism will move to
while feeding the cable. To adjust this offset, move
the slider or enter a numeric value. Raise the slider
to raise the hold down mechanism during cable
feeding or lower the slider to lower the hold down
mechanism during cable feeding. Press Default to
return to the factory default setting.
9. Pressing default all will cancel all changes and
Return to factory default settings.
10. Press < to return to the setup screen, and then
Press < again to return to the main menu screen.
Note: See Cable Reference Guide for appropriate
machine parameters for different MC cables.
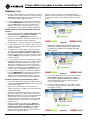
User Setup Screen
User Setup displays the three factory default users
and allows up to 24 users to be set up. An access
level can be assigned to each user to limit access to
specic screens. The three access levels and their
available screens are listed below. To access the
User Setup screen, go to the Main Menu on the HMI
(Figure 9) and touch the User Setup box.
The display shows the table to enter users and their
access level (Figure 29).
Figure 29
The Page Down box accesses the next eight users,
and the Page Up box accesses the previous eight
users. Press < to return to the previous screen. To
enter a new user, touch an empty box in the second
column to access the keypad and enter the name of
Operation (con’t)
the user and press Enter. Add the User Name and
Password in the corresponding boxes. Touch the
Access box and enter the desired access level for
the user. Press < to return to the Main Menu screen.
a. Access 1 – allow access to Operation and
History (Figure 30), setup, and logout.
b. Access 2 – allows the same access as level 1
plus the anility to toggle the inspect rst piece
feature on and off.
Figure 30
c. Access 3 – allow access to Operation, History,
Setup, User Setup and Logout (Figure 31).
Figure 31
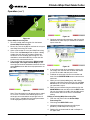
Desktop Software Instructions:
The C3 Autowhip desktop software is a
supplemental program that can be run on a PC
which allows the user to create Whip processing
les and Cable Material les that can be transferred
via a USB drive to the C3 Autowhip. The software
can be downloaded from the Greenlee website by
clicking the link under the C3 Autowhip Product
Documentation tab.
Note: The number in the bottom left corner of the
screen is the software version.
Page is loading ...
Page is loading ...
Page is loading ...
Page is loading ...
Page is loading ...
Page is loading ...
Page is loading ...
Page is loading ...
Page is loading ...
Page is loading ...
Page is loading ...
Page is loading ...
Page is loading ...
Page is loading ...
Page is loading ...
Page is loading ...
Page is loading ...
Page is loading ...
Page is loading ...
Page is loading ...
Page is loading ...
Page is loading ...
Page is loading ...
Page is loading ...
Page is loading ...
Page is loading ...
Page is loading ...
Page is loading ...
Page is loading ...
Page is loading ...
Page is loading ...
Page is loading ...
Page is loading ...
Page is loading ...
Page is loading ...
Page is loading ...
Page is loading ...
Page is loading ...
Page is loading ...
Page is loading ...
Page is loading ...
Page is loading ...
Page is loading ...
Page is loading ...
Page is loading ...
Page is loading ...
Page is loading ...
Page is loading ...
Page is loading ...
Page is loading ...
Page is loading ...
Page is loading ...
Page is loading ...
Page is loading ...
Page is loading ...
Page is loading ...
Page is loading ...
Page is loading ...
Page is loading ...
Page is loading ...
Page is loading ...
Page is loading ...
Page is loading ...
Page is loading ...
Page is loading ...
Page is loading ...
Page is loading ...
Page is loading ...
Page is loading ...
Page is loading ...
Page is loading ...
Page is loading ...
Page is loading ...
Page is loading ...
Page is loading ...
Page is loading ...
Page is loading ...
Page is loading ...
Page is loading ...
Page is loading ...
Page is loading ...
Page is loading ...
Page is loading ...
Page is loading ...
Page is loading ...
Page is loading ...
Page is loading ...
Page is loading ...
Page is loading ...
Page is loading ...
Page is loading ...
Page is loading ...
Page is loading ...
Page is loading ...
Page is loading ...
Page is loading ...
-
 1
1
-
 2
2
-
 3
3
-
 4
4
-
 5
5
-
 6
6
-
 7
7
-
 8
8
-
 9
9
-
 10
10
-
 11
11
-
 12
12
-
 13
13
-
 14
14
-
 15
15
-
 16
16
-
 17
17
-
 18
18
-
 19
19
-
 20
20
-
 21
21
-
 22
22
-
 23
23
-
 24
24
-
 25
25
-
 26
26
-
 27
27
-
 28
28
-
 29
29
-
 30
30
-
 31
31
-
 32
32
-
 33
33
-
 34
34
-
 35
35
-
 36
36
-
 37
37
-
 38
38
-
 39
39
-
 40
40
-
 41
41
-
 42
42
-
 43
43
-
 44
44
-
 45
45
-
 46
46
-
 47
47
-
 48
48
-
 49
49
-
 50
50
-
 51
51
-
 52
52
-
 53
53
-
 54
54
-
 55
55
-
 56
56
-
 57
57
-
 58
58
-
 59
59
-
 60
60
-
 61
61
-
 62
62
-
 63
63
-
 64
64
-
 65
65
-
 66
66
-
 67
67
-
 68
68
-
 69
69
-
 70
70
-
 71
71
-
 72
72
-
 73
73
-
 74
74
-
 75
75
-
 76
76
-
 77
77
-
 78
78
-
 79
79
-
 80
80
-
 81
81
-
 82
82
-
 83
83
-
 84
84
-
 85
85
-
 86
86
-
 87
87
-
 88
88
-
 89
89
-
 90
90
-
 91
91
-
 92
92
-
 93
93
-
 94
94
-
 95
95
-
 96
96
-
 97
97
-
 98
98
-
 99
99
-
 100
100
-
 101
101
-
 102
102
-
 103
103
-
 104
104
-
 105
105
-
 106
106
-
 107
107
-
 108
108
-
 109
109
-
 110
110
-
 111
111
-
 112
112
-
 113
113
-
 114
114
-
 115
115
-
 116
116


Greenlee 52084851.pdf User manual
- Type
- User manual
- This manual is also suitable for
Ask a question and I''ll find the answer in the document
Finding information in a document is now easier with AI
in other languages
- français: Greenlee 52084851.pdf Manuel utilisateur
- español: Greenlee 52084851.pdf Manual de usuario
Related papers
-
Greenlee CTR100 User manual
-
-
-
-
-
-
-
Greenlee Ultra Tugger User manual
-
-
Other documents
-
AG Neovo FMC-02 User manual
-
Klein Tools 31630 Operating instructions
-
General Power-Vee User manual
-
koban KPM3 ENERGY SMART User manual
-
Roberts 10-146-3 User manual
-
Olympia 80-559-0111 User guide
-
 Armour Line RP77112 Operating instructions
-
Reznor R6GP Installation guide
-
-
Promax TG-140 Reference guide
