Canon IR 2000 User manual

Category
Copiers
Type
User manual
iR2000/iR1600
Copying Guide
Canon
About the Manuals for the Machine
The manuals for this machine are divided as follows. Please read them to suit your needs.
For Basic Use......................................................
Troubleshooting .................................................
Reference Guide
For Basic Copying..............................................
For Convenient Copying....................................
Copying Guide
(This Document)
\
For Remote UI Use .............................................
Remote UI Guide
For Setting Up the Network Connection ..........
Setup Guide
For Printer Use....................................................
PS/PCL Printer Guide
For Installing Printer Driver...............................
PS Driver Guide
PCL Driver Guide
For Connecting and Setting the Network.........
Network Guide
1
2
3
4
How This Manual Is Organized
Basic Copying
Useful Copy Functions
Setting/Storing Specifications of the Copy Function
Appendix
Chapter 1
Chapter 2
Chapter 3
Chapter 4
Some of the data contained herein may not exactly reflect the current model of the particular product with which this manual has been included. If you have
a need for an exact specification, please contact Canon for the current specification.
No part of this document may be photocopied, reproduced, or translated into another language without prior written consent of Canon Inc.
ii
Table of Contents
How to Use This Manual . . . . . . . . . . . . . . . . . . . . . . . . . . . . . . . . . . . . . . . . . . . . . . . . . . . . . . . iv
Symbols Used in This Manual. . . . . . . . . . . . . . . . . . . . . . . . . . . . . . . . . . . . . . . . . . . . . . iv
Buttons Used in This Manual . . . . . . . . . . . . . . . . . . . . . . . . . . . . . . . . . . . . . . . . . . . . . . iv
Illustrations Used in This Manual . . . . . . . . . . . . . . . . . . . . . . . . . . . . . . . . . . . . . . . . . . . iv
Chapter 1 Basic Copying
What the iR2000/1600 Series Machine Can Do. . . . . . . . . . . . . . . . . . . . . . . . . . . . . . . . . . . . . 1-2
Flow of Copy Operations . . . . . . . . . . . . . . . . . . . . . . . . . . . . . . . . . . . . . . . . . . . . . . . . . . . . . . 1-3
Entering the Copy Quantity . . . . . . . . . . . . . . . . . . . . . . . . . . . . . . . . . . . . . . . . . . . . . . . . . . . . 1-7
Specifying the Required Number of Copies . . . . . . . . . . . . . . . . . . . . . . . . . . . . . . . . . . 1-7
Changing the Copy Quantity . . . . . . . . . . . . . . . . . . . . . . . . . . . . . . . . . . . . . . . . . . . . . . 1-7
Selecting the Copy Paper Size (Paper Select) . . . . . . . . . . . . . . . . . . . . . . . . . . . . . . . . . . . . . 1-8
Automatic Paper Selection (Auto Paper Selection). . . . . . . . . . . . . . . . . . . . . . . . . . . . . 1-8
Specifying Paper Size and Type (Manual Paper Selection) . . . . . . . . . . . . . . . . . . . . . . 1-9
Adjusting Exposure and Image Quality . . . . . . . . . . . . . . . . . . . . . . . . . . . . . . . . . . . . . . . . . 1-11
Adjusting Copy Exposure . . . . . . . . . . . . . . . . . . . . . . . . . . . . . . . . . . . . . . . . . . . . . . . 1-11
Selecting Image Quality . . . . . . . . . . . . . . . . . . . . . . . . . . . . . . . . . . . . . . . . . . . . . . . . 1-12
Automatic Adjustment of Exposure and Image Quality. . . . . . . . . . . . . . . . . . . . . . . . . 1-14
Changing the Copy Ratio (Copy Ratio). . . . . . . . . . . . . . . . . . . . . . . . . . . . . . . . . . . . . . . . . . 1-15
Enlarging/Reducing Originals to a Standard Size (Preset Zoom) . . . . . . . . . . . . . . . . . 1-15
Specifying the Copy Ratio by % (Zoom Designation) . . . . . . . . . . . . . . . . . . . . . . . . . . 1-16
Collating Copies (Finisher). . . . . . . . . . . . . . . . . . . . . . . . . . . . . . . . . . . . . . . . . . . . . . . . . . . . 1-18
Collating Copies into Sets in Page Order (Collate) . . . . . . . . . . . . . . . . . . . . . . . . . . . . 1-20
Collating Pages and Stapling (Staple). . . . . . . . . . . . . . . . . . . . . . . . . . . . . . . . . . . . . . 1-22
Reserved Copying. . . . . . . . . . . . . . . . . . . . . . . . . . . . . . . . . . . . . . . . . . . . . . . . . . . . . . . . . . . 1-23
Reserving a Copy Job While Printing . . . . . . . . . . . . . . . . . . . . . . . . . . . . . . . . . . . . . . 1-23
Interrupting the Current Job to Make Priority Copies (Interrupt Mode). . . . . . . . . . . . . . . . 1-25
iii
Chapter 2 Useful Copy Functions
Copying Facing Pages in a Book on Two Separate Sheets of Paper
(Two-page Separation) . . . . . . . . . . . . . . . . . . . . . . . . . . . . . . . . . . . . . . . . . . . . . . . . . . . . . . . . 2-2
Making Copies with Margins (Margin). . . . . . . . . . . . . . . . . . . . . . . . . . . . . . . . . . . . . . . . . . . . 2-5
Erasing Shadows and Frame Lines from Copies (Frame Erase) . . . . . . . . . . . . . . . . . . . . . . 2-7
Making Copies Erasing the Frame of the Originals (Original Frame Erase) . . . . . . . . . . 2-9
Making Copies Erasing the Book Frame (Book Frame Erase) . . . . . . . . . . . . . . . . . . . 2-11
Making Copies Erasing Binding Holes etc. (Binding Erase) . . . . . . . . . . . . . . . . . . . . . 2-12
Reducing Two Originals to Fit on a Single Copy Sheet (2 on 1 Combination) . . . . . . . . . . 2-15
Chapter 3 Setting/Storing Specifications of the Copy Function
Copy Settings List. . . . . . . . . . . . . . . . . . . . . . . . . . . . . . . . . . . . . . . . . . . . . . . . . . . . . . . . . . . . 3-2
Changing the Current Standard Settings . . . . . . . . . . . . . . . . . . . . . . . . . . . . . . . . . . . . . . . . . 3-3
Setting the Standard Exposure . . . . . . . . . . . . . . . . . . . . . . . . . . . . . . . . . . . . . . . . . . . . 3-3
Setting the Standard Zoom Ratio . . . . . . . . . . . . . . . . . . . . . . . . . . . . . . . . . . . . . . . . . . 3-5
Setting the Standard Copy Quantity . . . . . . . . . . . . . . . . . . . . . . . . . . . . . . . . . . . . . . . . 3-6
Setting the Standard Frame Erase Width . . . . . . . . . . . . . . . . . . . . . . . . . . . . . . . . . . . . 3-7
Setting the Automatic Collate On/Off . . . . . . . . . . . . . . . . . . . . . . . . . . . . . . . . . . . . . . . 3-8
Setting the Rotate Collate On/Off . . . . . . . . . . . . . . . . . . . . . . . . . . . . . . . . . . . . . . . . . . 3-9
Setting the Sharpness. . . . . . . . . . . . . . . . . . . . . . . . . . . . . . . . . . . . . . . . . . . . . . . . . . 3-10
Setting the Prescan Function . . . . . . . . . . . . . . . . . . . . . . . . . . . . . . . . . . . . . . . . . . . . 3-12
Chapter 4 Appendix
Chart of Available Combination of Functions . . . . . . . . . . . . . . . . . . . . . . . . . . . . . . . . . . . . . 4-2
Index. . . . . . . . . . . . . . . . . . . . . . . . . . . . . . . . . . . . . . . . . . . . . . . . . . . . . . . . . . . . . . . . . . . . . . . 4-5
iv
How to Use This Manual
Symbols Used in This Manual
Symbols are used in this manual for explanations of Restrictions and Cautions upon handling and
instructions to be observed for safety.
Buttons Used in This Manual
The control panel buttons are indicated with illustration and their names in parenthesis in this
manual.
e.g. (Start)
Illustrations Used in This Manual
Unless otherwise mentioned, illustrations used in this manual are those taken when the Feeder
(ADF-J1), Finisher-L1, and the Cassette Feeding Module-F1 are attached to the iR1600.
WARNING
Indicates a warning concerning operations that may lead to death or injury to
persons if not performed correctly. In order to use the machine safely, always
pay attention to these warnings.
CAUTION
Indicates a caution concerning operations that may lead to injury to persons
or damage to property if not performed correctly. In order to use the machine
safely, always pay attention to these cautions.
IMPORTANT
Indicates operational warnings and restrictions. Be certain to read these
items to operate the machine correctly, and to avoid damage to the machine.
NOTE
Indicates notes for operation or additional explanations. Reading these is
recommended.
CHAPTER
1-1
1
Basic Copying
This chapter describes the basic copy functions.
What the iR2000/1600 Series Machine Can Do . . . . . . . . . . . . . . . . . . . . . . . . . . . . . . . . . . . . . . . . . . . 1-2
Flow of Copy Operations . . . . . . . . . . . . . . . . . . . . . . . . . . . . . . . . . . . . . . . . . . . . . . . . . . . . . . . . . . . . . 1-3
Entering the Copy Quantity . . . . . . . . . . . . . . . . . . . . . . . . . . . . . . . . . . . . . . . . . . . . . . . . . . . . . . . . . . . 1-7
Specifying the Required Number of Copies . . . . . . . . . . . . . . . . . . . . . . . . . . . . . . . . . . . . . . . . . . . . . 1-7
Changing the Copy Quantity . . . . . . . . . . . . . . . . . . . . . . . . . . . . . . . . . . . . . . . . . . . . . . . . . . . . . . . . . 1-7
Selecting the Copy Paper Size (Paper Select) . . . . . . . . . . . . . . . . . . . . . . . . . . . . . . . . . . . . . . . . . . . . 1-8
Automatic Paper Selection (Auto Paper Selection) . . . . . . . . . . . . . . . . . . . . . . . . . . . . . . . . . . . . . . . 1-8
Specifying Paper Size and Type (Manual Paper Selection) . . . . . . . . . . . . . . . . . . . . . . . . . . . . . . . . . 1-9
Adjusting Exposure and Image Quality . . . . . . . . . . . . . . . . . . . . . . . . . . . . . . . . . . . . . . . . . . . . . . . . 1-11
Adjusting Copy Exposure . . . . . . . . . . . . . . . . . . . . . . . . . . . . . . . . . . . . . . . . . . . . . . . . . . . . . . . . . . 1-11
Selecting Image Quality . . . . . . . . . . . . . . . . . . . . . . . . . . . . . . . . . . . . . . . . . . . . . . . . . . . . . . . . . . . 1-12
Automatic Adjustment of Exposure and Image Quality . . . . . . . . . . . . . . . . . . . . . . . . . . . . . . . . . . . . 1-14
Changing the Copy Ratio (Copy Ratio) . . . . . . . . . . . . . . . . . . . . . . . . . . . . . . . . . . . . . . . . . . . . . . . . 1-15
Enlarging/Reducing Originals to a Standard Size (Preset Zoom) . . . . . . . . . . . . . . . . . . . . . . . . . . . . 1-15
Specifying the Copy Ratio by % (Zoom Designation) . . . . . . . . . . . . . . . . . . . . . . . . . . . . . . . . . . . . . 1-16
Collating Copies (Finisher) . . . . . . . . . . . . . . . . . . . . . . . . . . . . . . . . . . . . . . . . . . . . . . . . . . . . . . . . . . 1-18
Collating Copies into Sets in Page Order (Collate) . . . . . . . . . . . . . . . . . . . . . . . . . . . . . . . . . . . . . . . 1-20
Collating Pages and Stapling (Staple) . . . . . . . . . . . . . . . . . . . . . . . . . . . . . . . . . . . . . . . . . . . . . . . . 1-22
Reserved Copying . . . . . . . . . . . . . . . . . . . . . . . . . . . . . . . . . . . . . . . . . . . . . . . . . . . . . . . . . . . . . . . . . 1-23
Reserving a Copy Job While Printing . . . . . . . . . . . . . . . . . . . . . . . . . . . . . . . . . . . . . . . . . . . . . . . . . 1-23
Interrupting the Current Job to Make Priority Copies (Interrupt Mode) . . . . . . . . . . . . . . . . . . . . . . 1-25
1-2
Basic Copying
1
What the iR2000/1600 Series Machine Can Do
What the iR2000/1600 Series Machine Can
Do
Flexible document handling
To make a copy of an original, you have the choice of setting the document in the optional
Feeder (ADF-J1) when attached, or placing it directly onto the platen glass. The Feeder is useful
when copying a multi-page document, and the platen glass is ideal when copying a single-page
document, or from a book.
Copy reduction/enlargement
You can manually select a reduction / enlargement ratio from 50% to 200%. You can also set
the unit to select an appropriate ratio to fit the paper size you are copying onto.
Automatic and manual exposure/image quality adjustment
The machine can automatically set the most appropriate image quality settings, including the
exposure, for the document you are copying. You can also manually adjust them to get the best
output quality.
Various finishing function
With the optional Finisher-L1 or Inner 2-Way tray attached, you can select various finishing
modes to collate the copies by copy sets.
Frame erase copy
This feature allows you to erase unwanted shadows, borders, and binding marks from around
an original. When copying directly from a book, you can also erase the center line and edges on
the copy. To make a copy from a book, use the platen glass.
Binding margin copy
This feature allows you to create a margin on the top, bottom, left, or right of the document for
use when binding the document together. This is convenient if you later want to staple or insert
binding holes.
Two-page separation
Double spread pages in magazines or books can be copied onto separate sheets of paper in
one operation. This feature works only when the document is copied from the platen glass.
2 on 1 combination
You can copy two pages of a document onto a single page.
Energy saver mode
This machine incorporates an energy saver feature to conserve power. In energy saver mode,
the display and the operation panel lamps go out automatically when the unit remains idle for a
specified period of time.
1-3
Basic Copying
1
Flow of Copy Operations
This section describes the flow of basic copy operations.
NOTE
For the following items, see the Reference Guide:
- Main power and Energy Saver button ( )
- Routine maintenance
If the platen glass is dirty, the output quality may deteriorate. Always keep the platen glass clean.
Do not touch the platen cover while copying. Rocking the cover can distort the image being copied.
1
Place your original.
You can set the original both vertically and horizontally.
[Platen glass]
Vertical placement Horizontal placement
Copies are stapled here. Copies are stapled here.
Original
(face down)
Original (face down)
Basic Copying
1
1-4
Flow of Copy Operations
[Feeder]
Staple copy: place the original with its top upward
IMPORTANT
The copies are stapled at the part equivalent to the upper left side of the original.
NOTE
A4, B5 and A5-size originals can be placed either vertically or horizontally. However, the scanning speed for
horizontally placed originals is somewhat slower than for vertically placed originals. You can place originals
horizontally when printing with Preset Zoom mode, such as when processing A4 A3 .
Horizontally placed A4, B5 and A5-size originals are referred to as A4 , B5 and A5 .
A3 and B4-size originals must be placed horizontally.
For instructions on placing the original, see the Reference Guide.
If the message <ENTER DAC> is displayed
Enter the Department ID and Password. (See the Reference Guide.)
NOTE
When <AUTO SORT> is set to <ON>, the Collate or Offset Collate mode is automatically set when you place the
originals in the feeder. (See “Setting the Automatic Collate On/Off,” on p. 3-8.)
ENTER DAC
_
ABC
ABC
Vertical placement Horizontal placement
Copies are stapled here.
Original
(face up)
Original
(face up)
1-5
Flow of Copy Operations
Basic Copying
1
If the message <INSERT CONTROL CARD> is displayed
Insert a control card. (See the Reference Guide.)
2
Set the desired copy mode (paper size, image quality, exposure, copy ratio and
finishing).
NOTE
For details about these settings, see the pages from 1-8 in this chapter, or ‘Chapter 2 Useful Copy Functions’.
3
Enter the copy quantity (1 to 99) using the numeric buttons.
NOTE
For instructions on setting the number of copies, see “Specifying the Required Number of Copies,” on p. 1-7.
4
Press (Start).
Copying starts.
IMPORTANT
While copying, you cannot change copy mode settings, such as the copy quantity, paper size, and copy ratio.
INSERT CONTROL CARD
Basic Copying
1
1-6
Flow of Copy Operations
NOTE
If there is a current job, the machine scans the original, and waits to print it. Printing starts when the current job is
completed.
When scanning is completed, remove the original.
If you have set the Department ID Management, press . (See the Reference Guide.)
If the optional Card Reader is attached, remove the control card. (See the Reference Guide.)
When you want to reserve a copy job while the machine is printing:
Place the original and press (start). (See “Reserving a Copy Job While Printing,” on
p. 1-23.)
When you want to cancel a copy job:
Press (Stop).
Press or to select <YES> or <NO>.
NOTE
After you have pressed (Stop), several copies may be output from the machine.
You can also stop a copy job in the Monitor screen. (See the Reference Guide.)
When you want to interrupt a copy job:
To interrupt a copy job when you need to make priority copies, press (Interrupt).
For instructions on explaining how to interrupt a copy job, see “Interrupting the Current Job
to Make Priority Copies (Interrupt Mode),” on p. 1-25.
CANCEL COPYING?
< YES NO >
ID
1-7
Basic Copying
1
Entering the Copy Quantity
The machine allows up to 99 copies to be made.
Specifying the Required Number of Copies
1
Press numeric buttons to enter the desired copy quantity (1 to 99).
The copy quantity appears on the right side of the display.
IMPORTANT
You cannot change the copy quantity while copying.
Changing the Copy Quantity
1
Press (Clear) to clear the entered number.
2
Press numeric buttons to enter the desired copy quantity (1 to 99).
The copy quantity appears on the right side of the display.
IMPORTANT
You cannot change the copy quantity while copying.
100% AUTO PAPER
TEXT
10
100% AUTO PAPER
TEXT
01
100% AUTO PAPER
TEXT
10
C
1-8
Basic Copying
1
Selecting the Copy Paper Size (Paper Select)
You can set the machine to automatically select the paper size, or you can specify the paper size
for a copy job.
NOTE
When copying an original onto the same size paper at a 100% copy ratio, the periphery of the original may be cut
slightly on the copy. For details of the size of the non-image areas, see the Reference Guide.
For instructions about loading paper in the stack bypass, see the Reference Guide.
Automatic Paper Selection (Auto Paper Selection)
The machine automatically selects copy paper.
IMPORTANT
When the optional Feeder (ADF-J1) is attached, or the original is set on the platen glass of iR1600, the machine cannot
detect the original size and the Automatic Paper Selection does not function.
You cannot use the Automatic Paper Selection mode when copying the following types of originals. Copy these
originals using the Manual Paper Selection mode.
- Non-standard size originals
- Highly transparent originals such as transparencies
- Originals with an extremely dark background
NOTE
The default setting is <AUTO PAPER>.
You can set whether to activate or deactivate the Automatic Paper Selection for each paper drawer and the stack
bypass. (See the Reference Guide.)
You can use the stack bypass for the Automatic Paper Selection when:
- The paper is set on the stack bypass
- The paper size, is specified in <3.USE STACK BYPASS> in the <1.COMMON SETTINGS> menu
- The Auto Paper Selection is set to <ON> for the stack bypass in the <3.DRAWER ELIGIBLTY> menu
1-9
Selecting the Copy Paper Size (Paper Select)
Basic Copying
1
1
Place your original.
Make sure that <AUTO PAPER> is displayed. If not, press (Reset).
2
Press (Start).
Copying starts.
NOTE
If the message <NO APPROPRIATE SIZE> appears, the paper set is different in size from the original. Set the
appropriate paper. If you press (Start) without loading the paper, the machine automatically selects the paper with
the least margin, and starts copying.
When the paper is selected automatically, an asterisk appears on the left of the paper size indication on the display.
Specifying Paper Size and Type (Manual Paper
Selection)
You can make copies after selecting the paper size of paper loaded in the paper drawer or on the
stack bypass.
IMPORTANT
If you select the paper manually, the Rotate print cannot be made even if you set <ROTATE PRINT> to <ON> in the
<COMMON SETTINGS> menu.
1
Place your original.
2
Press (Paper Select) to select the paper size.
NOTE
The paper sizes are displayed in the order in which they are loaded in the paper drawers.
indicates that the paper is set vertically; indicates that the paper is set horizontally.
The paper sizes which are loaded in the paper drawers are shown on the display.
100% AUTO PAPER
TEXT
01
100% A4
TEXT
01
Basic Copying
1
1-10
Selecting the Copy Paper Size (Paper Select)
3
Press (Start).
Copying starts.
NOTE
To cancel all settings and return the machine to the standby mode, press (Reset).
1-11
Basic Copying
1
Adjusting Exposure and Image Quality
The exposure and image quality can be adjusted when the original is scanned.
Adjusting Copy Exposure
You can manually adjust the exposure to the most appropriate level for the original.
1
Place your original.
2
Press (Light) or (Dark) to adjust the exposure.
Move the indicator between (Light) and (Dark) below the display. Move the left to make the exposure
lighter or to the right to make the exposure darker.
You can adjust the exposure in 9 levels.
3
Press (Start).
Copying starts.
NOTE
To adjust the copy exposure automatically, see “Automatic Adjustment of Exposure and Image Quality,” on p. 1-14.
To cancel all settings and return the machine to the standby mode, press (Reset).
100% AUTO PAPER
TEXT
01
Lighter Darker
Basic Copying
1
1-12
Adjusting Exposure and Image Quality
Selecting Image Quality
You can adjust image quality to the level best suited to the quality of text or photo originals. The
following three modes are available for adjusting image quality:
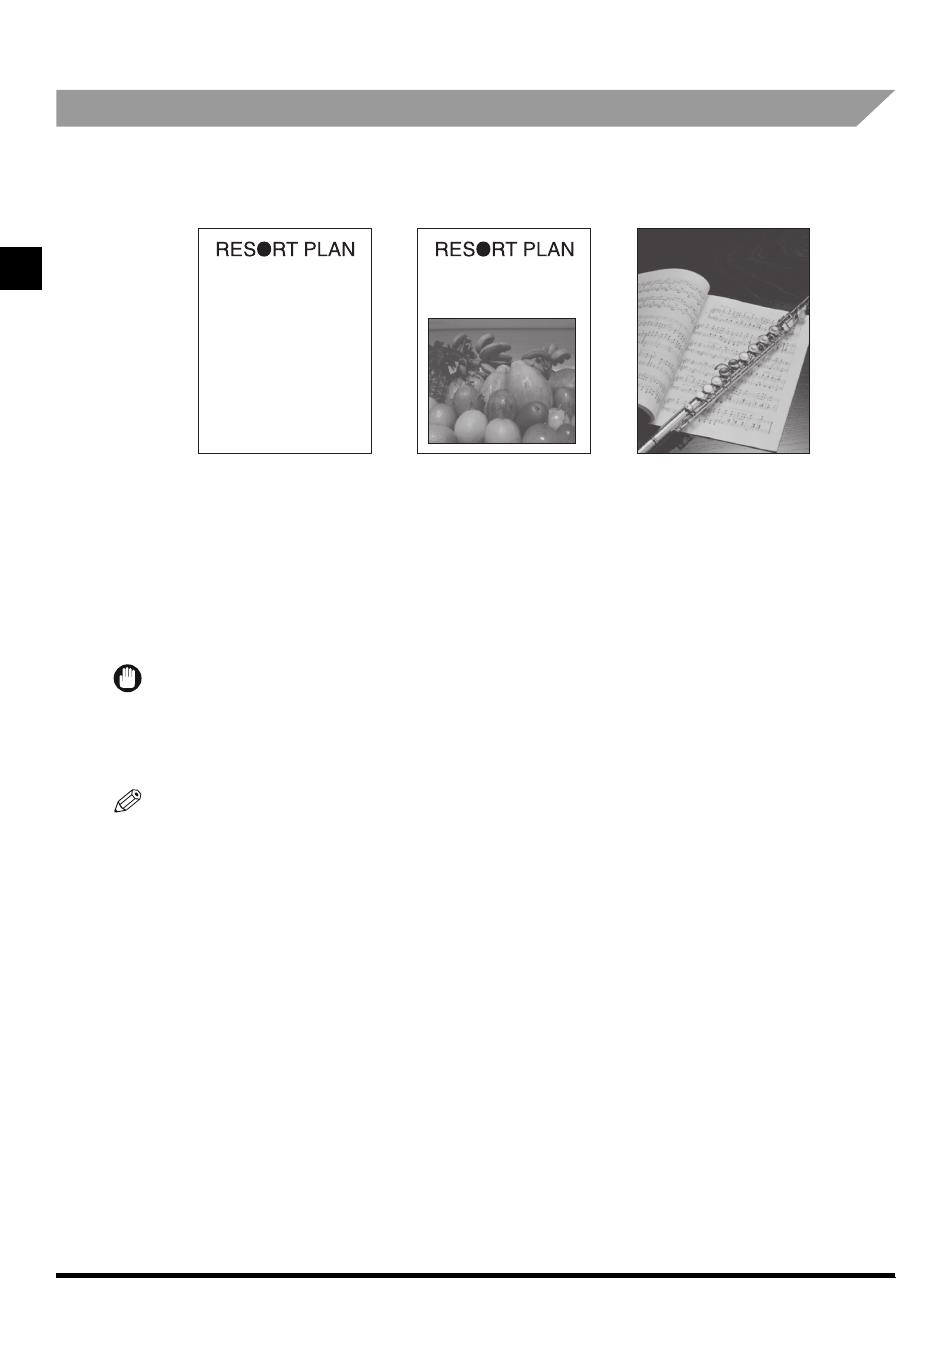
Text Mode
This mode is best suited for making copies from text originals. Blueprints or penciled originals
can be copied clearly.
Text/Photo Mode
This mode is best suited for making copies from originals containing both text and photos.
Photo Mode
This mode is best suited for making copies from photos printed on photographic paper, or photo
originals containing halftones (i.e., printed photos).
IMPORTANT
Combinations of these three modes (Text mode, Text/Photo mode and Photo mode) cannot be set. If you select one of
these modes, the previously set mode is canceled.
If you make copies of an original containing halftones, such as a printed photograph using the Photo mode, then moire
may occur. If this happens, you can soften the moire effect by adjusting the Sharpness level. (See “Setting the
Sharpness,” on p. 3-10.)
NOTE
The default setting is <TEXT>.
When you select the Text, Text/Photo, or Photo mode, the exposure can be adjusted only by the Manual Exposure
Control. Automatic Exposure Control cannot be selected.
If the original is a transparency, select the Text, Text/Photo, or Photo mode and adjust the exposure to the most
appropriate level.
The world’s coral reefs, where
brilliantly colored fish and a
myriad of other tropical creatures
come together. Aptly nicknamed
“Tropical Forests under the sea”,
these spots of breathtaking
beauty serve as home to
countless varieties of life, and to
us of the land, this alluring,
dream-like world forms a tropical
paradise filled with romance.
The world’s coral reefs, where
brilliantly colored fish and a
myriad of other tropical creatures
come together.
Text mode Text/Photo mode Photo mode
1-13
Adjusting Exposure and Image Quality
Basic Copying
1
1
Place your original.
2
Press (Image Quality) repeatedly until the desired type of original (TEXT, TEXT/
PHOTO, or PHOTO) appears.
3
Press (Light) or (Dark) to adjust the copy exposure.
Move the indicator between (Light) and (Dark) below the display. Move to the left to make the
exposure lighter or to the right to make the exposure darker.
4
Press (Start).
Copying starts.
NOTE
To adjust the copy exposure automatically, see “Automatic Adjustment of Exposure and Image Quality,” on p. 1-14.
To cancel all settings and return the machine to the standby mode, press (Reset).
100% AUTO PAPER
TEXT
01
100% AUTO PAPER
TEXT/PHOTO
01
100% AUTO PAPER
PHOTO
01
Basic Copying
1
1-14
Adjusting Exposure and Image Quality
Automatic Adjustment of Exposure and Image
Quality
1
Place your original.
2
Press .
The indicator lights and exposure is automatically adjusted to the level best suited to the quality of the
original.
NOTE
The copy mode is set to Text automatically.
When scanning transparencies, adjust exposure using (Light) and (Dark) as the automatic exposure control may
not operate correctly on transparent originals.
3
Press (Start).
Copying starts.
NOTE
To cancel all settings and return the machine to the standby mode, press (Reset).
  • Page 1 1
  • Page 2 2
  • Page 3 3
  • Page 4 4
  • Page 5 5
  • Page 6 6
  • Page 7 7
  • Page 8 8
  • Page 9 9
  • Page 10 10
  • Page 11 11
  • Page 12 12
  • Page 13 13
  • Page 14 14
  • Page 15 15
  • Page 16 16
  • Page 17 17
  • Page 18 18
  • Page 19 19
  • Page 20 20
  • Page 21 21
  • Page 22 22
  • Page 23 23
  • Page 24 24
  • Page 25 25
  • Page 26 26
  • Page 27 27
  • Page 28 28
  • Page 29 29
  • Page 30 30
  • Page 31 31
  • Page 32 32
  • Page 33 33
  • Page 34 34
  • Page 35 35
  • Page 36 36
  • Page 37 37
  • Page 38 38
  • Page 39 39
  • Page 40 40
  • Page 41 41
  • Page 42 42
  • Page 43 43
  • Page 44 44
  • Page 45 45
  • Page 46 46
  • Page 47 47
  • Page 48 48
  • Page 49 49
  • Page 50 50
  • Page 51 51
  • Page 52 52
  • Page 53 53
  • Page 54 54
  • Page 55 55
  • Page 56 56
  • Page 57 57
  • Page 58 58
  • Page 59 59
  • Page 60 60
  • Page 61 61
  • Page 62 62
  • Page 63 63
  • Page 64 64
  • Page 65 65
  • Page 66 66
  • Page 67 67
  • Page 68 68
  • Page 69 69
  • Page 70 70

Canon IR 2000 User manual

Category
Copiers
Type
User manual

Ask a question and I''ll find the answer in the document

Finding information in a document is now easier with AI