Huawei MatePad T10s User manual

Category
Smartphones
Type
User manual
User Guide
Contents
Essent
ials
Basic Gestures
1
System Navigation
3
Phone Clone
4
Lock and Unlock Your Screen
4
Get Familiar with the Home Screen
5
Notication and Status Icons
5
Shortcut Switches
7
Home Screen Widgets
7
Set Your Wallpaper
8
Screenshots & Screen Recording
8
View and Clear Notications
9
Adjust Sound Settings
9
Enter Text
9
Split-screen Mode & Floating Window
10
Power On and O or Restart Your Device
11
Charging
11
Smart Features
Huawei Share
14
Camera and Gallery
Launch Camera
16
Take Photos
16
Zoom to Take Photos
17
Take Panoramic Photos
17
Take HDR Photos
17
Record Videos
18
Adjust Camera Settings
18
Manage Gallery
19
Apps
Apps
23
Contacts
24
Phone
26
Messaging
31
Calendar
33
Clock
35
Notepad
36
Recorder
37
Email
38
i
Calculator
42
Radio
42
App Twin
43
Quickly Access Frequently Used App Features
43
Tablet Manager
43
Phone Clone
45
HiSuite
45
Tips
46
Settings
Search for Items in Settings
48
Wi-Fi
48
Bluetooth
49
Mobile Data
50
More Connections
52
Home Screen & Wallpaper
54
Display & Brightness
55
Sounds & Vibration
58
Notications
60
Biometrics & Password
61
Apps
62
Battery
62
Storage
64
Security
64
Privacy
65
Accessibility Features
66
System & Updates
67
About Tablet
71
Contents
ii
Essentials
Basic Gestur
es
Basic Gestures
System Navigation Gestures
Go to
Settings > S
ystem & updates > System navigation and ensure that Gestures is
selected.
Back
S
wipe inward from the left or right edge to return to the
previous screen.
Back to the home screen
S
wipe up from the bottom to go to the home screen.
View recent tasks
S
wipe up from the bottom of the screen and hold to view
recent tasks.
Close an app
On the r
ecent tasks screen, swipe up on an app preview to
close the app.
1
More Gestures
Access Home screen editing mode
Pinch t
wo ngers together on the home screen.
Display the shortcut panel on the lock screen
S
wipe up from the bottom of the lock screen.
Open the
notication panel
Swipe down from the status bar.
Button Shortcuts
Power o and restart
Pr
ess and hold the Power button until the Power o and
Restart options appear.
Increase the volume
Pr
ess the Volume up button.
Decrease the volume
Press the Volume down button.
Essentials
2
Take a screenshot
Pr
ess the Volume down and Power buttons simultaneously.
System Navigation
Change the Navigation Mode
Go to
Settings > S
ystem & updates > System navigation to select a navigation mode
according to your preferences.
Navigate with Gestures
Go to
Settings > S
ystem & updates > System navigation and enable or disable
Gestures.
After enabling Gestures, you can:
Go back to the previous screen: Swipe inward from the left or right edge.
Return to the home screen: Swipe up from the bottom of the screen.
Access the recent tasks screen: Swipe up from the bottom of the screen and hold.
Close an app from the recent tasks screen: Swipe up on an app preview.
Three-Key Navigation
Go to
Settings > System & updates > System navigation, and select Three-key
navigation.
Touch Settings to select the navigation key combination you prefer.
The icons on the navigation bar are as follows:
: Back key to return to the previous screen, exit an app, or close the onscreen keyboard.
: Home key to return to the home screen.
: Recents key to display the recent tasks screen.
:
Notication key to open the notication panel.
Customize the Navigation Key Combination
Go to Three-key navigation > Settings. You can:
Select a navigation key combination.
Essentials
3
Enable Hide navigat
ion keys to allow you to hide the navigation bar when not in use.
Phone Clone
Phone Clone
Phone Clone lets you quickly and seamlessly move all the basic data (including contacts,
calendar, images, and videos) from your old tablet to your new tablet.
Clone Data from an Android Device
1 On your new tablet, open
Phone Clone. Alternat
ively, go to
Settings > S
ystem &
updates > Phone Clone, touch This is the new phone, then touch Huawei or Other
Android.
2 Follow the onscreen instructions to download and install Phone Clone on your old device.
3 On your old device, open
Phone Clone and touch This is the old phone. Follow the
onscreen instructions to connect your old device with your new tablet by scanning a code
or connecting manually.
4 On your old device, select the data you want to clone, then touch Transfer to start
cloning.
Phone Clone is only available on tablets running Android 4.4 or later.
Clone Data from an iPhone or iPad
1 On y
our new tablet, open
Phone Clone. Alternatively, go to Settings > System &
updates > Phone Clone, touch This is the new phone, then touch iPhone/iPad.
2 Follow the onscreen instructions to download and install Phone Clone on your old device.
3 On your old device, open Phone Clone and touch This is the old phone. F
ollow the
onscreen instructions to connect your old device with your new tablet by scanning a code
or connecting manually.
4 On your old device, select the data you want to clone, then follow the onscreen
instructions to complete the data cloning.
Phone Clone is only available on tablets running iOS 8.0 or later.
Lock and Unlock Your Screen
Lock and Unlock Y
our Screen
Lock the Screen
If your tablet remains inactive for a period of time, it will automatically lock the screen and
enter sleep mode to save power.
Alternative, you can manually lock the screen in either of the following ways:
Essentials
4
Pr
ess the Power button.
On the home screen, pinch two ngers together to enter screen editing mode. Touch
Widgets, then dr
ag the Screen Lock icon to the home screen. You can now touch the
Screen Lock icon to lock the screen.
Set the Screen Timeout Period
Go to
Settings > D
isplay & brightness > Sleep and select a screen timeout period.
Unlock the Screen with Password
Once the screen is turned on, swipe up from the middle of the screen to display the password
input panel. Then, enter your lock screen password.
Change the Lock Screen Display
Go to
Settings > Home screen & wallpaper, touch Lock screen signature, then type
text to display on the lock screen.
To remove the signature, touch Lock screen signature and delete the text.
Access Apps from the Lock Screen
You can access commonly used apps such as Camera, Recorder, and Calculator from the lock
screen.
Turn on the screen, touch and hold , then swipe up to open Camer
a.
Turn on the screen, then swipe up from the bottom of the lock screen to open the shortcut
panel. Shortcuts for Recorder, Calculator and Timer will be available.
Get Familiar with the Home Screen
From the home screen, you can:
Check the status of your tablet and notications from the status bar at the top of the
scr
een.
Swipe left or right to view apps and widgets displayed on the home screen.
Notication and Status Icons
Network status icons may vary according to your region or network service provider.
Supported funct
ions vary according to the device model. Some of the following icons may
not be applicable to your tablet.
Essentials
5
5G network connected 4G network connected
3G network connected 2G network connected
Full signal strength Roaming
Data saver enabled SIM card not found
Hotspot enabled Hotspot connected
Calling VoLTE enabled
Wi-Fi network connected SkyTone in use
Hotspot disconnected
Network being switched by Wi-Fi
+
Airplane mode enabled Alarm set
Battery empty Battery low
Charging Quick charging
Super charging Super wireless charging
Quick wireless charging Regular wireless charging
Power saving mode enabled Digital balance enabled
Bluetooth enabled Bluetooth device battery
Bluetooth device connected VPN connected
Driving mode Projection device connected
Location service enabled Eye Comfort mode enabled
Headset connected
Headset with a microphone
c
onnected
Missed call Unread SMS
Microphone disabled Muted
Essentials
6
More
notications
Vibrate only
NFC enabled Do Not Disturb mode enabled
Data syncing Data sync failed
Performance mode enabled New email
Event reminders
Shortcut Switches
Shortcut S
witches
Turn on a Shortcut Switch
Swipe down from the status bar to open the notication panel, then swipe down further to
sho
w all shortcut switches.
Touch a shortcut switch to enable or disable the corresponding feature.
Touch and hold a shortcut switch to enter the settings screen for that feature. (Only
available for some features)
Touch
to open Settings.
Customiz
e Shortcut Switches
Touch
, touch and hold an icon, then drag it to the desired position.
Home Scr
een Widgets
Home Screen Widgets
You can add, move, or delete home screen widgets, such as Screen lock, Weather, Notepad,
Clock, Contacts, and Calendar, according to your personal requirements.
Add a Widget to the Home Screen
1 Pinch two ngers together on the home screen to access the Home screen editor.
2 T
ouch Widgets, then swipe left to view all widgets.
3 Some widgets, like Weather, come in various formats. Touch the widget to view all
formats, then swipe right to return.
4 Touch a widget to add it to the home screen. If there is no room on the current screen
page, touch and hold it, then drag it to a dierent screen page.
Essentials
7
Set Your Wallpaper
Set Y
our Wallpaper
Use a Preset Wallpaper
1 Go to
Settings > Home scr
een & wallpaper > Wallpaper.
2 Touch an image you want to set as the wallpaper.
3 Set the following according to your preferences:
Blur: applies a blur eect, which can be adjusted by dragging the slider.
Scrollable: enables the wallpaper to be scrollable on the home screen.
4 Touch
, then determine whether you'd like to set it as the wallpaper for the Lock
scr
een, Home screen, or Both.
Set an Image from Gallery as Your Wallpaper
1 Open
Gallery, and open the image y
ou want to set as your wallpaper.
2 Go to
> Set as > W
allpaper, then follow the onscreen instructions.
Screenshots & Screen Recording
Take a Screenshot
Use a Key Combination to Take a Screenshot
Press and hold the Power and Volume down buttons simultaneously to take a screenshot.
Use a Shortcut to Take a Screenshot
Swipe down from the status bar to open the notication panel, then swipe down on it again
to sho
w all shortcuts. Touch
to take a screenshot.
Shar
e and Edit a Screenshot, or Switch to Scrollshot
After you take a screenshot, a thumbnail will display in the lower left corner of the screen.
Then you can:
Swipe down on the thumbnail to take a scrolling screenshot.
This function is not supported in landscape view.
S
wipe up on the thumbnail to select a sharing mode and share the screenshot with your
friends.
Touch the thumbnail to edit or delete it.
Screenshots are saved to Gallery by default.
Essentials
8
View and Clear
Notications
View and Clear
Notications
View Notications
When there is a notication reminder, you can turn on the screen and swipe down from the
status bar to open the notication panel and view the notication.
Clear
Notications
Swipe right on a notication reminder to clear the notication.
T
ouch
at the bottom of the notication panel to clear all notications.
Block, Silence, or Delay Notications
Swipe left on a notication, then touch to block, silence, or delay notications from that
sour
ce.
Some system notications can't be blocked, cleared, or delayed.
Adjust Sound Settings
Adjust Sound Set
tings
Press a Volume Button to Adjust the Volume
Press the Volume up or down button to adjust the volume.
Press the Power Button to Mute Your Device When It Rings
When your tablet rings for an incoming call or alarm, you can press the Power button to
mute it.
Use a Shortcut to Switch Between Ring or Mute Mode
1 Swipe down from the status bar to open the notication panel, then swipe down on it
again to sho
w all shortcuts.
2 Touch the
Sound, Silent ic
on to switch between dierent modes.
Enter Text
Edit Text
You can select text displayed on your screen, copy or cut it to the clipboard, then paste it
somewhere else. You can also share it in multiple ways.
Essentials
9
1 T
ouch and hold the text until
appears.
In some apps, what happens af
ter you touch and hold the text may dier. For example, if
you touch and hold a sent or received message, an option menu will be displayed, and
will appear only after you touch Select text.
2 Dr
ag
and to select the text you need, or touch Select all to select all text
.
3 Touch Copy or Cut as needed.
4 Touch and hold the space where you want to paste the text until Paste appears, then
touch Paste.
Split-screen Mode & Floating Window
Split-screen Mode
You can split the screen of your tablet to use two apps simultaneously.
Enable Split-screen Mode
Certain apps do not support Split-screen mode.
1 O
pen an app.
2 Enable split-screen mode using any of the following methods:
Swipe up from the middle of the screen with three ngers.
When using gestur
e navigation, swipe up from the bottom of the screen and hold to
enter the Recent tasks screen. Then touch .
When using thr
ee-key navigation, touch and hold the
key.
3 O
pen the other app to start multitasking.
Switch the Split-screen Panes
If the home screen is displayed in either of the split-screen panes, you won't be able to
switch the panes.
Touch in the middle of the split screen line, then touch .
Disable Split-screen Mode
Touch in the middle of the split screen line, then touch .
APP Mult
iplier
App Multiplier displays an app's home and content screens in dual windows for easier
multitasking when your tablet is in landscape orientation.
Essentials
10
1 Go to Settings > Apps > App Mult
iplier, and turn on the switch for apps that you
want to use this feature with.
2 Open an app that has App Multiplier enabled. The app's home screen will then be
displayed in the center of the screen.
3 Touch an entry on the app's home screen. The home screen will then be relocated to the
left to make space for the new screen.
Power On and O or Restart Your Device
P
ower On and O or Restart Your Device
P
ower Your Device On and O
To power
o your device, press and hold the Power button for a few seconds, touch Power
o and Touch to power o.
To power on your device, press and hold the Power button for a few seconds until your device
displays the logo.
Restart Your Device
Restart your device on a regular basis to clear the cache and keep the device in an optimal
state. A restart can sometimes resolve the issue when your device encounters a problem.
Just press and hold the Power button for a few seconds, then touch Restart and Touch to
restart.
Force Restart Your Device
If your device isn't working or won't turn o normally, you can force restart it.
Just press and hold the Power button for 10 seconds or longer.
Charging
Charge Your Tablet
Your tablet will alert you when it is running out of power. Please make sure to charge your
tablet in time to prevent it from turning o automatically when the power runs out.
Pr
ecautions for Charging
Charge your tablet using the standard adapter and USB cable that came with your device.
Using other chargers or USB cables may cause repeated restarts, slow charging,
overheating, or other undesirable eects.
Your tablet will automatically run a safety check when a charger or other device is
connected to the USB port. If moisture is detected in the USB port, your tablet will
automatically activate safety measures and stop charging. Disconnect your tablet from the
USB port and wait until the USB port is dry.
Essentials
11
The t
ime required to fully charge the battery depends on the ambient temperature and age
of the battery.
Batteries have a limited number of charge cycles. When the battery life becomes noticeably
shorter, go to an authorized Huawei Customer Service Center to replace the battery.
Do not cover your tablet or charger during charging.
Your tablet may heat up when you have been using it for an extended period of time,
especially in high temperatures. In this case, stop charging, disable some features, and
move your tablet to a cool place.
Please do not use your tablet while it is charging.
If your tablet does not respond after you press and hold the Power button, the battery may
have run out. Charge for 10 minutes and then power it on.
Using the Charger that Came with Your Device
1 Use the USB cable that came with your tablet to connect your tablet and the adapter.
2 Plug the adapter into a power socket.
Charging Your Tablet with a PC
1 Connect your tablet to a PC or other device using a USB cable.
2 When the Use USB to dialog box is displayed on your tablet, touch Charge only.
If another option has been set previously, the dialog box will not pop up. Swipe down
from the status bar to open the notication panel, touch Set
tings, then select Charge
only.
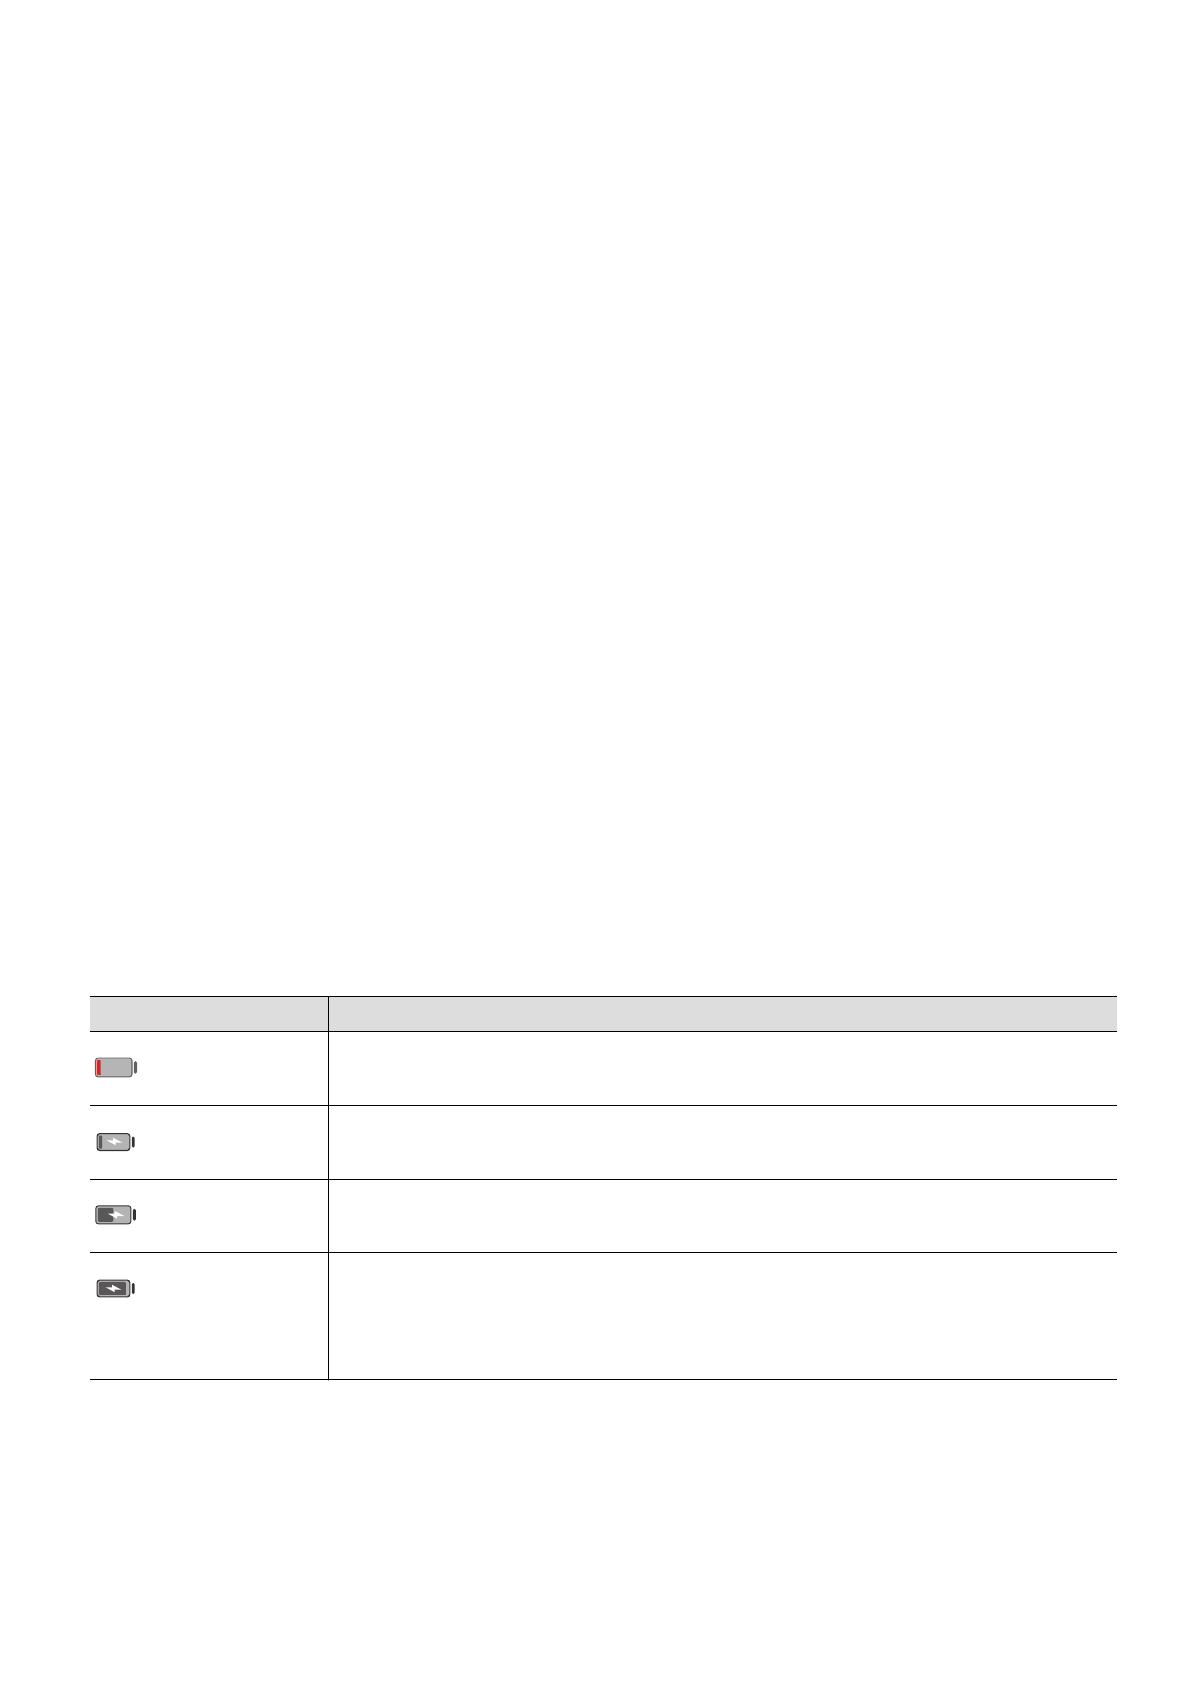
Overview of Battery Icons
You can check the battery level from the battery icon on the tablet screen.
Battery Icon Battery Level
Less than 4% battery remaining.
Charging, less than 10% battery remaining.
Charging, 10% to 90% battery remaining.
Charging, at least 90% battery remaining.
If 100% is display
ed next to the battery icon, or a charging complete
message is displayed on the lock screen, the battery is fully charged.
Reverse Charging with an OTG Cable
On-
The-Go (OTG) is a USB transmitting technology that allows a tablet to directly access les
on a USB ash drive or digital camera, or connect to an external device such as a keyboard or
mouse, with the help of an O
TG cable.
You can use your tablet to charge other devices using an OTG cable.
Essentials
12
1 Connect y
our tablet with the device to be charged using an OTG cable.
2 Swipe down from the status bar to open the notication panel, touch Settings > Touch
for more options, and then select Reverse charge.
3 Follow the onscreen instructions on the device to be charged to start charging.
Essentials
13
Smart Features
Huaw
ei Share
Huawei Share
Huawei Share is a wireless sharing technology that allows you to quickly transfer images,
videos, documents, and other types of les between devices. This technology uses Bluetooth
to disc
over nearby devices that supports Huawei Share and Wi-Fi Direct to transfer les
without using mobile data.
Enable or Disable Huawei Share
You can enable or disable Huawei Share in either of the following ways:
Swipe down from the status bar to open the notication panel, then touch
to enable
or disable Huaw
ei Share. Touch and hold the toggle to enter the Huawei Share settings
screen.
Go to
Settings > Mor
e connections > Huawei Share, and enable or disable Huawei
Share.
Enabling Huawei Share automatically turns on Wi-Fi and Bluetooth.
Quickly Share Files Between Your Tablets with Huawei Share
You can use Huawei Share to quickly share les between Huawei tablets. The recipient can
preview the les before they are sent, then view the full content of the les once they have
been received. For example, the recipient can view received pictures or videos in Gallery.
1 On the receiving device, enable Huawei Share.
2 On the sending device, touch and hold to select the les you want to share, then touch
. Touch Huaw
ei Share, then touch the icon of the receiving device to send the les.
These steps may be dierent if you are sharing les directly from an app.
3 On the r
eceiving device, touch Accept to accept the transfer.
To view the received les, go to Files, then go to Internal stor
age > Huawei Share on the
Categories tab.
Received pictures or videos can also be found in
Gallery > Albums > Huaw
ei Share.
Share Files Between Your Tablet and Computer with Huawei Share
You can use Huawei Share to quickly and easily share les wirelessly between your tablet and
a computer (Windows or macOS).
1 Make sure your tablet and computer are connected to the same Wi-Fi network.
14
2 On y
our tablet, go to the Huawei Share settings screen and enable Huawei Share and
Computer Share.
3 Make a note of the name displayed next to Name shown on computers and the user
name and password under Verication.
4 On the c
omputer, go to:
Windows: This PC (Computer) > Network.
macOS: Finder > Go to > Network.
Currently, this feature is only available on Macs running macOS 10.8 to 10.14.
5 On y
our computer, double-click the name of your tablet and enter the user name and
password noted down previously.
6 Open a shared folder on your tablet, such as the Internal storage or Album folder to view,
edit, or copy les from your tablet to your computer or vice versa.
Changes made to les in the shared folders on your computer will be automatically
sync
ed to your tablet and vice versa.
One-Touch Printing with Huawei Share
When a printer that supports Huawei Share is nearby, you can use Huawei Share to nd the
printer and print out pictures or PDF les stored on your tablet.
1 Depending on the type of printer, ensure the following:
Wi-Fi capable printers: The printer must be powered on and connected to the same
network as your tablet.
Wi-Fi Direct capable printers: The printer must be powered on and have Wi-Fi Direct
enabled.
Bluetooth capable printers: The printer must be powered on and discoverable via
Bluetooth.
2 On your tablet, preview the le to be printed, then go to Shar
e > Huawei Share.
3 Once the printer has been discovered, touch its name on your tablet, and adjust the
settings on the preview screen. Then, touch PRINT to print.
If you are connecting a Bluetooth printer to your tablet for the rst time, nd the printer
on your tablet, touch the printer name, then press and hold the Power button on the
printer for about 1 second to conrm the connection.
For a list of supported printers, touch Help on the Huaw
ei Share sharing screen, select
Printers, then touch What printers are supported?.
Smart Features
15
Camera and Gallery
Launch Camer
a
Launch Camera
There are multiple ways to open the Camera app.
From the Home Screen
From the home screen, open
Camera.
Fr
om the Lock Screen
When the screen is locked, turn on the screen, then swipe up on the camera icon in the lower
right corner to open the camera.
Take Photos
Take Photos
1 Open
Camera.
2 Y
ou can then:
Focus: Touch where you want to focus.
To adjust focus and metering separately, touch and hold the viewnder and drag the
individual frame or ring to the desired location.
Adjust brightness: Touch the viewnder. When the
symbol appears next to the
f
ocus frame, drag it up or down.
Zoom in or out: On the viewnder, pinch in or out, or drag the zoom slider.
Select a camera mode: Swipe left or right across the camera mode options.
Some features are only available when using the rear camera.
3 Touch
to take a photo.
T
ake Timed Photos
The camera timer allows you to set a time delay so you can get into position after you have
touched the shutter button.
1 Open
Camera.
2 Go to
> Timer and select a delay opt
ion.
16
3 Return to the viewnder and touch the shutter button. Your tablet will take a photo when
the c
ountdown ends.
Use Voice Commands to Take Photos
You can use your voice to take photos without having to touch the shutter button.
1 Open
Camera.
2 Go to > Audio c
ontrol, enable Audio control, and select an audio control option.
3 Go back to the viewnder, then say your command to take a photo.
Zoom to Take Photos
Take Photos with Various Zoom Settings
1 Open
Camera and select Photo mode.
2 Aim the camer
a at the distant object you want to take a photo of. Drag the zoom slider,
or pinch in or out to adjust the zoom level.
3 In the viewnder, touch where you want to focus. When the camera is in focus, touch
.
Take Panoramic Photos
Add breadth to your landscape or group photos with the Panorama feature. The camera
takes multiple photos of objects within your eld of view and stitches them together into a
single panor
amic photo.
Use the Rear Camera to Take Panoramic Photos
1 Go to
Camera > Mor
e and select Panorama mode.
2 Touch
at the bottom of the viewnder to set the pan direction.
3 P
oint the camera at your starting point, then touch
to start shooting.
4 Slo
wly move the camera in the direction of the arrow displayed on the screen. Keep your
tablet steady and the arrow on the center line the entire time.
5 Touch
when you are nished.
Take HDR Photos
Camera and Gallery
17
  • Page 1 1
  • Page 2 2
  • Page 3 3
  • Page 4 4
  • Page 5 5
  • Page 6 6
  • Page 7 7
  • Page 8 8
  • Page 9 9
  • Page 10 10
  • Page 11 11
  • Page 12 12
  • Page 13 13
  • Page 14 14
  • Page 15 15
  • Page 16 16
  • Page 17 17
  • Page 18 18
  • Page 19 19
  • Page 20 20
  • Page 21 21
  • Page 22 22
  • Page 23 23
  • Page 24 24
  • Page 25 25
  • Page 26 26
  • Page 27 27
  • Page 28 28
  • Page 29 29
  • Page 30 30
  • Page 31 31
  • Page 32 32
  • Page 33 33
  • Page 34 34
  • Page 35 35
  • Page 36 36
  • Page 37 37
  • Page 38 38
  • Page 39 39
  • Page 40 40
  • Page 41 41
  • Page 42 42
  • Page 43 43
  • Page 44 44
  • Page 45 45
  • Page 46 46
  • Page 47 47
  • Page 48 48
  • Page 49 49
  • Page 50 50
  • Page 51 51
  • Page 52 52
  • Page 53 53
  • Page 54 54
  • Page 55 55
  • Page 56 56
  • Page 57 57
  • Page 58 58
  • Page 59 59
  • Page 60 60
  • Page 61 61
  • Page 62 62
  • Page 63 63
  • Page 64 64
  • Page 65 65
  • Page 66 66
  • Page 67 67
  • Page 68 68
  • Page 69 69
  • Page 70 70
  • Page 71 71
  • Page 72 72
  • Page 73 73
  • Page 74 74
  • Page 75 75

Huawei MatePad T10s User manual

Category
Smartphones
Type
User manual

Ask a question and I''ll find the answer in the document

Finding information in a document is now easier with AI