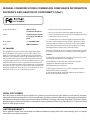
Behringer Headphones: Escape into a world of pure audio bliss with our wireless active noise-canceling headphones. Experience superior sound quality with deep bass and crystal-clear highs. Seamlessly connect to your Bluetooth devices and enjoy a stable connection for up to 10 meters. Activate noise cancellation to immerse yourself in your music or block out unwanted noise.
Behringer Headphones: Escape into a world of pure audio bliss with our wireless active noise-canceling headphones. Experience superior sound quality with deep bass and crystal-clear highs. Seamlessly connect to your Bluetooth devices and enjoy a stable connection for up to 10 meters. Activate noise cancellation to immerse yourself in your music or block out unwanted noise.


-
 1
1
-
 2
2
-
 3
3
-
 4
4
-
 5
5


Behringer Headphones User guide
- Type
- User guide
- This manual is also suitable for
Behringer Headphones: Escape into a world of pure audio bliss with our wireless active noise-canceling headphones. Experience superior sound quality with deep bass and crystal-clear highs. Seamlessly connect to your Bluetooth devices and enjoy a stable connection for up to 10 meters. Activate noise cancellation to immerse yourself in your music or block out unwanted noise.
Ask a question and I''ll find the answer in the document
Finding information in a document is now easier with AI
Related papers
-
Behringer Stereo Headphones 3-Multipack User manual
-
Behringer HO 66 Quick start guide
-
Behringer HLC 660M Quick start guide
-
-
-
Behringer HC 200 Quick start guide
-
-
Behringer HC 2000B User manual
-
-
Other documents
-
Jiangxi Sunwe Industrial SW-B69 User manual
-
 SHENZHEN QI SHENGLONG INDUSTRIALIST Y56QSLHD276 User manual
-
Silvercrest 398448 Owner's manual
-
Goodmans GHP04BT Quick start guide
-
 BlueHive Bluetunes Wireless ANC Headphones Owner's manual
-
Earbuds J08 Series Wireless Bluetooth User manual
-
 HANPURE Ecouteur Sommeil User manual
-
 SHENZHEN SHENGLAI TECHNOLOGY LUP052 Bluetooth Headphone User manual
-
Sennheiser M3AEBTXL User manual
-


