Page is loading ...
LASER PRINTER
User's Guide
MODEL: DX-B350P
DX-B450P


TOC-1
Contents
1 Introduction.............................................................................................................. 1-1
Conventions ....................................................................................................................................... 1-1
Safety Notes ...................................................................................................................................... 1-2
Printer Orientation.............................................................................................................................. 1-2
2 Getting to Know Your Printer................................................................................. 2-1
Components....................................................................................................................................... 2-1
Front View ....................................................................................................................................2-1
Rear View .....................................................................................................................................2-2
Internal Components .................................................................................................................... 2-3
Turning the Printer On and Off........................................................................................................... 2-4
Turning the Printer On ..................................................................................................................2-4
Turning the Printer Off.................................................................................................................. 2-4
Available Printer Drivers ..................................................................................................................... 2-4
Paper Usage....................................................................................................................................... 2-5
Paper Sizes ................................................................................................................................... 2-5
Custom Sizes .........................................................................................................................2-6
Paper Types .................................................................................................................................. 2-6
Printing Transparencies..........................................................................................................2-7
Printing Envelopes .................................................................................................................2-8
Printing Labels........................................................................................................................2-8
Available Paper ............................................................................................................................. 2-9
Unusable Paper ..........................................................................................................................2-11
Loading Paper .................................................................................................................................. 2-11
Loading Paper Larger Than A4/Letter Size In The Paper Tray .................................................... 2-14
Replacing the Toner Cartridge.......................................................................................................... 2-15
Power Save Mode............................................................................................................................ 2-17
Understanding Printing Options ....................................................................................................... 2-17
3 Operator Panel ......................................................................................................... 3-1
Operator Panel Features .................................................................................................................... 3-1
LCD Display .................................................................................................................................. 3-1
LED Indicators........................................................................................................................3-2
Push buttons .......................................................................................................................... 3-2
Navigating the Operator Panel Menus ......................................................................................... 3-3
Sample Navigation .................................................................................................................3-3
Printing a Configuration Summary ..................................................................................................... 3-4
Panel Lock.......................................................................................................................................... 3-4
Operator Panel Menus ....................................................................................................................... 3-5
Job Library Menu..........................................................................................................................3-5
Job Accounting Menu ..................................................................................................................3-5
Paper Menu .................................................................................................................................. 3-6
Interface Menu .............................................................................................................................3-8
PS Menu..................................................................................................................................... 3-13
PCL Menu...................................................................................................................................3-13
System Menu .............................................................................................................................3-15
Quality Menu ..............................................................................................................................3-16
Functions Menu..........................................................................................................................3-16
FLASH/Disk/CF Menu.................................................................................................................3-17
Date/Time Menu.........................................................................................................................3-17
Status Information ......................................................................................................................3-18
Understanding Page Counters ............................................................................................. 3-20

TOC-2 User’s Guide
4 Windows Operations ...............................................................................................4-1
Installing PCL5e and PostScript 3 Drivers ......................................................................................... 4-1
Setting Default Values ....................................................................................................................... 4-2
Printing a Test Page........................................................................................................................... 4-4
Cancelling Printing ............................................................................................................................. 4-5
Cancelling a Print Job at the Printer ............................................................................................. 4-5
Cancelling Print Jobs at the Computer......................................................................................... 4-5
Accessing the Driver from an Application ......................................................................................... 4-6
Navigating the Printer Properties Window ........................................................................................ 4-7
Saved Settings................................................................................................................................... 4-7
Main Tab............................................................................................................................................ 4-8
Selecting Number of Copies ........................................................................................................ 4-8
Collating Copies ........................................................................................................................... 4-9
Setting Image Orientation ............................................................................................................ 4-9
Output Destination....................................................................................................................... 4-9
Document Style (2-Sided Printing/Duplex) ................................................................................... 4-9
Poster Printing............................................................................................................................ 4-10
Multiple Pages to Single Sheet (N-up) ....................................................................................... 4-11
Finishing ..................................................................................................................................... 4-11
Job Offset .................................................................................................................................. 4-12
Paper Tab......................................................................................................................................... 4-12
Source ........................................................................................................................................ 4-12
Printing on Special Paper ........................................................................................................... 4-12
Selecting Paper Size................................................................................................................... 4-13
Custom Size Paper..................................................................................................................... 4-13
Cover Sheet Selection................................................................................................................ 4-13
Zoom Settings............................................................................................................................ 4-14
Auto Tray Change....................................................................................................................... 4-14
Media Check .............................................................................................................................. 4-14
Skip Blank Pages........................................................................................................................ 4-15
Manual Feed .............................................................................................................................. 4-16
Advanced Tab .................................................................................................................................. 4-16
Manual Adjustments .................................................................................................................. 4-16
Quality ........................................................................................................................................ 4-16
Overlay Options ......................................................................................................................... 4-16
Create Overlays ................................................................................................................... 4-16
Using Overlays .................................................................................................................... 4-17
Font Substitution........................................................................................................................ 4-17
Job Handling Tab ............................................................................................................................. 4-18
Job Accounting .......................................................................................................................... 4-18
Job Accounting Fields ......................................................................................................... 4-19
Job Retention and Storage......................................................................................................... 4-20
Hold Only............................................................................................................................. 4-21
Hold After Print.................................................................................................................... 4-21
Sample Print ........................................................................................................................ 4-21
Password/PIN ...................................................................................................................... 4-21
Watermark Tab ................................................................................................................................ 4-21
5 Macintosh Operations .............................................................................................5-1
Installing the Driver............................................................................................................................ 5-1
Accessing the Driver ......................................................................................................................... 5-3
Navigating the Driver ......................................................................................................................... 5-4
6 Embedded Web Server ............................................................................................6-1
Accessing the EWS ........................................................................................................................... 6-1
Navigating the EWS........................................................................................................................... 6-2
7 Networking...............................................................................................................7-1

User’s Guide TOC-3
Protocols ............................................................................................................................................ 7-1
Initial Setting of the Printer’s IP Address ........................................................................................... 7-1
Setting the IP Address through DHCP ................................................................................... 7-1
Setting the Network Configuration Manually ......................................................................... 7-2
Setting the IP Address through the Embedded Web Server ................................................. 7-2
Configuring the Driver ........................................................................................................................ 7-2
Printer Network Configuration ........................................................................................................... 7-3
Network Protocol Configuration ...................................................................................................7-3
I/O Port Configuration ...................................................................................................................7-3
Hub Link Speed/Duplex Configuration..........................................................................................7-3
Notifications ....................................................................................................................................... 7-4
IP Filtering .......................................................................................................................................... 7-4
IPv6 Implementation .......................................................................................................................... 7-5
Specifications ............................................................................................................................... 7-5
Operational Information ................................................................................................................7-5
SNMP................................................................................................................................................. 7-5
Supported Object Identifiers ........................................................................................................7-6
Traps.............................................................................................................................................7-6
Hewlett Packard Web Jet Administrative Compatibility ...............................................................7-6
SNMP Alerts.................................................................................................................................7-6
8 Accessories............................................................................................................... 8-1
Tray module (A4/Letter, 550 sheets).................................................................................................. 8-2
Installing/Uninstalling the Tray Module.........................................................................................8-2
Checking the contents of the tray module package .....................................................................8-2
Installing the Tray Module ............................................................................................................8-3
Uninstalling the Tray Module........................................................................................................ 8-7
Paper trays ....................................................................................................................................... 8-10
Paper tray (A4/Letter, 550 sheets)..............................................................................................8-10
Duplex module ................................................................................................................................. 8-10
Installing the Duplex Module......................................................................................................8-11
Uninstalling the Duplex Module ................................................................................................. 8-12
Offset Catch Tray ............................................................................................................................. 8-14
Installing/Uninstalling the Offset Catch Tray ..............................................................................8-15
Installing the Offset Catch Tray ..................................................................................................8-15
Uninstalling the Offset Catch Tray..............................................................................................8-18
Memory Expansion Module ............................................................................................................. 8-20
Hard Disk Drive ................................................................................................................................ 8-21
Compact Flash (CF) Card.................................................................................................................. 8-22
9 Troubleshooting....................................................................................................... 9-1
Poor Print Quality ............................................................................................................................... 9-2
Paper Is Output Blank or All Black................................................................................................9-2
Printout Is Faded, Stained, Missing, Wrinkled, or Blurred............................................................ 9-2
No Power ........................................................................................................................................... 9-6
Cannot Print ....................................................................................................................................... 9-6
Printing is Not Clear ........................................................................................................................... 9-7
Paper Incorrectly Fed ......................................................................................................................... 9-7
Noise .................................................................................................................................................. 9-8
Error and Warning Messages............................................................................................................. 9-8
Warning Messages.......................................................................................................................9-8
Error Messages ............................................................................................................................ 9-9
10 Clearing Paper Jams............................................................................................ 10-1
At the Paper Trays............................................................................................................................ 10-2
At the Fuser Unit.............................................................................................................................. 10-4
At the Toner Cartridge...................................................................................................................... 10-6
At the Duplex Module ...................................................................................................................... 10-8

TOC-4 User’s Guide
Duplex at the paper exit ............................................................................................................. 10-8
Duplex at the interior of the top cover ....................................................................................... 10-9
At the Offset Catch Tray................................................................................................................ 10-10
11 Windows Utilities.................................................................................................11-1
Font and Macro Manager Utility ...................................................................................................... 11-1
Status Monitor Utility....................................................................................................................... 11-2
PCL5 Tray Mapping Utility ............................................................................................................... 11-2
Direct PDF Utility ............................................................................................................................. 11-4

1-1
Chapter 1: Introduction
Thank you for selecting the DX-B350P/B450P Laser
printer. The DX-B350P prints 35 ppm on Letter paper and
34 ppm on A4 paper. The DX-B450P prints 45 ppm on
Letter paper and 43 ppm on A4 paper. This guide contains
all of the information necessary to operate and care for
your printer and accessories. It is intended to be used after
the printer is installed. See the Installation Manual supplied
in the box for installation instructions.
Conventions
The following conventions are used throughout this guide
to emphasize certain procedures or information.
NOTE: A note is a tip or extra information that may be helpful
in installing or using the printer.
CAUTION: A caution message provides
information that may help you avoid equipment
damage, process failure, or inconvenience. Read all
caution messages carefully.
WARNING! A warning message indicates the
possibility of personal injury if a specific procedure
is not performed exactly as described in the guide.
Pay close attention to these sections and read them
fully to prevent possible injury.
In this Chapter...
• Conventions
• Safety Notes
• Printer Orientation
1-2 User’s Guide
Safety Notes
Introduction
Safety Notes
For your own safety, please read these carefully before using the machine.
• Do not place the machine in a hot, humid, dusty, or poorly ventilated environment.
Prolonged exposure to these adverse conditions can cause fire or electric shock.
• Do not place the machine near heaters or volatile, flammable, or combustible materials,
such as curtains, that may catch fire.
Printer Orientation
Throughout this guide, the four sides of the printer are referred to as front, rear, right, and left.
LEFT
FRONT
RIGHT
REAR
2-1
Chapter 2: Getting to Know Your Printer
Components
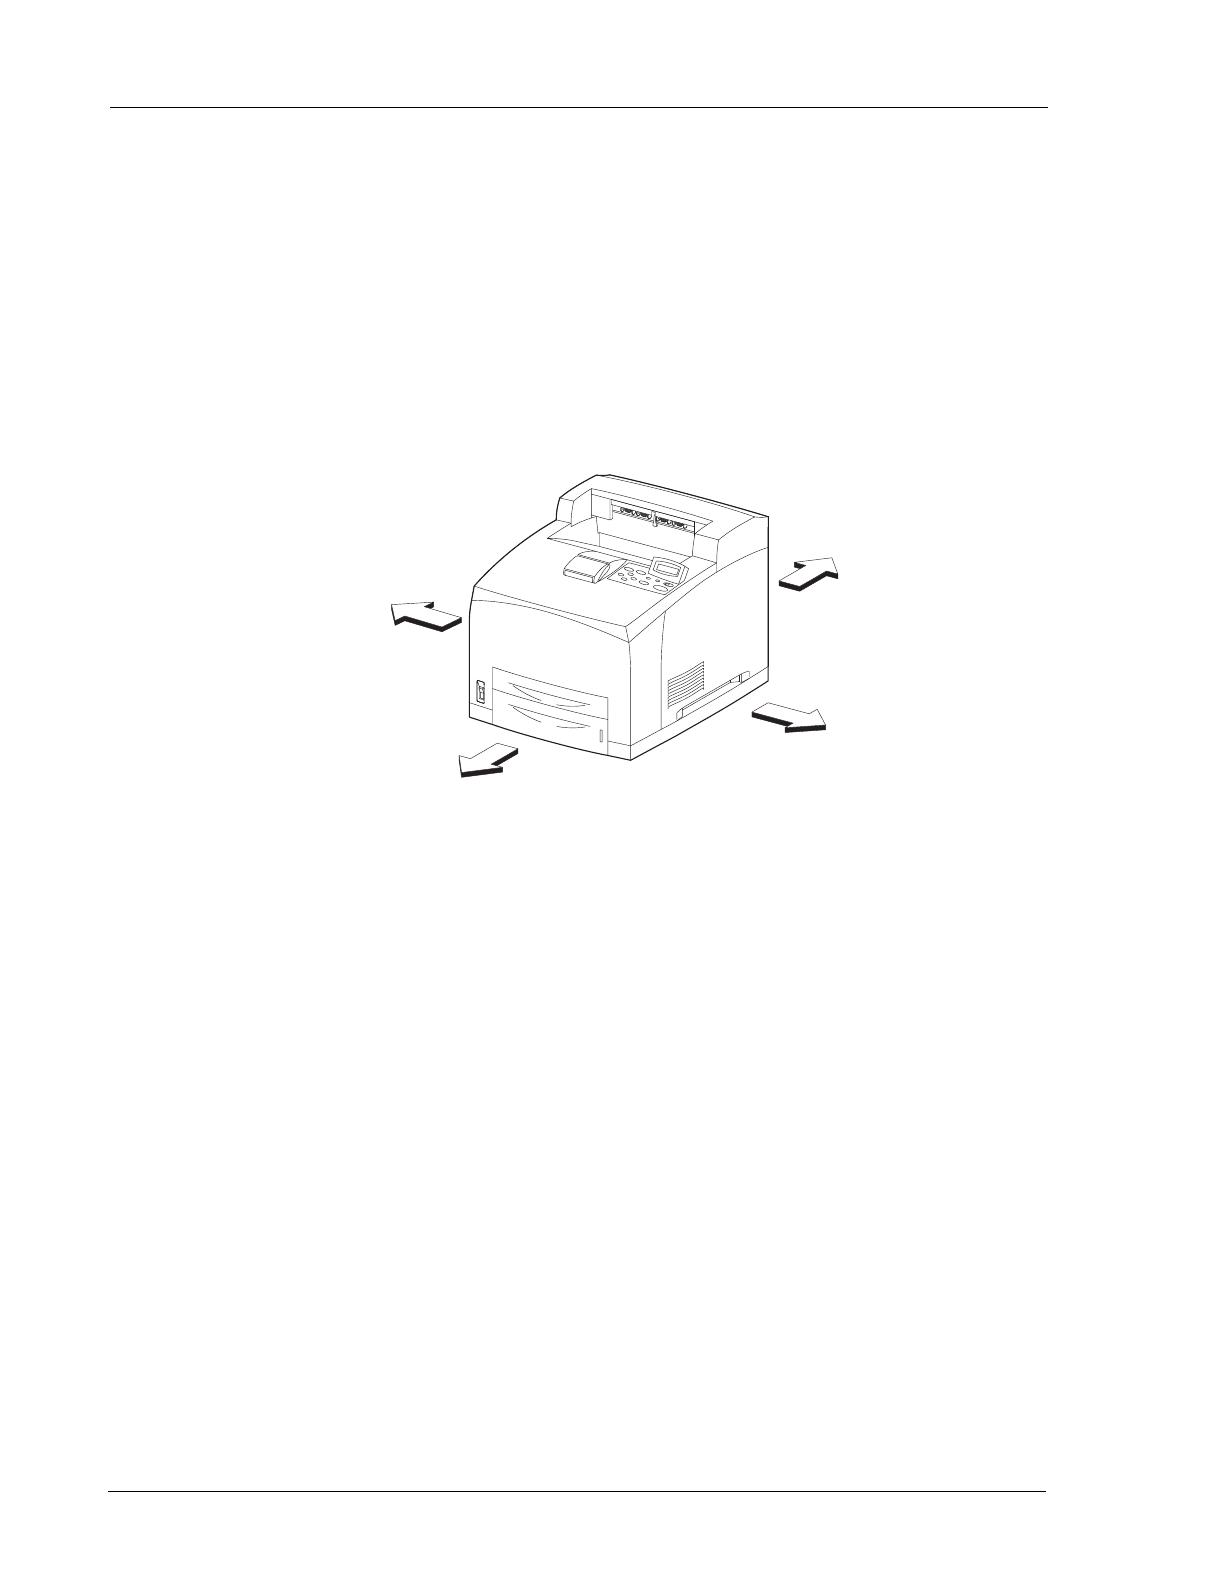
Front View
No. Name
1Paper Stop
2 Operator Panel
3 Tray 1 - Capacity is 150 sheets 20 lb. (75 gsm) paper
4Power Switch
5 Tray 2 - Capacity is 550 sheets 20 lb. (75 gsm) paper
6 Tray 3 (Optional Tray Module) - Capacity is 550 sheets 20 lb. (75 gsm) paper
7 Tray 4 (Optional Tray Module) - Capacity is 550 sheets 20 lb. (75 gsm) paper
8 Paper Gauge
9 Access panel for installation of Memory, Hard Disk (HDD), and Compact Flash.
10 Standard Output Tray - Capacity is 500 sheets 20 lb. (75 gsm) paper
11 Offset Catch Tray (Optional) - Capacity is 500 sheets 20 lb. (75 gsm) paper
12 Toner Cartridge
1
2
3
4
5
6
7
8
9
10
12
11
In this Chapter...
• Components
• Turning the Printer
On and Off
• Available Printer
Drivers
• Paper Usage
• Loading Paper
• Replacing the
Toner Cartridge
• Power Save Mode
• Understanding
Printing Options

2-2 User’s Guide
Components
Getting to Know Your Printer
The maximum paper capacity with all options installed is 1800 sheets of 20 lb. (75 gsm) paper.
The label in each paper tray indicates the maximum stacking capacity for certain paper types.
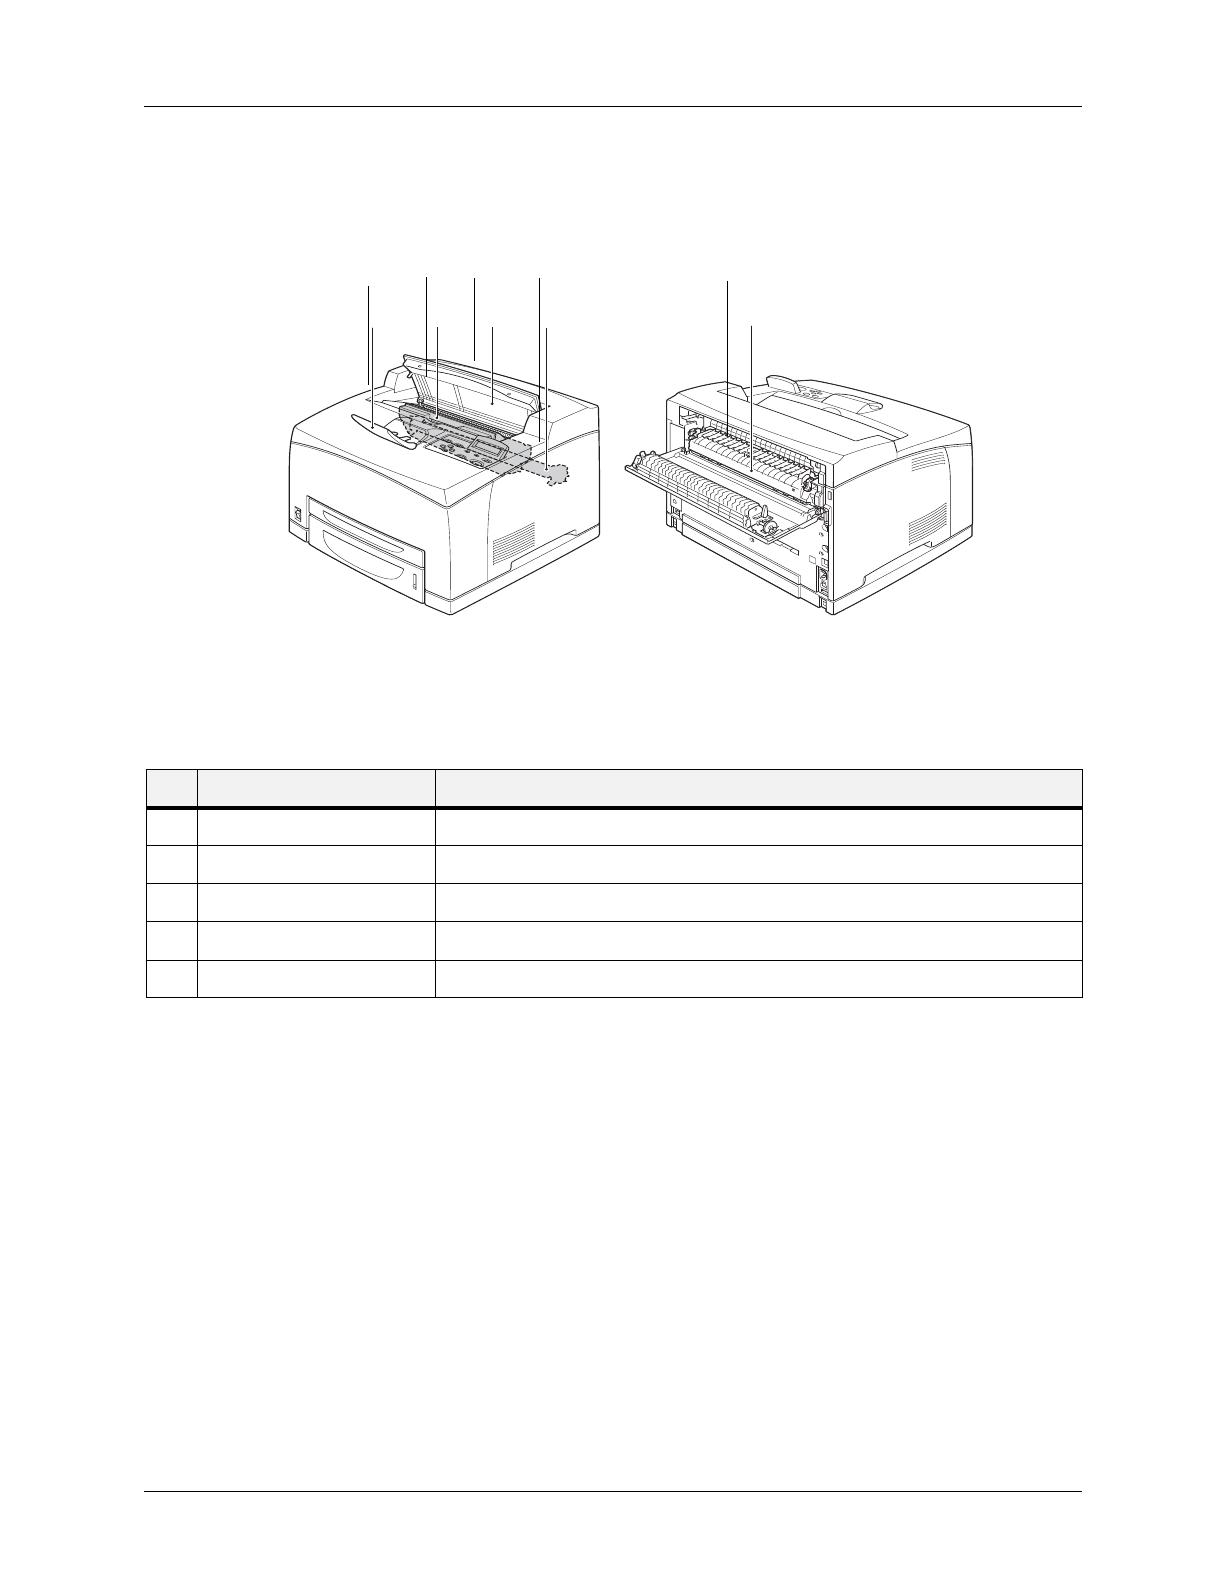
Rear View
Data I/O connector settings can be configured via the Operator Panel’s Interface Menu. There
are settings for each of the I/O ports including IEEE-1284, USB2, Serial RS-232, and Ethernet.
No. Name
1 USB 2
2 Serial RS-232
3 Ethernet 10/100 Base-Tx
4 IEEE 1284 Parallel
5 Power Receptacle
6 Optional Duplex Module
7 Rear Cover, access to Fuser
8 Offset Catch Tray Rear Cover
Tray 1
Tray 2
1
2
3
4
5
6
7
8
User’s Guide 2-3
Components
Getting to Know Your Printer
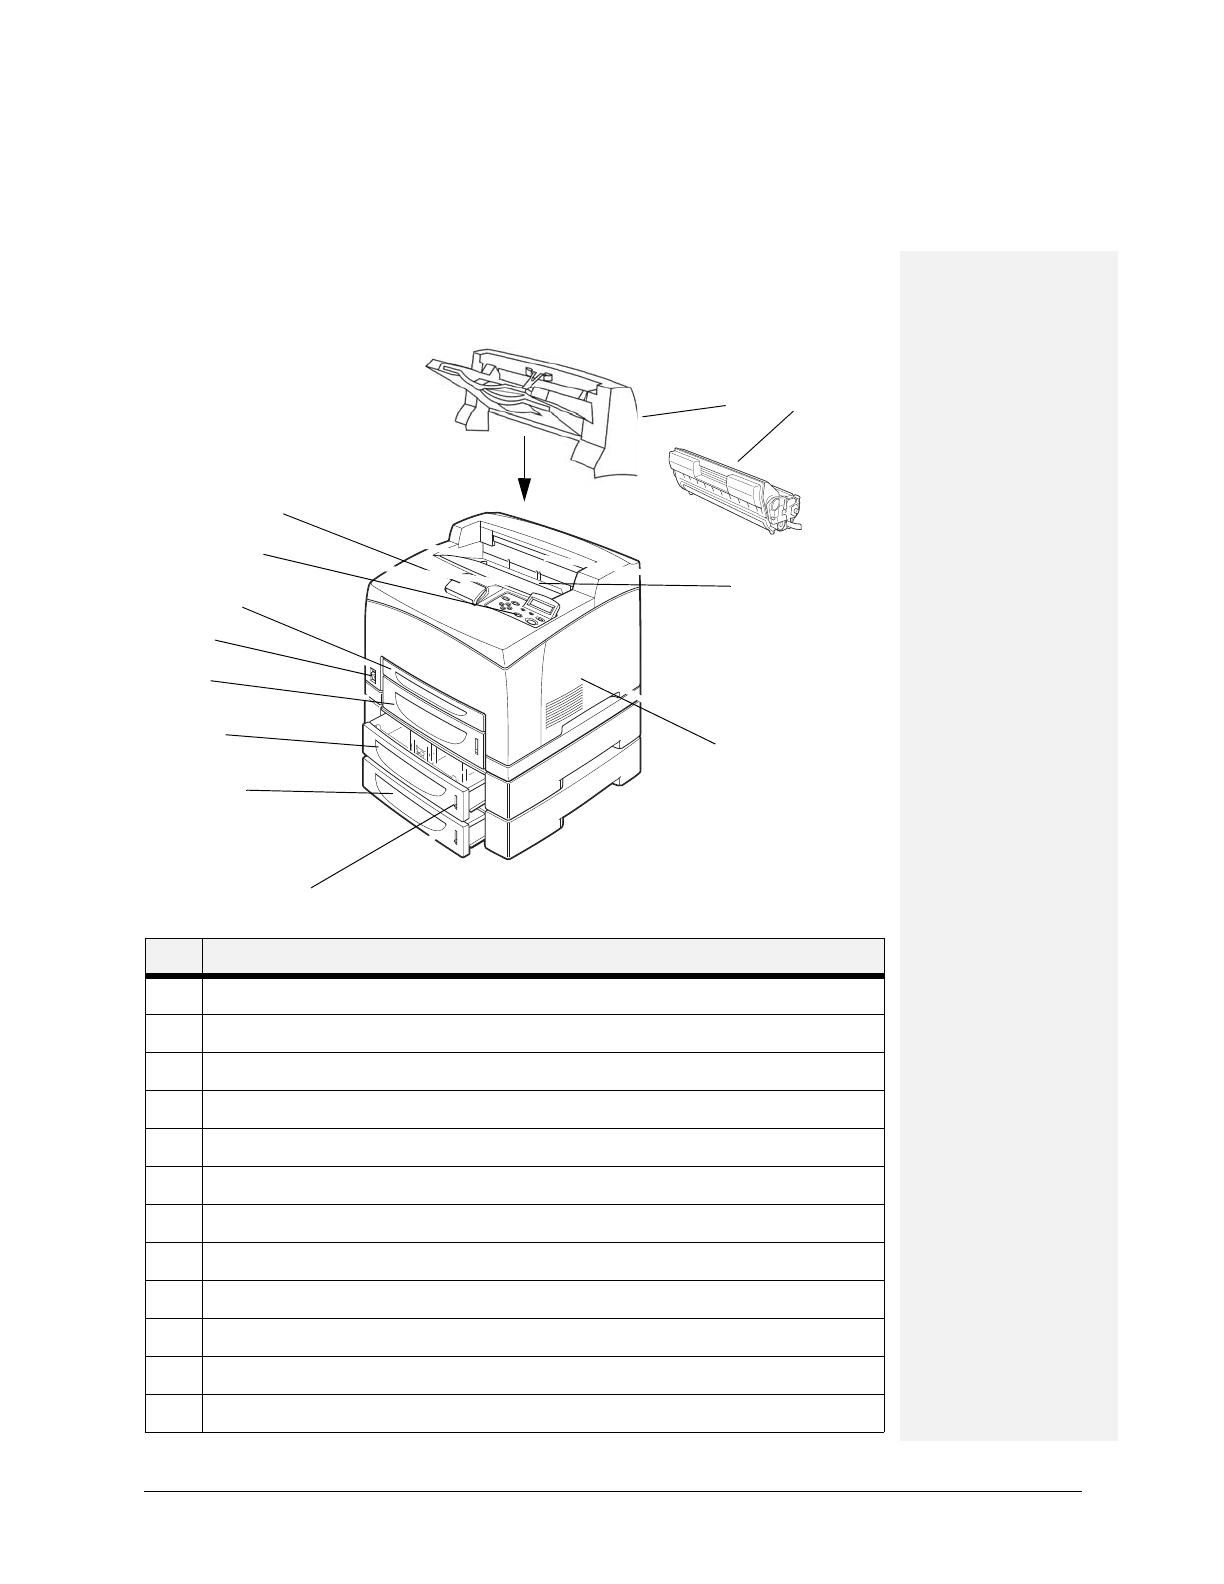
Internal Components
1
2
35
4
45123
No. Name Description
1 Paper Stop Raise this when printing on paper larger than A4/Letter size.
2 Toner Cartridge Contains the toner and the photosensitive drum.
3 Top Cover Open this when replacing the Toner Cartridge and removing jammed paper.
4 Fuser Unit Fixes the toner on the paper. Do not touch this when using the printer as it is hot.
5 Transfer Roll Cartridge Transfers the toner image on the surface of the photosensitive drum to the paper.
2-4 User’s Guide
Turning the Printer On and Off
Getting to Know Your Printer
Turning the Printer On and Off
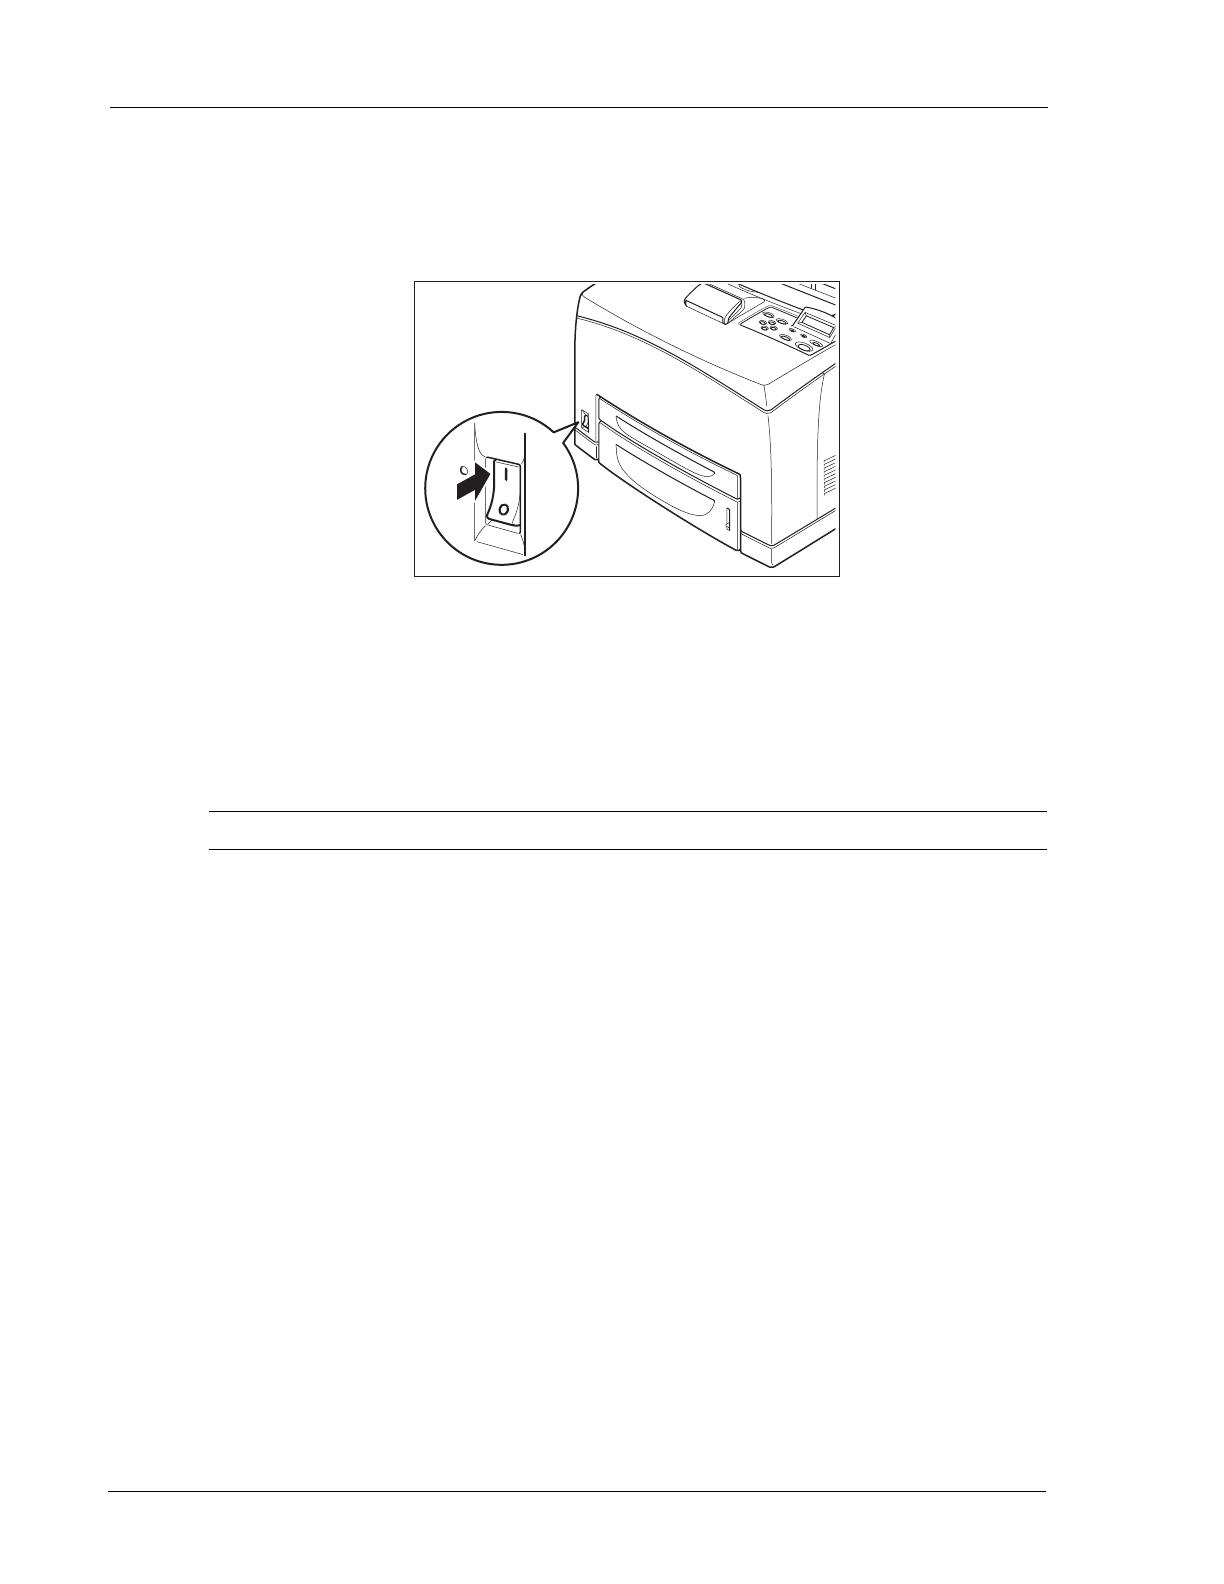
Turning the Printer On
1. Press the power switch to the <I> position to turn the power on.
Turning the Printer Off
1. Make sure that the printer is not processing a print job.
2. Press the power switch to the <> position to turn the power off.
Remember to turn off the printer at the end of the day or when the printer will not be used for an
extended period of time.
NOTE: When the printer is turned off, all print data still in memory will be erased.
Available Printer Drivers
Drivers are available for the following Microsoft Windows operating systems: Vista 32/64, XP
32/64, Server 2003 32/64, Server 2008 32/64, NT 4, and 98. Drivers for the following Page
Description Languages (PDLs) are available for each of the above operating systems:
• PostScript 3
•PCL5e
•PCL6
The printer contains PCL5c, PCL6, and Adobe® PostScript® 3™ printer languages.
PPDs are provided for Mac OS X (10.2 - 10.5) on the installation CD.

User’s Guide 2-5
Paper Usage
Getting to Know Your Printer
Paper Usage
This section describes available paper sizes, paper types, recommended papers, unusable paper,
and which paper types and sizes can be used in which trays.
NOTE: GSM indicates the weight of a 1 m
2
sheet of paper in grams per square meter.
Paper Sizes
The printer supports the following standard paper sizes. All standard sizes listed can be printed
from all four input trays and output to the Standard Output Tray or the optional Offset Catch
Tray.
*These sizes are automatically sensed by the printer. If you want to use a size that is not auto
sensed, you must select the size on the Operator Panel. See section “Paper Menu” on page 3-6.
Using paper that is not suitable for this printer might lead to paper jams or poor print
quality. To make full use of the printer features, use only paper that is recommended in
the recommended paper table.
Paper Sizes
Letter (8.5 x 11in)*
Legal (8.5 x 14in)*
Legal13 (8.5 x 13in)*
Executive (7.25 x 10.5in)*
Invoice (5.5 x 8.5in)
COM9 (3.875 x 8.875in)
COM10 (4.125 x 9.5in)
Monarch (3.875 x 7.5in)
A4 (210 x 297mm)*
A5 (148 x 210mm)*
A6 (105 x 148mm)
B5 (182 x 257mm)*
C5 (162 x 229mm)
DL (110 x 220mm)
Custom

2-6 User’s Guide
Paper Usage
Getting to Know Your Printer
Custom Sizes
In addition to the standard sizes of paper you can use, you can also print on custom size paper
from any tray. The custom size paper must meet the following guidelines.
• All Custom sizes must be fed short edge first.
• Paper smaller than 3 in by 5 in (76.2 mm by 127.0 mm) or larger than 8.5 in by 14 in
(215.9 mm by 355.6 mm) cannot be printed.
• Paper smaller than 3.5 in by 5.5 in (88.9 mm by 139.7 mm) must be printed from Tray 1
and cannot be duplexed or output to the Offset Catch Tray.
Insert paper in the tray so the side to be printed is facing up and the short edge of the paper goes
into the printer first. On the Operator Panel, use the Paper>Media Size/Type Menu to set
Auto-Sense OFF and then set Custom Size for the intended tray. Then use your application
software printer driver to send data to be printed on the installed custom size paper. See section
“Custom Size Paper” on page 4-14.When using the EWS, turn Auto-Sense OFF and press
Submit to gain access to Custom Size settings.
Paper Types
The printer supports the following paper types
Paper Types Fuser Mode Restrictions
Plain (64-105 gsm DX-B350P)
(68-105 gsm DX-B450P)
Normal None
Transparency
Transparency No duplex
Half speed on DX-B450P
Pre-Punched
Normal None
Letter Head
Normal None
Color
Normal None
Pre-Printed
Normal None
Bond
Thick1 None
Labels
Thick1 No duplex
Cardstock
Thick2 No duplex
Postcard
Thick1 None
Envelope
Thick1 for DX-B350P
Thick3 for DX-B450P
No duplex
Half speed on DX-B450P
Thick 1 (106-159 gsm)
Thick1 None
Thick 2 (160-216 gsm)
Thick2 None

User’s Guide 2-7
Paper Usage
Getting to Know Your Printer
You should set your printer Media Type to Thick1 or any of the other paper types that use
Thick1 fuser mode for any paper that is from 106 gsm to 159 gsm. If your paper is 160 gsm to
216 gsm, you should set your printer Media Type to Thick2 or Cardstock. If you do not get
satisfactory results using Thick1 or Thick2 on some paper types with rough or uneven surfaces,
it is possible you will get improved results using Thick3 on the DX-B450P because of the lower
fuser temperature and slower paper speed in the printer.
The fuser temperature progression is
DX-B350P:
(Low) Transparency Normal Thick1 Thick2 (High) and
DX-B450P:
(Low) Transparency Thin Thick3 Normal Thick1 Thick2 (Low)
Printing Transparencies
Transparencies can be printed from all trays, but they can not be printed on two sides using the
Duplex Module. Only use transparencies designed for laser printers so they can withstand the
heat required for fusing. It is possible to damage your printer by using unsupported
transparencies.
Loading transparencies into the trays:
1. Remove the tray from the printer.
2. Remove all paper from a tray before loading transparencies.
3. Fan the stack of new transparencies before putting them in the tray.
4. Insert the transparencies into the tray.
Place the transparencies in the input tray with the side to be printed facing up. Do not fully
load a tray with transparencies. The printer supports loading 100 transparencies or less in
a tray. Handle them by the edges with both hands and avoid getting fingerprints and
creases on them.
5. Adjust the paper guides to fit the transparencies.
6. Insert the tray firmly into the printer.
7. Using the Operator Panel or EWS, select the Transparency Media Type and correct Media
Size for the tray to be used.
Thick 3 DX-B450P only
Thick3 No duplex
Half Speed on DX-B450P
Not available on DX-B350P
Thin (64-67 gsm) DX-B450P only
Thin Not available on DX-B350P
Paper Types Fuser Mode Restrictions
Eliminate line space
Eliminate line space

2-8 User’s Guide
Paper Usage
Getting to Know Your Printer
8. In the printer driver or the computer application program, select Transparency as the
paper type you wish to use.
Printing Envelopes
Envelopes can be printed from all trays. There are 5 sizes of standard envelopes that can be
used. They are COM10, COM9, C5, Monarch, and DL. All other envelope sizes must be
specified as custom size. Only use envelopes designed for use in laser printers. The heat from
the fuser can melt some adhesives and possible damage your printer.
Loading envelopes into the trays:
1. Remove the tray from the printer.
2. Insert the envelopes into the tray.
3. Adjust the paper guides to fit the envelopes.
All sizes of envelopes go in all trays with the printing side up, “flap-side down”, and the
top of the envelopes toward the right side of the printer.
Do not load more than 15 envelopes in Tray 1 or more than 80 in Trays 2 – 4.
4. Insert the tray firmly into the printer.
5. Using the Operator Panel or EWS, select the Envelope Media Type and correct Media
Size for the tray to be used.
6. In the printer driver or the computer application program, select Envelope as the paper
type you wish to use, and select the size and orientation of the image to be printed.
Printing Labels
Labels can be printed from any tray. Use labels that were designed for use in laser printers. See
section “Available Paper” on page 2-9 for recommendations.
Insert the labels into the tray and adjust the guides to fit the sheets. Place the side to be printed
facing up and the top of the sheets to be fed into the printer first. Do not load more than 100
label sheets in Tray 1 or more than 290 in Tray 2 – 4, and do not fill any tray above the fill line
marked inside the tray.
Use the Operator Panel Paper>Media Size/Type Menu to select the Label Media Type and size
for the tray in use. Then use your computer’s application software to print the labels. See
section “Printing on Special Paper” on page 4-13 for further detail about using your computer
to print labels.
Caution: Never use padded envelopes or those with windows or metal clasps. These
can damage your printer.

User’s Guide 2-9
Paper Usage
Getting to Know Your Printer
Available Paper
The following table describes common brands of paper and other media that are supported for
this printer.
Paper Type Paper Name Weight (gsm) Size Part Number
Plain, Pre-Punched, Letter, Color, Pre-Printed
Xerox 4200DP 20lb 75 Letter 3R2047
Xerox RX80 Premier 80 A4 3R91720
Hammermill Photo White 105 Letter 10246-7
Hammermill Fore MP 90 Legal 10127-9
Multicopy Nymolla 100 A4 AMA157091
Xerox Premier80 80 A5 3R91832
FX Green100 70 A4 V883
Berga Focus 80 A4 67393
Hammermill Tidal MP 75 Letter 16200-8
Boise Cascade 75 Letter P10X9001
Steinbeis Recycled 80 A4 3R91165
Wiggins Teape Conqueror 90 A4 CON90F
Xerox RX90 90 A4 3R91854
Envelope
COM10 Envelope, Action 75 COM10 43687
DL Envelope, Autofil 80 DL JB04122
C5 Envelope, Autofil 80 C5 JB1933
COM 9 Columbia 75 COM9 WEVCO115
Labels
30up Paper Label Label Letter 5160
Xerox 24up Paper Label Label A4 3R96178
Xerox 24 cut Label Label A4 3R97408
Transparency
Clear Transparency Transparency A4 V516
3M Transparency(CG3300) Transparency Letter CG3300 LT
Xerox Permanent Stripe Transparency Transparency Letter 3R2780
Xerox Paper Backed Transparency Transparency Letter 3R3028
Xerox Clear Transparency Transparency A4 3R96002

2-10 User’s Guide
Paper Usage
Getting to Know Your Printer
3M Transparency(CG3300) A4 Transparency A4 CG3300 A4
Postcard
Xerox Postcard Premier TCF160 CUT 160 A6 3R91798A
Thick 1, Thick 2, and Thick 3
Xerox Premier200gsm 200 A4 3R93011
Oxford Index Card 200 3 by 5 40801
Xerox 65lb Cover Stock 176 Letter 3R3041
Springhill 110lb Index 203 Letter 15445
Xerox Premier160gsm(Premier TCF160) 160 A4 3R91798
Classic Crest Super Smooth 216 Letter NEE04631
Shiraoi 156 A4 DK245
Xerox Color Expressions 120 Letter 3R11540
Xerox 4200 DP Bond 75 A4 3R2594
Xerox 4200 DP Bond 75 letter 3R2047
Cardstock.
Xerox Premier200gsm 200 A4 3R93011
Oxford Index Card 200 3 by 5 40801
Xerox 65lb Cover Stock 176 Letter 3R3041
Springhill 110lb Index 203 Letter 15445
Bond
Xerox Color Expressions 120 Letter 3R11540
Xerox 4200 DP Bond 75 A4 3R2594
Xerox 4200 DP Bond 75 letter 3R2047
Thin (DX-B450P)
EP_R 64 B5 V632
Paper Type Paper Name Weight (gsm) Size Part Number
User’s Guide 2-11
Loading Paper
Getting to Know Your Printer
Unusable Paper
Using the following types of paper might cause paper jams, malfunctions or damage to the
printer. Do not use these types of paper.
• Full-color transparencies
• Paper that is too thick or thin
• Paper that has been printed on before (including color printing)
• Wrinkled, folded, or torn paper
•Wet paper
• Curled paper
• Paper with static electricity
• Adhesive paper
• Postcards with pictures
• Paper with special coatings that may be melted by hot fusing temperatures
• Treated colored paper
• Paper using ink that will run at a temperature of 150 °C
• Heat sensitive paper
• Carbon paper
• Paper with staples, paper clips, ribbons, or tape
• Paper with rough surfaces such as pulp paper or fibrous paper
• If acid paper is used, the characters might appear fuzzy. Replace it with alkaline paper.
• Envelopes with windows or metal fasteners
• Labels which do not fully cover the adhesive backing
• Transparencies which are not designed for laser printers (i.e., inkjet transparencies)
• Paper that cannot be heated.
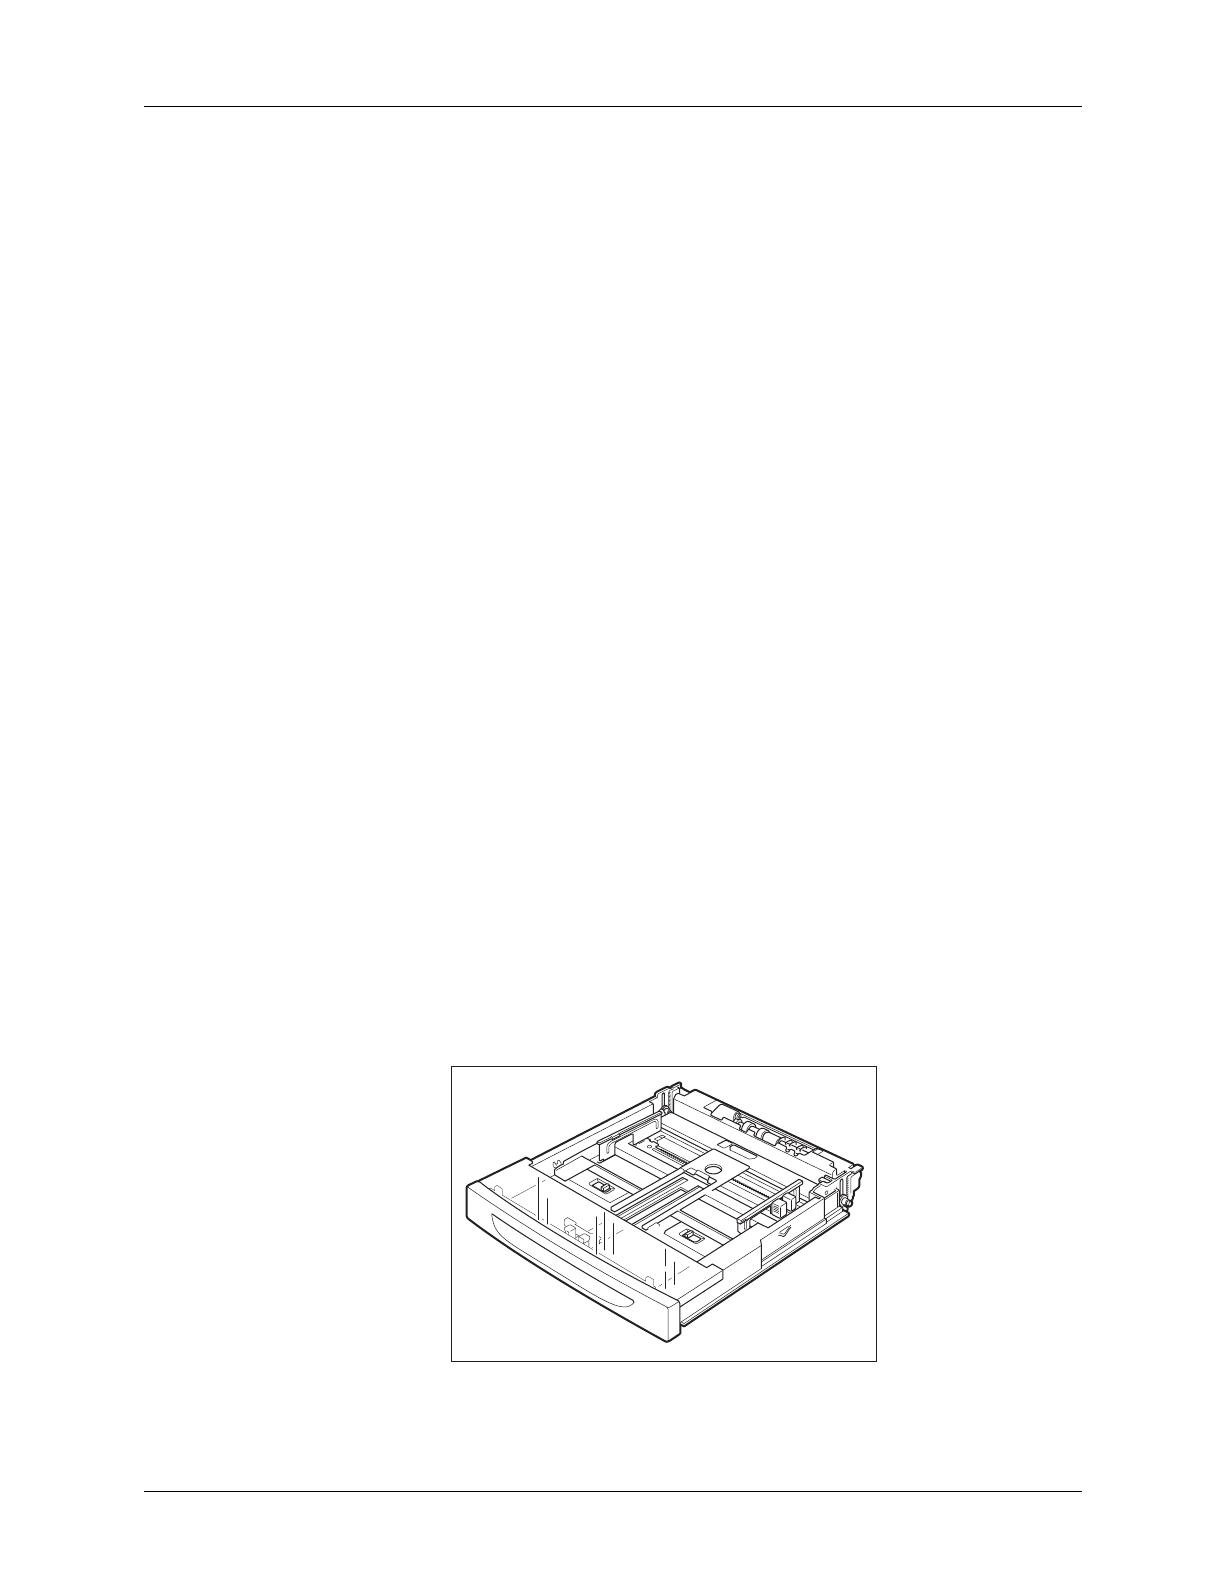
Loading Paper
1. Place the paper tray on a flat surface.
2-12 User’s Guide
Loading Paper
Getting to Know Your Printer
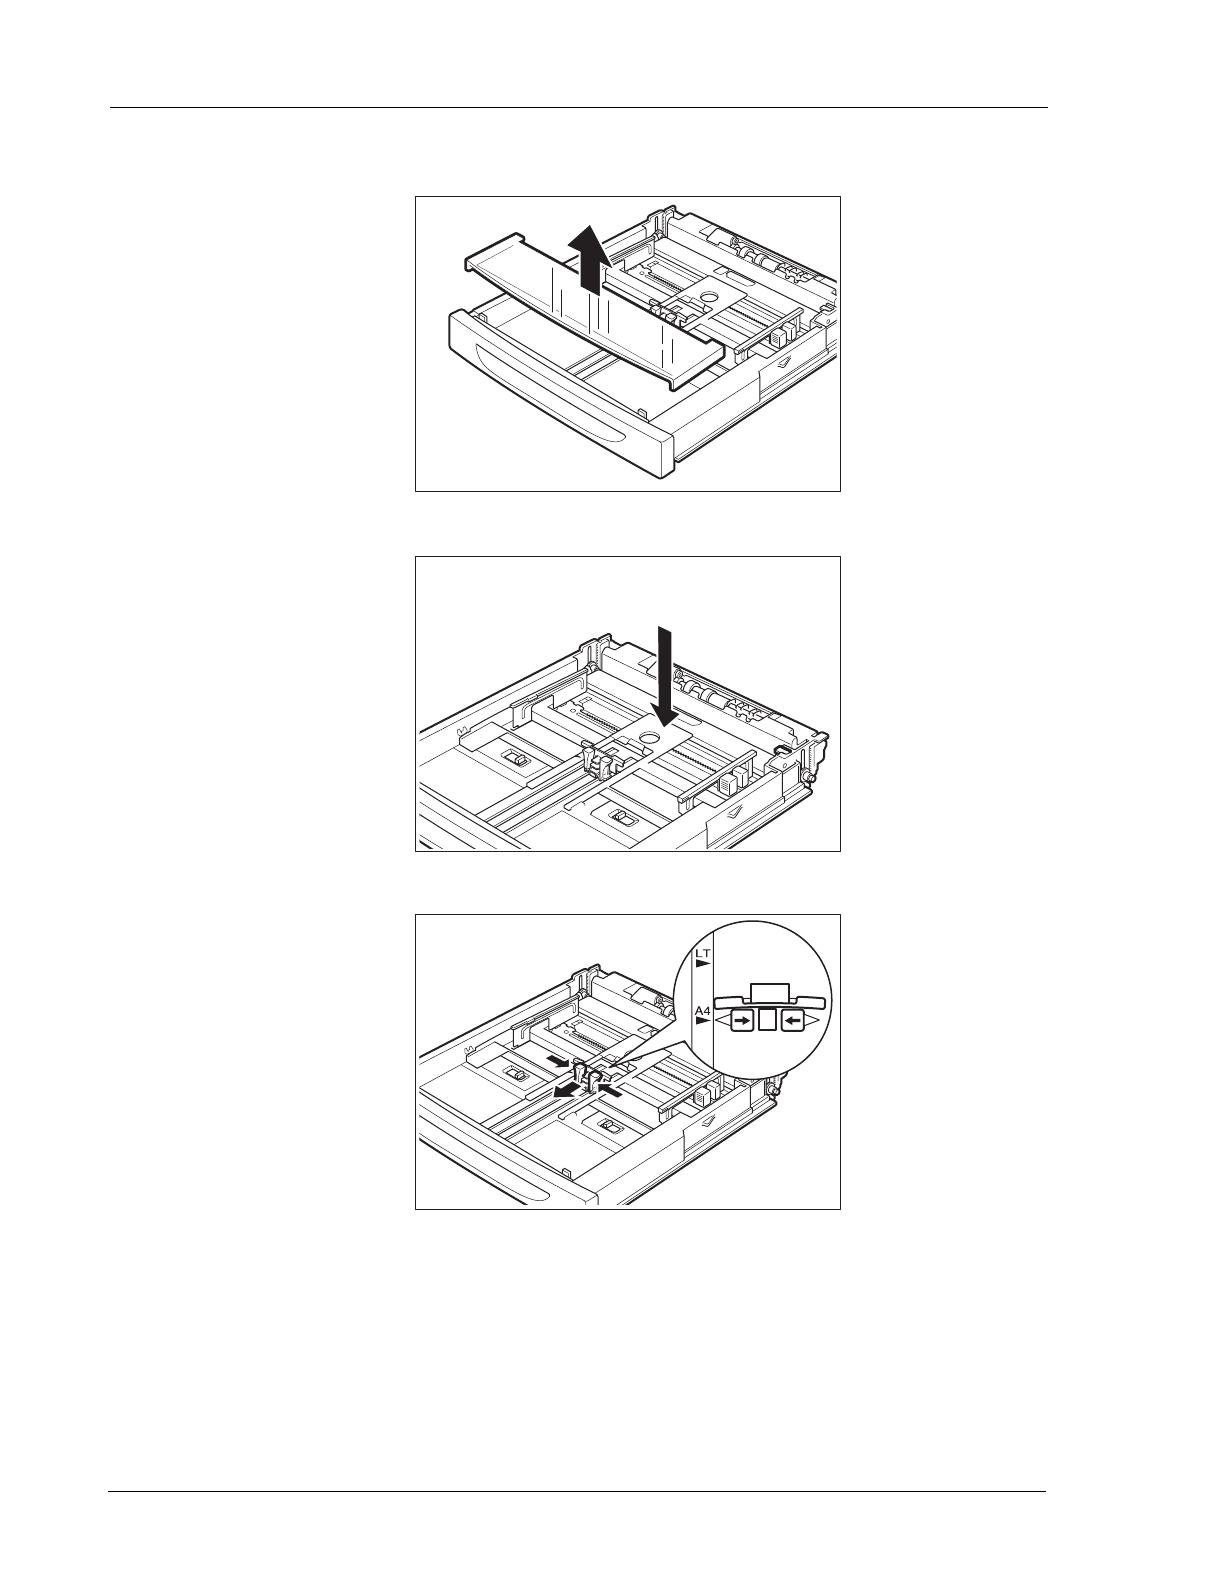
2. Remove the lid.
3. If the base plate of the paper tray is raised, push it down.
4. Squeeze the length guide and slide it to the desired paper size.
/
