Heavy Duty
Commercial
Upright
Vacuum Cleaner
Owner’s Guide
ZC880 Series
Index
Important Safeguards .........................2
Service Information .............................4
Assemble ............................................5
Use ......................................................7
Dust Bag .............................................8
Brush Roll Belt ....................................9
Brush Roll ..........................................10
Headlight ...........................................11
IMPORTANT
For any advice and
to order filters and
accessories
on your cleaner,
please telephone
Customer Care
08706 055055
www.electrolux.com

IMPORTANT SAFEGUARDS
When using an electrical appliance, basic precautions should always be followed, including
the following:
READ ALL INSTRUCTIONS BEFORE USING THIS VACUUM CLEANER.
WARNING
To reduce the risk of fire, electric shock, or injury:
• Do not use outdoors or on wet surfaces.
• Do not leave vacuum cleaner when plugged in. Turn off the switch and unplug the
electrical cord when not in use and before servicing.
• Do not allow to be used as a toy. Close attention is necessary when used by or near
children.
• Use only as described in this manual. Use only manufacturer’s recommended
attachments.
• Do not use with damaged cord or plug. If vacuum cleaner is not working as it should,
has been dropped, damaged, left outdoors, or dropped into water, return it to a service
center before using.
• Do not pull or carry by cord, use cord as a handle, close door on cord, or pull cord
around sharp edges or corners. Do not run vacuum cleaner over cord. Keep cord away
from heated surfaces.
• Connect to properly grounded outlet only. (Refer to Grounding Instructions.)
• Do not use extension cords or outlets with inadequate current carrying capacity.
• Turn off all controls before unplugging.
• Do not unplug by pulling on cord. To unplug, grasp the plug, not the cord.
• Do not handle plug or vacuum cleaner with wet hands.
• Do not put any object into openings. Do not use with any opening blocked; keep free
of dust, lint, hair, and anything that may reduce airflow.
• This vacuum cleaner creates suction and contains a revolving brush roll. Keep hair,
loose clothing, fingers, and all parts of body away from openings and moving parts.
• Do not pick up anything that is burning or smoking, such as cigarettes, matches, or hot
ashes.
• Do not use without dust bag in place.
• Use extra care when cleaning on stairs.
• Belt pulleys can become hot during normal use. To prevent burns, avoid touching the
belt pulley when servicing the drive belt.
• Do not use to pick up flammable or combustible liquids such as gasoline, or use in
areas where they may be present.
• Store your cleaner indoors in a cool, dry area.
• Keep your work area well lighted.
• Unplug electrical appliances before vacuuming them.
SAVE THESE INSTRUCTIONS
2

3
BEFORE YOU START
CHECK THE VOLTAGE
First check the voltage shown on the data plate (see rear view) to make sure that the cleaner is of the correct
voltage for your electricity supply. If it is not, do not use the cleaner but refer back to your dealer.
CONNECTING TO YOUR ELECTRICITY SUPPLY
Permanently connected to the cleaner is a mains supply (3-core) cable fitted with a non-rewirable plug incorporating
a 13A fuse.
In the event of the fuse requiring replacement the fuse cover should be removed using a small screwdriver. The old fuse
MUST be replaced by a 13A ASTA approved BS1362 fuse or a BSI approved fuse. The cover must be replaced before
the plug is used again. In the event of loss of the fuse cover, replacements can be obtained from your Electrolux dealer
or Electrical Retailers and must be of the same colour as indicated by the coloured insert on the base of the plug.
If difficulty is experienced in obtaining a replacement, contact Electrolux on 08706 055055.
In no circumstances must the plug be used without a correct fuse cover fitted.
If the plug that is fitted to your appliance is not suitable for your socket outlet, it must be cut off and the appropriate
plug fitted.
Remove the fuse from the cut off plug.
The cut off plug should then be disposed of to prevent the hazard of shocks in case it should be plugged into a 13
amp socket in another part of your home.
The wires in the mains cable of this appliance are coloured in accordance with the following code: Blue: Neutral.
Brown: Live. Green/Yellow: Earth.
As the colours of the wires in the mains cable of this appliance may not correspond with the coloured markings
identifying the terminals in your plug, proceed as follows:
The wire which is coloured blue must be connected to the terminal which is marked with the letter N or coloured
black.
The wire which is coloured brown must be connected to the terminal which is marked with the letter L or
coloured red.
The wire which is coloured yellow and green must be connected to the terminal which is marked with a letter E or
coloured yellow and green.
It is in your interest to ensure that the plug is correctly attached to the mains cable. In case of doubt, have it done
by a qualified electrician, as Electrolux cannot regard the repair of faults on the plug connection as a service that
can be given free of charge under the terms of the guarantee.
WARNING
If the mains supply cable becomes damaged during cleaning the following action should be taken:
1. Switch off and remove the plug from the socket outlet.
2. Examine the mains supply cable for damage (only after removing the plug from the socket outlet).
3. If there is any sign of damage to the supply cable it MUST be renewed. The repair MUST be carried out by
Electrolux Service Staff or a similar qualified person.
4. NEVER use the machine with a damaged mains supply cable.
The wire which is coloured yellow and green must be connected to the terminal which is marked with a letter E or
coloured yellow and green.
Fuse Cover
Fuse
Blue
Brown
Cord Clamp
13 Amp Fuse
Yellow and
Green

DO NOT OIL the motor or the brush roll at any time. The bearings are
permanently lubricated and sealed.
Rating Plate
The model, type, and serial numbers are indicated on the rating plate located on the
underneath side of the cleaner. For prompt and complete service information, always refer
to these numbers when inquiring about service.
Model & Type_________________________
Serial No.____________________________
4
SERVICE
Should you require service on your Electrolux cleaner, please telephone 08706 055055.
Important - in the event of the mains supply cable of this cleaner requiring replacement,
we recommend that this be carried out by a Electrolux Service Agent.
ELECTROLUX
MODEL TYPE SERIAL NO.
VOLTS WATTS HERTZ
DANGER
GROUNDING INSTRUCTIONS
This appliance must be grounded. If it should malfunction or breakdown, grounding
provides a path of least resistance for electric current to reduce the risk of electric shock.
This appliance is equipped with a cord having an equipment-grounding conductor and
grounding plug. The plug must be plugged into an appropriate outlet that is properly installed
and grounded in accordance with all local codes and ordinances.
Improper connection of an equipment-grounding conductor can result in risk of electric
shock. Check with a qualified electrician or service person if you are in doubt as to whether
the outlet is properly grounded. Do not modify the plug provided with the appliance. If it will
not fit the outlet, have proper outlet installed by a qualified technician.

HOW TO ASSEMBLE
CAUTION: Completely assemble vacuum cleaner before using.
5
A
2-Part
Bolt
B
Lower
Cord Hook
C
Bag
Screws
Assembly Packet
is with owner’s guide.
Detail A
1
1
Step 1
Attach the Handle
Push lower handle into handle socket
on the base.
Note: Check to be sure slot in
handle is positioned correctly, see
Detail A.
Align the holes on the lower handle
and the socket. Insert a 2-part bolt
(A) in the bottom center of the
handle and tighten.
Push upper handle onto lower handle.
Make sure grip curves away from
cleaner. Align the holes on the upper
handle to the holes on the lower
handle. Insert a 2-part bolt (A) in
center of the handle and tighten.

001 ASSEMBLED
6
2
3
3
4
4
2
The cleaner has two convenient cord storage
hooks attached to the handle. However, some
models feature a quick release cord hook on the
upper handle. A downward twist of the cord hook
frees the cord for quick removal. With either style,
wind the cord around the hooks for storage.
Step 2
Attach Lower Cord Hook
Make sure cord hook is pointing
downwards. Press the power cord into
the groove on the cord hook pulling any
slack toward the base of the cleaner.
On the cord hook, find the curved
tab and place in slot on lower handle
section, keep cord taut while pressing
the cord hook to the left until it snaps
into slot on opposite side of handle.
The hook should point downward on
the same side that the cord exits the
hood.
Step 3
Attach Outer Bag
Important: To provide a good gasket
seal, the bag coupling must seat
firmly against the motor base.
Hold outer bag with zipper away from
the handle. Line up screw holes. Start
the bag screws by hand, then tighten
with a screwdriver.
Loop the bag spring onto the bag
support hook located at the back of
the upper handle section.
Step 4
Store Electrical Cord

001 ASSEMBLED
HOW TO USE
The upright vacuum cleaner is designed to be used on multiple types of carpeting. Do
not attempt to use the upright vacuum cleaner on bare floors, as damage to the floor
covering may result.
The front of the cleaner has an adjustment
that raises or lowers the cleaner base to
match the type of carpet. With the cleaner
cord unplugged, set the adjustment to lowest
setting for maximum cleaning. If the cleaner
is difficult to push, move adjustment to next
highest setting until cleaner is comfortable to
push. The brush roll must reach the carpet for
effective cleaning.
Make each adjustment with cleaner
switch off and cord disconnected
from outlet. For ease in moving the
adjustment knob, place handle in
operating position and tilt cleaner back
to remove weight from front wheels.
7
Cleaner Height Setting
WARNING: Avoid injury. Keep loose clothing, hair, fingers, and all other parts of
body away from any moving part (such as the revolving brush). Turn off
the switch and unplug the cleaner before changing the cleaner height
setting.
Handle Adjustment
With the tip of the foot, press down to release
the handle lock located at the left rear side of
the cleaner. Move the handle and adjust it to
the desired position for (1) storing upright, (2)
operating the cleaner at a comfortable height
for the user, and (3) cleaning underneath low
furniture.
Handle Lock
1. Store
2. Use
3.Clean
Underneath
ON/OFF
Power Switch
The power switch is mounted on the handle.
Push ON (-) or OFF (O).

HOW TO MAINTAIN
The instructions given in this booklet serve as a guide to routine maintenance. To avoid
unnecessary service calls, check the bag, belt and brush roll often.
Disposable Dust Bags
Paper bags play a very important role in the efficiency of a vacuum cleaner. The purpose of
a paper bag is to trap dirt. But at the same time the paper bag must be porous enough to
allow air to pass through. If the paper bag becomes clogged, no air can pass through the
cleaner and no cleaning can take place, regardless of how powerful the unit. Change the
dust bag frequently. Some fine particles can restrict airflow very quickly and will decrease
performance even before the bag appears to be full. For that reason, when vacuuming
carpet fresheners or cleaners, powder, plaster dust, or similar fine substances, the bag
may need to be changed more often.
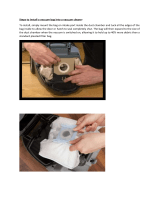
How To Change Disposable Dust Bag–Code E74
NOTE: Turn off the switch and unplug the electrical cord before changing
dust bag. Never operate the vacuum cleaner without the dust bag.
4. Unfold
new
bag.
TOP
BOTTOM
THROAT
{
5. Place
bag throat
on sleeve.
3. Pull bag
throat off
sleeve.
2. Roll down
coil spring.
Ask for GENUINE ELECTROLUX
dust bags–Code E74
Micron Filter
®
Bag Care (Micron Filter Bag is standard on some models)
Because the Micron Filter Bag is an effective filter medium, occasionally trapped dust
particles will need to be cleaned from the inside of it. The dust accumulation can be
vacuumed out with another vacuum or the bag may be removed to shake out. If you
desire, the bag may be hand laundered. The zipper on the bag should be down and the
bag should remain right side out. Use warm water (150°F 65°C) and a mild detergent.
Pre-soaking the bag in a laundry pre-soak is desirable for best cleaning results. Air dry
thoroughly before using.
DO NOT USE AN AUTOMATIC WASHER OR DRYER as either will cause abrasion to
the delicate polyester fabric. DO NOT DRY CLEAN as dry cleaning fluids will damage
plastic parts of your bag assembly.
1. Pull
zipper
down.
8
6. Roll up coil spring.
7. Place paper bag into outer bag.
NOTE: Be certain there are no
folds at the top or bottom of the
paper bag.
8. Lift zipper.

Brush Roll Belt - Code ZE096
The brush roll belt on the upright vacuum cleaner drives the brush to agitate, sweep,
and comb the carpet nap. The belt should be checked regularly to be sure it is in good
condition. Replace the belt if it is stretching, cracking, or slipping. Cut away any hair or
thread wound around the brush roll or the belt pulley because the buildup could cause
the belt to rotate unevenly.
How To Replace A Worn Belt
NOTE: Turn off the switch and unplug the electrical cord before replacing belt. Belt
pulleys can become hot during normal use. To prevent burns, avoid touching
the belt pulley when servicing the drive belt.
IMPORTANT: Improper installation of the brush roll or brush roll belt could cause
carpet or cleaner damage.
1. Remove Phillips® screws and
release cam locks, remove bottom
plate.
Check for brush wear (see Brush Roll
instructions on page 10).
3. Place new belt around brush roll.
4. Align brush roll pulley with belt
guide.
7. Place lower side of belt into belt
guide and pull to stretch the belt
around the left side of motor pulley.
Rotate pulley to secure belt into
groove.
.
.
1
1
Motor
Pulley
2
2. Pull up on belt to rotate it off the
motor pulley. Lift up on brush roll
and remove worn belt.
Metal Brush Roll only.
Place rubber end cap covers (available
on select models) over both end caps
(flat side against end cap). Align holes
and secure.
5. Slant brush roll forward so end
caps are in line with slots in
cleaner base.
6. Push brush roll into base.
8. Place slots of bottom plate over tabs
of cleaner base.
9. Seat and secure cam locks. Replace
Phillips® screws.
Ask for GENUINE ELECTROLUX
replacement belts - Code ZE096.
3
4
Belt
Guide
7
6
5
8
8
.
.
9
9
9
.
.
.
.

Brush Roll
The rotating brush roll sweeps and combs the carpet nap. Keep the brush roll free from
hair and threads so it will continue brushing. When the bristles of the brush roll no longer
touch a straight edge held across the bottom plate, the brush roll is ineffective because
the bristles no longer touch the carpet nap. Install new brush strips on the chromed steel
brush roll (refer to instructions).
How To Replace Worn Brush Strips- Code 506003114002 (chromed
steel brush roll)
NOTE: Turn off the switch and unplug the electrical cord before replacing
brush strips.
New brush strips are supplied in sets of two, one long and one short. To replace, remove
bottom plate and belt (see How To Change Belt). Then, grasp center of brush roll and lift
to remove.
Slide in new brush strip of same
length (rounded end first). Fit track on
either side into brush roll slot. Replace
second brush strip from opposite end
of brush roll.
Replace shaft.
Align indentation on bearing retainer
with brush strip on both ends of brush
roll.
Replace shaft washer.
Position end cap with flat sides of
center hole over flat sides of threaded
shaft.
Tighten locknut.
Align holes and secure rubber end cap
cover flat side against end cap.
A.
B.
C.
D.
E.
F.
G.
Remove rubber end cap cover (available
on select models) from one end.
Unscrew locknut.
Remove end cap.
Remove shaft washer (not included in
ball bearing brush roll).
Remove bearing retainer.
Push shaft through opposite end.
Pull out worn brush strip with pliers.
E
G
F
Note:
Shaft washer (D) not included in ball bearing brush roll assembly.
A B C D E
When properly assembled, the brush roll should rotate freely between the two end caps.
Check the condition of the belt; change if necessary. Replace the brush roll, belt, and
bottom plate (see How To Replace A Worn Belt).
Ask for GENUINE ELECTROLUX replacement brush strip - Code 506003114002.
G.
F.
E.
D.
C.
B.
A.
10

Cleaner Care
NOTE: Turn off the switch and unplug the electrical cord before cleaning unit.
To keep the vacuum cleaner looking new, it can be wiped with a damp cloth and a mild soap
solution, then thoroughly dried. Never use any type of chemical as chemicals can damage
the cleaner. When not in use, the cleaner should be stored in a clean, dry place.
11
Quick Kleen® Fan Chamber (On some models)
NOTE: Turn off the switch and unplug the electrical cord before cleaning.
The clear, removable fan chamber cover provides
easy inspection, cleaning, and maintenance of the
fan chamber. Removing the cover provides easy
access to the motor fan. Grease buildup, dirt, or other
obstructions, visible through the fan cover, should be
removed. To clean the fan area, take off the chrome
bottom plate by releasing the two cam locks (see
Brush Roll Belt, Figure 1 and 2). Remove the belt
from, the motor pulley, then loosen and remove the
screws on either side of the fan cover, as indicated
by the arrows. Push the cam locks outward against
the wheels to lift the cover from the cleaner base.
Dirt and obstructions can easily be cleared; however,
caked grease may need to be scraped from the
cover and the cleaner. If the fan does not turn freely,
it also should be removed for cleaning. To remove
the fan, place a wrench over the motor pulley. Hold the fan blades with one hand and
turn the wrench counterclockwise. Remove the motor pulley and lift the fan off the motor
shaft. Clean the area and replace the fan over the motor shaft. Tighten the motor pulley
snugly clockwise with the wrench. If necessary, replace the fan cover or the gasket with
replacement parts.
Be sure the gasket is in place. Reposition the fan cover by first placing the exhaust end
into place between the large rear wheels. Seat fan cover firmly. Next replace the belt and
bottom plate as the pressure from the bottom plate helps seal the fan cover. Start the two
screws by hand to be sure they are straight, then tighten.

Part No. 71994 (2/02)
©2002 Electrolux
Printed in U.S.A.
LUTON, BEDFORDSHIRE, LU4 9RJ
Features of the Electrolux vacuum cleaner and accessories supplied with it are protected
in Great Britain and abroad by Patents or Registered Designs.
This appliance conforms with the requirements of the amended E.E.C. directive No.
89/336/EEC relating to electromagnetic compatibility (EMC) CE.
Electrolux, may introduce modifications to their product from time to time, and consequently
the details given in this booklet are subject to alteration without notice.
Guarantee
This guarantee is in addition to your statutory and other legal rights.
Electrolux products are carefully designed, manufactured, tested and inspected and,
in consequence, we undertake to replace or repair any part found to be defective in
material or workmanship, within one year of delivery to the original purchaser, free
of charge. You may be required to take the product to your nearest service provider
if the product requires attention during the first year.
There are certain conditions which may invalidate this guarantee:
a. It is dependent upon the appliance being correctly installed and used in accordance
with the Company’s instructions under normal domestic conditions within the
United Kingdom or the Republic of Ireland.
b. Service at all times must be carried out by an Electrolux Service Representative
or authorised agent.
c. The guarantee may be invalidated by unauthorised repair or modification of the
appliance.
d. You may be charged by Electrolux if you call for an engineer to resolve a problem
that we believe is covered in the instruction booklet.
The Company does not accept liability for defects arising from neglect, misuse or
accident. This guarantee excludes such normal wearing parts as cloths and brushes
as the life of these depends upon the amount and nature of use.
Proof of the date of purchase will be required before service under guarantee is
provided. For further assistance call our customer care line on 08706 055055.
Important:
For future reference we suggest you record the following details here, and keep the
receipt with the handbook as proof of purchase.
Purchased from ____________________________________________________
Date purchased __________________Model no __________________________
/