Manual

The information in this document is subject to change without notice and does not represent a
commitment on the part of Native Instruments GmbH. The software described by this docu-
ment is subject to a License Agreement and may not be copied to other media. No part of this
publication may be copied, reproduced or otherwise transmitted or recorded, for any purpose,
without prior written permission by Native Instruments GmbH, hereinafter referred to as Native
Instruments.
“Native Instruments”, “NI” and associated logos are (registered) trademarks of Native Instru-
ments GmbH.
Mac, Mac OS, GarageBand, Logic, iTunes and iPod are registered trademarks of Apple Inc.,
registered in the U.S. and other countries.
Windows, Windows Vista and DirectSound are registered trademarks of Microsoft Corporation
in the United States and/or other countries.
All other trade marks are the property of their respective owners and use of them does not im-
ply any affiliation with or endorsement by them.
Document authored by: Native Instruments GmbH
Software version: 1.2 (07/2012)
Special thanks to the Beta Test Team, who were invaluable not just in tracking down bugs, but
in making this a better product.
Disclaimer


Table of Contents
1 Introduction ..............................................................................................................
6
2 Quickstart .................................................................................................................
8
2.1 Basic Navigation ........................................................................................................................ 8
2.2 Editing the Drums ...................................................................................................................... 8
2.2.1 Fine-Controlling Individual Drums and Articulations ................................................. 8
2.2.2 Changing the Snare ................................................................................................... 9
2.2.3 Creating a Mix ........................................................................................................... 10
2.2.4 Adding and Removing Drums .................................................................................... 11
2.2.5 Preset Handling ......................................................................................................... 12
3 The Performance View ...............................................................................................
13
3.1 Kit Page ...................................................................................................................................... 13
3.1.1 OH and ROOM MIX Knobs ........................................................................................... 15
3.1.2 TUNE Knob ................................................................................................................. 16
3.1.3 ATTACK, HOLD and DECAY Knobs ............................................................................... 16
3.2 Mixer Page .................................................................................................................................. 17
3.2.1 Common Mixer Controls ............................................................................................. 18
3.2.2 CLOSE MICS Area ....................................................................................................... 19
3.2.3 KIT MICS/BUSES Area ................................................................................................ 19
3.2.4 Effects ....................................................................................................................... 20
3.2.5 Channel Settings ....................................................................................................... 24
3.3 Grooves Page .............................................................................................................................. 25
3.4 Options Page .............................................................................................................................. 29
3.4.1 VELOCITY Settings ..................................................................................................... 30
3.4.2 MIDI Mapping ............................................................................................................ 30
3.4.3 KIT VIEW Settings ...................................................................................................... 31
3.4.4 RANDOMIZE Settings ................................................................................................. 31
Table of Contents
STUDIO DRUMMER - Manual - 4

4 Kit Selection .............................................................................................................
33
5 Drum Articulations .....................................................................................................
35
5.1 Session Kit .................................................................................................................................. 35
5.2 Stadium Kit ................................................................................................................................ 39
5.3 Garage Kit .................................................................................................................................. 43
6 Credits ......................................................................................................................
47
Table of Contents
STUDIO DRUMMER - Manual - 5

1 Introduction
STUDIO DRUMMER is an acoustic drum library that gives you premium drum kits, a top of the
line studio sound, full mixing control with high quality effects, and a huge selection of MIDI
grooves covering a variety of popular music genres. It gives you everything you need to create
the perfect drum tracks for all kinds of productions.
Three top tier drum kits were recorded: a Yamaha Maple Custom Absolute kit, a Pearl Masters
Premium Maple kit, and a Sonor SQ2 Drum System kit. Just about every articulation was
played on the various drums and cymbals and recorded with up to 25 velocity layers and up to
six variations per same-velocity hit. Each kit has up to 18 microphones that can be mixed sep-
arately, including many direct mics, a mono and stereo overhead set of mics, and room mics to
capture the ambient sound of the various recording spaces in the studio.
The drums were recorded at Teldex Studio in Berlin, Germany, world renown for legendary
classical recordings as well as many other styles for several decades. Their famous recording
hall as well as state of the art equipment and highly skilled professional engineers provided the
perfect setting to record the STUDIO DRUMMER library.
From left to right: the mixing desk at Teldex Studio Berlin, Germany, with the Yamaha kit visible in the background; the
Yamaha Maple Custom Absolute kit set up in the live room; the Sonor SQ2 Drum System kit, set up for recording.
Introduction
STUDIO DRUMMER - Manual - 6

Document Conventions
This document uses particular formatting to point out special facts and to warn you of poten-
tial issues. The icons introducing the following notes let you see what kind of information can
be expected:
Whenever this exclamation mark icon appears, you should read the corresponding note
carefully and follow the instructions and hints given there if applicable.
This light bulb icon indicates that a note contains useful extra information. This informa-
tion may often help you to solve a task more efficiently, but does not necessarily apply to
the setup or operating system you are using; however, it's always worth a look.
Furthermore, the following formatting is used:
▪ Text appearing in (drop-down) menus (such as Open…, Save as… etc.) and paths to loca-
tions on your hard drive or other storage devices is printed in italics.
▪ Text appearing elsewhere on the screen (labels of buttons, controls, text next to checkbox-
es etc.) is printed in light blue. Whenever you see this formatting applied, you will find
the same text appearing on the screen.
▪ Important names and concepts are printed in bold.
▪ References to keys on your computer's keyboard you'll find put in square brackets (e.g.,
"Press [Shift] + [Return]").
►
Single instructions are introduced by this play button type arrow.
→
Results of actions are introduced by this smaller arrow.
About KONTAKT / KONTAKT PLAYER
STUDIO DRUMMER is a KONTAKT Instrument; you will, therefore, have to have KONTAKT or
the free KONTAKT PLAYER installed on your computer in order to use this instrument. Refer
to the KONTAKT / KONTAKT PLAYER documentation to learn how to load and configure KON-
TAKT Instruments.
Introduction
STUDIO DRUMMER - Manual - 7

2 Quickstart
In this chapter, you will find a quick guide to navigating the controls of STUDIO DRUMMER,
as well as step by step guides to certain functions.
2.1 Basic Navigation
The interface has four main pages of control. You can navigate among these pages by clicking
on the tabs at the bottom of the instrument's Performance View. The different pages and their
uses are as follows:
▪ Grooves page: On this page is a browser of many genre-separated MIDI grooves and fills
with variations that can be dragged to your host for immediate song creation.
▪ Options page: This page has options for technical kit settings such as kit mapping and ve-
locity options, as well as randomization parameters.
▪ Kit page: You can select each drum on this page to adjust the overhead and room mixes,
tuning, and volume envelopes for those drums. You can also select which snare you want
to use, as well as load and unload the separate kit pieces.
▪ Mixer page: This page has all of the standard controls for an audio mixer, including levels,
panning, solo, mute, send levels and channel routing. This is also where all effect settings
and effect routing options are edited.
The four navigation tabs at the bottom of the Performance View
2.2 Editing the Drums
2.2.1 Fine-Controlling Individual Drums and Articulations
To change the individual kit piece's sound settings and articulations:
Quickstart
Basic Navigation
STUDIO DRUMMER - Manual - 8

1. Click on the Kit tab.
2. To edit the settings for a particular drum or cymbal, just click on its picture. Percussion is
selected from a sub-menu of icons next to the drum kit image.
3. To change the overhead and room mix amounts for each piece, adjust the corresponding
OH MIX and ROOM MIX knobs.
4. To alter the tuning, adjust the TUNE knob.
5. To change the volume envelope of the selected piece, you can adjust the ATTACK, HOLD
and DECAY with the respective knobs.
A typical drum's control panel
2.2.2 Changing the Snare
Each kit has alternate snares to choose from. To change the snare:
1. Click on the Kit tab.
2. Click on the snare drum image.
3. Click on the A or B button located underneath the snare drum image to switch between
the snares.
→
The snare image will change to indicate the newly selected snare.
Switching between the snares
Quickstart
Editing the Drums
STUDIO DRUMMER - Manual - 9

2.2.3 Creating a Mix
To create a mix of the kit, click on the Mixer tab. This will give you a virtual mixing console
with many of the same controls you would find on a real mixing desk. Here you can control the
volume, pan, mute, solo, and routing of the various tracks. You can also add many customiza-
ble effects to all channels.
A typical channel on the Mixer page
You can also adjust the levels of the in, out, and sub mics on the kick, the top and bottom mic
on the snare, and the amount of snare mic bleed when the kick and toms play.
Quickstart
Editing the Drums
STUDIO DRUMMER - Manual - 10

Additional controls for the Kick and Snare channels
2.2.4 Adding and Removing Drums
If you will not be using a particular drum, cymbal or percussion instrument, you can remove it
from the kit, thus freeing up more computer memory. To do this:
1. Click on the Kit tab.
2. Select the instrument that you want to remove.
3. Click on the small memory chip icon above the instrument name at the bottom left of the
page.
4. A drop-down menu will appear, giving you the option to add or remove the instrument
from the kit with Load Instrument and Unload Instrument options. When an instrument is
unloaded, a darkened version of it will replace the original image.
If you unload an instrument, you can always load it back again using the same method.
Unloading an instrument on the Kit page.
Quickstart
Editing the Drums
STUDIO DRUMMER - Manual - 11

2.2.5 Preset Handling
►
To step through the presets, simply click on the right and left arrows.
►
To load a preset, simply select the preset from the drop-down menu.
Saving User Presets
You can save presets for the settings of the whole mixer on the Mixer page, as well as kit map-
ping layouts on the Options page. Each of these preset menus contains a selection of factory
presets and allows you to save your own custom presets. Factory presets cannot be overwritten
(indicated by the darkened Ø icon), but they can be adjusted and saved as a new user preset.
To save a user preset:
1. Adjust the settings you want to save and recall for your preset.
2. Click in the text area on the preset drop-down menu.
3. Type in the name for the new preset and click on the Save icon above the drop-down
menu.
→
The new preset will now appear at the bottom of the drop-down menu and is ready to be
used when opening the kit again.
If you save a user preset without changing the name, it will overwrite the current user pre-
set.
Removing User Presets
1. To remove a user preset:
2. Select the preset in the drop-down menu.
3. Click on the Ø icon above the drop-down menu.
→
The user preset will be deleted and not be available when opening the kit again.
Quickstart
Editing the Drums
STUDIO DRUMMER - Manual - 12

3 The Performance View
This chapter describes the Performance View interface of STUDIO DRUMMER. Learn how to
use the functions and controls of the four pages: Kit, Mixer, Grooves and Options.
3.1 Kit Page
The Kit page has a view of the drum kit where you can select each drum and adjust:
▪ the tuning
▪ the volume envelope
▪ the overhead microphone mix
▪ the room microphone mix
You can also choose which snare you want to use, as well as load or unload the selected drum.
The Performance View
Kit Page
STUDIO DRUMMER - Manual - 13

Kit page Performance View of the Stadium Kit
To select a drum or cymbal for editing, click on it with the mouse. To select a percussion in-
strument, click on its icon at the right of the drum kit image. For details on editing the instru-
ment settings on the Kit page, see section ↑2.2.1, Fine-Controlling Individual Drums and Ar-
ticulations.
Clicking on an instrument will also play the sound of that instrument, giving you a quick
preview of the sound. For instructions on how to disable (or enable) sound playback on
mouse click, see section ↑3.4.3, KIT VIEW Settings.
The Performance View
Kit Page
STUDIO DRUMMER - Manual - 14

After selecting an instrument, its name and controls will appear in the panel at the bottom of
the page. Editing the sound of a selected instrument will edit all articulations of that instru-
ment.
Each kit has two snare drums to choose from. You can select the snare drum you want to use
by clicking on the A and B buttons below the snare image. Switching between the snares will
unload the current snare from memory and load the other one, and will change the image of
the snare drum.
When the SELECT BY MIDI icon at the upper right of the Kit page is activated, the drums will
be selected depending on the notes played with your MIDI input device.
This function is automatically turned off during host playback, or while the file player of
the KONTAKT stand-alone application is running (e.g. playing back a MIDI groove).
You can also select the kit pieces by using the INSTRUMENT drop-down menu at the left
of the panel at the bottom.
You can remove the selected instrument from the kit (and thus unload it from memory) by
clicking on the small memory chip icon to the right of the INSTRUMENT header, as described
in section ↑2.2.4, Adding and Removing Drums. Removing unused kit pieces is useful for free-
ing up computer memory. You can always load the kit pieces back at any time. When a kit
piece is unloaded, its image turns dark.
The rest of the panel contains the controls for the Overhead (OH) and Room microphone mix-
es, the drum Tuning control, and the volume envelope of the drum with controls for the Attack,
Hold, and Decay (AHD envelope). For more information on these controls, see sections ↑3.1.1,
OH and ROOM MIX Knobs, ↑3.1.2, TUNE Knob, and ↑3.1.3, ATTACK, HOLD and DECAY
Knobs.
3.1.1 OH and ROOM MIX Knobs
OH MIX and ROOM MIX knobs
The Performance View
Kit Page
STUDIO DRUMMER - Manual - 15

The OH MIX and ROOM MIX knobs adjust the volume levels of the Overhead microphone(s)
and the Room microphone(s) of the selected drum, cymbal, or percussion instrument. This al-
lows you to create your own custom mix of those microphones for each individual drum, which
is not possible in a traditional studio recording.
Please note that this is a separate control from the overall level of the OH and Room mics.
These levels can be adjusted on the Mixer page.
3.1.2 TUNE Knob
TUNE knob
The TUNE knob changes the pitch of the selected kit piece. The pitch changes for all micro-
phones and all articulations of that piece. The range of the TUNE knob is limited to values that
are relatively realistic.
3.1.3 ATTACK, HOLD and DECAY Knobs
ATTACK, HOLD and DECAY knobs
The ATTACK, HOLD and DECAY knobs are controls for a typical AHD volume envelope for each
selected drum.
▪ Increasing the ATTACK value adds more of a fade-in to the beginning of the sound.
▪ The HOLD knob adjusts how long the sound stays at maximum volume.
▪ The DECAY knob adjusts how quickly the sound fades out after the HOLD time has
passed.
The Performance View
Kit Page
STUDIO DRUMMER - Manual - 16

For the most natural drum sound, the default setting is the best (ATTACK is off, and HOLD is
at maximum). Adjusting these controls is only necessary if you want to shape the sound in an
“unnatural” way.
3.2 Mixer Page
The Mixer page has the same microphone level and panning controls as a real mixing board, as
well as a large selection of effects and routing controls. You can save and load all mixer set-
tings by using the MIXER panel at the upper left of the page. This panel appears on every page
of STUDIO DRUMMER, in order to select different mixer page presets while using other parts
of the interface. As each kit has a very different sound, these mixer presets can only be used
for the kit that they are saved with.
The Performance View
Mixer Page
STUDIO DRUMMER - Manual - 17

Mixer page Performance View
3.2.1 Common Mixer Controls
▪ The channel faders on the Mixer page control the volume level of the various microphones.
The faders in the CLOSE MICS area control the volume of the individual direct micro-
phones, and the KIT MICS faders control the volume of the overhead and room micro-
phones.
The Performance View
Mixer Page
STUDIO DRUMMER - Manual - 18

The levels of each instrument within the overhead and room microphones can be adjusted
separately, but this is done on the Kit page (see section ↑3.1, Kit Page above).
▪ Each close mic and mono kit mic has a PAN knob to change the left and right location of
that mic in the stereo field.
▪ Each stereo kit mic has a WIDTH knob, ranging from MONO to STEREO. STEREO is the
standard setting, where the left and right channels are independent on the left and right
sides. As the knob is turned towards MONO, the left and right channels are combined un-
til they become a single central sound source when the knob is turned all the way to the
left.
▪ The S and M buttons allow you to solo (S) and mute (M) the individual channels. When a
track has the Solo button pressed, all other channels are silent and only the soloed chan-
nel can be heard. Putting additional channels into solo mode will add those channels into
the mix, but still keep all other channels silent. When the mute button is pressed, the se-
lected track can no longer be heard. Mute has a higher “ranking” than solo, so if a track
has both buttons pressed, the track will be muted.
▪ The SEND knob at the top of each channel controls the amount of reverb effect to be in-
cluded in the mix for that channel. The global reverb level is adjusted with the reverb fad-
er in the BUSES area.
3.2.2 CLOSE MICS Area
The CLOSE MICS area takes up the left portion of the Mixer page. As the name suggests, this
area contains the channel controls for the close microphones. The close microphones (also
known as “direct” mics) are placed very close to the drums. There are close microphones for
the kick, snare, hi-hat, toms, and some percussion.
3.2.3 KIT MICS/BUSES Area
The right portion of the Mixer page displays the controls for either the kit microphones or the
busses:
The Kit Microphones view includes controls for the overhead and room microphones. These mi-
crophones are placed in such a way to record the sound of the entire kit, either with a stereo
pair or with a single mono microphone.
The Performance View
Mixer Page
STUDIO DRUMMER - Manual - 19

The controls in the Buses view are used to adjust the levels of the master output, master pan-
ning and reverb return level.
►
To switch between the Kit Microphones and Buses view, click on the BUSES or KIT MICS
button, respectively, both of which are located at the top-right of the Mixer page.
►
You can also switch the left and right position of the master out with the L↔R button on
the MASTER channel. All channels are labeled at the bottom, and the labels are high-
lighted when editing the channels.
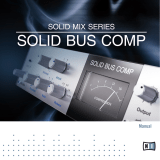
3.2.4 Effects
Several new high quality effects are included with STUDIO DRUMMER, specifically tailored for
acoustic drum production. These effects are Convolution Reverb, Solid G-EQ, Solid Bus Comp,
Tape Saturation, and the Transient Master. Each of these effects can be turned on or off for any
of the channels by clicking on the LED next to each effect name at the bottom of the page.
Convolution Reverb
Convolution Reverb effect
The Convolution Reverb includes many impulse samples of some of the best acoustic spaces
for acoustic drum production.
►
To select an acoustic space, click on the BUSES tab and then click on the Reverb chan-
nel. The various spaces will then appear at the bottom of the screen.
The Performance View
Mixer Page
STUDIO DRUMMER - Manual - 20
Page is loading ...
Page is loading ...
Page is loading ...
Page is loading ...
Page is loading ...
Page is loading ...
Page is loading ...
Page is loading ...
Page is loading ...
Page is loading ...
Page is loading ...
Page is loading ...
Page is loading ...
Page is loading ...
Page is loading ...
Page is loading ...
Page is loading ...
Page is loading ...
Page is loading ...
Page is loading ...
Page is loading ...
Page is loading ...
Page is loading ...
Page is loading ...
Page is loading ...
Page is loading ...
Page is loading ...
/