Page is loading ...

1
Owner’s Manual
Manufactured in USA
Model 5
with AutoBrake
Kangaroo Golf, 111 Kangaroo Drive, Columbus, NC 28722
Phone (800) 438-3011 [email protected]

32
INSTRUCTIONS FOR REPORTING DAMAGES DURING SHIPMENT
RETURN ADDRESS
Kangaroo Golf
111 Kangaroo Dr.
Columbus, North Carolina 28722
Phone: 800-438-3011
Call Kangaroo, with your invoice number. Please specify which parts on the invoice are damaged.
Kangaroo will send replacement merchandise promptly, generating a provisional invoice for the replacement
items. Then . . .
Do NOT return damaged merchandise to Kangaroo, and don’t destroy any carton or packing material in
which merchandise was shipped. Everything will be needed by the carrier on your receiving end.
If shipment was via United Parcel Service, call toll-free 1-800-742-5877, for the customer service, or if
shipment was via FedEx call toll-free (800) 463-3339. Either carrier will arrange to pick up your shipment
and inspect damage and return it to Kangaroo Products for repair.
You can also le a claim online UPS: https://wwwapps.ups.com/webClaims/create?loc=en_US&report_type=1
FedEx: http://www.fedex.com/us/customersupport/managing/claims
Index
Reporting damages during shipment 2
Return Addresses 2
Assembly Instructions 4, 5
Controls and Operations 6, 7, 8
Rear Wheel Removal & Replacement/Free-Wheeling 9
Owner Maintenance 10
Factory Warranty Service 10
Your Warranty 11
Parts List 12, 13, 14, 15
Battery & Charger 16
Optional Accessories 17, 18
Speed Control 19
AutoBrake 19
Caddie not tracking straight 20
Motor running, but wheels not turning 21
Rear Wheel Attachment 22, 23
Bag Support Position 24
Motorcaddie stopped running 25
Motorcaddie stops intermittently 25
Technical information, parts lists, accessories, and assembly instructions can be found at
http://www.kangaroogolf.com/tech.html
Trouble-Shooting Tips

54
Connect the Control Cable plug from the Upper Tube Handle to the receptacle in
the chassis.
Always hold the plug when connecting or disconnecting
the control cable. Pulling on the wire can cause damage.
Remove the black plastic cover from the battery post. Set the battery into the battery tray with
posts to the back of the battery tray. Connect the red clip to the (+) positive terminal and the black
to the (–) negative terminal. If the cables are accidentally reversed, your motocaddie will not
run until the polarity is corrected. (The caddie is equipped with reverse-polarity protection, and
connecting the terminals backwards won’t harm the unit.)
The upper bag support, also referred to as the yoke, is designed to fold up for easy transporta-
tion and storage. Pull it down until it comes to a stop. It can be adjusted to grip your golf bag by
bending the arms open or closed as needed.
The yoke is attached to the upper tubing handle at the best position to hold most golf bags
securely. If you have an unusual bag, or a personal preference for its position, its clamp can be
moved up or down the tubing to any point you like. The yoke is secured with four 5/32” allen-
type machine screws and a suitable wrench is provided with your caddie. Simply loosen the four
screws and adjust the clamps accordingly, then re-tighten securely.
Your Model 5 comes with an assortment of allen-type wrenches. They are provided for adjusting
the upper bag yoke, keeping screws tight, and for adding accessories.
Control Cable
with Plug
Control
Receptacle
Note: At this point of assembling your caddie for use, establish the
habit of making sure the ON/OFF rocker switch is in the “OFF” position
before connecting your battery cables. (See page 6 photo)
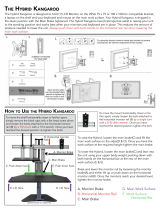
Model 5 Assembly
Your Model 5 is shipped without the rear
wheels attached. See page 9 for assembly
instructions and photo.
Steady the chassis by using the hand-hold,
located in the battery tray. Insert the Lower
Front Wheel tube into the hole located in
front of the battery tray.(shown photo right)
Insert the Upper Handle Tube into the top of chassis just behind the
battery tray. (Shown photo above)
Note: To avoid possible breakage, always
close Drawlatches before placing chassis into
your car.
Note: The Handle and Front wheel tubes will
t in either hole-- therefore be sure the motor
is on the top right side, while standing at the
rear of the motorcaddie.
Lower Front
Wheel Tube goes
here
Upper Handle Tube goes here
Battery
Tray
Drawlatch
Base
Latch Keeper
Bracket
Metal Tension Ad-
justment Ring
Drawlatch
(100-140A)
Rear View
Upper Han-
dle Tube
Lower Front
Wheel Tube

76
Runaway and Circuitry Protection:
The Model 5 will automatically shut itself off if the switch is left ON for an excessive period of
time. The reason for this is to shut it off in a possible runaway situation. This also allows the
solid state circuitry a cool-down period. To avoid activation of this safeguard, turn OFF the rocker
switch each time you stop. Merely turning the speed all the way down will not reset this internal
timer and will cause the Model 5 to unexpectedly shut off. If you forget, and your motorcaddie
unexpectedly “cuts out” or is “dead”, turn the ON-OFF switch to OFF and then back ON to restart.
Controls
ON-OFF
Rocker
Switch
Speed Control
ON-OFF Switch:
The ON-OFF switch, located top center of the handle, is self-explanatory in operation. It is located
for convenient access in starting or stopping your Model 5.
Speed Control and Operation:
Speed is controlled by the rotary thumb-wheel located between the handle grips. The speed control
decal indicates speed in relation to the thumb-wheel position.
Note: Turning the speed control all the way down doesn’t turn off controls, even if your motorcaddie
isn’t moving.
There is a feature, known in technical terms as “ramp up”, that automatically provides a gentle start
at any setting up to, and including, full speed. Even so, your Model 5 is very powerful, and it’s best
to start out at lower speeds, at least until you become familiar with the motorcaddie.
Normal Operation:
1. Turn dial to desired speed setting
2. Turn ON-OFF switch to ON. You can vary the speed control to suit your own walking pace.
3. To stop, turn ON-OFF switch to OFF. There’s no need to change the speed control when stop-
ping and re-starting.
Scorecard
Platform

98
Rear Wheel Assembly and Removal
Both rear wheels on the Model 5 motorcaddie are
easily removed and replaced. The wheel is held in
place by a spring-loaded Release Tab on the inside
of the wheel. The Tab seats into a groove on the
axle. There is a groove for the Drive position and
one for the Free-Wheeling position.
To install the wheel on the axle, pull the wheel Release
Tab back. While holding the Release Tab, place the wheel
on the end of the axle. Slip wheel all the way against the
Hub, aligning the Drive Pins on the hub into the Drive
Holes in the wheel. When the wheel is on the axle, up
against the Hub with Drive Pins engaged, release the tab.
This will allow the Release Tab to lock into the Drive
Groove, and the wheel should now be securely mounted
on the axle. Wheels should NOT slide off the axle.
To REMOVE wheels, pull the Release Tab back
toward the tire and slide the wheel off axle. Wheels
are not left/right specic and can be installed on
either side.
Free-Wheeling Function:
Free-Wheeling means that the wheels will turn freely without engaging the axle or gear train. Placing the
motorcaddie into Free-Wheeling is a MUST if the Model 5 is to be pulled or towed.
To position each wheel into Free-Wheeling, pull the Release Tab on the inside of the wheel back to-
wards the tire. Slide the wheel outward slightly on the axle. Position the wheel so that the Release Tab
is centered in the Free-Wheel Groove. Release the tab to allow it to lock in the proper groove. Wheel
should now spin freely. Hub Drive Pins will no longer be engaged into the wheel’s Drive Holes. Now
try to move the wheel outward on the axle to ensure the Release Tab is locked. The wheel will NOT
slide off the axle if properly positioned.
Hub
Drive Pin
Right Hub
(DAH-5) Drive
Groove
Free-Wheel
Groove
Release Tab
Drive
Hole
Drive
Hole
C
h
a
s
s
i
s
AutoBrake Operation:
The Model 5 is equipped with a transaxle drive train that engages the motor/gear drive unit and wheels at
all times. The motorcaddie will not free-wheel when pushed forward.
As you go downhill, with the power still switched ON, turn the speed control thumb-wheel downward to
a slower setting. The motorcaddie will slow down and give you a feeling of security as you drive down
the hill.
If the slope is extremely steep, you may turn the power switch OFF, which will provide approximately
50% more braking power than just turning the speed control to its slowest setting. If this is too much
braking power, alternate turning the power switch OFF and ON until you reach the bottom of the hill.
WARNING: If you must tow your Model 5 either forward or backward, always put the Model 5 into
free-wheeling FIRST! Gear damage may result from pulling or pushing your Model 5 with great force
or for long distances. Damage incurred from failure to disengage drive wheels from gear train is NOT
covered by warranty.
See free-wheeling instructions on page 9.
Overcurrent Protection:
An electric motor draws current to meet the load placed on it. If the load is too great, there is danger
that excess amperage will be drawn, damaging controls, wiring or the motor itself. An example of
this could be a motorcaddie stopped by shrubs or trees, or unable to roll, while the power is still on.
Your Model 5 is equipped with an overcurrent protection circuitry. It turns itself OFF in most
situations that cause current draw to approach the danger level.
In this event, reset your Model 5 by turning it OFF manually at the ON-OFF switch. After you have
corrected the problem, cleared the obstacle, etc., turn your Model 5 back ON and continue normal
operation.
AutoBrake isn’t supposed
to STOP your motorcaddie.
Rather, it slows it down when
going down hills. It does NOT
function as a parking brake.
Therefore, always make sure the
motorcaddie is turned sideways
when you’re stopped on a slope.
Hub
Drive Pin

1110
For subsequent sixty calendar months, the original retail purchaser (Owner)
will be entitled to free repair by the manufacturer (or replacement, at
Kangaroo’s option) of covered parts… motor, power train, wheels, tubing
and all electronics. Necessary labor will also be at no charge.
All warranty work MUST be done at the Kangaroo company location at
Columbus, North Carolina or a Warranty approved repair center (go to
www.KangarooGolf.com/repaircenters.html). All shipping charges are the
responsibility of the Owner.
Exclusions to warranty coverage include: damage from shipment to
Kangaroo, ordinary wear & tear, hairline cracks in structural parts (not
affecting motorcaddie operation), results of neglect, abuse, or accident,
damage by persons other than the Owner, or utilization for any purpose
other than carrying golf bags on golf courses. Battery, Charger, and
accessories have separate warranties.
The Kangaroo Model 5’s Five year Warranty is not automatically
transferable. If the motorcaddie is sold, the new owner can purchase the
remaining warranty for $5 per month left on the warranty. To do this,
the new owner must contact Kangaroo, request the warranty transfer and
provide proof of the original purchase.
FIVE-YEAR WARRANTY
So Superior
It’s warranted for Five Years
OWNER MAINTENANCE
Don’t Oil it!
The Model 5 has been designed and manufactured to be essentially maintenance free. Do not
open or attempt to service the transaxle gear train. It is tuned at the factory to minimize gear
noise. It also contains a special lubricant, which is sealed inside by a gasket. The control system
is well designed, with quality parts and full protection circuitry. There are no user serviceable
components.
Keep it Clean!
The only type of maintenance required for the Model 5 is to keep it clean. Use soap or mild
detergent and water, then rinse with clean water. You MUST avoid getting water in the control
plugs. Your Model 5 can dry in the sun, but the powder-painted stainless tubing should be wiped
dry for the best luster. Never use an abrasive cleaner.
For Good Looks!
It is a good idea to use a quality automotive wax on the powder-painted tubes to prevent nger-
prints and smudges from showing up. The Model 5’s polyurethane tires are made of a compound
unaffected by conditions that deteriorate ordinary rubber. You may use a cleaner/preservative
such as Armorall®, or a similar product, to keep it looking like new.
Normal Wear & Tear
The Handle Grips and Bag Huggers may deteriorate with use. This is normal wear and tear and
is not covered by warranty.
FACTORY WARRANTY SERVICE
If you need repair or service, please follow this procedure:
1. Telephone or e-mail the factory-owned location on page 2 of this manual for advice from Tech-
nical Service.
2. If Technical Service intructs you to return your motorcaddie or part of it, pack your motorcad-
die in the original carton or a sturdy substitute container. Enclose a note with Name, Address,
Daytime phone number or e-mail, and description of the problem you discussed with Technical
Service.
Any parts and services provided under warranty do not extend the original warranty. Any out-of-
warranty service, including parts and labor, is warranted for 60 days. If the service is not under
warranty, please specify whether you’d like for us to invoice you or charge to your credit card,
include all numbers and the expiration date of your card.

1312
Ref.# Part Code Part Description Need
1 600-479A Scorecard Plateform
2 400-280 Speed Control Knob
3 400-411A Handle Grips 2
4 400-320 On/Off Rocker Switch
5 400-811 Control cable w/plug
6 407-480 Yoke (without protectors)
700-008 Upper Protectors 2
7 400-416A Yoke washers 2
8 407-414 Top yoke clamp
9 407-413 Bottom yoke clamp
10 400-421A Yoke stop Metal
—— 400-490 Yoke assembly complete (see page 24)
11 400-400M5 Upper Tube Complete (Handle)
12 800-430 Tube plug shim
13 100-001A Croc Clip Kit with Wire
14 100-104B Motor
15 100-106 Control “Circuit” Board
16 201-201A Wheel & Tire Assembly
17 100-140A Drawlatch (two per motorcaddie)
18 100-107B Chassis insert
19 100-116 Chassis
20 300-300M5 Front Wheel and Tube assembly
21 300-311B Front Wheel Hub (2 halves)
22 300-309 Front wheel axle
23 300-310B Front tire
24 307-307 Lower Bag Mount (without Huggers)
700-009 Lower Protectors 2
Model 5 Parts List
(from diagram)
Model 5 Parts List
3
1
4
2
8
9
6
7
10
11
5
12
13
14
19
17
15
16
20
24
22
23 21
18

1514
Parts not shown on diagrams
TECHNICAL SPECIFICATIONS:
Motor:
High torque, 2-pole armature/permanent magnet,
12-volt DC
Drive Train:
Double reduction, sealed maintenance-free
self-lubricating gear drive with differential and
direct-drive hubs
Controls:
All solid-state motor control, 45 amp capacity,
all circuitry under overcurrent and reverse polar-
ity protection.
All parts and specications subject to change without
notice.
Part Code Description
400-309A Speed potentiometer
100-791 Control wire with receptacle
700-008 Upper bag huggers
700-009 Lower bag huggers
110-900 Long axle (left side)
110-800 Short axle (right side)
DAH-3 Hub with roll pin (left side)
DAH-5 Hub with roll pin (right side)
100-010A Axle bearing
300-210B 1/2” bronze bushing
Internal view of the precision-made transaxle,
with 4 power train gears plus 4 beveled
differential gears, enabling easy turning and
Automatic Braking.
Hardware Diagram
j
l
m
Ref
# Part Code Description Need
a 899-370 Handle screws 2
b 899-360A Yoke clamp screws 4
c 899-490 Yoke bolt 1
-- 899-492 Yoke Lock Nut 1
d 899-830B Yoke stop screw 1
e 800-220 Lower bag mount screws 2
f 899-309 Front wheel screws 2
g 899-310 Front wheel star washers 2
h 899-110 Receptacle screws 2
i 899-150 Drawlatch screws 6
j 800-410 Axle retainer rings 6
k 899-831 Control board screws 4
l 800-512A Axle ring spacers 2
m DRP Roll pin 3/16 x 1 1/2 2
Left/Right dened from rear of motorcaddie in its direction of travel
with your hands on controls.
a
c
d
e
fg
i
k

1716
For quick and easy ordering
24 hours a day, seven days a
week, order securely via our
website.
www.KangarooGolf.com
OPTIONS
FOR
YOUR
Model 5
Schauer Smart Charger
Best battery charger you can have, available from Kangaroo
Golf. Leave charger connected continuously to your battery
-- even for months! Extends battery life, automatically
reduces input voltage during maintenance mode. Tends
battery with safe minimal amperage.
-- Item SCBC Battery Charger
X-Gel Deep Cycle Battery
Maintenance-free gel cell battery. Lasts longer:
permanently sealed valves keep the six battery
cells properly pressurized and prevents oxygen
contamination. Comfortable, retractable handle.
Engineering tests prove cost-per-round will be
less than inferior batteries. 5 x 7 1/2 x 6 inches.
You must use at least a 31 amp-hour, 12-volt battery
on Kangaroo motorcaddies.
-- Item BATPA Battery
Sand & Seed
Holder
Repair divots to help maintain your course fairways.
Comes complete with Sand Bottle. Just ll with
your superintendent’s divot repair mixture.
-- Item 600-452 Sand and Seed Holder
Gallery
Seat
Mounts at side of your Kangaroo, out of the way while
you walk behind your motorcaddie. Spring loaded.
Seat molded of puncture-proof polyurethane foam --
more durable than rubber or vinyl. Withstands rain,
ozone, and ultraviolet rays.
--Item 600-100A Model 5 Seat
e practical solution for your Kangaroo
storage problem is the NEW space-saving
CaddieStand. Lightweight yet sturdy the
free-standing CaddieStand measures 52 inches
high and 32 inches across and stores your
Kangaroo securely until you are ready to play
again. Helps solve your garage clutter
problem too. Takes just a few minutes to
assemble. Welded steel construction. For
Hillcrest and Model 5 models only.
--Item 600-640 CaddieStand
Caddie Stand

1918
TROUBLE-SHOOTING TIPS
My motorcaddie runs on fast speed only.
Do you have a friend that has a Kangaroo Model 5 with whom you can swap handles? Note:
(Hillcrest AB handles will not work in a Model 5) If you put a friend’s handle in your motorcad-
die and their speed control functions properly, then the speed potentiometer (600-897) in your
handle needs to be replaced.
If the speed control on your friend’s handle doesn’t work in your motorcaddie, then your control
board (100-106) probably needs to be replaced.
My motorcaddie has suddenly lost the AutoBrake function.
There is an electrical resistor built into your control board for braking. If your motorcad-
die does not automatically brake when power is switched OFF, the control board under-
neath the chassis needs to be replaced or factory serviced.
Hundreds of microne bristles are designed to quickly remove
even the smallest particles from woods and irons without dam-
aging the nest clubs.
Item 600-400 Ball and Club Washer
Item 600-403 Ball and Club Washer chassis bracket
Item 600-004 Wedge Clip
(allows the use of the Gallery Seat and Ball & Club Washer
simultaneously. Easy to follow instructions are available if
you wish to install it at home.)
Ball and Club Washer
Oers added stability on steep inclines. Designed with trailing wheel on arm of precise length. Does
not carry weight during normal travel, and allows your motorcaddie to easily steer side-to-side.
When your motorcaddie tilts back, the Xtreme Slope Wheel arm automatically pivots out, prevent-
ing an embarrassing tip-over. Mounts easily to Upper Caddie Structure. Recommended for remote
control operation. -- Item 600-410S Extreme Slope Wheel
Extreme
Slope
Wheel

2120
My motor is running, but the wheels aren’t turning.
Do you hear any growling or grinding noise coming from the gearbox? If so, there may be broken or cracked
gears in the gearbox that will need replaced. Return to Kangaroo factory (North Carolina) for repair.
WARNING: Don’t open the gearbox or attempt to service the transaxle gear train. It is tuned at the factory to
minimize gear noise. It also contains a special lubricant, which is sealed inside by a gasket.
If you aren’t hearing any noise, then you may have a sheared axle pin. Ordering the pin from Kangaroo is
simple and installation is easy. Authorized Service Centers can do this (for a charge), or it can be done at the
Kangaroo factory, free if under warranty.
For quick instructions on how to check this axle pin, visit our Technical Support
Website at http://www.kangaroogolf.com/tech.html
If the axle pin (shown in photo above) is not missing or sheared, the problem may be with a roll pin inside
the gearbox that has sheared, loosened, or the motor pinion gear may be worn. In such cases your chassis
must be returned to the Kangaroo factory for repairs.
Axle Pin
The front wheel is out of alignment. It is best to put your motorcaddie on a paved level surface to test your
motorcaddie.
The center of gravity and weight distribution of your golf bag can affect the straight line travel of your
motorcaddie. In some cases you may need to make the alignment adjustments with your golf bag on the
motorcaddie, or re-adjust the contents of your bag for better balance.
Tighten the screw back down and run the motorcaddie forward to check align-
ment. You may need to do this procedure several times in order to get the motor-
caddie in alignment and track straight.
While standing in front of the motorcaddie, hold the front wheel and loosen the screw on the right side and
move the wheel (very slightly, a little means a lot) in the opposite direction that it was tracking.
My motorcaddie isn’t keeping a straight line.
DO NOT LOOSEN BOTH SCREWS!
Once wheel has been moved to the desired location, hold it in
place while tightening screw!
1/2” Axle
Bushing
Loosen this
1/4” -20
Screw with
Star Washer

2322
Drive
Groove
Free-wheel
Groove
Spacer ring
(800-512A)
Snap Rings
(800-410)
Axle rings all seem to be there and in place.
Next remove the wheel plate by removing the four screws and star washers. Check to make sure
the Wheel Clip is seated correctly in the wheel, and the spring is in its proper place. See photo
below for proper spring position/location.
Release Tab
Pull to Release
Axle hole
Wheel Clip
(209-200)
Spring
(206-200A)
Wheel Plate
Screws
(800-208)
Wheel Plate
Star Washers
(800-209)
Check the rings on your axle to ensure they are all there. Make sure none of the three Snap Rings are worn or
missing.
One of my rear wheels won’t stay attached.
Switch your wheels (right to left, and left to right) to see if the same wheel comes off on the op-
posite side of your caddie.
Rear wheel won’t stay attached regardless of which side of the caddie it is
on.
Check the center of the wheel plate to see if the wheel clip is as shown in the photograph below and
on page 23, bottom right. There should be minimal wear. Also check to see if all four wheel plate
screws and star washers are in place.
If all is ne with the wheel plate, check to see if the bronze bushing located in center of the
wheel, beneath the wheel plate, is inserted as far down in the hole as it will go. If the bushing
isn’t seated into the hole completely, take a hammer and screwdriver and lightly tap the bushing
back down to ensure it is seated in the hole as far down as it will go.
Bushing Raised Bushing Seated
Bronze Bushing
Part # 300-210B
Minimal wear in this area
See Photos below. The plate, clip, and spring have been removed for better view, though the process can be
accomplished with all parts in place.
Rear Wheel falls off. Swapping wheels does not help. The wheel still
falls off on same side of motorcaddie no matter which wheel is mounted.
Wheel Plate
(205-200)

2524
My Kangaroo Model 5 Stopped Running.
Did the motorcaddie die gradually as the round of golf progressed?
When the motorcaddie starts out with enough power and slowly diminishes toward the end of the round, it’s
probably your battery. If your battery is over a year old and fully charged, you may need to order a new bat-
tery. If you have doubts that your battery is the problem, try borrowing or swapping batteries with a friend.
My battery seems okay, but the motorcaddie was a little sluggish in the begin-
ning of play then died during my round of golf.
Did the motorcaddie seem to be struggling on inclines? If so, reach down and touch the motor. If the motor is
HOT to the touch, then your motor will need to be serviced or replaced. It is normal for the motor to be warm
to the touch, but it should never get HOT to the touch.
Did the motorcaddie just stop all of a sudden during the round of golf?
First, review Controls operation in this manual (pages 7, 8). Check your battery wire clips. While standing be-
hind the motorcaddie, wiggle them to see if the motorcaddie will power up while moving the wires. If it does,
then you have a broken wire somewhere on your battery clips. To check your battery wires, open the crocodile
clips and clip them on to an object 3/4” thick so they are held in the open position. Then slide the black/red rub-
ber covers back to inspect the metal clip, solder joint and wire.
My motorcaddie stops and starts intermittently!
Check the plug on the control wire and the receptacle on the chassis. Make sure they are clean of any
debris and that they are dry. Use “canned air” like the type used on computer keyboards to carefully blow
out both the handle plug and the control receptacle.
My Upper Bag Support keeps falling down.
Is your yoke-stop broken? If so, you will need to order a new yoke stop. If your yoke stop isn’t broken, check
the screw to make sure it’s tight. If the screw is broken off in the yoke, the fragment of the screw will have to
be removed using an easy-out tool, or a new yoke will need to be purchased.
Upper Tube
Yoke Stop Metal
(400-421A)
Yoke Stop Boot
(400-499)
Yoke Stop Screw
(899-830B)
Lock-Nut
(899-492)
Yoke Friction Washer
(400-416A)
Yoke
Assembly
(400-490)
1/4”x 20 x 1 1/4 Bolt
(899-490)
Yoke Clamps
Top (407-414)
Bottom (407-413)
Includes all
Parts Shown
Here
Why does my charger never shows GREEN (Schauer Smart Charger) or
double GREEN (ReadyPRO Smart Charger)?
The battery (BATPA) is incapable of being fully charged. It should be replaced.


/