Alto-Shaam 6-05ML Installation Maintenance And Service Manual

Type
Installation Maintenance And Service Manual

This manual is also suitable for

EELLEECCTTRRIICC
MODELS:
6•05
ML
6•10iNML
10•10iN
7•14i
EELLEECCTTRRIICC
SSMMOOKKEERR
MODELS:
6•10iN/SK
10•10iN/SK
7•14i/SK
INSTALLATION
MAINTENANCE
AND
SERVICE MANUAL
W164 N9221 Water Street
P.O. Box 450
Menomonee Falls, Wisconsin 53052-0450
U.S.A.
PHONE: (262)251-3800 (800)558-8744
U.S.A./CANADA FAX: (262)251-7067 (800)329-8744 U.S.A. (262)251-1907 INTERNATIONAL
www.alto-shaam.com
PRINTED IN USA #6002•02/05
COMBINATION OVEN/STEAMERS
COMBITHERM
®
INSTALLATION
#6002 COMBITHERM ELECTRIC INSTALLATION AND MAINTENANCE MANUAL
PG
. 1
RECEIVING & TRANSPORTATION
Upon receipt of the Combitherm combination
oven/steamer, check the exterior of the shipping
carton for any physical damage that could result in
damage to the contents. If the oven was not
received from the carrier in an upright position,
there is a stronger possibility of concealed damage.
Remove the carton or uncrate the unit carefully
and inspect for any transit damage. Immediately
report any damage to the delivering freight carrier.
The oven must remain on the pallet
while being moved to the installation site
by fork lift or pallet lift truck.
Note dimensions required for doorways and aisles
for access of the oven and pallet to the installation
site. Transport the oven in an upright and level
position only. Do not tilt the oven.
With the oven on the original pallet, remove the
carton and all packaging materials. Open the oven
door and remove all documents and other
materials from the oven interior. Remove the
roll-in cart if so equipped.
®
#6002
COMBITHERM ELECTRIC INSTALLATION AND MAINTENANCE MANUAL
PG
. 2
BASIC INSTALLATION SITE REQUIREMENTS
HOOD INSTALLATION IS REQUIRED
• Installation surface must be level.
• Do not install adjacent to flammable surfaces.
• Deep fat fryers or similar heat producing equipment must not be installed in
the immediate vicinity of the hand shower.
• Installation surface must be non-combustible (unable to burn).
The oven must remain on the pallet while being moved
to the installation site with fork lift or pallet lift truck.
Do not tilt the oven.
VENTILATION
A steam ventilation hood is mandatory for the operation of the oven. The ventilation hood must be installed
in accordance with local building codes for steam exhaust and must protrude 12-inches to 20-inches
(300mm to 500mm) over the front side of the oven. A grease filter must be located in the protruding area of
the hood. Grease filters should be thoroughly cleaned on a regular basis following manufacturer's
instructions. Ventilation hoods must ensure an adequate amount of incoming air during operation and must
be operated whenever the combination oven/steamer is used in order to avoid the accumulation of
condensation in the hood area.
If a ventless hood is to be installed, we recommend
the Combitherm Ventless Hood for the appropriate
model oven.
VHML-5
Combitherm model 6•05, 6•10iN
ML, and 10•10iN
VH
ML-10
Combitherm model 7•14i
MODEL
Air Movement
Drain Connection
Electrical
Ship Weight
Replacement
Filters GREASE
CHARCOAL
VHML-5
530 CFM
100 watts, .50 amps
100 lb (45 kg)
FI-24113
FI-24114
VHML-10
1200 CFM
240 watts, 1.0 Amps
126 lb (57 kg)
FI-23062
FI-24102
3/4" (19,1mm) NPT
208-240 V.A.C. — 50/60 Hz, 1 ph
COMBITHERM
®
INSTALLATION
#6002 COMBITHERM ELECTRIC INSTALLATION AND MAINTENANCE MANUAL
PG
. 3
POSITIONING ON SITE
Before removing the oven from the pallet for
positioning on site, it is important to remove the drip
tray to prevent damage to the tray caused by the
lifting forks. The drip tray is fastened to the bottom of
the oven with three sheet metal screws as illustrated.
This requirement pertains to the following models.
Lift the oven from the pallet
with a fork lift or pallet lift
truck positioned at the front
of the oven. To avoid
damage, position the lift forks
to the left of the condenser as
indicated in one of the two
diagrams shown below. For
additional damage protection,
the use of two wooden boards,
placed between the bottom of
the oven and the lifting forks,
is strongly recommended.
After the oven is correctly positioned
on site, reattach the drip tray.
MODEL
6•05
6•10iN
10•10iN
7•14i
NET WEIGHT
180 lb (82 kg)
285 lb (129 kg)
385 lb (175 kg)
405 lb (184 kg)
8"
(203mm)
CONDENSER
MODELS 6•05
6•10iN
ML
10•10iN
7•14i
COMBITHERM
®
INSTALLATION
#6002
COMBITHERM ELECTRIC INSTALLATION AND MAINTENANCE MANUAL
PG
. 4
INSTALLATION REQUIREMENTS
Do not install oven adjacent to flammable
surfaces. Strictly observe all local fire
safety regulations.
In order to ensure proper ventilation, a
minimum distance of at least 6-inches
(152mm) must be kept from the control
panel side [
LEFT] of the oven and any
adjoining surfaces.
NOTE: In addition to ventilation
requirements, additional clearance
is needed for service access. A
minimum distance of 18-inches
(457mm) is strongly recommended.
Allow a minimum of 4-inches (102mm) from
the right side of the oven to allow the door
to open to at least a 90° angle. Fully opened,
the door will extend up to a 225° angle. If
the oven is furnished with the retractable
door option, allow a minimum clearance of
6-1/2-inches (16cm).
Allow a minimum clearance of 4-inches
(102mm) from the back of the oven for
plumbing connections.
Allow a 20-inch (50cm) clearance at the top of
the oven for free air movement and for the
steam vent(s) located at the top [RIGHT-REAR].
Do not install the oven adjacent to heat
producing equipment such as fryers,
broilers, etc. Minimum clearance
recommended: 20-inches (50cm).
Place the Combitherm oven on a stable, non-
combustible LEVEL horizontal surface. For
counter-top models, the oven stand must be level.
In addition, the overall height of the oven should
be positioned so the operating controls and
shelves may be conveniently reached from
the front.
ALL INSTALLATION INSTRUCTIONS
AND REQUIREMENTS MUST BE
STRICTLY OBSERVED.
IMPROPER CONNECTION
OF THIS APPLIANCE
NULLIFIES ALL WARRANTIES.
18"
(46cm)
4"
(102mm)
4" (102mm)
RETRACTABLE
DOOR OPTION:
6-1/2" (165mm)
20"
(50cm)
MINIMUM
20"
(50cm)
#6002 COMBITHERM ELECTRIC INSTALLATION AND MAINTENANCE MANUAL
PG
. 5
WATER SUPPLY
CONNECT TO POTABLE (
DRINKABLE) COLD WATER ONLY
WATER PRESSURE REQUIREMENTS: MINIMUM 30 PSI (2 BAR)
MAXIMUM 90 PSI (6 BAR)
Flush the water line at the installation site before connecting the oven to the water supply. A shut-off valve
and approved back-flow preventer must be installed when connecting the oven to the cold water intake.
The water supply line must be a minimum of 3/4-inch NPT (19mm). A water conditioning system is
recommended if the water supply is between 6 and 8 grains of hardness. If water tests over 14 grains of
hardness, the installation of a water softener is strongly recommended. Install the line filter at the cold
water intake connection point.
PIPE SEALING TAPE (TEFLON®) MUST BE USED AT ALL CONNECTION POINTS.
The use of a pipe sealing compound is not recommended.
THE MAIN WATER SHUT-OFF VALVE MUST BE IN THE
OPEN POSITION WHEN THE OVEN IS BEING USED.
The hand shower spray hose is installed adjacent to the cold water
intake connection. A ball valve is installed on the oven for hose
connection to the COLD water source. Assemble the washer and
the flexible hose on the ball valve and hang the spray handle on the
holder previously installed on the oven.
COMBITHERM
®
INSTALLATION
ELBOW
ASSEMBLY REQUIREMENTS
HAND SHOWER HOLDER
Fasten the hand shower holder in the holes
provided on the oven using the three (3)
screws packaged
with the holder.
DRIP TRAY INSTALLATION
Hang the drip tray at the front of the oven
as indicated on the drawing.
COMBITHERM
®
INSTALLATION
#6002
COMBITHERM ELECTRIC INSTALLATION AND MAINTENANCE MANUAL
PG
. 6
WATER DRAINAGE
The oven must discharge through an indirect
waste pipe by means of an air gap. The drain
thread is 1-1/4-inch (32mm) NPT.
A union is required. Install a 1-1/4-inch
(32mm) diameter drain line. The drain line
must always be a positive gradient away
from the Combitherm oven and not more than
12-inches (305mm) before an air gap.
NOTE: In the U.S.A., this equipment is to be
installed to comply with the Basic
Plumbing Code of the Building
Officials and Code Administrators
International, Inc. [BOCA], and the
Food Service Sanitation Manual of the
Food & Drug Administration [FDA].
If several units are to be connected to one
drain pipe, the dimensions of the pipe must be
sufficient to allow an unobstructed water drain system.
1-1/4" (32mm) diameter NPT
WASTE PIPE
1-1/2" to 2" minimum diameter
(c. 38mm to 51mm)
2" (51mm)
Air Gap
Type of Oven counter counter counter counter
oven stand oven stand oven stand oven stand
Pan INCHES 6: 12" x 10" 6: 12" x 20" 10: 12" x 20" 14: 12" x 20"
Capacity 12: 12" x 6" 6: 18" x 13" 10: 18" x 13" 7: 18" x 26"
12: 12" x 10"
GASTRONORM 6: GN 1/2 6: GN 1/1 10: GN 1/1 14: GN 1/1
12: GN 1/3 18: GN 1/3
Side Rack INCHES 2-5/8 2-5/8 2-5/8 2-5/8
Spacing (MILLIMETERS) (65mm) (65mm) (65mm) (65mm)
Interior INCHES 15-1/4 13-1/4 13-1/4 23-1/2
Width (MILLIMETERS) (596) (387) (387) (596)
Interior INCHES 17-7/8 26-1/4 26-1/4 28-7/16
Depth (MILLIMETERS) (455) (665) (665) (722)
Interior INCHES 17-3/4 17-3/4 27 20-5/16
Height (
MILLIMETERS) (450) (450) (685) (515)
Noise
Level
Spray Hose 81-inches 81-inches 81-inches 81-inches
Length (2050mm) (2050mm) (2050mm) (2050mm)
Water Consumption 3 - 5 gal/hr 4 - 6 gal/hr
(
APPROX.) (12 - 20 l/hr) (15 - 25 l/hr)
ADDITIONAL TECHNICAL DATA
6•05ML 6•10-iNML 10•10iN 7•14i
MODEL
The noise emission level related to the workplace is lower than: 70 dBA
AVERAGE
DRAIN WATER
TEMPERATURE
149°F (65°C)
#6002 COMBITHERM ELECTRIC INSTALLATION AND MAINTENANCE MANUAL
PG
. 7
ELECTRICAL INSTALLATION
ELECTRICAL CONNECTIONS MUST BE
MADE BY A QUALIFIED ELECTRICIAN IN
ACCORDANCE WITH APPLICABLE
ELECTRICAL CODES.
An electrical wiring diagram is located behind
the control panel on the left side of the oven.
The oven must be installed by a qualified
electrician. This appliance must be branch
circuit protected with proper ampacities, in
accordance with the wiring diagram located in
the electrical compartment of the oven. The
oven must be properly grounded in accordance
with the National Electrical Code and applicable
local codes.
CAUTION
ENSURE THE AVAILABLE POWER
SOURCE MATCHES THE
VOLTAGE STAMPED ON THE
NAMEPLATE OF THE OVEN.
Wire size for the main incoming power to the
unit must match the minimum size listed in the
specifications applicable to the specific oven
model. For supply connections, locate the wire size posted on the label located on the electrical control box
cover, behind the service panel or elsewhere listed in this manual.
When connecting to a Delta-B (wild leg) on a 3-phase system, the wild leg must be connected to line 3.
Before operating the oven, check all cable
connections in the electrical connection area
for tightness since connections can loosen
during transport.
NOTE: After both water and electrical
connections have been completed,
operate the oven in any cooking
mode for a period of 15 minutes and
recheck the main power connections
at the terminal block to make
certain they remain tight.
FOLLOWING ELECTRICAL
CONNECTION, THE FAN
MUST ROTATE IN THE
SAME DIRECTION AS
THE ARROW
LOCATED ON THE
OVEN FAN MOTOR.
THIS APPLIANCE WILL NO
T
FUNCTION PROPERLY AND DAMAGE
CAN OCCUR IF THE MOTOR
ROTATION IS NOT CORRECT.
Electrical
Panel
Terminal
Block
Electrical
Connection
MOTOR
with
Rotation Direction
Ground
TO CHANGE MOTOR DIRECTION,
EXCHANGE TWO OF THE
INCOMING PHASES.
COMBITHERM
®
INSTALLATION
#6002
COMBITHERM ELECTRIC INSTALLATION AND MAINTENANCE MANUAL
PG
. 8
COMBITHERM
®
INSTALLATION
3/4"
(19mm)
1"
(25,4mm)
UNION
UNION
Intake
1" (25,4mm)
VENT
15" (381mm)
1-1/4"
(32mm)
1-1/2" (38mm)
STACKING INSTALLATION
Stacking Combitherm ovens require two (2) water connections, two (2) drain connections, and two (2)
electrical connections.
If local code allo
If local code allo
ws
ws
,
,
the water and drain may be manifolded as long as the size of the water inlet is increased to
1-inch (25,4mm) and the drains include an external vent. The drawing illustrates one
suggested method of a manifold installation.
WATER INTAKE DRAIN
COMBITHERM ELECTRIC INSTALLATION AND MAINTENANCE MANUAL
PG
. 9
POST-INSTALLATION CHECK LIST
In order for this oven to operate properly, installation must conform with the instructions provided in this
manual. Following full installation the following list is provided as a final check to help assure conformance.
INSTALLER REQUIREMENTS INITIALS/DATE
Bottom of oven has been checked for damage due to improper positioning on site.
Proper clearances have been allowed at the top of the oven and from all adjacent surfaces
with allowance of free air access to all vents.
Clearance has been provided at the left of the oven for service access.
A minimum distance of 20-inches (1/2 meter) has been provided between the oven and any
heat producing equipment such as fryers, broilers, etc.
The oven has been leveled on a stable non-combustible surface.
The oven has been connected to COLD water on a single water connection.
Incoming water pressure is between a minimum of 30 PSI (2 BAR) and a maximum
of 90 PSI (6
BAR).
A water conditioner is highly recommended, especially if the water grains of hardness
is NOT within the range of pH5 and 9. Contact factory for assistance.
Installation of drain is at a minimum of 1-1/4" (32mm) with a positive descending slope.
2" (51mm) air gap at drain is free of obstructions.
Motor direction correctly corresponds with the direction of the arrow on the motor.
Electrical safety devices and phase rotation have been checked.
INSTRUCTIONS TO OWNER/OPERATOR INITIALS/DATE
Owner/operator has been instructed on the importance of cleaning the oven along with
proper cleaning procedures with regard to daily cleaning of the interior.
Owner/operator has been advised to use authorized Combitherm oven cleaner only.
Owner/operator has been informed of the safety warnings located in the operation guide
including the warning not to handle pans containing liquid or semi liquid products
positioned above eye level of the operator.
Damage directly attributed to improper set up, installation, or cleaning can invalidate warranty claims.
COMBITHERM® INSTALLATION
#6002
COMBITHERM ELECTRIC INSTALLATION AND MAINTENANCE MANUAL
PG
. 10
POWER ON/OFF KEY
STEAM MODE KEY
PROGRAMMED MENU KEY
COOKING TEMPERATURE KEY
DOWN ARROW KEY
MOISTURE VENT KEY
START/STOP KEY
CHEF FUNCTION KEY
TIME KEY
SUPERHEATED STEAM AND
RETHERM MODE KEY
CONVECTION MODE KEY
PROGRAM INSTALL/EDIT KEY
FUNCTION & OPERATING
CONTROL PANEL DISPLAY
CORE TEMPERATURE KEY
UP ARROW KEY
QUICK PROGRAM KEYS
CONVECTION MODE KEY
INDICATORS
DELUXE MODELS ONLY
DELUXE MODELS ONLY
DELUXE MODELS ONLY
ELECTRIC MODELS ONLY
CONTROL PANEL IDENTIFICATION
ADJUSTMENT KNOB
#6002 COMBITHERM ELECTRIC INSTALLATION AND MAINTENANCE MANUAL
PG
. 11
POWER ON/OFF KEY
Activates power to the oven.
STEAM MODE KEY
The oven will operate in the steam mode at
a temperature range of 86°F to 248°F
(30°C to 120°C).
Automatic steaming at 212°F (100°C)
FACTORY
-SET DEFAULT
.
• Quick steaming between 213°F and 248°F
(101°C and 120°C).
• Low Temperature Steaming between
86°F and 211°F (30°C and 99°C).
START/STOP KEY
Initiates all cooking mode functions and
programmed procedures stored in memory.
Stops an activated cooking mode or
programmed procedure currently in
progress, and exits Chef function key.
SUPERHEATED STEAM AND
CONVECTION MODE KEY
Selection key for the combination steam
and convection cooking mode which can be
set within a temperature range of
212°F to 482°F (100°C and 250°C).
PROGRAMMED MENU KEY
Shows a list menu in display of all stored
cooking programs and is also used to exit
the list menu display. DELUXE MODELS ONLY.
CHEF FUNCTION KEY
Used to select programmed menu
functions, various auxiliary functions, and
several chef help instructions.
COOKING TEMPERATURE KEY
Used to set the required cooking
temperature, to recall the set cooking
temperature, or to check the actual oven
temperature in conjunction with the down
arrow key , the up arrow key or the
adjustment knob
.
TIME KEY
Used to set the required cooking time or
recall the set cooking time in conjunction
with the down arrow key , the up arrow
key or the adjustment knob .
DOWN ARROW KEY
Used to decrease displayed cook temperature
, time , or core temperature and as a
scrolling key for programming functions.
ADJUSTMENT KNOB
Serves the same function as the up and
down arrow keys to increase or decrease
the displayed cook temperature , time ,
or core temperature .
MOISTURE VENT KEY
Immediately vents steam and condensate
from the oven compartment while cooking in
the Convection mode or in the
Superheated Steam and Convection mode .
RETHERM MODE KEY
Food rethermalization or reheating mode
will operate with automatic steam injection
at a temperature range of 248°F and 320°F
(120°C and 160°C).
CONVECTION MODE KEY
Selection key for convection cooking
without steam at a temperature range of
86°F to 482°F (30°C and 250°C).
PROGRAM INSTALL AND EDIT KEY
Used to create, change, duplicate, and delete
programmed menus. DELUXE MODELS ONLY.
FUNCTION & OPERATING INDICATORS
CONTROL PANEL DISPLAY
CORE TEMPERATURE KEY
Used to set the required internal product
temperature, to recall the internal product
temperature set by the operator, or to display
the current internal temperature of the
product in conjunction with the down arrow
key , the up arrow key or the adjustment
knob .
UP ARROW KEY
Used to increase displayed cook temperature ,
time , or core temperature and as a
scrolling key for programming functions.
QUICK PROGRAM KEYS
Immediate access to frequently used
operator set programs including cooking
modes, cleaning, and other oven functions.
DELUXE MODELS ONLY.
CONTROL PANEL IDENTIFICATION
Reduced Power
Reduced Fan Speed
Confirmation of
Oven Operation
Key Lock
Moisture Vent
Peak Power Use
Energy Protection
ELECTRIC MODELS ONLY
#6002
COMBITHERM ELECTRIC INSTALLATION AND MAINTENANCE MANUAL
PG
. 12
POWER ON/OFF KEY
STEAM MODE KEY
PROGRAMMED MENU KEY
COOKING TEMPERATURE KEY
DOWN ARROW KEY
START/STOP KEY
CHEF FUNCTION KEY
TIME KEY
COMBINATION STEAM AND
RETHERM MODE KEY
CONVECTION MODE KEY
PROGRAM INSTALL/EDIT KEY
FUNCTION & OPERATING
CONTROL PANEL DISPLAY
CORE TEMPERATURE KEY
UP ARROW KEY
QUICK PROGRAM KEYS
CONVECTION MODE KEY
INDICATORS
DELUXE MODELS ONLY
DELUXE MODELS ONLY
DELUXE MODELS ONLY
ELECTRIC MODELS ONLY
ADJUSTMENT KNOB
SMOKER CONTROL PANEL IDENTIFICATION
STANDARD AND PROGRAMMABLE DELUXE MODELS
SMOKING MODE KEY
COMBITHERM ELECTRIC INSTALLATION AND MAINTENANCE MANUAL
PG
. 13
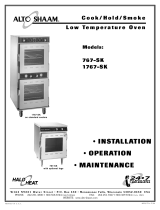
SMOKER CONTROL PANEL BASIC FUNCTION
POWER ON/OFF KEY
Activates power to the oven and automatically
fills the steam generator with water which will
heat to a stand-by mode temperature of 150°F
(65°C). The steam generator flush is also
activated by pressing this key.
STEAM MODE KEY
The oven will operate in the steam mode at
a temperature range of 86°F to 248°F (30°C
to 120°C).
Automatic steaming at 212°F (100°C)
FACTORY-
SET DEFAULT
.
• Quick steaming between 213°F and 248°F
(101°C and 120°C).
• Low Temperature Steaming between
86°F and 211°F (30°C and 99°C).
START/STOP KEY
Initiates all cooking mode functions and
programmed procedures stored in memory.
Stops an activated cooking mode or
programmed procedure currently in
progress, and exits Chef function key.
SUPERHEATED STEAM AND
CONVECTION MODE KEY
Selection key for the combination steam
and convection cooking mode which can
be set within a temperature range of
212°F to 482°F (100°C and 250°C).
PROGRAMMED MENU KEY
Used to access and exit a menu list of all
stored cooking programs which can be
reviewed in display . DELUXE MODELS ONLY
CHEF FUNCTION KEY
Used to select programmed menu
functions, various auxiliary functions, and
several chef help instructions.
COOKING TEMPERATURE KEY
Used to set the required cooking
temperature, to recall the set cooking
temperature, or to check the actual oven
temperature in conjunction with the down
arrow key
, the up arrow key or the
adjustment knob .
TIME KEY
Used to set the required cooking time or
recall the set cooking time in conjunction
with the down arrow key , the up arrow
key , or the adjustment knob .
DOWN ARROW KEY
Used to decrease displayed cook temperature
, time , or core temperature and as a
scrolling key for programming functions.
ADJUSTMENT KNOB
Serves the same function as the up and
down arrow keys to increase or decrease
the displayed cook temperature , time ,
or core temperature .
SMOKING MODE KEY
Initiates the production of smoke from the
wood chip container located at the bottom of
the oven compartment. The smoking
function operates in the convection mode and
in the combination mode.
. RETHERM MODE KEY
Food rethermalization or reheating mode
will operate with automatic steam injection
at a temperature range of 248°F and 320°F
(30°C and 250°C).
CONVECTION MODE KEY
Selection key for convection cooking
without steam at a temperature range of
86°F to 482°F (30°C and 250°C).
PROGRAM INSTALL AND EDIT KEY
Used to create, change, duplicate, and delete
programmed menus. DELUXE MODELS ONLY.
...........FUNCTION & OPERATING INDICATORS
..........CONTROL PANEL DISPLAY
CORE TEMPERATURE KEY
Used to set the required internal product
temperature, to recall the internal product
temperature set by the operator, or to display
the current internal temperature of the
product in conjunction with the down arrow
key , the up arrow key , or the adjustment
knob .
UP ARROW KEY
Used to increase displayed cook temperature ,
time , or core temperature and as a
scrolling key for programming functions.
..........QUICK PROGRAM KEYS
Immediate access to frequently used
operator set programs including cooking
modes, cleaning, and other oven functions.
DELUXE MODELS ONLY.
Reduced Power
Reduced Fan Speed
Confirmation of
Oven Operation
Key Lock
Smoking Indicator
Peak Power Use
Energy Protection
ELECTRIC MODELS ONLY
#6002
COMBITHERM ELECTRIC INSTALLATION AND MAINTENANCE MANUAL
PG
. 14
COMBITHERM SMOKER OPERATION
GENERAL OPERATION — SMOKERS
Load wood chips.
Measure one container full of dry wood chips.
Soak dry chips in water for 5 minutes.
Shake excess water off wood chips.
Place moistened chips back into the container and
position the container in the holder located on the
interior back panel of the smoker.
The smoking function can be used whenever the oven is operating in the convection mode or the
combination mode. The smoking function cannot be operated when the oven is operating in
steam mode or the retherm mode.
The smoking function can be programmed into a procedure with any of the
Duluxe Combitherm Smoker models. Press the smoking function button
after setting time or core temperature in the Convection mode
or the Combination mode .
A full container of wood chips will produce smoke for an approximate period of one hour. This time period
will vary depending on the degree of cooking temperature used, however, by following the tested
procedures set fourth in this manual, smoke production will be more than sufficient for complete product
smoke penetration and full smoke flavor. Other procedures in the front portion of this manual can be
adapted to a smoked product offering. If you need assistance, you are invited to contact an Alto-Shaam
corporate chef for recommendations.
The Combitheerm Smoker can be operated without using the smoking function. After using the oven as a
smoker, however, it is necessary to clean the oven in order to prevent a transfer of smoke flavor. Cleaning
instructions are provided in a previous section of this manual.
DO NO
T USE SAWDUST FOR SMOKING. DO NOT USE
WOOD CHIPS SMALLER THAN THUMBNAIL SIZE.
THE USE OF IMPROPER MATERIAL FOR THE SMOKING
FUNCTION COULD RESULT IN DAMAGE, HAZARD,
EQUIPMENT FAILURE, OR COULD REDUCE THE
OVERALL LIFE OF THE OVEN.
AVAILABLE FROM ALTO-SHAAM
WOOD CHIPS 20 POUND BULK PACKS
APPLE
WC-22543
HICKORY WC-2829
CHERRY
WC-22541
SUGAR MAPLE WC-22545
THE TOTAL WEIGHT OF WOOD CHIP
BULK PACKS MAY VARY DUE TO HIGH
MOISTURE CONTENT WHEN PACKAGED
.
COMBITHERM ELECTRIC INSTALLATION AND MAINTENANCE MANUAL
PG
. 15
PRESS START
OVEN MODE
COOKING TEMPERATURE
SMOKING FUNCTION SMOKING FUNCTION SMOKING FUNCTION
PAN
SIZES
BEEF BRISKET
PREHEAT THE OVEN BEFORE COOKING PRODUCT
COMBITHERM SMOKER OVEN PROCEDURE
TIMER
APPROXIMATE COOK TIME
TIMER
APPROXIMATE COOK TIME
TIMER
APPROXIMATE COOK TIME
FAN SPEED
PRODUCT
MATERIALS
PRODUCT
PREPARATION
PRESS & SET EACH OPERATING FUNCTION IN SEQUENCE
1. 2. 3.
MAXIMUM CAPACITY
USE APPROXIMATE COOKING TIMES SHOWN FOR FULL OR PARTIAL LOADS
PAN SIZES FINAL INTERNAL PRODUCT TEMPERATURE
STOP THE COOKING FUNCTION AT ANY TIME BY PRESSING THE STOP KEY.
Time and temperature settings are suggested guidelines only. Due to variations in product quality, weight, and desired degree of doneness the
controls may require some adjustment from the time and temperatures shown. All cooking should be based on internal product temperatures.
OVEN MODE OVEN MODE
COOKING TEMPERATURE COOKING TEMPERATURE
WOOD CHIP
CONTAINER
Beef Brisket, Fresh: 9 to 13 lb (4 to 6 kg)
Stainless steel sheet pans or full-size pans
Wire pan grids (optional)
Vegetable release spray (optional)
Seasoning
Spray pans or wire pan grids with vegetable release spray if desired.
Place briskets in pans and season as desired.
Load pans in preheated oven.
Full Speed
Full
Steam Mode
180°F (82°C)
DO NOT PRESS
Full-size Pans: 20" x 12" x 2-1/2"
Half-size Sheet Pans: 18" x 13" x 1"
(GN 1/1: 530mm x 325mm x 20mm)
165°F (73°C)
10 minutes
Convection Mode
90°F (32°C)
Press to engage smoke
30 minutes
Combination Mode
225°F (107°C)
Press to engage smoke
3 hours
MODEL 610iN/SK MODEL 1010iN/SK
5 full-size pans
(GN 1/1)
9 full-size pans
(GN 1/1)
12 full-size pans
(GN 1/1)
MODEL 714i/SK
#6002
COMBITHERM ELECTRIC INSTALLATION AND MAINTENANCE MANUAL
PG
. 16
PRESS START
OVEN MODE
COOKING TEMPERATURE
SMOKING FUNCTION SMOKING FUNCTION SMOKING FUNCTION
PAN
SIZES
BEEF RIBS
PREHEAT THE OVEN BEFORE COOKING PRODUCT
COMBITHERM SMOKER OVEN PROCEDURE
TIMER
APPROXIMATE COOK TIME
TIMER
APPROXIMATE COOK TIME
TIMER
APPROXIMATE COOK TIME
MODEL 610iN/SK MODEL 1010iN/SK
FAN SPEED
PRODUCT
MATERIALS
PRODUCT
PREPARATION
PRESS & SET EACH OPERATING FUNCTION IN SEQUENCE
1. 2. 3.
MAXIMUM CAPACITY
USE APPROXIMATE COOKING TIMES SHOWN FOR FULL OR PARTIAL LOADS
PAN SIZES FINAL INTERNAL PRODUCT TEMPERATURE
STOP THE COOKING FUNCTION AT ANY TIME BY PRESSING THE STOP KEY.
OVEN MODE OVEN MODE
COOKING TEMPERATURE COOKING TEMPERATURE
WOOD CHIP
CONTAINER
Beef Ribs: 2 to 3 lb (1 to 1,3 kg)
Stainless steel or aluminum sheet pans or full-size pans
Vegetable release spray (optional
Seasoning
Spray pans with vegetable release spray if desired.
Place short ribs side-by-side in pans and season as desired.
Load pans in preheated oven.
Full Speed
Full
Steam Mode
180°F (82°C)
DO NOT PRESS
5 full-size pans
(GN 1/1)
9 full-size pans
(GN 1/1)
12 full-size pans
(GN 1/1)
Full-size Pans: 20" x 12" x 2-1/2"
Half-size Sheet Pans: 18" x 13" x 1"
(GN 1/1: 530mm x 325mm x 20mm)
190°F (88°C)
10 minutes
Convection Mode
90°F (32°C)
Press to engage smoke
30 minutes
Combination Mode
225°F (107°C)
Press to engage smoke
2 hours
MODEL 714i/SK
COMBITHERM ELECTRIC INSTALLATION AND MAINTENANCE MANUAL
PG
. 17
PRESS START
OVEN MODE
COOKING TEMPERATURE
SMOKING FUNCTION SMOKING FUNCTION SMOKING FUNCTION
PAN
SIZES
PORK
BACK RIBS
PREHEAT THE OVEN BEFORE COOKING PRODUCT
COMBITHERM SMOKER OVEN PROCEDURE
TIMER
APPROXIMATE COOK TIME
TIMER
APPROXIMATE COOK TIME
TIMER
APPROXIMATE COOK TIME
FAN SPEED
PRODUCT
MATERIALS
PRODUCT
PREPARATION
PRESS & SET EACH OPERATING FUNCTION IN SEQUENCE
1. 2. 3.
MAXIMUM CAPACITY
USE APPROXIMATE COOKING TIMES SHOWN FOR FULL OR PARTIAL LOADS
PAN SIZES FINAL INTERNAL PRODUCT TEMPERATURE
STOP THE COOKING FUNCTION AT ANY TIME BY PRESSING THE STOP KEY.
OVEN MODE OVEN MODE
COOKING TEMPERATURE COOKING TEMPERATURE
WOOD CHIP
CONTAINER
Pork back ribs:
1-3/4 down
Stainless steel or aluminum sheet pans or full-size pans
Seasoning
Barbeque Sauce (optional)
Place ribs side-by side on pans and season as desired.
Load pans in preheated oven.
NOTE: When cooking for immediate service or hot food holding, brush with heated
barbeque sauce after ribs are removed from the oven to prevent sauce from
burning. As an alternative, ribs can be cooked in advance, rapidly chilled, and
removed from refrigeration for reheating and service as required. Barbecue sauce
can be used for the reheating process.
Full Speed
Full
Steam Mode
160°F (71°C)
DO NOT PRESS
Full-size Pans: 20" x 12" x 2-1/2"
Half-size Sheet Pans: 18" x 13" x 1"
(GN 1/1: 530mm x 325mm x 20mm)
175° to 180°F
(79° to 92°C)
10 minutes
Convection Mode
90°F (32°C)
Press to engage smoke
30 minutes
Combination Mode
225°F (107°C)
Press to engage smoke
50 minutes
MODEL 610iN/SK MODEL 1010iN/SK
5 full-size pans
(GN 1/1)
9 full-size pans
(GN 1/1)
12 full-size pans
(GN 1/1)
MODEL 714i/SK
#6002
COMBITHERM ELECTRIC INSTALLATION AND MAINTENANCE MANUAL
PG
. 18
PRESS START
OVEN MODE
COOKING TEMPERATURE
SMOKING FUNCTION SMOKING FUNCTION SMOKING FUNCTION
PAN
SIZES
PORK SHOULDER
PREHEAT THE OVEN BEFORE COOKING PRODUCT
COMBITHERM SMOKER OVEN PROCEDURE
TIMER
APPROXIMATE COOK TIME
TIMER
APPROXIMATE COOK TIME
TIMER
APPROXIMATE COOK TIME
MODEL 610iN/SK MODEL 1010iN/SK
FAN SPEED
PRODUCT
MATERIALS
PRODUCT
PREPARATION
PRESS & SET EACH OPERATING FUNCTION IN SEQUENCE
1. 2. 3.
MAXIMUM CAPACITY
USE APPROXIMATE COOKING TIMES SHOWN FOR FULL OR PARTIAL LOADS
PAN SIZES FINAL INTERNAL PRODUCT TEMPERATURE
STOP THE COOKING FUNCTION AT ANY TIME BY PRESSING THE STOP KEY.
OVEN MODE OVEN MODE
COOKING TEMPERATURE COOKING TEMPERATURE
WOOD CHIP
CONTAINER
Pork Shoulder, Boston Butt, Bone-In or Boneless: 8 to 10 lb (4 to 5 kg)
Stainless steel sheet pans or full-size pans
Vegetable release spray (optional)
Seasoning
Spray pans with vegetable release spray if desired.
Place briskets in pans and season as desired.
Load pans in preheated oven.
Full Speed
Full
Steam Mode
160°F (71°C)
DO NOT PRESS
5 full-size pans
(GN 1/1)
9 full-size pans
(GN 1/1)
12 full-size pans
(GN 1/1)
Full-size Pans: 20" x 12" x 2-1/2"
Half-size Sheet Pans: 18" x 13" x 1"
(GN 1/1: 530mm x 325mm x 20mm)
165°F to 170°F
(74°C to 77°C)
10 minutes
Convection Mode
90°F (32°C)
Press to engage smoke
30 minutes
Combination Mode
225°F (107°C)
Press to engage smoke
2 hours, 30 minutes
MODEL 714i/SK
COMBITHERM ELECTRIC INSTALLATION AND MAINTENANCE MANUAL
PG
. 19
PRESS START
OVEN MODE
COOKING TEMPERATURE
SMOKING FUNCTION SMOKING FUNCTION SMOKING FUNCTION
PAN
SIZES
CHICKEN
Whole
PREHEAT THE OVEN BEFORE COOKING PRODUCT
COMBITHERM SMOKER OVEN PROCEDURE
TIMER
APPROXIMATE COOK TIME
TIMER
APPROXIMATE COOK TIME
TIMER
APPROXIMATE COOK TIME
FAN SPEED
PRODUCT
MATERIALS
PRODUCT
PREPARATION
PRESS & SET EACH OPERATING FUNCTION IN SEQUENCE
1. 2. 3.
MAXIMUM CAPACITY
USE APPROXIMATE COOKING TIMES SHOWN FOR FULL OR PARTIAL LOADS
PAN SIZES FINAL INTERNAL PRODUCT TEMPERATURE
STOP THE COOKING FUNCTION AT ANY TIME BY PRESSING THE STOP KEY.
OVEN MODE OVEN MODE
COOKING TEMPERATURE COOKING TEMPERATURE
WOOD CHIP
CONTAINER
Chicken, Whole: 2-1/4 to 2-3/4 lb (1 to 1,2 kg) each
Seasoning
Vegetable release spray
Stainless steel or aluminum sheet pans with wire pan grids
or Alto-Shaam chicken roasting racks with grease tray
Place chicken on sprayed, grid-lined sheet pans or on roasting racks.
If desired, fold the wings and tuck under the back of the bird. Cross and secure legs.
Season as desired.
Load chicken in preheated oven.
NOTE: When using roasting racks, insert the grease tray before preheating or use rack with an
attached grease tray. When using sheet pans, do not overload each pan.
Chickens should not touch.
Full Speed
Full
Steam Mode
160°F (71°C)
DO NOT PRESS
Full-size Pans: 20" x 12" x 2-1/2"
(GN 1/1: 530mm x 325mm x 20mm)
175°F
(79°C)
10 minutes
Convection Mode
90°F (32°C)
Press to engage smoke
30 minutes
Combination Mode
225°F (107°C)
Press to engage smoke
45 minutes
MODEL 610iN/SK MODEL 1010iN/SK
1 full-size pan
(GN 1/1)
2 full-size pans
(GN 1/1)
4 full-size pans
(GN 1/1)
MODEL 714i/SK
  • Page 1 1
  • Page 2 2
  • Page 3 3
  • Page 4 4
  • Page 5 5
  • Page 6 6
  • Page 7 7
  • Page 8 8
  • Page 9 9
  • Page 10 10
  • Page 11 11
  • Page 12 12
  • Page 13 13
  • Page 14 14
  • Page 15 15
  • Page 16 16
  • Page 17 17
  • Page 18 18
  • Page 19 19
  • Page 20 20
  • Page 21 21
  • Page 22 22
  • Page 23 23
  • Page 24 24
  • Page 25 25
  • Page 26 26
  • Page 27 27
  • Page 28 28
  • Page 29 29
  • Page 30 30
  • Page 31 31
  • Page 32 32
  • Page 33 33
  • Page 34 34

Alto-Shaam 6-05ML Installation Maintenance And Service Manual

Type
Installation Maintenance And Service Manual
This manual is also suitable for

Ask a question and I''ll find the answer in the document

Finding information in a document is now easier with AI