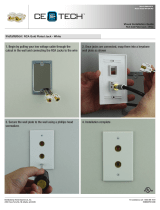
NHT IWS Owner's Manuals

Category
Audio equalizers
Type
Owner's Manuals

NHT iWS is an in-wall subwoofer system designed to deliver refined, musical sound from an invisible package. With a custom-designed 12” woofer, the A1 amplifier, and the X1 crossover, this system fits within standard frame construction and provides powerful, versatile performance. Enjoy 27Hz bass extension, a rigid acoustic suspension enclosure, and a host of convenience features like variable gain control, phase control, and selectable internal or external standby mode. Experience the sonic performance and value of NHT's freestanding subwoofers with the invisibility of in-wall installation.

NHT iWS is an in-wall subwoofer system designed to deliver refined, musical sound from an invisible package. With a custom-designed 12” woofer, the A1 amplifier, and the X1 crossover, this system fits within standard frame construction and provides powerful, versatile performance. Enjoy 27Hz bass extension, a rigid acoustic suspension enclosure, and a host of convenience features like variable gain control, phase control, and selectable internal or external standby mode. Experience the sonic performance and value of NHT's freestanding subwoofers with the invisibility of in-wall installation.

iWS
In-Wall Subwoofer
Now Hear This
6400 Goodyear Road
Benicia, CA 94510
800-NHT-9993
OWNER’S MANUAL
Table of Contents
Specifications Page 2
Design Page 3
Placement Page 3
Connections Page 4
Configurations Page 5
Parts List Page 6
Enclosure Installation: Page 7
New Construction (unfinished walls)
Enclosure Installation: Page 8
Existing Construction (retrofitting finished walls)
Painting Page 9
Connecting the iWS to your system Page 9
Basic Settings for the X1 Crossover Page 11
X1 Active Crossover Page 11
X1 Design Page 11
X1 Placement Page 12
X1 Features and Controls Page 12
X1 System Status Indicators Page 15
X1 Fine Tuning Chart Page 15
A1 Monaural Amplifier Page 16
A1 Design Page 16
A1 Placement Page 16
Rack Mounting the A1 and or X1 Page 16
A1 Power Standby Mode Page 17
A1 Courtesy Lights Page 17
A1 Status Indicators Page 18
A1 - Replacing the Fuse Page 18
A1 - Changing the Line Voltage Page 18
Warranty Statement Page 19
1
Specifications
System Type:
Driver Complement:
Response:
Sensitivity:
Impedance:
Inputs:
Weight:
Cutout Dimension:
Bezel Dimension:
Depth behind wall:
Finish:
In-wall subwoofer
12” aluminum cone woofer
27Hz - 140Hz, +/-3dB
86dB (2.83V at 1M)
12 ohms nominal
Professional grade 5 way binding posts
36 lbs. each
13 1/8” H 13 1/8” W
14 1/2” H 14 1/2” W
3 3/8”
Matte black enclosure, white (paintable) bezel/grille
iWS Enclosure
A1 Amplifier
X1 Crossover
Frequency response: 10Hz - 65KHz +/-3.0 dB
20Hz - 20KHz +/- 0.5 dB
Distortion: <0.01% 20Hz-1KHz
< 0.075% 10KHz - 20Khz
Power Output:
200W rms into 8 ohms at rated distortion
250W rms into 6 ohms at rated distortion
300W rms into 4 ohms at rated distortion
Signal to noise ratio: 100dB (unwtd)
Input Impedance: >10K ohms
Damping Factor: >100 into 6 ohms
Gain: +27dB (1.7V sensitivity) for full output
Input connectors:
RCA jack for unbalanced line level input
XLR jack for balanced line level input
Detachable terminal block for external trigger in/thru
Output connectors: Pair of 5-way binding post
Standby Mode: Selectable internal and external. External 5 -24 VDC
Internal automatic when no signal is present for >20 minutes
Power Consumption: 600W Max
Standby Mode Power Consumption: <3W
Weight: 18 lbs.
Dimensions: 1.5"H x 17"W x 11.5"D
Finish: matte black anodized front panel, black painted chassis
Frequency response: 20Hz - 140Hz +/-3dB
through L/R input (continuously variable)
20Hz - 220Hz +/-3dB through LFE input (fixed)
50Hz,80Hz,110Hz-100KHz +/-3dB
Distortion: < 0.01% subwoofer output @ 100Hz, 1V
< 0.001% hi-pass output @ 1KHz, 1V
Signal to noise ratio: >105dB at Hi-pass output
>100dB at subwoofer output
Crossover: Low-pass continuously variable between 30-220Hz, 12dB/octave
Low-pass fixed at 220Hz,12dB/octave
High-pass selectable between 50, 80, 110Hz, 12dB/octave
Input connectors: Gold plated L and R RCA jacks for line level input
XLR jacks for line level input
Gold plated RCA jack for LFE input
XLR jack for LFE input
Detachable terminal block for external trigger in/thru
2.1mm x 5.5mm x 9.5mm power connector
Output connectors: Gold plated L and R RCA jacks for line level high-pass output
Gold plated RCA jack for LFE thru
XLR jacks for line level high-pass output
Gold plated RCA jacks for line level sub woofer output
XLR jacks for line level subwoofer output
Phase Control: Variable between 0 and 90 degrees
Switchable 0 - 180 degrees
Gain Control: +10dB and 0dB subwoofer sensitivity
Stereo / Mono Switch: Stereo or mono operation
Standby Mode: Selectable internal or external.
External 5 -24 VDC
Internal automatic when no signal is present for >20 minutes
Power Consumption: 3W
Weight: 9 lbs.
Dimensions: 1.5"H x 17"W x 11.5"D
Finish: matte black anodized front panel, black painted chassis
2
Thank you for your purchase of the NHT iWS In-Wall Subwoofer System. Please take a few minutes to read through this
Owner's Manual prior to installing your new subwoofer. The information provided will help you to obtain maximum perfor-
mance from your audio system. If you have questions or need assistance at any time during the installation or operation
of your new speakers, please call your NHT Dealer or our Toll-Free Customer Hotline at:
1-800-NHT-9993
Design
NHT loudspeakers are designed to deliver refined, musical sound from attractive and affordable packages. Our efforts are
guided by the study of human hearing and are optimized for real-world use. Every NHT speaker undergoes rigorous
testing and quality control at the factory to ensure you years of listening pleasure.
The iWS In-Wall Subwoofer System is designed to deliver the sonic performance and value of NHT’s acclaimed free-
standing subwoofers, while offering the invisibility of in-wall installation. The system comprises a custom-designed 12”
woofer, the A1 amplifier, and the X1 crossover. The rigid acoustic suspension enclosure is designed to minimize the audi-
ble effects of unwanted vibrations and resonances when mounted within standard frame construction. The powerful and
versatile A1 amplifier provides 200W output and a host of convenience features, while the X1 Crossover allows the sys-
tem to achieve 27Hz bass extension from an extremely small cabinet.
Caution: The iWS should be installed by an experienced and licensed custom installation professional. Be sure that the
installer possesses sufficient skill, the proper tools, knowledge of local fire and building codes, and a familiarity with the
structure of the building (especially wall and/or ceiling materials, layouts, electrical and plumbing lines, etc.).
Placement
The iWS is designed for interior in-wall installation between standard 2”x4” wood studs. Installation in outdoor locations or
in moisture-prone interior environments such as indoor swimming pools or saunas is not recommended.
Spend some time considering placement prior to installing the subwoofer(s). Once it is installed, the iWS is permanent, so
its location should be selected carefully. Contrary to popular belief, subwoofers are sensitive to placement. Low frequen-
cies produce long wavelengths and thus interact with room boundaries significantly. Placing the subwoofer near a corner
will tend to increase its bass output, but may result in “boomy” or “muddy” sound. Conversely, placing the subwoofer far-
ther into the room will tend to decrease its bass output, but may result in improved articulation and clarity. For flattest
response, install the subwoofer according to the “rule of thirds”: in a location 1/3 or 2/3 across a wall, and not 1/4 or 1/2
across the wall. A 1/3 or 2/3 location will excite fewer standing waves in the room.
Generally, the iWS should be installed along the same wall as the main (satellite) speakers for optimal integration. Position
the subwoofer so that it faces into the room, unobstructed by large furnishings. Install it on a flat wall surface to ensure a
good seal between the bezel and the wall. If you are using two iWS subwoofers in the same room, it is preferable to install
the second subwoofer assymetrically. For example, one subwoofer in a front corner, and one subwoofer 2/3 across the
front wall.
The iWS subwoofer is not magnetically shielded, and the woofer will distort a direct view (picture tube) type TV if installed
too close. Make sure that if the woofer is oriented directly behide the TV , the TV is at least two feet away. If the TV is off
to the side or above of the woofer, make sure it is three feet away.
3
Configurations
The basic configuration of the iWS can be expanded. For increased low frequency response and clarity, two iWS enclo-
sures may be connected in parallel to the A1 amplifier, which is designed with enough current capability to drive two sub-
woofers. Below are illustrations of 3 possible configurations.
iWS Cabinet
iWS Cabinet
iWS Cabinet
iWS Cabinet
iWS Cabinet
iWS Cabinet
iWS Cabinet
iWS Cabinet
X1
X1
X1
A1
A1
A1
A1
A1
A1
_
_
_
_
_
_
_
_
_
_
_
_
_
_
_
_
+
+
+
+
+
+
+
+
+
+
+
+
+
+
+
+
L
L
L
R
R
R
Mono
2 enclosures
wired parallel
Stereo
2 enclosures
wired parallel
times 2
Stereo
4
Connections
Before connecting the iWS to your system, it is important that you turn off the power to all components to avoid
damage. Before installing the iWS, map out the wiring paths between the enclosure and the A1 amplifier. Make
sure that the speaker cable does not rest on sharp or pointed objects.
The iWS is designed for use with the A1 amplifier and X1 crossover. As it does not have an internal crossover and requires
these components, or it will not function properly. Proper wiring of the subwoofer is essential to good sound. At a mini-
mum, 14AWG 2-conductor speaker wire is recommended for runs of 10 feet or less, with heavier special purpose speak-
er wire used for longer runs. When permanently installing wire inside walls, be sure to use cable that is rated for
in-wall use and has special jacketing for fire prevention. In the U.S., the U.L. standard is CL-2, CL-3 and CM cable,
and in Canada the CSA standard is FT4 wire. The wires should be run in accordance with National Electrical Code
and any applicable local building codes. Prepare the wire by stripping 1/4” to 3/8” of insulation from the ends and twist-
ing the exposed wire strands tightly. The 5 way binding posts accept all types of wire ends.
Be sure to wire the subwoofer "in-phase." That is, the Positive (red) terminal on the amplifier output must be
connected to the corresponding Positive (red) terminal on the subwoofer. Likewise with the Negative (black)
terminals. All speaker wires have some sort of marking along one or both conductors to help you make the correct con-
nections. Take care to wire the subwoofer correctly in-phase, because once the wall is sealed there is no access to the
terminals.
Parts List (one system):
(1) iWS subwoofer enclosure with driver
(1) A1 amplifier (packaged separately)
(1) X1 crossover (packaged separately)
iWS bezel and grille pack includes:
(1) Bezel
(1) Metal grille
(4) 1/4-20 X 2 1/4” panhead machine screws
(4) 1/4” washers
(1) Paint shield
Tools Needed:
#2 Philips screwdriver
Pencil
Caulking
Tape measure
Utility knife or keyhole saw
Level
Wire strippers
Safety goggles
Protective gloves
5
Enclosure Installation: New Construction (unfinished walls)
Note: If the bezel and grille are to be painted to match the wall, they must be painted first before being installed. See
“Painting” for further instructions.
1. Locate the centerline of the studs that the iWS cabinet is to be installed between. For a 2 x 4 that is 3 5/8" deep, this
will be 1 13/16" from one surface. Locate and mark this point on the inside surface of each of the two studs in at least two
locations. With a straightedge, connect these two marks to form the centerline of the 2 x 4.
2. Decide how high you are going to mount the iWS from the floor. Make sure to leave room for
the bezel to clear any baseboard that may be applied over the drywall. Higher up is safer from
this standpoint. Once you have determined the vertical location of the iWS, measure 12" up from
the bottom of the iWS. (Fig. 1) Make a mark on the 2 x 4 centerline at this location. Repeat for
the other 2 x 4. Repeat for both 2 x 4s at a height of 24" from the bottom of the iWS. Drill a 3/8"
hole through the 2 x 4s at each of the four marked locations. Try to keep the drill square to the
surface of the 2 x 4.
3. Insert the iWS cabinet into the wall between the studs. If the subwoofer is not going to be
mounted on the bottom of the wall, raise it to the desired height by placing blocks of wood under-
neath. Do not remove the woofer protector board. Put one of the supplied ¼" washers on the ¼-
20 x 2.25" machine screw. Push this screw through the 2 x 4. Start this screw several turns with
a HAND SCREWDRIVER. Repeat this step for the other three screws. Tighten all four of the
screws until the washers are just touching the 2 x 4. Make sure that the iWS cabinet is centered
between the front and rear surfaces of the 2 x 4s. Tighten the screws moderately. Once the foam
on the cabinet has been crushed some, stop.
If the iWS is going to be installed in the corner of the room where you may not have access to
the opposite side of the stud, or the stud is too thick for the screws, the threaded insert in that
side of the iWS cabinet MUST be filled with caulking. Failure to do this will cause air leaks, noise
and poor performance from the subwoofer.
4. Complete the pre wiring before the drywall goes up (see “Tech Tips: Pre Wiring for New
Construction”). Connect the speaker wire to the binding posts on the top of the enclosure, mak-
ing sure to observe correct polarity (see “Connections”). It’s a good idea to leave an extra few
feet of speaker wire.
12"
12"
fig.1
Enclosure
Drywall
Wood Cover
(cutout template)
fig.2
Tech Tips: Pre-Wiring for New Construction
1. For best results, avoid running speaker wire near AC wiring, as it may induce a 60Hz hum in the audio signal. It’s a
good idea to run the speaker wire after the electrical wiring has already been completed, so that you can route the speak-
er wire at least three feet away from the electrical wiring. If speaker wire and AC wiring must run parallel, install the wire
within a metal conduit. Note that low-voltage wiring (doorbell, intercom, telephone, security, etc.) are unlikely to induce
hum and can typically be run parallel to speaker wire with no detrimental effects.
2. When drilling holes through wall studs or ceiling joists, use a drill bit that is at least as wide as the speaker wire that
will be routed through them. Always drill through the center of the stud or joist. If the hole must be drilled within one inch
of the edge of a wall stud, add a nail plate to the drywall side to protect the wire from possible nails and screws put in the
wall later. Line up the holes in the studs or joists as you go, so that pulling the wire through them will be easier.
6
5. During the drywall phase, the wood cover that protects the
woofer also serves as the cutout template. The template is 13 1/8”
square with 1/2” radiused corners (fig. 2). Once installed, the
bezel outer frame will extend out about 5/8” beyond the perimeter
of the cutout to hide minor imperfections in the cutout .
6. When painting the wall, leave the wood cover to protect the
woofer, and don’t worry about overspray. If the bezel frame and
grille are to be painted, paint them separately before installing
them. (see the ‘Painting’ section in this manual)
7. Once the drywall and paint are complete, remove the wood cover and attach the bezel to the enclo-
sure via the (8) 8 X 2” panhead screws (fig. 3). Tighten screws snugly, making sure not to over-tight-
en, as this may compromise the fit of the bezel. DO NOT USE a power screwdriver for this. The foam
strips on the drywall side of the bezel frame reduce unwanted vibrations against the drywall and will compress
slightly to allow the bezel frame to rest flush against the wall.
8. Attach the metal grille by inserting it into the grooves in the bezel (fig. 4).
Enclosure Installation: Existing Construction (retrofitting finished walls)
Note: The iWS is primarily designed for new construction installations. Installing it into finished
walls requires cutting away a large piece of drywall and patching it once the subwoofer is
installed. If you are not comfortable or experienced with precision drywall work, consult a pro-
fessional contractor or custom installation professional. If the subwoofer bezel and grille are to
be painted to match the new wall, they must be painted first before being installed.
Warning: Exercise caution when drilling or cutting into exisiting walls. Do not drill through exist-
ing wires, pipes, conduits, heating or air conditioning ducts. If you feel resistance while drilling,
stop immediately.
1. Once you’ve selected the desired location for the subwoofer, use a studfinder or the “knock-
ing” method to locate the studs in the wall area where you wish to mount the subwoofer enclo-
sure. The enclosure is 14” wide, 3-3/8” deep and mounts neatly between 2 x 4 studs spaced 16”
apart on center.
2. Determine that there are no obstructions behind the desired cutout area. This is accomplished
by driling a hole in the cener of the cutout area and using a long “L”-shaped piece of metal (like a
coat hanger) to “feel around” behind the wall. Most walls will have a run of Romex (electrical
wiring) approximately one foot up from the floor (fig. 5). Do not attempt to cut the electrical
wires! In these cases, the enclosure will need to be mounted above the electrical wiring. If you
discover any other obstructions (such as pipes, conduits or ducts), fill the hole with patching com-
pound and try another location.
3. Once a suitable wall location has been found, carefully cut away a section of drywall 24” wide and 38” tall. Center the
24” wide hole over the two studs. There should be an opening 3 3/16” wide on either side of each stud (fig. 6). If the sec-
tion of drywall is cut out carefully, it may be re-used later to patch the wall once the enclosure is installed.
4. Locate the centerline of the studs that the iWS cabinet is to be installed between. For a 2 x 4 that is 3 5/8" deep, this
Electrical
Wiring
fig.5
3 3/16"
fig.6
fig.3
fig.4
7
will be 1 13/16" from one surface. Locate and mark this point on the inside surface of each of
the two studs in at least two locations. With a straightedge, connect these two marks to form
the centerline of the 2 x 4.
5. Decide how high you are going to mount the iWS from the floor. Make sure to leave room
for the bezel to clear any baseboard that may be applied over the drywall. Higher up is safer
from this standpoint. Once you have determined the vertical location of the iWS, measure 12"
up from the bottom of the iWS. (Fig. 7) Make a mark on the 2 x 4 centerline at this location.
Repeat for the other 2 x 4. Repeat for both 2 x 4s at a height of 24" from the bottom of the
iWS. Drill a 3/8" hole through the 2 x 4s at each of the four marked locations. Try to keep the
drill square to the surface of the 2 x 4.
6. Insert the iWS cabinet into the wall between the studs. If the subwoofer is not going to be
mounted on the bottom of the wall, raise it to the desired height by placing blocks of wood
underneath. Do not remove the woofer protector board. Put one of the supplied ¼" washers
on the ¼-20 x 2.25" machine screw. Push this screw through the 2 x 4. Start this screw sev-
eral turns with a HAND SCREWDRIVER. Repeat this step for the other three screws. Tighten
all four of the screws until the washers are just touching the 2 x 4. Push the iWS cabinet as
far back into the wall as possible. Tighten the screws moderately. Once the foam on the cab-
inet has been crushed some, stop.
7. After running speaker wire to the enclosure location, connect the wire to the binding posts
on the top of the enclosure, making sure to observe correct polarity (see “Connections”).Once
the enclosure is connected to the speaker wire and secured to the studs, prepare a drywall
patch that includes a cutout for the bezel (fig. 8). The wood cover that protects the woofer
also serves as the cutout template. The template is 13 1/8” square with 1/2” radiused cor-
ners. Once installed, the bezel outer frame will extend out about 5/8” beyond the perimeter
of the cutout to hide minor imperfections in the cutout.
8. When painting the wall, leave the wood cover to protect the woofer, and don’t worry about
overspray. If the bezel frame and grille are to be painted, paint them separately before
installing them. (see the ‘Painting’ section in this manual)
9. Once the drywall and paint are complete, remove the wood cover and attach the bezel to
the enclosure via the (8) 8 X 2” panhead screws (fig. 9). Tighten the screws snugly, making
sure not to over-tighten, as this may compromise the fit of the bezel. DO NOT USE a power
screwdriver for this. The foam strips on the drywall side of the bezel frame reduce unwanted
vibrations against the drywall and will compress slightly to allow the bezel frame to rest flush
against the wall.
10. Attach the metal grille by inserting it into the grooves in the bezel (fig. 10).
Painting
The bezel frame and grille of the iWS are finished in a matte white powder-coated finish that
may be painted to match the wall. The bezel and grille must be painted before they are
installed. Keep in mind that the grille contains hundreds of tiny holes that are essential to the
sound of the subwoofer. Take care not to cover these holes with paint.
12"
12"
fig.7
fig.8
fig.9
fig.10
8
1. Paint the bezel frame and the grille at the same time using the same paint.
2. When using spray paint, apply two thin coats, making sure to let the first coat dry completely before applying the sec-
ond. This will avoid running. When using a compressor and spray gun, apply the paint using its finest setting. Hold the
gun or spray can 24” from the grille when painting, this will help keep the holes from getting clogged. Painting with a brush
is not recommended, but when necessary be sure to thin the paint so as not to cover the holes in the grille. If paint does
cover any of the grille holes, poke them out with a paper clip.
3. Do not attempt to paint the black surface surrounding the driver on the enclosure. Its black finish prevents the sub-
woofer’s black driver from being visible once the grille is attached.
Connecting the iWS to your system
Connect the iWS from the front L & R audio signal
and employ a high-pass filter for the front L & R speakers
Use if:
You wish to send your front L & R speakers a high-pass filtered signal
iWS Connection Method #1
Line
Output
LFE /
Subwoofer
L
R
AV Receiver
(or surround processor and separate amplifier)
Set
To
Mono
iWS Cabinet
X1
A1
_
_
+
+
9
Connect the iWS from the “Subwoofer Out”
and run the front L & R speakers full-range
Use if:
You wish to run your front L & R speakers full-range (no high-pass filter)
You have a receiver / integrated amplifier with “Subwoofer Out” jacks
iWS Connection Method #2
LFE /
Subwoofer
AV Receiver
(or surround processor and separate amplifier)
Set
To
Mono
iWS Cabinet
X1
A1
_
_
+
+
10
Basic Settings for the X1 Active Crossover
The following diagrams will provide starting points for each control feature on the X1. Begin with these basic settings and
then move onto the next section which describes each X1 control function in detail and provides advice for fine tuning the
X1 to your listening room.
X1 Active Crossover
The subwoofer enclosure must be correctly connected to the A1 amplifier and X1 crossover in order to function properly.
X1 Design
The NHT X1 active crossover is designed to allow convenient front panel adjustment necessary to integrate the iWS sub-
woofer with most popular satellites. It also provides unbalanced RCA and balanced XLR inputs and outputs for connec-
tion with all types of receivers or separate audio components.
NOTE: The X1 contains special equalization circuitry specifically designed for the iWS and Evolution subwoofers. It is not
recommended for use with other subwoofers.
The X1 Active Crossover can operate as either a mono (single channel) or stereo unit (dual channel). See the
Configurations section on page 5. In the stereo mode, you may add an additional subwoofer without purchasing an addi-
Boundary EQ
LFE Gain
Master Gain
Min
Min
-6
-3 +3
Max
Max
+6
0
0
90
180
0
Phase
75
55
30
Low Pass
140
80
110
HZ
50
65
Degrees
dB
LFE LFE In
High Pass
Out L
High Pass
Out R
Hi Pass
Out
Sub
Out
Gain
High Pass Filter
Out
In
R
L
110Hz
Stereo
10 dB
80Hz
50Hz
Mono
0dB
Not used in Method #1
11
tional amplifier. Two subwoofers can be used for stereo bass (which is desirable for music reproduction) or for additional
mono bass reinforcement (for movie soundtracks).
Note: Do not use both the unbalanced (RCA) and balanced (XLR) inputs at the same time. The unbalanced (RCA) and
balanced (XLR) outputs are buffered separately and may be used simultaneously.
X1 Placement
The X1 Crossover may be used on a shelf, or in a standard 19" equipment rack using the optional rack ears and hardware.
See section Rack Mounting the A1 and or X1 on page 16.
Ideally, the X1 should be placed in close proximity to the receiver or surround processor. Minimizing cable lengths reduces
the chance of noise contamination. If your other audio equipment has balanced inputs or outputs we strongly recommend
connecting the X1 and A1 to your system with them.
If you are using the X1 in combination with the Evolution A1 amplifier, we recommend that you place the X1 underneath
the A1 amplifier. Or, in a stereo configuration, place the X1 between two A1 amplifiers. The A1's are equipped with lamps
under the front edge, which illuminate the X1 controls. See A1 Courtesy Lights on page 17 section for more details.
X1 Features and Controls
This section describes the various controls and functions of the X1. Make sure that your X1 controls initially are set as
described in the previous section before continuing.
Power/Standby Mode (Rear Panel)
Your X1 crossover does not have a power switch but has been designed with the ability to turn itself
on and off under various conditions. There are three methods for triggering the X1.
On the rear panel of the X1 is a 3-position switch that determines the trigger mode:
1) On; the X1 is always on.
2) Audio; the X1 automatically turns on when it detects an audio signal and turn off after 20 minutes with no signal.
3) 12V Ext; the X1 is remotely turned on when it detects a DC control signal from another component in your system.
The external trigger will accept 5 - 24 volt (DC) signals. For more information regarding external triggers, consult your
authorized dealer.
Master Gain (Front Panel)
The Master Gain control allows you to adjust the volume of the subwoofer relative to the other
speakers in the system. Use the Master Gain judiciously. A properly calibrated subwoofer blends
seamlessly with the Monitors or satellites without calling attention to itself. Here are some general
guidelines for setting the Master Gain control:
12
Begin by playing some stereo music you are familiar with. Set your AV Receiver or Surround Processor volume to a com-
fortable listening level. Slowly increase or decrease the Master Gain on the X1 crossover, listening for a natural
frequency balance between the subwoofer and the front left and right satellites. When properly balanced, you will hear
natural bass extension, without being aware that it is coming directly from the subwoofer.
Once the Master Gain is set, the volume control on your AV Receiver or Surround Processor will control the volume of your
entire system, including the subwoofer.
LFE Gain Control (Front Panel)
LFE is short for ‘Low Frequency Effects’. Low Frequency Effects originally were low frequency
sounds added to movie soundtracks in order to increase their impact. For consumer electronics,
there is no standard concerning what type of signal might be present on the LFE channel.
Therefore, we have added an LFE input and gain control to the X1 so that you can integrate what-
ever is present on the LFE channel with the signal being reproduced by the rest of the system.
After you have adjusted the Master Gain control as described above, play a multi-channel recording through your system
(as from a movie). Sources with lots of bass output will be the most useful. Adjust the LFE gain control until the bass pro-
duced by the subwoofer reaches the desired level. Most users initially set the level of the LFE gain control too high, so be
prepared to adjust the control over a long period of time. You have reached an appropriate level setting when movies
soundtracks have impact and music sources have punchy bass, but the overall character of the bass produced by the sub-
woofer is not thick and ill defined.
The level of the signal on the LFE channel varies considerably from source to source, in most cases this can be adusted.
Consult the manual for your receiver or processor for further details.
There is an LFE “Thru” output on the back of the X1. For more information concerning the use of this output, visit our web-
site, www.nhthifi.com/technicalhelp/evolution .
High Pass Filter Switch (Rear Panel)
Note: If you are using Connection Method #2, the X1 High Pass Filter is not in the circuit path. Your
left and right speakers will reproduce the frequency range selected by your AV Receiver.
The High Pass Filter determines the range of frequencies that the left and right main speakers
("satellites") will reproduce. For example, a high pass setting of 80Hz means that the main speakers receive a signal con-
taining only frequencies above 80Hz. The 3-positon High Pass Filter is selectable between 50Hz, 80Hz, and 110Hz to
accommodate a variety of speaker sizes.
Set the High Pass Filter to a frequency above the rated low frequency limit of the main speakers. For example, if your
speakers have a rated low frequency response of 40Hz, use the 50Hz high-pass setting. If your speakers have a rated
low frequency response of 90Hz, use the 110Hz high-pass setting. Check the owner's manual for their rated low frequency
response.
Low Pass Filter Control (Front Panel)
The continuously variable Low Pass Filter determines the range of frequencies produced by the
subwoofer. For example, a low pass setting of 100Hz means that the subwoofer reproduces only
13
frequencies below 100Hz. The LFE input is not affected by this control.
Adjust the Low Pass Filter to approximately the same setting as the High Pass Filter as a starting point. Adjust the Low
Pass Filter in small increments up or down until the blend between the Evolution Subwoofer and your main speakers is
seamless and the subwoofer does not call attention to itself. Music featuring male vocals, cello and acoustic bass, bass
guitar and certain wind instruments (like saxophone and trombone) is useful for setting the low pass frequency.
Phase Controls (Front Panel)
The Subwoofer Phase switch and continuously variable control change the phase of the subwoofer
output anywhere from 0° to 270° relative to the high pass output. Proper subwoofer phase is impor-
tant to achieve smooth bass response. An improper phase setting causes a dip in the frequency
response of the combined subwoofer/satellite system at the listening position. The result of this dip
is low frequency production that is very deficient around the crossover frequency and a lack of seamless integration
between the satellites and subwoofer.
The optimal phase setting will vary depending on room conditions and placement. While fine tuning the phase controls,
have a familiar stereo CD available. You should listen to the same song while alternating phase settings. Find the best
setting while sitting at the primary listening position.
Begin by setting the phase knob at 0°, alternating the switch position between 0° and 180°. From the listening position,
choose the switch position that yields the most bass output and leave the switch in that position. Then use the knob to
fine-tune the phase setting. Slowly twist the knob, listening for the point at which the bass at the listening position is the
loudest. Small changes in phase generally produce subtle changes in bass output. You may have to adjust the knob now
and again over a period of a few weeks to find the best setting for your listening room.
Gain Switch (Rear Panel)
The Subwoofer Gain switch allows you to increase the gain of the X1 subwoofer output by 10dB.
Normally, the factory default "0" position will give you a wide range of volume adjustment. However,
if the sensitivity of your satellite speakers is greater than 93dB, your range of volume adjustment on
the X1 may be limited. In this case, set the Gain Switch to 10dB.
Boundary EQ (Front Panel)
Reflective boundaries (such as walls) reinforce a speaker’s bass output (3dB for two walls, 6dB for
a corner) if the subwoofer is placed near them. Conversely, placing a subwoofer out in the room
results in a relative decrease in bass output. Boundary reinforcement may lead to low frequency
response that is uneven. Some frequencies will sound exaggerated relative to others, or the sub-
woofer will sound thin and lack impact. The Boundary EQ control allows you to compensate for the effects of room bound-
aries on the frequency response of the subwoofer. Adjusting the control enables you to achieve smooth low frequency
output from the subwoofer regardless of its location in your room.
14
X1 System Status Indicators (Front Panel)
Located on the right hand side of the front panel are two LEDs. They are used to indicate the func-
tional status of the X1 Crossover.
P - Power LED (green) - indicates the X1 is on and in a ready condition.
S - Standby LED (amber) - indicates the X1 crossover is in "standby" mode.
X1 Fine Tuning Chart
The chart below was developed to assist you in the further fine tuning of your subwoofer or tower system. Should you be
unable to achieve satisfactory performance from your iWS subwoofer system using the fine-tuning chart, contact your
authorized NHT dealer or call our Customer Hotline at 1-800-NHT-9993 (648-9993).
Low
Bass
Lower
Mid
High
Mid
Bass
Mid
Upper
Bass
Upper
Mid
Below
50Hz
50Hz 300Hz180Hz100Hz 700Hz
100Hz 700Hz300Hz
3KHz
and Above
180Hz 3KHz
"Boomy"
Too Much
Mid / Upper
Bass
Problem
Solution
Lacks
Low
Bass
Weight
Excessive
Low
Bass
Weight
Lacks
Mid / Upper Bass:
Lean But With
Weight
Fine Tuning Flow Chart
Lower
Low Pass
X-Over
Frequency
Increase
Boundary
EQ
Decrease
Boundary
EQ
Adjust
Subwoofer
Volume
Listen
If this makes
it worse,
try
If the sound
improves
Raise
Low-Pass
Setting
Adjust
Subwoofer
Volume
Adjust
Subwoofer
Phase
Listen
Lower
Subwoofer
Volume
Adjust
Subwoofer
Phase
0-90
(Continuously
Add)
Adjust
Subwoofer
Phase
0-90
(Continuously
Add)
Adjust
Subwoofer
Phase
Switch
0-180
Listen
Listen
Listen
15
A1 Monaural Amplifier
A1 Design
The A1 is a full range (20Hz - 20kHz) audio power amplifier. It provides RCA and XLR inputs for connection with all types
of receivers or separate audio components. The A1 is a single channel or monaural amplifier and can be used to drive any
loudspeaker with a minimum impedance of 3 ohm.
The A1 is a Class G design, which operates at lower temperatures than typical amplifier designs and is typically more effi-
cient. The A1 offers the wide dynamic range and low distortion typical of more conventional class AB designs.
A1 Placement
The A1 amplifier may be placed on a shelf, or in a standard 19" equipment rack using the optional rack ears and hardware.
See instructions on rack mounting below.
Ideally, the A1 should be placed in close proximity to the receiver or surround processor. Minimizing low level signal wire
lengths reduces the chance of noise pickup. If long runs (more than 20’) of signal cable are required we recommend using
the balanced (XLR) input on the amplifier.
Note: Due to the placement of the A1's power switch on the rear panel, do not install the A1 in a wooden box or similar enclo-
sure where access to the power switch is blocked or inconvenient.
Rack Mounting the A1 and or X1
You may need assistance to hold the A1 or X1 in place while mounting them in a rack.
Note: When rack mounting, we recommend you leave at least one rack space
between components (particularly amplifiers) for proper cooling.
Step One: Remove the two screws on each front side of the X1 or A1 with a #2
Phillips screwdriver.
Step Two: Position the rack ears over the threaded holes. Replace the two screws
and tighten both securely.
16
Step Three: Arrange the mounting screws included with the rack ears and the plastic insulat-
ing washers as shown.
Step Four: Start all four screw, then tighten securely.
A1 Power/Standby Mode
The main power switch for the A1 is located on the rear panel and does not normally need to be used. The A1 has a stand-
by mode that can be triggered internally or externally. On the rear panel of the A1 is a 3-position switch that determines
the trigger source:
1) On: The A1 is always on.
2) Audio: The A1 automatically turns on when it detects an audio signal and turn off after 20
minutes with no signal.
3) 12V Ext: The A1 is remotely turned on when it detects a DC control signal from another
component in your system. The external trigger will accept 5 - 24 volt (DC) signals. For more infor-
mation regarding external triggers, consult your authorized dealer.
A1 Courtesy Lights
The A1 amplifier is equipped with courtesy lights to illuminate
the controls of the X1. This feature is controlled by a 3-position
switch for HI, LO and OFF settings that can be accessed from
the bottom of the amplifier just behind the center of the front
panel. The A1 courtesy lights are set in the HI position at the
factory.
To adjust the intensity or turn off the lights, unplug the A1 from the wall. Use a small flat blade screwdriver and move the
switch according to the desired position using the diagram. The courtesy lights will turn off automatically when the ampli-
fier is in “standby” mode.
High
Low
Off
17
A1 System Status Indicators
Located on the right hand side of the front panel are three LEDs. They are used to indicate the sta-
tus of the A1 amplifier.
P - Power LED (green) - indicates the A1 amplifier is on and in a ready condition.
S - Standby LED (amber) - indicates the A1 amplifier is in "standby" mode.
F - Fault/Protection LED (red) - indicates the A1 amplifier is in a fault condition.
Fault/Protection: The A1 can go into Protection mode for several reasons. A common reason is that the speaker output
wires have been shorted together. Another could be that the amplifier has overheated. Should either of these conditions
occur, repairing the cause of the output short or allowing the amplifier to cool will solve the problem. To reset the A1, turn
the power switch (rear panel) off and then on. If the problem persists, contact your NHT dealer.
A1 - Replacing the Fuse
The A1 amplifier's fuse is user-serviceable.
To replace the fuse:
1. Turn the power off.
2. UNPLUG the power cord from the wall outlet and the A1.
3. Remove the fuse holder cover (next to power cord) with a flat blade screwdriver.
4. Remove the fuse from holder and replace it with the appropriate type.
5. Reinstall the fuse holder.
Always replace the fuse with one of the exact same specifications.
For systems operating at 115VAC, use only a 5x20 mm, T5AL, 250V slow-blow fuse.
For systems operating at 230VAC, use only a 5x20mm, T2.5AL, 250V slow-blow fuse.
A1 - Changing the Line Voltage Setting
The A1 was designed to operate on two line voltage settings, 115VAC and 230VAC. In the event
that it is necessary to change the line voltage setting, begin by turning the power switch to the off
position. Remove all the connections from the amplifier, including the detachable power cord.
Using a flat blade screwdriver, slide the switch to the correct position. Use the 115VAC position for
110 to 120 VAC, and the 230VAC position for 220 to 240 VAC. Next you will likely need a power
cord that fits the AC receptacle and you will need to replace the fuse (see "Changing the Fuse" above).
18
Limited Warranty
Valid Only in the U.S.A.
Warranty Period
For the period of 5 years for parts and 5 years for labor from date of original purchase (the warranty period) from an autho-
rized NHT dealer, Now Hear This (NHT) warrants that if our product fails to function properly under normal use due to a man-
ufacturing defect when installed and operated according to the owner’s manual instructions enclosed with the unit, it will be
repaired or replaced with a unit of comparable value at the option of NHT without charge to you for parts or actual repair work.
Parts supplied under this warranty may be new or rebuilt at the option of NHT.
What’s Not Covered
This warranty does not cover any product which is used in any trade or business, or in an industrial or commercial applica-
tion.
This warranty does not cover the cabinet or any appearance item, or any damage caused to the product resulting from: alter-
ations, modifications not authorized in writing by NHT, accident, misuse or abuse, damage due to lightning or power surges,
or being subjected to power in excess of the speaker’s published power rating.
This warranty does not cover the cost of parts which would otherwise be provided without charge under this warranty, obtained
from any source other than an authorized NHT service location. This warranty does not cover defects or damage caused by
the use of unauthorized parts or labor or from improper maintenance.
Altered, defaced or removed serial numbers void this warranty.
Your Rights
The liability of NHT will be limited to the purchase price of the product, and NHT will not be liable for incidental or consequential
damages. NHT limits its obligations under any implied warranties under state laws to a period not exceeding the warranty
period. Some states do not allow limitations on how long an implied warranty lasts, and some states do not allow the exclu-
sion or limitation of incidental or consequential damages. The above limitations or exclusions may not apply to you. This war-
ranty gives you specific legal rights, and you may have other rights which vary from state to state.
To Obtain Service
NHT has appointed a number of authorized service companies throughout the USA should your product ever require service.
To receive warranty service, you will need to present your sales receipt showing place and date of original owner’s transac-
tion.
To find the name and address of the nearest authorized NHT service location, call or write: Customer Service Department,
NHT, 6400 Goodyear Rd., Benicia, CA 94510, 1-800-NHT-9993 (648-9993), www.nhthifi.com
Keep this warranty with your sales receipt. Record date and place of purchase for future reference.
19
  • Page 1 1
  • Page 2 2
  • Page 3 3
  • Page 4 4
  • Page 5 5
  • Page 6 6
  • Page 7 7
  • Page 8 8
  • Page 9 9
  • Page 10 10
  • Page 11 11
  • Page 12 12
  • Page 13 13
  • Page 14 14
  • Page 15 15
  • Page 16 16
  • Page 17 17
  • Page 18 18
  • Page 19 19
  • Page 20 20

NHT IWS Owner's Manuals

Category
Audio equalizers
Type
Owner's Manuals

NHT iWS is an in-wall subwoofer system designed to deliver refined, musical sound from an invisible package. With a custom-designed 12” woofer, the A1 amplifier, and the X1 crossover, this system fits within standard frame construction and provides powerful, versatile performance. Enjoy 27Hz bass extension, a rigid acoustic suspension enclosure, and a host of convenience features like variable gain control, phase control, and selectable internal or external standby mode. Experience the sonic performance and value of NHT's freestanding subwoofers with the invisibility of in-wall installation.

Ask a question and I''ll find the answer in the document

Finding information in a document is now easier with AI