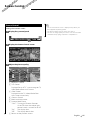
Kenwood DNX-710 User manual
- Category
- Car video systems
- Type
- User manual
This manual is also suitable for

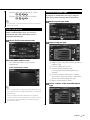
GPS NAVIGATION SYSTEM
DNX7100
DNX710EX
INSTRUCTION MANUAL
© B64-3644-10/01 (KV)
Take the time to read through this instruction manual.
Familiarity with installation and operation procedures will help you obtain the best
performance from your new GPS Navigation System.
For your records
Record the serial number, found on the back of the unit, in the spaces designated on the
warranty card, and in the space provided below. Refer to the model and serial numbers
whenever you call upon your Kenwood dealer for information or service on the product.
Model DNX7100/DNX710EX Serial number
US Residence Only
Register Online
Register your Kenwood product at
www.Kenwoodusa.com

2 DNX7100
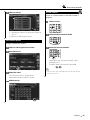
Contents
Basic Operations 12
Radio Listening 31
Functions When Displaying the Easy
Control Panel 31
Functions While Displaying the
Control Screen 31
Seek Mode 32
Auto Memory 32
Manual memory 33
Preset Select 33
Radio Text 34
Set Station Name 34
Direct Search 34
Traffic Information 35
Search for Program Type 35
Video File/Picture File Watching 28
Function During Playback Screen 28
Functions When Displaying the Easy
Control Panel 28
Functions While Displaying the
Control Screen 29
Picture Control 30
Folder Select 30
How to read this manual 4
Safety precautions 6
Notes 7
Navigation Control 16
Using the Navigation System 16
Accessing the SD Memory Card
Insertion Slot 16
Music Disc & Audio File Listening 22
Functions When Displayig the
Easy Control Panel 22
Functions While Displaying the
Control Screen 23
Set Disc Name 26
Folder Select (Function of Audio File) 26
Disc Select (Function of Disc Changer) 27
Direct Search 27
iPod Control 36
Connecting an iPod 36
Functions when Displaying the
Easy Control Panel 36
Functions while Displaying the
Control Screen 37
iPod List 38
Watching DVD/VCD 17
Functions During the Playback Screen 17
Functions When Displaying the Easy
Control Panel 18
Functions While Displaying the
Control Screen 18
DVD Disc Menu 19
VCD Zoom Control 21
Direct Search 21
USB Device Control 39
Functions when Displaying the
Easy Control Panel 39
Functions while Displaying the
Control Screen 39
USB List 40
Folder Select 41
TV Watching 42
Functions During TV Screen 42
Functions when Displaying the
Easy Control Panel 42
Functions while Displaying the
Control Screen 43
Seek Mode 43
Auto Memory 44
Manual memory 44
Preset Select 44
Set Station Name 45
Direct Search 45
Video Watching 46
Functions When Displaying the
Easy Control Panel 46
Functions while Displaying the
Control Screen 46
Satellite Radio Control 47
Functions When Displaying the
Easy Control Panel 47
Functions while Displaying the
Control Screen 47
Channel Search 48
Channel Memory 49
Direct Channel Search 49

English 3
Setup Menu 66
Setup Menu 66
Audio Setup 66
Crossover Network Setup 67
DVD Setup 67
Language Setup 68
Parental Level Setup 69
DivX Setup 70
Software Information 70
iPod Setup 71
System Setup 71
AV Interface Setup 72
User Interface 73
Entering Background 74
Background Delete 75
Background Select 76
Touch Panel Adjustment 76
Clock Setup 77
Monitor Setup 78
Security Code Setup 79
Deactivating Security Code 81
SAT ESN Watch Setup 81
Setup Memory 82
EXT SW Setup 83
Help? Troubleshooting 94
Help? Error 96
DVD language codes 97
Specifications 98
Audio Control 84
Audio Conrol Menu 84
Audio Control 84
Equalizer Control 85
Tone Setup 86
Zone Control 86
Source Select 53
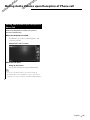
Displaying the Control Screen 53
External Device Power
Supply Control 54
External Device Power Supply Control 54
Muting Audio Volume upon
Reception of Phone Call 55
Muting Audio Volume upon Reception of
Phone Call 55
Character Entry 56
How to Use the Character Entry Screen 56
Screen Control 57
Screen Control 57
Hands Free Unit Control 58
Control Screen Function 58
When Called 59
When Dialing 59
Quick Dialing 60
Calling by Phone Book 60
Redialing 62
Setting Up the Hands-Free Phone 63
Selecting a Hands-Free Phone 63
Deleting the Hands-Free Phone 64
Remote Controller 88
Battery installation 88
Remote Controller mode switch 88
Common operations (AUD mode) 89
DVD/VCD/CD/Audio files (DVD mode) 90
TV (TV mode) 91
Radio (AUD mode) 92
NAVI (NAVI mode) 92
HD Radio Control 50
Functions When Displaying the
Easy Control Panel 50
Functions while Displaying the
Control Screen 50
Seek Mode 51
Auto Memory 52
Manual Memory 52

4 DNX7100
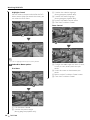
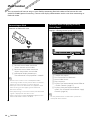
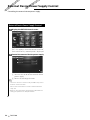
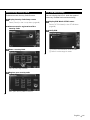
How to read this manual
This manual uses illustrations to explain its
operations.
The displays and panels shown in this manual
are examples used to provide clear explanations
of the operations.
For this reason, they may be different from the
actual displays or panels used, or some display
patterns may be different.
The above operation example with the mark
differs from the actual operation.
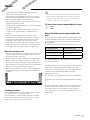
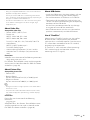
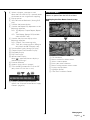
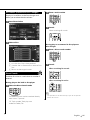
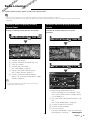
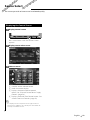
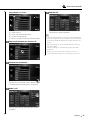
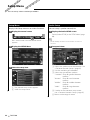
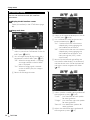
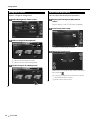
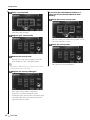
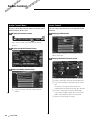
Seek Mode
Sets a station selection.
The mode is switched in following order each
time you touch the button.
Display Setting
"AUTO1" Tunes in a station with good reception
automatically.
"AUTO2" Tunes in stations in memory one after another.
"MANU" Switches to the next frequency manually.
Manual Memory
Stores the current receiving station in memory.
NAV
1 Select a station you wish to store in
memory
2 Store in memory
Next page

English 5

6 DNX7100
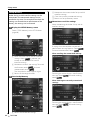
2WARNING
To prevent injury or fire, take the following
precautions:
• To prevent a short circuit, never put or leave any
metallic objects (such as coins or metal tools) inside
the unit.
• Do not watch or fix your eyes on the unit’s display
when you are driving for any extended period.
• Mounting and wiring this product requires skills and
experience. For safety’s sake, leave the mounting
and wiring work to professionals.
2CAUTION
To prevent damage to the machine, take
the following precautions:
• Make sure to ground the unit to a negative 12V DC
power supply.
• Do not install the unit in a spot exposed to direct
sunlight or excessive heat or humidity. Also avoid
places with too much dust or the possibility of
water splashing.
• When replacing a fuse, only use a new fuse with
the prescribed rating. Using a fuse with the wrong
rating may cause your unit to malfunction.
• Do not apply excessive force to the open faceplate
or place objects on it. Doing so will cause damage
or breakdown.
• Do not use your own screws. Use only the screws
provided. If you use the wrong screws, you could
damage the unit.
Do Not Load 3-in. CDs in the CD slot
If you try to load a 3 in. CD with its adapter into the
unit, the adapter might separate from the CD and
damage the unit.
Safety precautions
About CD players/disc changers connected
to this unit
Kenwood disc changers/ CD players released in 1998
or later can be connected to this unit.
Refer to the catalog or consult your Kenwood dealer
for connectable models of disc changers/ CD players.
Note that any Kenwood disc changers/ CD players
released in 1997 or earlier and disc changers made by
other makers cannot be connected to this unit.
Connecting unsupported disc changers/CD players to
this unit may result in damage.
Set the "O-N" Switch to the "N" position for the
applicable Kenwood disc changers/ CD players.
The functions you can use and the information
that can be displayed may differ depending on the
models being connected.
¤
• You can damage both your unit and the CD changer if you
connect them incorrectly.
Lens Fogging
When you turn on the car heater in cold weather,
dew or condensation may form on the lens in the
CD player of the unit. Called lens fogging, this
condensation on the lens may not allow CDs to play.
In such a situation, remove the disc and wait for the
condensation to evaporate. If the unit still does not
operate normally after a while, consult your Kenwood
dealer.

English 7
• If you experience problems during installation,
consult your Kenwood dealer.
• When you purchase optional accessories, check
with your Kenwood dealer to make sure that they
work with your model and in your area.
• We recommend the use of <Security Code Setup>
(page 79) to prevent theft.
• The characters conforming to ISO 8859-1 character
set can be displayed.
• The RDS or RBDS feature won’t work where the
service is not supported by any broadcasting
station.
• The illustrations of the display and the panel
appearing in this manual are examples used to
explain more clearly how the controls are used.
Therefore, what appears on the display in the
illustrations may differ from what appears on the
display on the actual equipment, and some of the
illustrations on the display may be inapplicable.
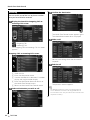
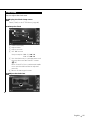
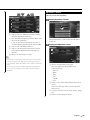
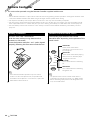
How to reset your unit
• If the unit fails to operate properly, press the Reset
button. The unit returns to factory settings when
the Reset button is pressed.
• Remove the USB device before pressing the Reset
button. Pressing the Reset button with the USB
device installed can damage the data contained in
the USB device. For how to remove the USB device,
refer to <Playing a USB device> (page 15).
• Press the reset button if the disc auto changer fails
to operate correctly. Normal operation should be
restored.
Reset button
NAV
Cleaning the Unit
If the faceplate of this unit is stained, wipe it with a
dry soft cloth such as a silicon cloth.
If the faceplate is stained badly, wipe the stain off
with a cloth moistened with neutral cleaner, then
wipe it again with a clean soft dry cloth.
¤
• Applying spray cleaner directly to the unit may affect its
mechanical parts. Wiping the faceplate with a hard cloth
or using a volatile liquid such as thinner or alcohol may
scratch the surface or erases characters.
TV tuner that can be connected to this unit
• KTC-V500N
• KTC-V300N
About iPod that can be connected to this
unit
You can control an iPod from this unit by connecting
an iPod (commercial product) with Dock connector
using an optional accessory iPod connection cable
(KCA-iP300V).
The following iPods can be controlled from this unit.
Controllable iPod Software version
iPod nano iPod nano software 1.2
iPod nano second generation iPod software 1.1.1
iPod with video iPod software 1.2
You must update your iPod software if its version is
less than the above.
The iPod software version is displayed in the "Version"
field by pressing the iPod MENU button and then
selecting "Set", "Information". The latest iPod software
updater can be downloaded from the Apple
Computer web site.
The character set supported by this unit is ISO08859-
1.
Characters that cannot be displayed correctly appear
as "*".
By connecting your iPod to this unit with an optional
accessory iPod connection cable (KCA-iP300V), you
can supply power to your iPod as well as charge it
while playing music. However, the power of this unit
must be on.
Notes

8 DNX7100
Handling CDs
• Do not touch the recording surface of the CD.
• Do not stick tape etc. on the CD, or use a CD with
tape stuck on it.
• Do not use disc type accessories.
• Clean from the center of the disc and move
outward.
• When removing CDs from this unit, pull them out
horizontally.
• If the CD center hole or outside rim has burrs,
use the CD only after removing the burrs with a
ballpoint pen etc.
CDs that cannot be used
• CDs that are not round cannot be used.
• CDs with coloring on the recording surface or CDs
that are dirty cannot be used.
• This unit can only play the CDs with
.
This unit may not correctly play discs which do not
have the mark.
• You cannot play a CD-R or CD-RW that has not
been finalized. (For the finalization process refer to
your CD-R/CD-RW writing software, and your CD-
R/CD-RW recorder instruction manual.)
List of playable discs
Disc
types
Standard Support Remark
DVD DVD Video
‡
DVD Audio ×
DVD-R
‡
MP3/WMA/AAC/JPEG/
MPEG/DivX Playback
Multi-border/Multisession/
(Playback depends on
authoring conditions)
Compatible with 8-cm (3
inch) discs
DVD-RW
‡
DVD+R
‡
DVD+RW
‡
DVD-R DL (Double layer)
‡
Only video format
DVD+R DL (Double layer)
‡
DVD-RAM ×
CD Music CD
‡
CD-TEXT/8-cm (3 inch)
discs supported.
CD-ROM
‡
MP3/WMA/AAC/JPEG/
DivX playback
Multisession supported
Packet write not supported.
CD-R
‡
CD-RW
‡
DTS-CD
‡
Video CD (VCD)
‡
Super video CD ×
Photo CD ×
CD-EXTRA
%
Only music CD session can
be played.
HDCD
%
Sound quality of normal
CD music
CCCD ×
Others Dualdisc ×
Super audio CD
%
Only CD layer can be
played.
‡
: Playback is possible.
% : Playback is partly possible.
× : Playback is impossible.
⁄
• DivX file must have the extension ".divx", ".div", or ".avi".
• When buying DRM enabled contents, check the
Registration Code in the <DivX Setup> (page 70).
Registration Code changes each time a file with the
displayed Registration Code is played to protect against
copying.
Notes

English 9
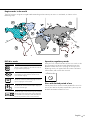
Region codes in the world
The DVD players are given a region code according to the country or area it is marketed, as shown in the
following map.
Operation regulatory marks
With this DVD, some functions of this unit such as the
play function may be restricted depending on the
location where the DVD is playing. In this case, the
following marks will appear on the screen. For more
information, refer to the disc manual.
Prohibition Mark
Discs with limited period of use
Do not leave discs with a limited period of use in this
unit. If you load an already expired disc, you may not
be able to remove it from this unit.
1
2
4
1
5
4
5
2
1
2
6
3
DVD disc marks
Symbol Description
ALL
Indicates a region number. The discs with this mark can
be played with any DVD player.
8
Indicates the number of audio languages recorded. Up
to 8 languages can be recorded in a movie. You can
select a favorite language.
32
Indicates the number of subtitled languages recorded.
Up to 32 languages can be recorded.
9
If a DVD disc has scenes shot from multiple angles, you
can select a favorite angle.
16:9 LB
Indicates the type of screen for the image. The left mark
indicates that a wide image picture (16:9) is displayed
on a standard TV set screen (4:3) with a black band at
both the top and bottom of the screen (letter box).

10 DNX7100
Notes
About Audio files
• Playable Audio file
AAC-LC (.m4a), MP3 (.mp3), WMA (.wma)
⁄
• If music of normal CD and other playback systems are
recorded in the same disc, only the playback system
recorded at the first setout is played.
• Playable AAC file
".m4a" file encoded by AAC-LC format.
Transfer bit rate: 16 – 320 kbps
Sampling frequency: 16 – 48 kHz
• Playable MP3 file
MPEG 1/2 Audio Layer 3 file
Transfer bit rate: 8 – 320 kbps
Sampling frequency: 8 – 48 kHz
• Playable WMA file
The file in accordance with Windows Media Audio
(Except for the file for Windows Media Player 9 or
after which applies the new functions)
Transfer bit rate: 48-192 kbps
Sampling frequency: 32, 44.1, 48 kHz
• Playable disc media
CD-R/RW/ROM, DVD±R/RW
• Playable disc file format
ISO 9660 Level 1/2, Joliet, Romeo, Long file name.
• The maximum number of characters for display
(CD-R/RW/DVD±R/RW)
File/Folder name: 128 characters
MP3 ID3 Tag version 1.x: 30 characters
• Limitation of structure for the file and the
folder (CD-R/RW/DVD±R/RW/USB device)
Maximum number of directory levels: 8
Maximum number of folders: 254
Maximum number of files per folder: 255
Maximum number of files per playlist: 7000 (USB
device)
• Playable USB device
USB mass storage class, iPod with KCA-iP300V
• Playable USB device file system
FAT16, FAT32
• About the Connection of the USB device
If an extension cable is needed for USB device
connection, usage of the CA-U1EX (option) is
recommended.
Normal playback is not guaranteed when a cable
other than the USB compatible cable is used.
Connecting a cable whose total length is longer
than 5 m can result in abnormal playback.
Although the audio files are complied with the standards
listed above, the play maybe impossible depending on
the types or conditions of media or device.
• Playing order of the Audio file
In the example of folder/file tree shown below, the
files are played in the order from to .
CD
v
()
<: Folder
v: Audio
v
v
v
v.
v
Folder
Audio file
The Audio file plays in the order which is written
by CD writing software. You may be able to set
the playing order by writing the play sequence
numbers such as "01" to "99" at the beginning of
the file name.
Audio files are played in the order the files are
written. You can specify the order of playback by
numbering files in a folder and writing them by
folder. (USB device)
⁄
• In this manual, the word "USB device" is used for flash
memories and digital audio players which work as mass-
storage-class devices.
• "iPod" in this manual refers to iPod connected with KCA-
iP300V (Optional accessory). iPod connected with KCA-
iP300V can be controlled from this unit. iPods that can be
connected to KCA-iP300V are iPod nano and iPod with
video. If you connect an iPod with commercially available
USB cable, it is treated as a mass storage class device.
• For the supported formats and types of USB device, refer to
www.kenwood.com/usb/.
• Attach the correct extension for the Audio file (AAC: ".M4A",
MP3: ".MP3", WMA: ".WMA")
• Do not attach the extensions to files other than the Audio
file. If the extension is attached, the file, which is not the
Audio file, will play and outputs a loud noise, causing
damage to the speaker.
• The files with copy protection cannot be played.
• The unit may not be compatible with upgrade of
compression format standard and additional specifications.
• CD-RW discs which are quick formatted by the writing
software cannot be used.
• When recording to the maximum CD-R/RW media capacity
at once, the writing software is set to "Disc at once".
• File/Folder name is the number of the characters including
the extensions.
• This unit can display the following versions of MP3 ID3 tag:
version 1.0/ 1.1/ 2.2 (USB device)/ 2.3 (USB device)
• AAC ID3 Tag cannot be displayed.
• Contact the sales agent as to whether your USB device
conforms to the USB mass storage class specs.

English 11
• Using an unsupported USB device can result in abnormal
playback or display of the audio file.
Even if you use the USB device conforming to the above
specs, audio files cannot be played normally depending on
the type or condition of the USB device.
• Do not leave the USB device in the vehicle for a long time.
It can deform or damage due to direct sunlight, high
temperature, etc.
About Video files
Acceptable video files
• Format: MPEG1, MPEG2, DivX
• Picture size:
MPEG1: 320 × 240, 352 × 240
MPEG2: 640 × 480, 704 × 480
DivX: 352 x 240, 352 x 288, 720 x 450, 720 x 576
• Audio format:
MPEG1/2: MPEG Audio Layer 2
DivX: MP3, Dolby Digital
• Audio sampling frequencies: 32/ 44.1/ 48 kHz
• Audio bit rate: 32–384 kbps (Only constant bit
rates)
Extensions
Video files must have one of the following extensions:
mpg, mpeg, mpe, m1v, m2v
Disc formats, file and folder names and playing order
are the same as those for audio files. Refer to <About
Audio files> (page 10).
About Picture files
Acceptable picture files
• Format: JPEG
• Baseline format:
Up to a maximum of 8192(W) × 7680(H) pixels
• Progressive format:
Up to a maximum of 1600(W) × 1200(H) pixels
⁄
• Enlarges and reduces images up to the size shown above
to fit to the screen.
• The picture files with information attached (such as Exif)
may not be displayed or operated (e.g.: rotation display)
properly.
Extensions
Picture files must have one of the following
extensions:
jpg, jpeg, jpe
Acceptable discs, disc formats, file and folder names
and playing order are the same as those for audio
files. Refer to <About Audio files> (page 10).
About USB device
• Install the USB device in the place where it will not
prevent you from driving your vehicle properly.
• You cannot connect a USB device via a USB hub.
• Take backups of the audio files used with this unit.
The files can be erased depending on the operating
conditions of the USB device.
We shall have no compensation for any damage
arising out of erasure of the stored data.
• No USB device comes with this unit. You need to
purchase a commercially available USB device.
Use of "DualDisc"
When playing a "DualDisc" on this unit, the surface
of the disc that is not played may be scratched
while the disc is inserted or ejected. Since the music
CD surface does not conform to the CD standard,
playback may be impossible.
(A "DualDisc" is a disc with one surface containing
DVD standard signals and the other surface
containing music CD signals.)

NAV
B
A EDC F
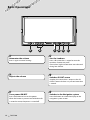
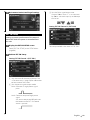
12 DNX7100
Basic Operations
Adjusts the volume
B
Attenuates the volume
Press it again to cancel muting.
A
Switches AV OUT source
Switches the source that is output at the AV
OUTPUT terminal when it is pressed more than
1 second.
C
Sets the Loudness
Press it for more than 1 second to turn the
Loudness function on or off.
If turned on, high and low tones are enhanced
during low volume.
A
Turns power ON/OFF
Press the button to turn on the power.
When the button is pressed and held down for
1 second or more, the power is turned off.
E
Switches to the Navigation system
Press the button to switch the display to the
navigation system screen.
E

English 13
Next page 3
Playing a disc
Press [0] (Eject) button to open the operation panel.
When you load a disc into disc loading slot, the disc starts playing.
If a menu appears, when playing a video disc, select the desired item.
⁄
• See <List of playable discs> (page 8) for a list of supported discs and formats.
Removing a disc
Press [0] (Eject) button to open the operation panel.
After removing the disc, press [0] (Eject) button to close the operation panel.
F

NAV
B
A EDC F
14 DNX7100
Basic Operations
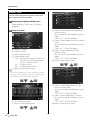
Switches the function screen
The function control screen switches in the following order each time you press the button.
Picture & Easy Control Panel
Source Control Screen
Picture Panel (OFF)
The following buttons are always displayed on the source control screen.
C
1 Displays the Source Select screen. (page 53)
2 Returns to the Source Control screen.
3 Displays the Audio Control Menu screen. (page 84)
4 Displays the SETUP Menu screen. (page 66)
5 Adjusts the Volume.
6 Clock display
⁄
• Touch displayed at bottom right of various screens to return to
the original screen.
2
3
4
5
6
1
5

English 15
Switches the video source
The video source switches in the following order each time you press the button.
Built-in Disc Player
TV
Video
iPod
Rear View Camera
Navigation
You can also turn off the video display by pressing the button longer than 1 second.
When you press the button again, the previous video display comes back on.
⁄
• You cannot switch to a source that is not connected or inserted.
• The Rear view camera video is displayed when the vehicle's gear is in "Reverse".
• Turn "On" the "Navigation Source" of the <AV Interface Setup> (page 72) to display the Navigation video.
D
Playing a USB device
When connecting a USB device, playback starts automatically.
Removing the USB device
Press on the USB control screen to enter the USB suspend mode, and then remove the USB
device. Refer to <USB Device Control> (page 39).
¤
• Removing the USB device before entering the USB suspend mode may result in damaging the data in the USB device.
⁄
• If the USB source is selected when a USB device is not connected, "No Device" is displayed.
• When the playback is stopped and then restarted, the playback will start from the point where it was stopped at the last
time. Even if the USB is removed and connected again, the playback will start from the last stopped point unless the
contents in the USB device is changed.
• Make sure that the USB device is connected firmly.

16 DNX7100
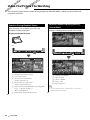
Sets and controls the navigation system function.
Using the Navigation System
Displays the navigation system screen and makes
the navigation function available.
1 Displaying the navigation screen
NAV
Press several times until the navigation screen
appears.
2 Setting the navigation system function
Touch the navigation system button displayed
on the screen. See the included NAVIGATION
SYSTEM's INSTRUCTION MANUAL for
information on using the navigation system.
⁄
• You can set the navigation system function when
nothing else is displayed on the screen. If anything else,
such as Easy control panel is displayed, erase it first.
Navigation Control
Accessing the SD Memory Card Insertion
Slot
An SD memory card is used to upgrade the map.
1 Press [NAV] to turn the power on
NAV
2 Press [0] to close the panel
NAV
3 Press [0] for at least 1 second to fully open
the panel
NAV
⁄
• See the NAVIGATION SYSTEM's INSTRUCTION MANUAL
for the detail upgrade method.

English 17
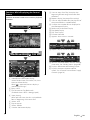
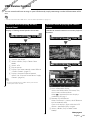
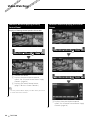
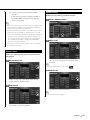
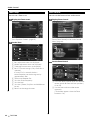
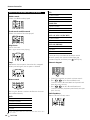
Watching DVD/VCD
You can play DVD/VCD using various functions.
• For the basic method of how to watch DVD/VCD, refer to <Basic Operations> (page 12).
• Set the remote controller mode switch to "DVD" mode before starting operation, refer to <Remote Controller mode switch>
(page 88).
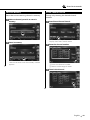
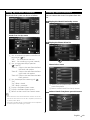
Functions During the Playback Screen
Basic functions are available even when the
playback screen is displayed.
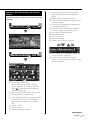
Display the playback screen.
or
NAV
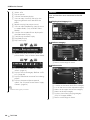
DVD playback screen
1 2 3
5 4
6
7
1 Title Number Display
2 Chapter Number Display
3 Play Time Display
4 Forward Chapter Search Area
Selects the next chapter.
5 Backward Chapter Search Area
Selects the previous chapter.
6 DVD Disc Menu Control Buttons Area
Displays the Disc Menu Control buttons
(page 19).
7 Information Display Button Area
VCD playback screen
8 9
11 10
12
13
8 Scene/Track Number Display
9 Play time Display
p Forward Scene/Track Search Area
Selects the next scene (when PBC is On) or
track (when PBC is Off ).
q Backward Scene/Track Search Area
Selects the previous scene (when PBC is On)
or track (when PBC is Off ).
w Zoom Control Button Area
Displays the Zoom Control buttons (page
21).
e Information Display Button Area
⁄
• The information display is cleared automatically after
approximately 5 seconds. Also, the information can be
displayed automatically when it is updated.

18 DNX7100
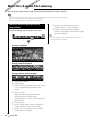
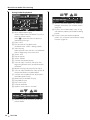
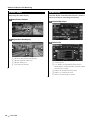
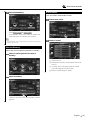
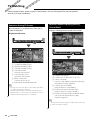
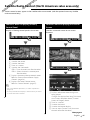
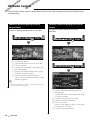
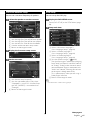
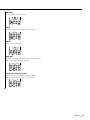
Functions When Displaying the Easy
Control Panel
Displays a floating control panel in the screen.
NAV
1
2 3 4
5
3 4
7
6
1 Switches the source.
2 Stops playing.
When pressed twice, the disc is played from
its beginning when you play it in the next
time.
3 Fast Forwards or Fast Backwards.
4 Chapter Search (during DVD play)
Searches for a chapter.
Scene/Track Search (during VCD play)
Selects a scene (when PBC is On) or a track
(when PBC is Off ).
5 Plays or pauses.
6 Displays the Screen Control screen.
Refer to <Screen Control> (page 57).
7 Displays the external device control screen.
Refer to <External Device Power Supply
Control> (page 54).
⁄
• The Easy Control Panel is hidden when you touch a
central part of the monitor.
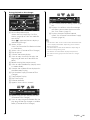
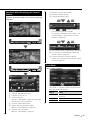
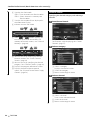
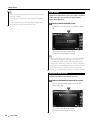
Watching DVD/VCD
Functions While Displaying the Control
Screen
Switches to control screen to use various
playback functions.
NAV
NAV
1
5
6
8 9
11
13
10
15
2
3
4
7
2
4
6
16
12
14
When playing a VCD
17 9
1 Ejects the disc from the built-in disc player.
2 Fast Forwards or Fast Backwards.
3 Stops playing.
When pressed twice, the disc is played from
its beginning when you play it in the next
time.

English 19
4 Selects a chapter, a scene or a track.
When the DVD-VIDEO/VCD is paused, touch
this button to start single-frame stepping.
5 Plays or pauses.
6 Slow Forwards or Backwards. (during DVD
play)
7 Switches the button display.
8 Switches the Repeat Play operations in the
following sequence.
DVD: Title Repeat, Chapter Repeat, Repeat
Off
VCD: Track Repeat, Repeat Off (Available
when the PBC is off )
9 Switches the play time display in the
following sequence.
DVD: Chapter, Title, remaining titles
VCD: Track, disc, remaining discs (Effective
only when the PBC function is off )
p Title Number Display (during DVD play)
q Chapter/Scene/Track Number Display
w Play Mode Display
e Play Time Display
r Volume Label Display
When
is appeared, the text display is
scrolled by pressing it.
t Function Indicator
y Appears when a disc is inserted.
u Turns the PBC function of VCD On or Off.
(only when VCD Ver 2.0 is in use)
18
i Displays the external device control
screen. See <External Device Power Supply
Control> (page 54).
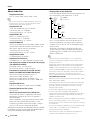
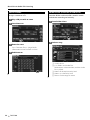
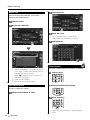
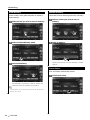
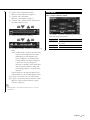
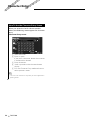
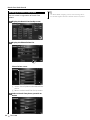
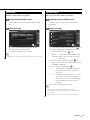
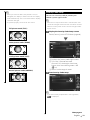
DVD Disc Menu
Selects an option from the DVD Disc Menu.
1 Display the Disc Menu Control screen
1
6
8
5
7
2
34
3
33
1 Calls the Menu.
2 Returns to the Disc Menu screen.
3 Selects a menu option.
4 Enters your menu selection.
5 Returns to the previous menu screen.
6 Displays the Top Menu.
7 Highlight Control.
8 Clears the Disc Menu Control.
Next page 3

20 DNX7100
Watching DVD/VCD
Highlight Control
You can select a chapter and title for the DVD
Menu screen. When you touch the screen, you
can select the DVD menu.
⁄
• To cancel Highlight Control, press [V.SEL] button.
2 Select Disc Menu options
Disc Menu
9
1413 10
11 12
9 Calls the Menu Control.
p Switches the picture angle.
(during program playback only)
q Switches the subtitle language.
(during program playback only)
w Switches the voice language.
(during program playback only)
e Displays the Zoom Control screen.
r Clears the Disc Menu Control.
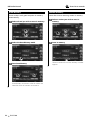
Zoom Control
15
16
16
16 16
17 18
t Changes the zoom ratio at 4 levels (2 times,
3 times, 4 times, or off) each time you
touch.
y Scrolls the screen in the direction you
touch.
u Returns to the Disc Menu Control screen.
i Clears the Disc Menu Control.
Page is loading ...
Page is loading ...
Page is loading ...
Page is loading ...
Page is loading ...
Page is loading ...
Page is loading ...
Page is loading ...
Page is loading ...
Page is loading ...
Page is loading ...
Page is loading ...
Page is loading ...
Page is loading ...
Page is loading ...
Page is loading ...
Page is loading ...
Page is loading ...
Page is loading ...
Page is loading ...
Page is loading ...
Page is loading ...
Page is loading ...
Page is loading ...
Page is loading ...
Page is loading ...
Page is loading ...
Page is loading ...
Page is loading ...
Page is loading ...
Page is loading ...
Page is loading ...
Page is loading ...
Page is loading ...
Page is loading ...
Page is loading ...
Page is loading ...
Page is loading ...
Page is loading ...
Page is loading ...
Page is loading ...
Page is loading ...
Page is loading ...
Page is loading ...
Page is loading ...
Page is loading ...
Page is loading ...
Page is loading ...
Page is loading ...
Page is loading ...
Page is loading ...
Page is loading ...
Page is loading ...
Page is loading ...
Page is loading ...
Page is loading ...
Page is loading ...
Page is loading ...
Page is loading ...
Page is loading ...
Page is loading ...
Page is loading ...
Page is loading ...
Page is loading ...
Page is loading ...
Page is loading ...
Page is loading ...
Page is loading ...
Page is loading ...
Page is loading ...
Page is loading ...
Page is loading ...
Page is loading ...
Page is loading ...
Page is loading ...
Page is loading ...
Page is loading ...
Page is loading ...
Page is loading ...
Page is loading ...
-
 1
1
-
 2
2
-
 3
3
-
 4
4
-
 5
5
-
 6
6
-
 7
7
-
 8
8
-
 9
9
-
 10
10
-
 11
11
-
 12
12
-
 13
13
-
 14
14
-
 15
15
-
 16
16
-
 17
17
-
 18
18
-
 19
19
-
 20
20
-
 21
21
-
 22
22
-
 23
23
-
 24
24
-
 25
25
-
 26
26
-
 27
27
-
 28
28
-
 29
29
-
 30
30
-
 31
31
-
 32
32
-
 33
33
-
 34
34
-
 35
35
-
 36
36
-
 37
37
-
 38
38
-
 39
39
-
 40
40
-
 41
41
-
 42
42
-
 43
43
-
 44
44
-
 45
45
-
 46
46
-
 47
47
-
 48
48
-
 49
49
-
 50
50
-
 51
51
-
 52
52
-
 53
53
-
 54
54
-
 55
55
-
 56
56
-
 57
57
-
 58
58
-
 59
59
-
 60
60
-
 61
61
-
 62
62
-
 63
63
-
 64
64
-
 65
65
-
 66
66
-
 67
67
-
 68
68
-
 69
69
-
 70
70
-
 71
71
-
 72
72
-
 73
73
-
 74
74
-
 75
75
-
 76
76
-
 77
77
-
 78
78
-
 79
79
-
 80
80
-
 81
81
-
 82
82
-
 83
83
-
 84
84
-
 85
85
-
 86
86
-
 87
87
-
 88
88
-
 89
89
-
 90
90
-
 91
91
-
 92
92
-
 93
93
-
 94
94
-
 95
95
-
 96
96
-
 97
97
-
 98
98
-
 99
99
-
 100
100


Kenwood DNX-710 User manual
- Category
- Car video systems
- Type
- User manual
- This manual is also suitable for
Ask a question and I''ll find the answer in the document
Finding information in a document is now easier with AI
Related papers
-
Kenwood DDX7701HD User manual
-
Kenwood DNX710EX User manual
-
Kenwood DDX5901HD Operating instructions
-
-
-
-
-
Kenwood DNX5250BT Owner's manual
-
-
Other documents
-
Kenwood Electronics DNX-4230BT User manual
-
JVC KW-V51BT Owner's manual
-
Pioneer DVH-P4150UB Operating instructions
-
Mitsubishi MZ360234EX (DNX7200ZM4) User manual
-
Pioneer DVH-P4100UB User manual
-
Rosen DP-1001 User manual
-
Rosen CAR SHOW 7 User manual
-
Sony XTL-W7000 User manual
-
Pyle PLTV71 User manual
-