Page is loading ...

SAVE FOR FUTURE USE
7302165-100 Rev. A
Product names listed herein are trademarks of AS America, Inc.
© AS America, Inc. 2014
INSTALLATION INSTRUCTIONS
CARE AND MAINTENANCE
CAUTION: PRODUCT IS FRAGILE. TO AVOID BREAKAGE AND POSSIBLE INJURY HANDLE WITH CARE!
!
NOTE: Pictures may not exactly define contour of china and components.
Thank you for selecting American Standard - the benchmark of fine quality for over 100 years. To ensure this product is installed properly, please read
these instructions carefully before you begin. (Certain installations may require professional help.) Also be sure your installation conforms to local codes.
Water Supply Line
EZ-INSTALL KIT INCLUDED WITH TANK
TANK 4000.119
BOWL 3075.120 RIGHT HEIGHT
®
ELONGATED
BOWL 3053.120 RIGHT HEIGHT
®
ROUND FRONT
SOLD SEPARATELY
EZ-INSTALL KIT INCLUDED WITH BOWL
Studio
®
ActiVate
™
Right Height
®
Elongated 2-piece Toilet
Model 2794.119
Studio
®
ActiVate
™
Right Height
®
Round Front 2-piece Toilet
Model 2795.119
Wax Ring
Toilet Seat
T-Bolts with Retainer (2)
Bolt Covers (2)
For seat installation, see
instructions included with seat.
*
*
Bowl-To-Floor Knobs (2)
Tank To Bowl Gasket Attachment Handles
with Nuts (2)
Plastic
Washers (2)
AA Batteries (4)
A
AA
AA
AA
A

Turn Off Water Supply
Flush to remove
water from tank;
sponge remaining
water from
bowl before
removing toilet.
Clean Flange
!
Caution: If leaving floor flange
open for more than 1-2 hours,
cover flange to prevent escaping
sewer gases.
ROUGHING-IN DIMENSIONS:
NOTE:
Distance from wall to closet flange
centerline must be as listed:
Studio
®
ActiVate
™
Right Height
®
Elongated
2-piece Toilet Model 2794.119
Studio
®
ActiVate
™
Right Height
®
Round
Front 2-piece Toilet Model 2795.119
7302165-100 Rev. A
- 2 -
BACK-TO-BACK INSTALLATION
Recommended fitting type for
back-to-back installations.
Depending upon your plumbing and venting conditions, the flow from the toilet in a back-to-back
installation may create a vacuum on the system and draw water from the opposing bowl. The
National Standards Plumbing Code prohibits the use of a cross fitting for drainage as throw over
is possible. The code does approve a directional "Y" style fitting with proper venting to direct the
water downward and away from the other toilet.
IMPORTANT: Water supply on the wall is required at 2-1/4" or 8" from centerline of the toilet (see rough-in). First suggested
position is hidden behind the toilet. The geometry of the toilet gives space for this installation. The second suggested position
is next to the toilet. Between these two positions, the space for the supply between wall and toilet is limited to 4-1/2". In this
case, check your supply and hose dimensions.
28-3/16"
(716mm)
8-3/4"
(221mm)
1-1/8"
(29mm)
16-1/2"
(419mm)
4-1/2"
(114mm)
3-1/8"
(81mm)
2-5/8"
(67mm)
7-1/2"
(191mm)
12-7/8"
(328mm)
12-3/16"
(309mm)
16-1/2"
(419mm)
15-3/4"
(399mm)
12"
(305mm)
FINISHED
FLOOR
FINISHED WALL
C/L OF SEAT POST
HOLES 5-1/2"
(140mm) CENTERS
SUPPLY AS
REQUIRED
(position 1 or
position 2)
6"
(152mm)
5-1/2"
(140mm)
14"
(356mm)
8"
(204mm)
BACK VIEW (for reference)
30-3/4"
(781mm)
C/L OF OUTLET
2-1/4"
(57mm)
30-1/4"
(768mm)
8-3/4"
(221mm)
1-1/8"
(29mm)
18-1/2"
(470mm)
4-1/2"
(114mm)
3-1/8"
(81mm)
2-5/8"
(67mm)
7-1/2"
(191mm)
13-11/16"
(347mm)
12-3/16"
(309mm)
16-1/2"
(419mm)
15-3/4"
(399mm)
12"
(305mm)
FINISHED
FLOOR
FINISHED WALL
C/L OF SEAT POST
HOLES 5-1/2"
(140mm) CENTERS
SUPPLY AS
REQUIRED
(position 1 or
position 2)
6"
(152mm)
5-1/2"
(140mm)
14"
(356mm)
BACK VIEW
(for reference)
30-3/4"
(781mm)
C/L OF OUTLET
2-1/4"
(57mm)
8"
(204mm)
IMPORTANT: Water supply on the wall is required at 2-1/4" or 8" from centerline of the toilet (see rough-in). First suggested
position is hidden behind the toilet. The geometry of the toilet gives space for this installation. The second suggested position
is next to the toilet. Between these two positions, the space for the supply between wall and toilet is limited to 4-1/2". In this
case, check your supply and hose dimensions.
Before You Start:
If Removing An Existing Toilet
IMPORTANT: Water supply on the wall is
required at 2-1/4" or 8" from centerline of the
toilet (see rough-in). First suggested position
is hidden behind the toilet. The geometry of
the toilet gives space for this installation. The
second suggested position is next to the toilet.
Between these two positions, the space for the
supply between wall and toilet is limited to
4-1/2". In this case, check your supply and
hose dimensions.

7302165-100 Rev. A
- 3 -
3
5
7 8
6
4
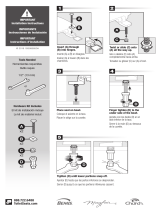
Thread, then hand
tighten water supply.
TIP: Place 2 pieces of masking tape on floor
(as shown) to help with alignment in step 4.
Apply weight
evenly. Do not
move after
placement.
Water tight seal
may break.
Hand Tighten Only.
Do Not Overtighten.
Tighten handles
alternately until tank
contacts bowl.
HAND TIGHTEN
ONLY!
* For seat installation,
see instructions
included with seat.
Press firmly.
Wax Ring
1 2

7302165-100 Rev. A
- 4 -
9
!
WARNING: Overtightening of water supply line nuts could result in breakage and potential flooding. If the
connection leaks after hand tightening, replace the supply line. Do not use any type of sealant on the water
supply connection. Use of plumber’s putty, pipe dope, or any other type of sealant will void the warranty.
ACTUATOR
HOSE LOCK
COLLARS
AA BATTERY PACK
AIR HOSE
ACTUATOR FACE
POWER ICON
MANUAL FLUSH BUTTON
FILL VALVE
WATER LEVEL ADJUSTMENT KNOB*
*See Step 1 of “TO OPERATE TOILET” of
“OPERATIONAL GUIDE” below.
OPERATIONAL GUIDE
Adjust water level to the water level
line indicated on the back of the tank.
FLUSH VALVE TOWER
!
TO INSTALL BATTERIES
(4) AA Batteries ONLY
(DO NOT USE 9 VOLT)
TO OPERATE TOILET
TO OPERATE ON/OFF FEATURE
On/Off feature puts the sensor into an off mode for 10
minutes, allowing time to clean in the bathroom area
without constantly flushing the touchless toilet.
Step 1) Lift open rubber battery housing cover, remove battery tray and install 4 alkaline AA
batteries into the battery tray.
Step 2) Insert battery tray back into the battery housing and connect sensor plug to battery tray.
Sensor will flash red once followed by 3 consecutive blue flashes.
Step 3) Route wires through slot in battery housing and close battery housing cover making sure it is
secure to prevent corrosion.
Step 1) Turn on water supply. Adjust water level to water level line indicated on the back of the tank by
turning Water Level Adjustment Knob on fill valve to move float cup up or down. Turning
knob clockwise raises water level. Turning knob counterclockwise lowers water level.
It is critical that water be filled exactly to specified water level for optimum performance.
Step 2) To flush toilet, swipe hand within 3 inches of activation sensor on side of toilet. Sensor will flash
blue twice.
Step 1) Feature is activated by touching the Power Icon for 3-6 seconds. Sensor will flash blue twice
and then constantly flash red while in this mode.
Step 2) Exit off mode by touching the Power Icon for 3-6 seconds. Sensor will flash blue 4 times.
*

7302165-100 Rev. A
- 5 -
Parts List can also be found under the tank lid.
Problem/Indicator
No ush or delayed ush
Leaking
Partial Flush
Unintended Flush
Manual Button not working
Red LED ashes during ush
Red LED constantly ashing
Blue LED is ashing
LED ashing red and blue
Toilet leaks
Toilet bowl rocks
after installation
Possible Cause
a. No batteries
b. Dead batteries. A light will blink red every time the
sensor is operated to indicate low battery.
c. Incorrect water level in tank
d. Air Hose not connected
e. No water in the tank
f. Sensor is OFF. A red light will ash when
the sensor is OFF.
g. Toilet is clogged
h. Toilet is in lock out mode (ush command was initiated during an
existing ush/ll cycle)
i. Touchless hand swipe was too fast
j. Touchless hand swipe was not in sensor detection area
k. Water supply valve closed
l. Supply line blocked
m. Sand or debris lodged in water control
a. Incorrect water level
b. Debris on sealing surface
c. Loose Shank Nut
d. Rell water level is too high
a. Rell clip/tube is not installed in the Overow Tube
b. Incorrect water level
c. Manual Flush Button not fully depressed
a. Motion or object in sensor area
b. Autoush
a. Touchless Mode is Active (batteries are connected,
system is not in turned OFF)
b. Manual Button is not depressed completely
c. There is no water in the tank
d. Air Hose not connected
e. Incorrect water level
a. Remaining battery power is low.
a. Sensor has been turned OFF
a. System has received a ush command and is
executing a ush cycle
a. System is executing initial boot up phase after batteries
are connected
a. Poor supply line connection
b. Poor bowl to tank/oor connection
a. Wax ring not fully compressed
b. Floor not level
Corrective Action
a. Install 4 alkaline AA batteries to the Activation Battery Case.
b. Replace 4 AA batteries in the Activation Battery Case with new batteries.
c. If water level is too low or too high, ush performance is affected. Fill water in the tank to the correct
level, as specied on the back of the tank.
d. Connect Air Hose to the Valve at end of the Activation Unit.
e. Fill the tank with water to the level specied on the label on the back of tank.
f. On/Off feature puts the sensor into an off mode for 10 minutes, allowing one to clean in the bathroom
area without constantly ushing the touchless toilet. Feature is activated by touching the Power Icon for
3-6 seconds. Exit On/Off mode by touching the Power Icon for 3-6 seconds, as indicated by 4 ashes of
the blue LED.
g. First deactivate the sensor by disconnecting the battery connector from the sensor unit and use the
manual ush button if you need to ush after unclogging the toilet. Once the toilet is unclogged, you
can reconnect the battery connector to the sensor unit and operate the sensor normally.
h. After a ush command is initiated, the toilet will enter a temporary "lock out mode", and not accept
another ush command until approximately 35 seconds. This is required in order for the system to
complete a full ush & rell cycle.
i. Initiate a slightly slower hand swipe within the sensor area.
j. Sensor detection area is directly in front of the sensor face and up to 3 inches away from the surface.
k. Open valve and allow water to ll tank.
l. Shut off water supply, disconnect supply line and inspect all gaskets and washers.
Reassemble.
m. Shut off water supply. Remove cap and clean as per Fluidmaster maintenance instructions at:
http://www.uidmaster.com//valve-runs-non-stop.html
a. If water level is too low or too high, ush performance is affected and leaking may occur.
Fill water in the tank to the correct level, as specied on the label on the back of tank.
b. Remove debris on sealing surface causing the leak.
c. Tighten the Shank nut to eliminate the leak.
d. Leaking occurs through the overow tube due to the Fill Valve oat setting too high. Lower the oat
setting until the Fill Valve rells to the correct water level.
a. Connect the rell clip to the Overow Tube.
b. If water level is too low or too high, ush performance is affected. Fill water in the tank to the correct
level, as specied on the label on the back of tank.
c. Press the Manual Flush Button in further.
a. Remove item from the sensor activation area.
b. When not in use, the system will initiate an automatic ush every 12 days.
a. If a user attempts to press the Manual Button, the Touchless system will recognize motion in the
activation area and initiate the ush before the user is able to press the button.
b. Press the Manual Flush Button in further.
c. Fill the tank with water to the level specied on the label on the back of tank.
d. Connect Air Hose to the Valve at one end and the Activation Unit at the other end. Slide hose collars
over ends to lock in place.
e. If water level is too low or too high, ush performance is affected. Fill water in the tank to the correct
level, as specied on the label on the back of tank.
a. Replace batteries.
a. Exit OFF Mode by touching the Power Icon for 3-6 seconds, as indicated by 4 ashes of the blue LED.
a. NA
a. NA. This is normal behavior for the sensor at start up.
a. Review Step 10 of installation instructions.
b. Review Step 3 through 8 of installation procedure.
a. Retighten bowl-to-oor knobs.
b. Use toilet shims and/or place a bead of caulk around the base of the toilet.
Troubleshooting Guide

When cleaning your toilet, wash it with mild, soapy water, rinse thoroughly with clear water and dry with a soft cloth.
WARNING: Do not use in-tank cleaners. These products can seriously corrode fittings in the tank. This damage can cause leakage and
property damage. American Standard shall not be responsible or liable for any damage caused by the use of in-tank cleaners.
CARE AND CLEANING
7302165-100 Rev. A
- 6 -
PARTS LIST
735158-400.XXX
7381125-400.0070A
7381551-401.0070A
7381553-201.0070A
7381549-201.0070A
7381550-201.0070A
7381552-201.0070A
7381147-200.0070A
7381437-200.0070A
7301540-200.XXX0A
Tank Cover
Universal Inlet Valve Assembly
Flush Valve Tower Assembly w/ Gasket, Washer & Nut
Hose Assembly w/ Lock Sleeves
Flush Valve Float w/ Seal
Actuator Less Battery Holder Case
Battery Holder Case
Tank to Bowl Coupling Kit w/ Gasket
Floor Mounting Hardware Kit - (T-Bolts, Retainers & Screw Knobs)
Bolt Cap Kit - (Includes Covers, Sleeves & Retaining Rings)
Parts are determined by toilet tank number which can be found marked inside tank.
NOTE: "XXX" represents color or trim finish options. Specify when ordering.
PL 7302164-100 Rev. A7302185-100
TOILET LIMITED WORRY-FREE WARRANTY
This toilet comes with a limited lifetime warranty on chinaware, a limited 5 year warranty on all mechanical parts of the toilet, 1 year warranty on electronic parts
and a limited 1 year warranty on the toilet seat if included with product. If inspection of this AS America, Inc. (“American Standard”) plumbing product, inclusive of the
chinaware and all mechanical parts, confirms that it is defective in materials or workmanship, American Standard will repair or, at its option, exchange the product for the
same or a similar model.
This limited warranty applies only to the original non-commercial purchaser and installation of the products. In the event of a limited warranty claim, proof of purchase will
be required – save sales receipts.
For this warranty to become effective, the warranty registration process must be completed via the internet or telephone per the warranty registration instructions.
This limited warranty does not apply to commercial installations.The warranty for commercial installations is 1 year on chinaware and mechanical parts, 1 year warranty
on electronic parts and 1 year on the toilet seat if included with product.
This warranty does not apply to local building code compliance.Since local building codes vary considerably, the purchaser of the product should check with a local
building or plumbing contractor to ensure local code compliance before installation.
This warranty will be void if the product has been moved from its initial place of installation; if it has been subjected to faulty maintenance, abuse, misuse, accident or other
damage; if it was not installed in accordance with American Standard’s instructions; or if it has been modified in a manner inconsistent with the product as shipped by
American Standard.
WARNING: This warranty DOES NOT COVER any damages caused by the use of in-tank cleaners. These products can seriously corrode the fittings in the tank. This
damage can cause leakage and property damage. American Standard will not be responsible or liable for any damage caused by the use of in-tank cleaners.
American Standard’s option to repair or exchange the product under this warranty does not cover any labor or other costs of removal or installation including any costs of
any surrounding material such as tile or marble.American Standard is not responsible for any other incidental or consequential damages attributed to a product
defect or to the repair or exchange of a defective product, all of which are expressly excluded from this warranty.(Some states or provinces do not allow the
exclusion or limitation of implied warranties, so this exclusion may not apply to you.)
This warranty gives you specific rights.You may have other statutory rights that may vary from state to state or province to province, in which case this warranty does not
affect such statutory rights.
PLEASE COMPLETE AMERICAN STANDARD WARRANTY REGISTRATION PROCESS AND SAVE THIS WARRANTY INFORMATION
IMPORTANT: Registration of the toilet must be completed for this warranty to become effective. Your registration will make it easier to contact you in the event of a product recall.*
THIS WARRANTY IS NOT TRANSFERABLE FROM ORIGINAL CONSUMER PURCHASER.
In the United States:
American Standard Brands
P.O. Box 6820
Piscataway, New Jersey 08855
Attention: Director of Customer Care
For residents of the United States, warranty
information may also be obtained by calling the
following toll free number: (800) 442-1902
www.americanstandard.com
In Canada:
AS Canada, ULC
5900 Avebury Rd.
Mississauga, Ontario
Canada L5R 3M3
Toll Free: (800) 387-0369
www.americanstandard.ca
In Mexico:
American Standard B&K Mexico
S. de R.L. de C.V.
Via Morelos #330
Col. Santa Clara
Ecatepec 55540 Edo. Mexico
Toll Free: 01-800-839-1200
www.americanstandard.com.mx
INSTRUCTIONS: Register your toilet at www.americanstandard.com. Please save your proof of purchase (sale receipt).
If you need assistance or do not have access to our website, please contact American Standard Customer Care at: (800) 442-1902.
An American Standard representative will assist in completing the warranty registration.
* In California, your warranty rights remain intact even if you do not complete the registration process.

7302165-100SP Rev. A
INSTRUCCIONES DE INSTALACIÓN
CUIDADO Y MANTENIMIENTO
TANQUE 4000.119
TAZA 3075.120 RIGHT HEIGHT
®
ALARGADA
TAZA 3053.120 RIGHT HEIGHT
®
FRENTE REDONDO
Studio
®
ActiVate
™
Right Height
®
Alargado Inodoro De Dos Piezas
Modelo 2794.119
Studio
®
ActiVate
™
Right Height
®
Frente Redondo Inodoro De Dos Piezas
Modelo 2795.119
Arillo de Cera
Asiento De Inodoro
T-Bolts with Retainer (2)
Cubrepijas (2)
Para instalar el asiento,
revise las instrucciones
incluidas con el asiento .
*
*
Perillas De La
Taza Al Piso (2)
Empaque De Acoplamiento
Taza A Tanque
Manijas De Unión
Con Tuercas (2)
Arandelas
Plásticas (2)
Baterías AA (4)
A
AA
AA
AA
A
Los nombres de productos que aparecen en este documento son marcas comerciales de AS America Inc.
© AS America, Inc. 2014
ADVERTENCIA: EL PRODUCTO ES FRÁGIL. ¡MANIPÚLELO CON CUIDADO PARA EVITAR QUE SE QUIEBRE Y
LA POSIBILIDAD DE QUE USTED SE LASTIME!
!
NOTA: Es posible que las imágenes no definan con exactitud el contorno de la loza y los componentes.
Gracias por elegir American Standard - el parámetro de primera calidad por más de 100 años. Para asegurarse de que el producto esté instalado
correctamente, por favor lea estas instrucciones cuidadosamente antes de comenzar. (Ciertas instalaciones pueden requerir ayuda profesional).
Asegúrese de que su instalación cumpla con los códigos locales.
Línea de Suministro de Agua
KIT DE INSTALACIÓN FÁCIL INCLUIDO CON EL TANQUE
SE VENDE POR SEPARADO
KIT DE INSTALACIÓN FÁCIL INCLUIDO CON LA TAZA
GUARDE ESTAS INSTRUCCIONES PARA UN USO FUTURO
/