iON Total PA Quick start guide

Category
Radios
Type
Quick start guide
Total PA
Quickstart Guide
English ( 3 – 7 )
Guía de inicio rápido
Español ( 8 – 13 )
Guide d'utilisation rapide
Français ( 14 – 19 )
Guida rapida
Italiano ( 20 – 24 )
Kurzanleitung
Deutsch ( 25 – 30 )
Snelstartgids
Nederlands ( 31 – 36 )
Appendix
English ( 37 )
3
Bluetooth Pairing
Instructions
Quickstart Guide (English)
1. Make sure all items listed in the Box Contents are included in the
box. Look in the box under the Styrofoam sheet for the speaker
stand rubber feet, speaker stand mounting knob, power cable,
and microphone.
2. READ SAFETY INSTRUCTION BOOKLET BEFORE USING
THE PRODUCT.
3. Study the connection diagram.
4. Make sure all input devices such as microphones, CD players, or
digital media players are turned off and volume settings are set
at "zero."
5. Connect all devices as shown.
6. Switch everything on in the following order:
audio input sources (i.e. microphones, instruments, CD
players)
Total PA
7. When turning off, always reverse this operation:
Total PA
any input devices
Support
For complete system requirements, compatibility information, and product registration, visit the ION website:
ionaudio.com.
For the latest information about this product, visit ionaudio.com/total-pa.
For additional product support, visit ionaudio.com/support.
For safety/warranty information, visit ionaudio.com/warranty.
Caution: Do not expose Total PA to rain or stand in water.
Connection Diagram
Box Contents
Total PA
Microphone with mic cable
Telescoping Speaker Stand
Remote Control
Power Cable (standard IEC)
Quickstart Guide
Safety Instructions &
Warranty Information
Booklet
Tablet*
Power
*not included
Smartphone*
Microphone
!
4
Speaker Stand Installation
1. Fully extend the speaker stand tripod legs
on a flat, stable surface. Look in the box
contents under the Styrofoam sheet for the
rubber feet and speaker stand mounting
knob.
2. Raise the mounting pole up to the
appropriate height needed and tighten the
side adjustment knob.
3. Insert the pin into the bottom pin-hole so
the mounting pole stays at your set height.
4. On Total PA, adjust the bottom knob
counter-clockwise so the screw is not
blocking the opening.
5. Line up the Total PA mounting hole with
the speaker stand pole and place on the
pole.
6. Tighten the mounting knob clockwise on Total PA.
5
Rear Panel Description
1. LCD: Displays the Media Panel modes for
Bluetooth, FM radio, USB and Aux.
Note: The LCD comes with a plastic protector on it.
Remove this for optimal viewing of the LCD.
2. USB Port: Connect your USB flash drive to play
music.
3. SD Card Slot: Insert your SD card here.
4. Media Panel: Controls for the Bluetooth, SD, USB,
and FM radio sources. The Media Panel Mode
source symbol will illuminate when that source is
playing.
5. Mic Input (1/4” and XLR): Connect a dynamic
microphone to the 1/4” or XLR inputs. Control the
volume of the XLR and 1/4” inputs using the Mic
Input volume knob.
6. Aux Input: Connect a CD player, digital media
player, or other audio source to this 1/8” stereo
auxiliary input. Control the output volume using the
Line Input volume knob.
7. Line Input (XLR): Connect a line-level mixer or
musical instrument to this XLR line-level input.
Control the output volume using the Line Input volume knob. Use this line-level
input when linking together two TOTAL PA units.
8. RCA Inputs: Connect a CD player, digital media player, mixer, or other media
source to these inputs. Control the output volume using the Line Input volume knob.
9. Mix Out: Connect this XLR output to another active (powered) speaker. The level of
the output is controlled by each channel’s volume setting (Mic Input volume, Line
Input volume, and Media Panel volume).
10. High EQ: Increases or decreases the high (treble) frequencies for Mic Input, Line
Input, and Media Panel sources at a range between -12dB to + 12dB.
11. Low EQ: Increases or decreases the low (bass) frequencies for Mic Input, Line
Input, and Media Panel sources at a range between -12dB to + 12dB.
12. Power LED: Indicates whether Total PA is powered on or off.
13. Clip LED: This LED will flash red if the signal from the inputs or Media Panel source is clipping. If this
happens, decrease the setting of the Mic Input volume knob, Line Level volume knob, or Media Panel
volume knob.
14. Media Panel Volume: Adjusts the speaker volume for the FM radio, SD card, USB port, and Bluetooth
sources.
15. Power ON/OFF Switch: Turns Total PA on or off.
16. Power Cable Input (IEC): Insert the included power cable here to power the unit.
POWER
ON OFF
15
15
16
16
Bluetooth Pairing
Instructions
6
5
7
8
9
1010
1111
1212
1313
1414
1
2
3
4
6
Media Panel
Media Panel functions:
* Note: In some apps, pressing the Prev or Next buttons may go to another playlist or music genre.
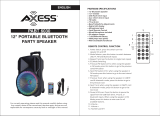
Media Panel Remote:
Note: Aim the remote straight at the front of the speaker woofer. Room lighting and battery life can affect the
operating range of the remote control.
Note: In order to use the remote control for the first time, first pull out the tab attached to the battery
compartment. To change the remote battery, follow the diagram located on the back of the remote. Use a 3V
DC CR2025 lithium button cell battery for replacement.
1. Stop - Stops the Media Panel source from playing.
2. Mode - Selects the Media Panel source: USB, SD, Bluetooth, or FM radio.
3. Mute - Silences the music playback on Media Panel sources.
4. Prev - Goes to the previous USB or SD card track. When listening to
Bluetooth sources, pressing Prev in some apps may go to another playlist or
music genre. When listening to the FM radio, press the Prev button once to
skip back through the FM stations and hold the button down to seek back
through the channel presets.
5. Next - Advances to the next USB or SD card track. When listening to
Bluetooth sources, pressing Next in some apps may go to another playlist or
music genre. When listening to the FM radio, press the Next button once to
tune the radio down one preset and hold the button down to seek forward
through the channel presets.
6. Play/Pause - Plays or pauses the USB, SD, or Bluetooth Media Panel source. Press and hold
Play/Pause for 2 seconds to begin the preset auto-store function. This jumps to the lowest station
(87.5) and then travels through the FM band to auto-store the strongest stations as presets.
Note: Files are played from the USB or SD source first by alphabetical order of what is on the root
level, then alphabetical by folder, and then alphabetical by the track name.
MODE
Switches modes from Bluetooth,
FM radio, SD, USB, and Aux.
Play/Pause the USB, SD, or
Bluetooth source. Press and
hold Play/Pause for 2 seconds
to begin the preset auto-store
function. This jumps to the
lowest station (87.5) and then
travels through the bandwidth to
auto-store the strongest stations
as presets.
Repeat the current playing USB
or SD track (ONE), repeat all of
the tracks (ALL), or shuffle the
track order (Pd0).
Navigates through USB and SD
tracks. Plays the previous USB,
SD, or Bluetooth* track, or tunes
the radio down one preset when
pressed once. Hold the button
down to seek back through radio
stations.
Plays the next USB, SD, or
Bluetooth* track, or tunes the
radio up one preset when
pressed once. Hold the button
down to seek forward through
radio stations.
1
EQ
STOP
MODE MUTE
100+ 200+0
1
23
456
789
2
3
4
7
6
5
8
9
12
12
10
10
11
11
7
7. Vol – - Decreases the Media Panel source volume.
8. Vol + - Increases the Media Panel source volume.
Note: The remote volume only affects the Media Panel source and works together with the physical
Media Panel volume knob on the unit’s rear panel.
9. EQ - Selects one of the following digital EQ presets to use with a Media Panel source:
Note: The digital EQ only works for Bluetooth, USB flash drive, and SD card sources.
BAS - Bass
POP - Pop
V0C - Vocal
JA2 - Jazz
CLA - Classical
COU - Country
Off - No EQ (factory default setting)
10. 100+ - Jumps ahead by 100 tracks.
11. 200+ - Jumps ahead by 200 tracks.
12. Number keys - Provides channel selection for FM radio stations, and track selection for USB/SD card
sources.
Pairing a Bluetooth Device
1. Turn on your Bluetooth device.
2. Power on Total PA.
3. Select Bluetooth Mode which appears as _ _ _ _
using the Mode button and Total PA will go into
pairing mode to search for Bluetooth devices.
4. Navigate to your Bluetooth device’s setup screen, find “Total PA”, and connect.
Note: Users should consider updating their device’s OS if experiencing trouble with pairing or playing
music.
5. To disconnect pairing, turn off Bluetooth on your device or select “forget this device” from your device.
Note: Maximum range will be achieved when using devices with Bluetooth 4.0.
Troubleshooting
If the sound is distorted: Try lowering the volume control of your sound source or musical instrument.
Also, try to reduce the overall volume of Total PA.
If there is too much bass: Try adjusting the tone or EQ control from Total PA or your sound source to lower
the bass level. This will allow you to play the music louder before clipping (distortion) occurs.
If there is a high-pitched whistling noise when using a microphone: This is probably feedback. Point the
microphone away from the speaker.
If you can’t hear the microphone over the music volume: Turn down the music volume from your source.
When I press |<< or >>| it doesn't increment to the next FM station: Short presses of the button will jump
to presets. Hold the button down to seek to the next station.
If the radio station channel is flashing: the unit is currently muted. Unmute to stop the flashing and resume
playback.
If the Bluetooth logo is flashing rapidly: the unit is currently in pairing mode.
If the Bluetooth logo is flashing slowly: a device is paired, but the music is muted. Unmute to stop the
flashing and resume playback.
The USB track # (Example: 001) is flashing slowly: the USB drive music playback is muted. Unmute to
stop the flashing and resume playback.
The LCD shows “NONE”: the unit is in USB/SD mode, but there is no USB drive attached or no SD card
inserted.
37
Appendix (English)
Specifications
Dimensions (H x W x D): 27” x 17.4” x 14.2”; (685 mm x 442 mm x 362 mm)
Weight (speaker only): 35 lbs; (16 kg)
Output Power: 300W (Peak); 150W (RMS)
Crossover: 2.2 kHz
Max SPL @ 1m: 116 dB Peak, 110 dB Continuous C-weighted, Free Space
Frequency Response: 55 Hz – 20 kHz (+ 3 dB)
Frequency Range: 45 Hz – 22 kHz (@ -10 dB)
Low Frequency: 15" (385 mm) woofer, 2" (50.5 mm) voice coil
High Frequency: Ferrite compression driver, 1" (25 mm) exit, 1" (25 mm) voice coil
Horn Coverage: 80/100° H x 60° V, nominal (@ -6 dB)
Input Control: Line/Mic – to +10 dB
Max input level: +10 dBu
Impedance: 22 k
External Control: channel volume, Media Panel volume, power on/off with LED, clip limiter with
LED, 2 band equalizer, mode, play/pause, repeat, previous track, next track
Connectors: Input: Two XLR, 1 ¼” TRS, 1 1/8” TRS, 1 stereo RCA, 1 SD, 1 USB
Link Output: One XLR
Wireless connectivity: Bluetooth (A2DP)
Bluetooth module type: BT 2.1 + EDR, compatible under 3.0, 3 Mbps
Wireless range: Up to 100 feet*
Supported Microphone Type: Dynamic mic
Remote battery: 3V DC CR2025 lithium button cell battery
USB: USB music playback
File Format: FAT32
Supported File Types: WMA, WAV, MP3
Maximum File Size: 16GB or less
SD Card/USB Flash Drive Size: 16GB or less
Protection features: Over-excursion, thermal, short-circuit protection
Power supply: 100 VAC, 110-120 VAC, or 220-240 VAC; 50/60 Hz
Cabinet: Trapezoidal with floor monitor capability. Injection-molded polypropylene with
perforated steel grille
Mounting information: Integrated pole socket (36 mm diameter)
Portability: 3 handles, 2 wheels
* Bluetooth range is affected by walls, obstructions, and movement. Best performance is achieved in a wide open area.
FCC ID: Y4O-iPA61
THIS DEVICE COMPLIES WITH PART 15 OF THE FCC RULES. OPERATION IS SUBJECT TO THE FOLLOWING TWO
CONDITIONS: (1) THIS DEVICE MAY NOT CAUSE HARMFUL INTERFERENCE, AND (2) THIS DEVICE MUST ACCEPT
ANY INTERFERENCE RECEIVED, INCLUDING INTERFERENCE THAT MAY CAUSE UNDESIRED OPERATION.
SHIELDED CABLES MUST BE USED WITH THIS UNIT TO ENSURE COMPLIANCE WITH THE CLASS B FCC LIMITS.
Trademarks and Licenses
ION Audio is a trademark of ION Audio, LLC, registered in the U.S. and other countries.
The Bluetooth word mark and logos are owned by the Bluetooth SIG, Inc. and any use of such marks by ION Audio is under
license.
All other product or company names are trademarks or registered trademarks of their respective owners.
ionaudio.com
Manual Version 1.0
  • Page 1 1
  • Page 2 2
  • Page 3 3
  • Page 4 4
  • Page 5 5
  • Page 6 6
  • Page 7 7
  • Page 8 8
  • Page 9 9
  • Page 10 10
  • Page 11 11
  • Page 12 12
  • Page 13 13
  • Page 14 14
  • Page 15 15
  • Page 16 16
  • Page 17 17
  • Page 18 18
  • Page 19 19
  • Page 20 20
  • Page 21 21
  • Page 22 22
  • Page 23 23
  • Page 24 24
  • Page 25 25
  • Page 26 26
  • Page 27 27
  • Page 28 28
  • Page 29 29
  • Page 30 30
  • Page 31 31
  • Page 32 32
  • Page 33 33
  • Page 34 34
  • Page 35 35
  • Page 36 36
  • Page 37 37
  • Page 38 38
  • Page 39 39
  • Page 40 40

iON Total PA Quick start guide

Category
Radios
Type
Quick start guide

Ask a question and I''ll find the answer in the document

Finding information in a document is now easier with AI