Page is loading ...

© LINDY ELECTRONICS LIMITED & LINDY-ELEKTRONIK GMBH - FIRST EDITION (March 2014)
HDMI 4x4 Matrix
with Video Wall Scaling
User Manual English
Benutzerhandbuch Deutsch
Manuel Utilisateur Français
Manuale Italiano
No. 38131
www.lindy.com
Tested to Comply with
FCC Standards
For Home and Office Use!

User Manual English
Introduction
Thank you for purchasing the LINDY HDMI Video Wall 4x4 Matrix. The HDMI Video Wall 4x4 Matrix
allows the signals from four different sources to be freely selected and arranged on 4 displays (TV,
Monitor or Projector), in one of three output modes; Video Wall, Matrix and dual.
This flexible feature rich product has been designed to be used in a number of different applications,
such as:
Public Advertisement
Digital Presentation
Broadcasting & Control
Surveillance & Control
Conference & Meeting Room
Package Contents
HDMI Video Wall 4x4 Matrix
IR Remote Control
Multi-Country 12V 3A Power Supply (UK/EU/US/AUS)
Driver CD
This manual
Features
Allows 4 HDMI Inputs to be displayed in 3 different modes across 4 HD displays
Video Wall Mode – Display an HDMI source across a 2x2 video wall
Matrix Mode – Display any HDMI source on any HDMI display
Dual Mode – Display 2 sources on a single HDMI display
Seamless switching between HDMI sources
User definable output scaling
Controlled via On-panel controls, IR Remote, RS-232 and Telnet
Bezel correction to aide screen blending
Adjustable picture contrast, brightness, saturation and hue
Memory function to store 4 user determined configurations
Can be used with LINDY HDMI extenders to reach remote displays
Specification
Input ports: 4 x HDMI Female
Input resolution: 480i – 1080p*
Output ports: 4 x HDMI Female
Output resolution: 480p – 1080p*
Audio support: LPCM 2CH, 6CH, 8CH, AC3, DTS, Dolby Digital Plus, Dolby TrueHD & DTS-HD
Control Ports: RJ45 (Telnet) & Serial 9 Way Male (RS-232)
Video bandwidth: 225MHz/6.75Gbps
Power consumption: 15W
Weight: 2.2Kg
Dimensions: 436x247x44mm (WxDxH)
*Please Note: For additional information regarding the exact resolution/timing combinations which are supported for input and
output please refer to the Timings section at the end of this manual.

User Manual English
Overview & Operation
Front Panel
1. IR Window
Receives IR commands from the supplied IR Remote
2. Power
Switch the Matrix On/Off
3. Menu
Press to launch the OSD menu
Press to make a menu selection in the OSD
Press along with “-“ to set the Output to 720p@60Hz
Press along with “+” to set the Output to 1024x768@60Hz
4. -/+ Buttons
Use these buttons to move up and down in the OSD
5. Channel Input (1 – 4) / Channel Output (A – D) Selection
In Matrix Mode select an Output by pressing one of the buttons marked A – D, then select the Input
to be used by pressing one of the buttons marked 1 – 4. Repeat this for each Output. Each Output
can independently display any of the Inputs according to your selection.
In Dual Mode there are two groups, Dual A (Outputs A & B) and Dual B (Outputs C & D). To set up
Dual A select Output A then select the first input by pressing one of the buttons marked 1 – 4. Now
select Output B then select the second input by pressing one of the buttons marked 1 – 4, without
duplicating your initial selection. Your two input selections will now be shown on Output A and
Output B. For Dual B repeat this for Output C and D as required. Press and hold Output A or B for 3
seconds to select the audio input for Dual A, or Output C or D to select the audio input for Dual B.
In Video Wall Mode select the input to be displayed across the 4 displays (2x2 configuration) by
selecting Input 1 – 4. Audio will be available through Output A only.
6. Matrix / Dual / Wall Mode
Press this button to switch between the different modes. When Matrix Mode is selected the button
will stay constantly illuminated, for Dual Mode the button will not illuminate and for Video Wall Mode
the button will blink on/off.
7. Lock
Press this button once to lock the keypad and remote control, press and hold the button again for 3
seconds to release the lock.
8. Save
Once you have configured the Matrix (Mode selection, Input/Output combinations etc.) press the
Save button, the Input 1 – 4 buttons will then illuminate. Now press one of the Input buttons to save
your configuration. Pressing Input 1 would save the configuration to slot 1, this can then be recalled
using the Recall button (see below) or by pressing Fav.1 on the IR Remote.
9. Recall
Press the Recall button, the Input 1 – 4 buttons will then illuminate. Now select which saved
configuration you want to recall by pressing Input button 1/2/3/4.
OUTPUT
A
B
C
D
INPUT
1
2
3
4
SAVE
RECALL
LOCK
MATRIX/
DUAL/WALL
POWER
MENU
-
+
XGA
720P
1
2
3
4
5
8
9
7
6

User Manual English
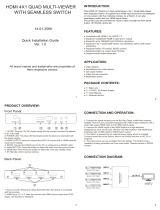
Rear Panel
1. HDMI In 1 – 4
Connect your HDMI sources devices such as PC, Blu-ray etc to these ports
2. HDMI Out A – D
Connect your HDMI displays to these ports
3. Control
Connect to an Ethernet network for Telnet control
4. USB Service Only
Reserved for Factory use only
5. RS-232
For connection to a PC/Notebook or Remote Control Processing unit
6. DC 12V
Connect the supplied 12V power supply here
Remote Control
1. Power
Switch the Matrix On/Off
2. Info
Press to display the Matrix’s firmware version
3. Output A – D & Input 1 – 4
Provide the same function as the front panel buttons
4. Matrix/Dual/Wall Mode Selection
Provide the same function as the front panel buttons
5. Lock
Provides the same function as the front panel button
6. Mute
Press to Mute audio playback from the HDMI output port
7. Navigation/Selection Buttons
Press to navigate the OSD and make selections
8. Menu
Press to enter the OSD menu
9. Exit
Press to exit the OSD menu
10. Output Resolution
Press to quickly change the Output resolution
11. Dual Mode Audio
Switch between Left/Right input source audio, for Dual A or Dual B
12. Save
Provides the same function as the front panel button
13. FAV. 1 – 4
Recalls the settings saved to the corresponding save location
1
2
3
4
5
6
HDMI IN
1
2
3
4
A
B
C
D
HDMI OUT
CONTROL
RS232
DC 12V
USB
SERVICE
ONLY
INFO
POWER
Out A
In 1
Matrix
Out B
In 2
Dual
Out C
In 3
TV Wall
Out D
In 4
Lock
Mute
OK
Exit
Menu
1024x768
Save
FAV.1
720p
1080p
FAV.2
AL
AR
FAV.3
FAV.4
BR
BL
1
2
3
4
5
6
7
8
9
10
11
13
12

User Manual English
By removing the battery cover of the IR Remote you can access a set of dip switches which allow you to
change the default IR address, as may be required if multiple Matrixes’ are used in close proximity or if
there is interference with another IR device. Before changing the dip switch setting from its default of 0,
please change the IR setting on the Matrix first. Enter the OSD and then select Others, now select IR
Address and select the desired address 0 – 3.
Connection Diagram
Set-Top Box
Blu-Ray Player
HDMI
Cable
HDMI
Cable
HDMI
Cable
HDMI
Cable
HDMI
Cable
HDMI
Cable
RJ45
Cable
9 Way Serial
Cable
PC
TV/Display
TV/Display
TV/Display
TV/Display
Notebook
Notebook

User Manual English
Video Output Modes
Video Wall
Displays a single user definable HDMI source across a
2x2 video wall.
Video Matrix
Display any HDMI source on any HDMI display.
Dual Output
Display 2 HDMI sources on a single HDMI Output.
Outputs are grouped as follows Dual A (Outputs A & B)
and Dual B (Outputs C & D).
RS-232, Telnet & OSD Control
RS-232 & Telnet Control
The Matrix may also be controlled via PC software which can be downloaded from www.lindy.com, or
using Hyper Terminal. The PC software provides a graphical interface for control as shown below:
Simple Control Panel
Full Function Control Panel

User Manual English
RS-232 Protocols
Baud Rate: 115200bps Data Bit: 8 bits
Parity: None
Flow Control: None
Stop Bit: 1
Telnet Setting
Use TCP/IP (Port 23) for Telnet communication.
RS-232 & Telnet Commands
Command
Active
4x4 Matrix Return
AUA001
Dual A Audio channel in Left side
AUA001
AUA002
Dual A Audio channel in Right side
AUA002
AUA999
Check Dual A audio channel status
AUA???
AUB001
Dual B Audio channel in Left side
AUB001
AUB002
Dual B Audio channel in Right side
AUB002
AUB999
Check Dual B audio channel status
AUB???
AUD000
Audio output Off
AUD000
AUD001
Audio output On
AUD001
AUD999
Check audio on/off status
AUD???
AUE000
Audio EDID is LPCM 2CH
AUE000
AUE001
Audio EDID is LPCM 6CH
AUE001
AUE002
Audio EDID is LPCM 8CH
AUE002
AUE003
Audio EDID is BITSTREAM
AUE003
AUE004
Audio EDID is HD
AUE004
AUE999
Check audio EDID setting
AUE???
BEZ000
Bezel Correction OFF
BEZ000
BEZ001
Bezel Correction ON
BEZ001
BEZ999
Check bezel correction on/off status
BEZ???
BEH???
Horizontal (H) Bezel correction???=000 - Maximum
BEH???
BEH998
Check the current Horizontal(H) Bezel correction Maximum value
BEH???
BEH999
Check the current Horizontal(H) Bezel correction setting value
BEH???
BEV???
Vertical (V) Bezel correction???=000- Maximum
BEV???
BEV998
Check the current Vertical(V) Bezel correction Maximum value
BEV???
BEV999
Check the current Vertical(V) Bezel correction setting value
BEV???
BRI???
Setting Brightness
No response
???=000-100 for matrix mode
???=(000-100)+200*(OUT No.-1) for dual/tv wall mode
For example: OUT B set the Brightness value to 57 =(57)+200*(2-1) = 257
BRI99?
Check current Brightness value
BRI???
99?=999 for matrix mode
99?=991-994=OUT1-4 for dual/tv wall mode
CAL???
RECALL FAV. ???=001-004=FAV.1-4
CAL???

User Manual English
On-Screen-Display (OSD) Menu
Main Menu
Sub Menu
Adjustments
Default
PICTURE (1)
ALL
CONTRAST
0 - 100
50
BRIGHTNESS
0 - 100
50
SATURATION
0 - 100
50
HUE
0 - 100
50
DUAL
DUAL AL
DUAL AR
DUAL BL
DUAL BR
TV WALL
OUT A
OUT B
OUT C
OUT D
D/T
RESET
ALL
RESET ALL
EXIT
OUTPUT RESOLUTION
480p
720p60
576p
720p50
720p60
1080i50 (2)
1080i60 (2)
1080p24
1080p50
1080p60
1024x768
1280x800
1280x1024
1366x768
1440x900
1600x900
1600x1200
1680x1050
1920x1200
EXIT
AUDIO EDID (3)
LPCM 2CH
LPCM 2CH
LPCM 6CH
LPCM 8CH
BIT-STREAM
HD
EXIT
OSD SETTINGS
POSITION
LEFT T
LEFT T
RIGHT T
LEFT B
RIGHT B
H OFFSET
0 - 20
10
V OFFSET
0 - 20
10
TRANSPARENCY
0 - 9
4

User Manual English
Main Menu
Sub Menu
Adjustments
Default
OSD SETTINGS
(CONTINUED)
MENU TIMEOUT
5 - 50, OFF (4)
8
INFO.TIMEOUT
5 - 50, OFF
8
INFO.DISPLAY
ON
ON
OFF
BRIEF INFO
ON
OFF
OFF
EXIT
HDCP
INPUT (5)
ACCEPT
ACCEPT
NOT ACCEPT
OUTPUT (6)
FOLLOW INPUT
FOLLOW INPUT
ALWAYS ON
EXIT
BEZEL CORRECTION (7)
CORRECTION
ON
OFF
OFF
H CORRECTION
0 - by output resolution
0
V CORRECTION
0 - by output resolution
0
EXIT
RECALL / SAVE (8)
RECALL
CANCEL
~ 4
CANCEL
FAV. 1
FAV. 2
FAV. 3
FAV. 4
SAVE
CANCEL
CANCEL
FAV. 1
FAV. 2
FAV. 3
FAV. 4
EXIT
ETHERNET
IP MODE
DHCP
DHCP
STATIC
STATIC SET
IP
IP
MASK
GATE
BYTE1
192
BYTE2
168
BYTE3
5
BYTE4
155
RE-LINK (9)
TIMEOUT (Min.) (10)
5 - 60
10
OFF
EXIT
OTHERS
IR ADDRESS (11)
0 - 3
0
EXIT
FACTORY DEFAULT
YES
NO
NO
EXIT
INFORMATION
(*12)
IN/OUT RESOLUTION
SOURCE HDCP/AUDIO
OUT MODE
FIRMWARE VER
EXIT
EXIT

User Manual English
Notes:
1 Picture
In Matrix mode, all four pictures are adjusted simultaneously.
In Dual/TV Wall mode, each picture can be adjusted individually and supports the last memory
feature.
2 Output
In Matrix mode if the Output is set to 1080i@50Hz or 1080i@60Hz Input 4 will be disabled.
3 AUDIO EDID
Embedded input audio EDID contents:
LPCM 2CH = LPCM 2CH
LPCM 6CH = LPCM 2CH/ 6CH
LPCM 8CH = LPCM 2CH/ 6CH/ 8CH
BITSTREAM = LPCM 2CH, AC3, DTS
HD = LPCM 2CH/ 6CH/ 8CH, AC3, DTS, Dolby Digital Plus, DTS-HD
4 TIMEOUT
Setting to OFF means that MENU and INFO will continuously be shown on the screen.
5 HDCP INPUT
ACCEPT: Supports source using HDCP, this is normal source setting.
NOT ACCEPT: Will not accept a source using HDCP.
6 HDCP OUTPUT:
FOLLOW INPUT: If the Input source uses HDCP the Output signal will support HDCP. If th e Input
source does not use HDCP the Output signal will not support HDCP. When
in Dual mode, if either of
the Input sources (Left or Right) uses HDCP, the
output will support HDCP.
ALWAYS ON: When using this setting all connected TV/Monitors must support HDCP. Using displays
which do not support HDCP will result in flashing image/no image when HDCP content is used.
7 BEZEL CORRECTION
This setting is only supported in TV Wall mode, after adjustment the system will save the setting until the
next time it is changed.
8 SAVE/RECALL
Used to SAVE/RECALL input/output settings and all other system settings such as bezel correction or
picture adjustment.
9 Ethernet RE-LINK:
After the setting up the system use this setting to re-link/refresh the
network connection.
10 Ethernet TIMEOUT:
Select OFF to end the time out functions of either the Ethernet or Telnet connection.

User Manual English
Timings
Supported Input Timings
Support Timing
480i@59
480p@60
576i@50
576p@50
720p@25,30,50,60,
1080i@50,60
1080p@24,25,30,50,60
640x480@60,72,75,85
720x400@70
800x600@56,60,72,75,85
1024x768@60,70,75,85
1152x864@70,75
1280x720@60cvt
1280x768@60RB,60,75
1280x800@60RB,60,75
1280x1024@60,60cvt,75
1360x768@60
1366x768@60RB,60
1400x1050@60RB,60
1440x900@60RB,60,75
1600x900@60RB
1600x1200@60
1680x1050@60RB,60
1920x1200@60RB
Supported Output Timings
Support Timing
480p60
576p50
720p50
720p60
1080i50 (Matrix Mode Only)
1080i60 (Matrix Mode Only)
1080p24
1080p50
1080p60
1024x768@60
1280x800@60
1280x1024@60
1366x768@60
1440x900@60
1600x900@60RB
1600x1200@60
1680x1050@60
1920x1200@60RB

Benutzerhandbuch Deutsch
RS-232 Protokolle
Baud Rate: 115200bps
Data Bit: 8 bits
Parity: None
Flow Control: None
Stop Bit: 1
Telnet Einstellung
Verwenden Sie TCP/IP (Port 23) für Telnet Kommunikation.
RS-232 & Telnet Kommandos
Command
Active
4x4 Matrix Return
AUA001
Dual A Audio channel in Left side
AUA001
AUA002
Dual A Audio channel in Right side
AUA002
AUA999
Check Dual A audio channel status
AUA???
AUB001
Dual B Audio channel in Left side
AUB001
AUB002
Dual B Audio channel in Right side
AUB002
AUB999
Check Dual B audio channel status
AUB???
AUD000
Audio output Off
AUD000
AUD001
Audio output On
AUD001
AUD999
Check audio on/off status
AUD???
AUE000
Audio EDID is LPCM 2CH
AUE000
AUE001
Audio EDID is LPCM 6CH
AUE001
AUE002
Audio EDID is LPCM 8CH
AUE002
AUE003
Audio EDID is BITSTREAM
AUE003
AUE004
Audio EDID is HD
AUE004
AUE999
Check audio EDID setting
AUE???
BEZ000
Bezel Correction OFF
BEZ000
BEZ001
Bezel Correction ON
BEZ001
BEZ999
Check bezel correction on/off status
BEZ???
BEH???
Horizontal (H) Bezel correction???=000 - Maximum
BEH???
BEH998
Check the current Horizontal(H) Bezel correction Maximum value
BEH???
BEH999
Check the current Horizontal(H) Bezel correction setting value
BEH???
BEV???
Vertical (V) Bezel correction???=000- Maximum
BEV???
BEV998
Check the current Vertical(V) Bezel correction Maximum value
BEV???
BEV999
Check the current Vertical(V) Bezel correction setting value
BEV???
BRI???
Setting Brightness
No response
???=000-100 for matrix mode
???=(000-100)+200*(OUT No.-1) for dual/tv wall mode
For example: OUT B set the Brightness value to 57 =(57)+200*(2-1) = 257
BRI99?
Check current Brightness value
BRI???
99?=999 for matrix mode
99?=991-994=OUT1-4 for dual/tv wall mode
CAL???
RECALL FAV. ???=001-004=FAV.1-4
CAL???

Benutzerhandbuch Deutsch
On-Screen-Display (OSD) Menü
Main Menu
Sub Menu
Einstellung
Default
PICTURE (1)
ALL
CONTRAST
0 - 100
50
BRIGHTNESS
0 - 100
50
SATURATION
0 - 100
50
HUE
0 - 100
50
DUAL
DUAL AL
DUAL AR
DUAL BL
DUAL BR
TV WALL
OUT A
OUT B
OUT C
OUT D
D/T
RESET
ALL
RESET ALL
EXIT
OUTPUT RESOLUTION
480p
720p60
576p
720p50
720p60
1080i50 (2)
1080i60 (2)
1080p24
1080p50
1080p60
1024x768
1280x800
1280x1024
1366x768
1440x900
1600x900
1600x1200
1680x1050
1920x1200
EXIT
AUDIO EDID (3)
LPCM 2CH
LPCM 2CH
LPCM 6CH
LPCM 8CH
BIT-STREAM
HD
EXIT
OSD SETTINGS
POSITION
LEFT T
LEFT T
RIGHT T
LEFT B
RIGHT B
H OFFSET
0 - 20
10
V OFFSET
0 - 20
10
TRANSPARENCY
0 - 9
4

Benutzerhandbuch Deutsch
Main Menu
Sub Menu
Einstellung
Default
OSD SETTINGS
(CONTINUED)
MENU TIMEOUT
5 - 50, OFF (4)
8
INFO.TIMEOUT
5 - 50, OFF
8
INFO.DISPLAY
ON
ON
OFF
BRIEF INFO
ON
OFF
OFF
EXIT
HDCP
INPUT (5)
ACCEPT
ACCEPT
NOT ACCEPT
OUTPUT (6)
FOLLOW INPUT
FOLLOW INPUT
ALWAYS ON
EXIT
BEZEL CORRECTION (7)
CORRECTION
ON
OFF
OFF
H CORRECTION
0 - by output resolution
0
V CORRECTION
0 - by output resolution
0
EXIT
RECALL / SAVE (8)
RECALL
CANCEL
~ 4
CANCEL
FAV. 1
FAV. 2
FAV. 3
FAV. 4
SAVE
CANCEL
CANCEL
FAV. 1
FAV. 2
FAV. 3
FAV. 4
EXIT
ETHERNET
IP MODE
DHCP
DHCP
STATIC
STATIC SET
IP
IP
MASK
GATE
BYTE1
192
BYTE2
168
BYTE3
5
BYTE4
155
RE-LINK (9)
TIMEOUT (Min.) (10)
5 - 60
10
OFF
EXIT
OTHERS
IR ADDRESS (11)
0 - 3
0
EXIT
FACTORY DEFAULT
YES
NO
NO
EXIT
INFORMATION
(*12)
IN/OUT RESOLUTION
SOURCE HDCP/AUDIO
OUT MODE
FIRMWARE VER
EXIT
EXIT

Benutzerhandbuch Deutsch
Timings
Supported Input Timings
Support Timing
480i@59
480p@60
576i@50
576p@50
720p@25,30,50,60,
1080i@50,60
1080p@24,25,30,50,60
640x480@60,72,75,85
720x400@70
800x600@56,60,72,75,85
1024x768@60,70,75,85
1152x864@70,75
1280x720@60cvt
1280x768@60RB,60,75
1280x800@60RB,60,75
1280x1024@60,60cvt,75
1360x768@60
1366x768@60RB,60
1400x1050@60RB,60
1440x900@60RB,60,75
1600x900@60RB
1600x1200@60
1680x1050@60RB,60
1920x1200@60RB
Supported Output Timings
Support Timing
480p60
576p50
720p50
720p60
1080i50 (Matrix Mode Only)
1080i60 (Matrix Mode Only)
1080p24
1080p50
1080p60
1024x768@60
1280x800@60
1280x1024@60
1366x768@60
1440x900@60
1600x900@60RB
1600x1200@60
1680x1050@60
1920x1200@60RB

Manuel Utilisateur Français
Protocole RS-232
Baud Rate: 115200bps Data Bit: 8 bits
Parity: None
Flow Control: None
Stop Bit: 1
Paramètres Telnet
Utilisez TCP/IP (Port 23) pour la communication Telnet.
Commandes RS-232 & Telnet
Commande
Active
Retour 4x4 Matrix
AUA001
Dual A Audio channel in Left side
AUA001
AUA002
Dual A Audio channel in Right side
AUA002
AUA999
Check Dual A audio channel status
AUA???
AUB001
Dual B Audio channel in Left side
AUB001
AUB002
Dual B Audio channel in Right side
AUB002
AUB999
Check Dual B audio channel status
AUB???
AUD000
Audio output Off
AUD000
AUD001
Audio output On
AUD001
AUD999
Check audio on/off status
AUD???
AUE000
Audio EDID is LPCM 2CH
AUE000
AUE001
Audio EDID is LPCM 6CH
AUE001
AUE002
Audio EDID is LPCM 8CH
AUE002
AUE003
Audio EDID is BITSTREAM
AUE003
AUE004
Audio EDID is HD
AUE004
AUE999
Check audio EDID setting
AUE???
BEZ000
Bezel Correction OFF
BEZ000
BEZ001
Bezel Correction ON
BEZ001
BEZ999
Check bezel correction on/off status
BEZ???
BEH???
Horizontal (H) Bezel correction???=000 - Maximum
BEH???
BEH998
Check the current Horizontal(H) Bezel correction Maximum value
BEH???
BEH999
Check the current Horizontal(H) Bezel correction setting value
BEH???
BEV???
Vertical (V) Bezel correction???=000- Maximum
BEV???
BEV998
Check the current Vertical(V) Bezel correction Maximum value
BEV???
BEV999
Check the current Vertical(V) Bezel correction setting value
BEV???
BRI???
Setting Brightness
No response
???=000-100 for matrix mode
???=(000-100)+200*(OUT No.-1) for dual/tv wall mode
For example: OUT B set the Brightness value to 57 =(57)+200*(2-1) = 257
BRI99?
Check current Brightness value
BRI???
99?=999 for matrix mode
99?=991-994=OUT1-4 for dual/tv wall mode
CAL???
RECALL FAV. ???=001-004=FAV.1-4
CAL???

Manuel Utilisateur Français
Menu On-Screen-Display (OSD)
Main Menu
Sub Menu
Adjustments
Default
PICTURE (1)
ALL
CONTRAST
0 - 100
50
BRIGHTNESS
0 - 100
50
SATURATION
0 - 100
50
HUE
0 - 100
50
DUAL
DUAL AL
DUAL AR
DUAL BL
DUAL BR
TV WALL
OUT A
OUT B
OUT C
OUT D
D/T
RESET
ALL
RESET ALL
EXIT
OUTPUT RESOLUTION
480p
720p60
576p
720p50
720p60
1080i50 (2)
1080i60 (2)
1080p24
1080p50
1080p60
1024x768
1280x800
1280x1024
1366x768
1440x900
1600x900
1600x1200
1680x1050
1920x1200
EXIT
AUDIO EDID (3)
LPCM 2CH
LPCM 2CH
LPCM 6CH
LPCM 8CH
BIT-STREAM
HD
EXIT
OSD SETTINGS
POSITION
LEFT T
LEFT T
RIGHT T
LEFT B
RIGHT B
H OFFSET
0 - 20
10
V OFFSET
0 - 20
10
TRANSPARENCY
0 - 9
4

Manuel Utilisateur Français
Main Menu
Sub Menu
Adjustments
Default
OSD SETTINGS
(CONTINUED)
MENU TIMEOUT
5 - 50, OFF (4)
8
INFO.TIMEOUT
5 - 50, OFF
8
INFO.DISPLAY
ON
ON
OFF
BRIEF INFO
ON
OFF
OFF
EXIT
HDCP
INPUT (5)
ACCEPT
ACCEPT
NOT ACCEPT
OUTPUT (6)
FOLLOW INPUT
FOLLOW INPUT
ALWAYS ON
EXIT
BEZEL CORRECTION (7)
CORRECTION
ON
OFF
OFF
H CORRECTION
0 - by output resolution
0
V CORRECTION
0 - by output resolution
0
EXIT
RECALL / SAVE (8)
RECALL
CANCEL
~ 4
CANCEL
FAV. 1
FAV. 2
FAV. 3
FAV. 4
SAVE
CANCEL
CANCEL
FAV. 1
FAV. 2
FAV. 3
FAV. 4
EXIT
ETHERNET
IP MODE
DHCP
DHCP
STATIC
STATIC SET
IP
IP
MASK
GATE
BYTE1
192
BYTE2
168
BYTE3
5
BYTE4
155
RE-LINK (9)
TIMEOUT (Min.) (10)
5 - 60
10
OFF
EXIT
OTHERS
IR ADDRESS (11)
0 - 3
0
EXIT
FACTORY DEFAULT
YES
NO
NO
EXIT
INFORMATION
(*12)
IN/OUT RESOLUTION
SOURCE HDCP/AUDIO
OUT MODE
FIRMWARE VER
EXIT
EXIT

Manuel Utilisateur Français
Synchronisations
Synchro d’entrée prise en charge
Support Timing
480i@59
480p@60
576i@50
576p@50
720p@25,30,50,60,
1080i@50,60
1080p@24,25,30,50,60
640x480@60,72,75,85
720x400@70
800x600@56,60,72,75,85
1024x768@60,70,75,85
1152x864@70,75
1280x720@60cvt
1280x768@60RB,60,75
1280x800@60RB,60,75
1280x1024@60,60cvt,75
1360x768@60
1366x768@60RB,60
1400x1050@60RB,60
1440x900@60RB,60,75
1600x900@60RB
1600x1200@60
1680x1050@60RB,60
1920x1200@60RB
Synchro de sortie prise en charge
Support Timing
480p60
576p50
720p50
720p60
1080i50 (Matrix Mode Only)
1080i60 (Matrix Mode Only)
1080p24
1080p50
1080p60
1024x768@60
1280x800@60
1280x1024@60
1366x768@60
1440x900@60
1600x900@60RB
1600x1200@60
1680x1050@60
1920x1200@60RB

Manuale Italiano
On-Screen-Display (OSD) Menu
Menu Principale
Sub Menu
Range valori
Default
PICTURE (1)
ALL
CONTRAST
0 - 100
50
BRIGHTNESS
0 - 100
50
SATURATION
0 - 100
50
HUE
0 - 100
50
DUAL
DUAL AL
DUAL AR
DUAL BL
DUAL BR
TV WALL
OUT A
OUT B
OUT C
OUT D
D/T
RESET
ALL
RESET ALL
EXIT
OUTPUT RESOLUTION
480p
720p60
576p
720p50
720p60
1080i50 (2)
1080i60 (2)
1080p24
1080p50
1080p60
1024x768
1280x800
1280x1024
1366x768
1440x900
1600x900
1600x1200
1680x1050
1920x1200
EXIT
AUDIO EDID (3)
LPCM 2CH
LPCM 2CH
LPCM 6CH
LPCM 8CH
BIT-STREAM
HD
EXIT
OSD SETTINGS
POSITION
LEFT T
LEFT T
RIGHT T
LEFT B
RIGHT B
H OFFSET
0 - 20
10
V OFFSET
0 - 20
10
TRANSPARENCY
0 - 9
4
/