CMPC 0W217-200RLC Installation guide

Type
Installation guide
Installation & Finishing Guide
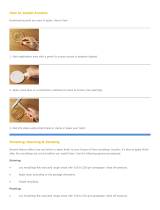
How Do I Apply Filler?
To ll nail holes, repair scratches, dents, and gouges,
simply sand the affected area lightly with a fi ne or extra
ne sandpaper using a sanding block (see Sanding).
Always use a non-shrinking fi ller. A light weight Spackle or
Shur-Patch is best. Follow the manufacturer’s directions to
achieve best results. For stainable mouldings use a fi ller that
closely matches the wood colour. Once holes have been
lled and allowed to dry, lightly sand these areas to remove
any rough spots.
How Do I Sand Mouldings?
Use a fi ne grit sanding sponge or
at least a 220-grit sandpaper on a
sanding block. Always sand with
the grain of the wood (Fig.12).
Coarser grits of sandpaper, or
going across or against the grain
will tend to leave fi ne gouges that
may be visible through subsequent
coats of paint. A very light pass over the nail area will
suffi ce. If you have purchased natural fi nish mouldings, such
as unfi n ished Finger-Joint Pine, they will require priming
before installation. A high quality primer is recommended.
Touch sanding with a fi ne grit (220 or higher) sandpaper
between each coat is strongly recommended. This light
sanding will ensure better bond between the coats, and
also give a smoother fi nal nish.
When to apply Paint or Stain.
Staining or painting the moulding before it is installed is
recommended. Ensure all areas that have fi ller are dry
and sanded before applying any paint. If you install the
moulding and then fi nish it, protect the area around the
moulding by masking it off with tape. Carefully remove
the tape immediately after fi nishing to prevent its drying to
the fi nish. Painting is recommended for moulding surfaces
already coated with a primer. In most applications a
semigloss coat for durability, washability, and appearance
is recommended. Please ensure that only higher quality
paints with high solids content are used. We recommend
two fi nish coats for top quality durability and appearance.
Mouldings with a pronounced wood grain are better suited
to stain or varnish to enhance the naturally occurring grain.
Other mouldings such as hemlock can be stained to virtually
any tint, but also provide a high quality surface for paint as
well when primed. The Following list shows the
recommended fi nishing.
What Tools Do I Need?
How Much Do I Need?
Take careful measurements of walls, windows etc. and
round up to the nearest foot. Add 10% extra for cutting
and waste.
Which Profi les Do I Need?
For windows and doors use casings, for ceilings use
crowns, for fl oors use baseboards, and for walls use chair
rails, panel moulds etc. Use the Moulding & Millwork
Catalogues or Charts to choose the right profi le numbers
to suit your needs and decor.
How Do I Mitre a Moulding?
Most moulding mitre joints are at a 90° angle (Fig.1) and
consist of 2 pieces of moulding cut at opposing 45° angles.
When fi tted together they should form a tight right angle.
For tight mitre joints, nail and glue at joint as shown. (Fig.2)
How do I do a return?
A return is where the profi le of a moulding is carried from
the front of the profi le around to the wall to give the ends
an appealing and fi nished look. This is commonly done
on door and window headers, chair rails, mantels, and
handrails. To do a return, measure the overall width of the
header etc, then cut both outside edges at 45° angles back
toward the header. Then cut your return pieces at opposite
45° and then trim them to the correct thickness to return to
the wall.
Species Stain Varnish Paint
Ultralite
Oak
✔✔
Hemlock
✔✔✔
Solid Pine
✔✔
Primed Finger Joint
Primed MDF
Raw Finger Joint
Knotty Pine
✔✔
Maple
✔✔
Fir
✔✔
Poplar
✔✔
* Species availability may vary from region to region.
HANDY TIP
Using a compound mitre saw and a compressed air brad
nailer will not only make all stages of installing
decorative mouldings easier but it will also speed up
the process considerably.
NOTE: Always wear eye, ear and respiratory protection
when doing any home improvement project.
Printed in Canada 03/04
Installation & Finishing Guide
Glue this piece in behind your header to create a pattern
that fl ows from the face of the moulding around to the wall.
Note on many patterns such as chair rails this piece will be
quite small, so use care when cutting.
How Do I Splice a Moulding?
To span longer lengths, you may have to splice mouldings.
Mitre the joining ends at 45° angles from front to back.
(Fig.5) One member will overlap the other in a scarf joint,
creating a vertical face seam in the fi nished installation. It is
advisable to join moulding pieces over wall stud (Fig.6) for
additional strength.
Climatizing your mouldings.
It is advisable that you “climatize” your mouldings prior to
installation. Mouldings that are made of natural materials in-
cluding MDF and other manufactured products can absorb
moisture from many sources such as a damp garage fl oor.
The result of this can be that your mouldings can shrink after
installation leaving gaps that need to be dealt with. A good
solution to this is to “climatize” your mouldings by stacking
them in the room environment which they are going to be
installed in for at least 48 hours prior to installation. Ideally
the mouldings should be separated to allow air to circulate.
How Do I Install a Moulding?
Install the moulding piece by piece, working your way
around the room, leaving the nail heads exposed to allow
for any repositioning. Avoid nailing the last 2 to 3 inches
of each piece to avoid splitting. In some cases you may
need to predrill your moulding before installation. Nail in
the curved or cove part of the moulding to better hide the
nail holes. Nail mouldings into wood studs or jambs. When
nailing by hand, any good quality fi nishing nail properly
countersunk will work well.
What Are Crown Mouldings?
Crowns usually run along the wall at the ceiling, (Fig.7)
softening the transition from wall to ceiling while adding a
distinctive look and charm to most rooms. Crowns bridge
the corners by sitting fl at against both the wall and ceil-
ing at the same time. (Fig.7.1) Crowns are available in a
wide range of profi les and sizes. They can be combined
with other profi les such as baseboards to create the look of
custom millwork without the cost. Crowns may also be used
in mantel and wall trim build-ups.
How To Cut A Crown?
As described, crowns do not lie
ush against the wall. Cutting cor-
rect 45° mitres is critical. Clamp two
blocks of wood to the mitre box to
hold the moulding in place at the
angle at which it will be installed.
Once blocks are in place, insert
moulding prior to cutting, face out
and upside down (Fig.8). Then cut
your 45° angles with a fi ne tooth saw. To fl at cut crown
mouldings with a compound mitre saw refer to the owner’s
manual that came with your saw.
How To Splice A Crown?
To span longer lengths, you may
have to splice your crowns. Set
your mouldings in a mitre box or
compound mitre saw as described
in previous section. Mitre the joining
ends at 45° angles from front to
back. One piece will overlap the
other in a scarf joint. (Fig.9),
creating a vertical face seam in the
nished installation.
How To Cope A Crown?
Trim the moulding in a mitre box at a 45° angle. The ex-
posed profi le serves as a guideline for the coping saw. To
establish a cutting line, highlight profi le shape by marking
along front edge of profi le with pencil. Cut along the line at
a 45° angle. (Fig.10.) The adjoining piece of moulding is
cut at a 90° angle and butts fl ush into the corner (Fig.11).
What Do I Need
to Finish the Job?
HANDY TIP
When installing crown moulding a helpful tip is to put up
a backing which can be made from cut down 2x4 or any
inexpensive wood. You should leave a small gap between
the crown and the backing to allow for uneven walls and
ceilings. The backing saves you searching for studs and
makes for an easier installation. (See Fig. 7.1 on
previous page)
  • Page 1 1
  • Page 2 2

CMPC 0W217-200RLC Installation guide

Type
Installation guide

Ask a question and I''ll find the answer in the document

Finding information in a document is now easier with AI