Bio Bidet SLIM TWO Installation guide

Type
Installation guide
The following terms are used in this manual to indicate hazards of varying degrees of severity.
Indicates potentially hazardous situation which, if not avoided, may result in minor or
moderate injury or in damage to the product or other property.
Indicates potentially hazardous situation which, if not avoided,
could result in death or serious injury.
WARNING
Indicates an imminently hazardous situation which, if not avoided,
will result in death or serious injury.
DANGER
CAUTION
READ ALL INSTRUCTIONS BEFORE INSTALLATION AND USE
DANGER - To reduce the risk of electrocution
WARNING - To reduce the risk of burns, electrocution, fire, or injury to persons
PLEASE OBSERVE THE FOLLOWING PRECAUTION BEFORE USING THIS PRODUCT
Do not open the product to repair or remodel.
Only qualified service personnel should service this product.
Do not use attachments not recommended by the manufacturer.
Do not dismantle
Connect this product to cold water supply pipe carrying potable water.
Do not connect to an industrial water supply line that
does not carry water of drinking quality.
This will negatively effect hygiene and performance.
Prohibited
About Low Temperature Burns-
A burn occurs when the skin has been exposed to high temperatures.
However, a low temperature burn may occur when the skin has been in contact with an
object at relatively low temperature (about 104 ). Close supervision is necessary when
this product is used by children or adults with sensitive skin.
Prohibited
If using any chemical toilet bowl cleaner, be sure to wipe up
any spills that splash onto Electric Bidet.
Do not use benzene or any acid chemical detergent.
Only neutral detergent permitted.
Prohibited
Do not plug in the power cord before connecting the water supply hose.
Prohibited
This product must be grounded.
An approved Ground Fault Circuit Interrupt must be used.
Grounding
Do not splash water on this product.
Please provide adequate ventilation to avoid high levels of humidity
which can damage the electronic components.
It is necessary to provide adequate ventilation with a fan,
open door or open window when bathing.
Do not spray water
Do not touch the power cord with wet hands.
Do not reach for a product that has fallen into water.
Unplug immediately!
Wet hands prohibited
This product must be connected to a standard voltage power source.
Do not connect power cord if the cord is damaged or broken.
Do not plug the unit into a loose electric outlet.
Observe at all times
Please disconnect the power cord when you clean this product or
detach it from toilet bowl.
Do not supply electrical power to the unit until the plumbing work
has been completed.
Observe at all times
Keep the electrical cord away from heated surfaces to prevent a fire
hazard.
Also, keep any flammable materials away from this product at all times.
Use of fire prohibited
Installation Manual and Operating Instructions
4 5
1
IMPORTANT SAFEGUARDS / GENERAL CAUTIONS
PREPARATION
6
CAUTION
Never operate this product if it is not
working properly, if it has been
dropped or damaged, or dropped into
water. Return the product to a service
center for examination and repair.
Prohibited
Do not obstruct or put
anything into the dry air
outlet. Do not apply
excessive force to the
shower nozzle.
Prohibited
Do not strain or push the connected hose and tube connecter;
it may cause water leakage.
Never drop or insert any object into any opening or hose.
Use proper plumbing supplies if any modification is to be made.
Prohibited
Drain the water from unit and unplug the power if this product is
not going to be used for an extended period of time.
Refer to page 19.
Observe at all times
Do not stand or sit on
the seat cover lid.
It is not designed to
support a user’s
body weight.
Prohibited
Allow the seat
and lid to close
automatically.
Do not force the
lid closed.
Prohibited
Use this product only as described
in the operating instructions.
Never use while sleeping or drowsy.
Do not use while bathing.
Observe at all times
Be careful so that
this product does not
become stained with
excrement and urine.
Observe at all times
- SAVE THESE INSTRUCTIONS -
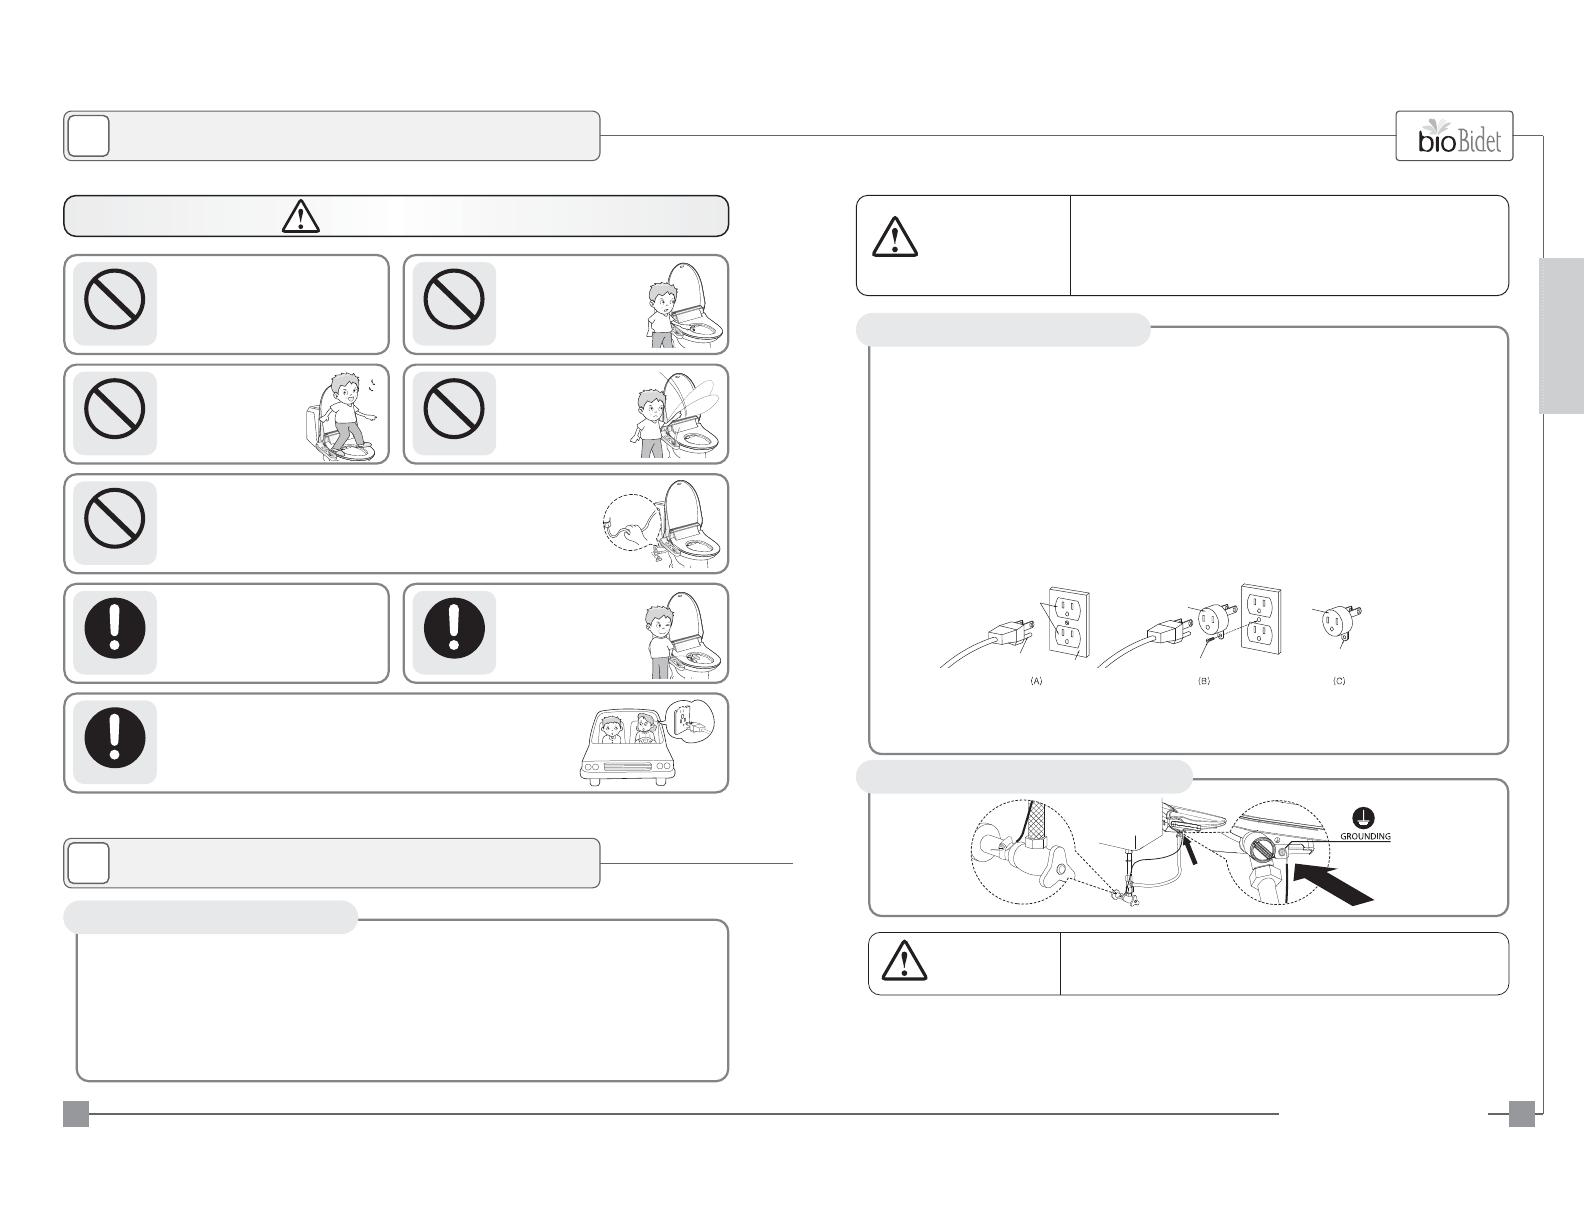
THIS PRODUCT MUST BE PLUGGED into a regular voltage grounded GFCI outlet (North America 120V ac).
The rated power consumption is 1400W. In locations where only a standard two-prong outlet is available,
it is the responsibility of the user to install a grounded three-prong outlet.
Using a higher voltage is dangerous and may result in a fire or other accident.
This product is not responsible for damage resulting from the use of it on other than specified voltage,
or operating it without proper grounding.
WIRING REQUIREMENT
(1) This product has a three-prong grounding plug, which must be plugged into an outlet that is properly installed and
grounded. In the event of an electrical short circuit, grounding reduces the risk of electric shock by providing an
escape wire for the electric current. If repair or replacement of the cord or plug is necessary, do not connect the
grounding wire to either flat blade terminal. The wire with insulation having an outer surface that is green with or
without yellow stripes is the grounding wire. Check with a qualified electrician or service person if the grounding
instructions are not completely understood, or if in doubt as to whether the product is properly grounded.
(2) This product is for use on a nominal 120V circuit, and has a grounding plug that looks like the plug illustrated in
sketch A in Figure 1. A temporary adapter, which looks like the adapter illustrated in sketches B and C, may be
used to connect this plug to a 2-pole receptacle as shown in sketch B if a properly grounded outlet is not available.
The temporary adapter should be used only until a properly grounded outlet (sketch A) can be installed by a qualified
electrician. The green colored rigid ear, lug, or the like extending from the adapter must be connected to a permanent
ground such as a properly grounded outlet box cover. Whenever the adapter is used, it must be held in place by the screw.
This appliance has to be earthed.
GROUND INSTRUCTIONS
GROUNDING PIN
ADAPTER
ADAPTER
METAL SCREW
TAB for
Grounding Screw
GROUNDED
OUTLET
- Figure 1-
The use of an extension cord is not recommended or advised. If it is necessary to use an extension cord, use
only a three-prong extension cord (one to one), and a three slot built-in GFCI receptacle that will accept the
plug on this product. The marked rating of the extension cord should be equal to or greater than the electrical
rating of the unit (10amp). Consult a qualified electrician or service person if you are not sure whether the unit is
properly grounded.
IMPROPER GROUNDING CAN RESULT IN A RISK OF ELECTRIC SHOCK.
Electric wiring has to be done in accordance with all local codes,
or in the absence of local codes, with the National Electrical Codes.
DANGER
OPTIONAL GROUND INSTRUCTIONS
This Product must be on a separate circuit. No other appliance
should share the circuit with this product.
Sharing a circuit could cause the branch circuit fuse to blow
or the circuit breaker to trip. Continuous usage under these
conditions could result in fire or property damage.
WARNING
GROUNDED
OUTLET BOX
Installation Manual and Operating Instructions
6 7
1
IMPORTANT SAFEGUARDS / GENERAL CAUTIONS
2
CAUTIONS BEFORE INSTALLATION
PREPARATION
MAIN UNIT
1
ACCESSORIES
2
Posterior Wash Nozzle
Turbo Wash Nozzle
Digital Occupied Sensor
Drain / Quick Release
Operation LED Window
Heated Seat
Lid
Caution Label
Deodorizer
Dryer Vent
Control Panel for BB-1700
Feminine Wash Nozzle
BB-1700
Installation Manual and Operating Instructions
8 9
3
Identification
BB-1700 Control Panel
3
Cone packing
(2 pcs)
Mounting bolts (2 pcs) Base Plate (1 pc)
Nuts
(2 pcs)
Bolt Case
(2 pcs)
User manual
For plumbing For product fixation Installation
instructions
Water supply hose
(for electrical toilet seat)
Water supply hose
(for toilet flush water tank)
T-Valve
- When you sit down on this product, sit in the center in order to activate the sensor.
Stop all operation.
Posterior wash. Feminine wash.
Turbo wash. Dry washed area.
Adjust the water pressure and
warm air dryer temperature.
Adjust the oscillation function and
nozzle position (5 levels).
Adjust the water temperature (3 levels). Adjust the seat temperature (3 levels).
When selected during the wash function, the
nozzle oscillates automatically for a wider wash.
When selected during the wash function,
it starts the massage wash.
If move button is selected when user is not sitting
on the seat, it operates nozzle shower function.
If massage function selected when user is not
using wash functions, it automatically operates
wash and dry function sequentially.
If Economy mode is selected, seat temperature
and water temperature will stay at 89.6.
When user sits on the seat, it automatically
operates to deodorize. (Can select on/off)
Drain button
PREPARATION
L-Valve
MAIN UNIT
1
Digital Occupied Sensor
Drain / Quick Release
Operation LED Window
Heated Seat
Lid
Caution Label
Deodorizer
Dryer Vent
Posterior Wash
Feminine Wash
Dry
Turbo
Deodrant
Remote signal intensity
battery life
Set Water Temperature
Heated Water
󰣫
󰣬
󰣭
󰣮
󰣯
󰣰
󰣱
Heated Seat
Set Seat Temperature
Water Pressure
Dry On / Off
Set Nozzle position
Watter pressure
Nozzle position
󰣢󰣣󰣤
󰣥󰣦
󰣧
󰣨
󰣩
󰣪
󰣫
󰣬
󰣭
󰣮
󰣯
󰣰
󰣱
Display
Installation Manual and Operating Instructions
10 11
3
Identification
BB-2000
ACCESSORIES
2
Cone packing
(2 pcs)
Mounting bolts (2 pcs) Base Plate (1 pc)
Nuts
(2 pcs)
Bolt Case
(2 pcs)
Remote control
User manual
Remote control
holder
1.5V AAA type
Battery (2pcs)
For plumbing For product fixation For remote control Installation
instructions
Water supply hose
(for electrical toilet seat)
Water supply hose
(for toilet flush water tank)
BB-2000 Remote Control
3
Simple Operation Panel
Feminine
Wash
Posterior
Wash
Stop
- When you sit down on this product, sit in the center in order to activate the sensor.
󰣢
󰣣
󰣤
󰣥
󰣦
󰣧
󰣨
󰣩
󰣪
Stop all operation.
Posterior wash.
Feminine wash.
Dry washed area.
VORTEX wash.
When selected during wash function nozzle
oscillates automatically for a wider wash.
If move button is selected when user is not sitting on
the seat, it operates nozzle shower function.
When selected during wash function,
it start massage wash.
If massage function selected when user is not using
wash functions, it automatically operates wash and
dry function sequentially.
When user sits on the seat, it automatically operates
to deodorize. (Can select on/off)
The water temperature can be adjusted up to 4 levels
(off, low, middle, high).
Can set time in the remote control with
hour( ) and minutes( ) buttons.
If Economy mode is selected, seat temperature
and water temperature will stay at 89.6.
If this( ) symbol flashes, please change
the battery in remote control.
The seat temperature can be adjusted up to 4 levels
(off, low, middle, high).
Simple Operation Panel
For BB-2000
Drain button
PREPARATION
Posterior Wash Nozzle
Turbo Wash Nozzle
Feminine Wash Nozzle
T-Valve
L-Valve
CAUTION BEFORE INSTALLATION
󰢠Do not plug in before installation.
󰢠If you need an electric power system or extension, please consult a qualified electrician.
STEPS
󰢠Shut off the water supply shut off valve.
󰢠Drain the toilet tank completely.
󰢠Then remove the existing fill valve water supply hose.
Flexible Tube
Water supply hose
(for toilet flush water tank)
1
Connect T-Valve.
󰢠Remove existing supply hose connected to the toilet tank.
Make sure not to damage the water supply hose
󰢠Install T-Valve at the thread from tank.
2
Removing the existing seat and lid.
󰢠Remove mounting bolts to release existing
toilet seat from toilet.
Check for any water leaks. Check for any water leaks.
3
Connect water supply hose to
the T-Valve.
4
Turn Off Water.
Catch plate
Place the plate and guides over each mounting hole.
Insert the mounting bolts through the plate and
mounting holes.
5
1. Slide this product onto the catch plate
centering the unit with the guide arrows on the Base.
2. You will hear a click once this product is securely
mounted to the catch plate.
3. This product will feel a little loose on the toilet bowl.
Adjust the fit from front to back and side to side for balance.
4. Tighten the nuts on both bolts securely.
7
Check for any water leaks.
8
Slide cone packing and washers onto the bolts
then fasten to securely mount bidet seat to toilet.
6
Installation Catch Plate. Bolt and Nut Assembly.
Assembly. Connect the flexible tube from side of
T-Valve to this product,
Open the Angle Stop valve to fill water.
Cone Packing
Nut
Bolt Guide
Bolt
Installation Manual and Operating Instructions
18 19
6
Installation
Central mounting
groove
Bolt
BACK
INSTALLATION
L-Valve
Wireless remote mounting guide. (BB-2000)
9
Nozzle Change
10
Disconnect the power plug.
Close water supply shut-off valve.
Drain water from bidet seat using drainage
as illustrated.
Remove bidet seat from toilet as illustrated.
Do not turn unit upside down.
1
2
3
4
Installation Manual and Operating Instructions
20 21
6
Installation
7
Separation Of Unit From The Toilet Bowl
Install wireless remote with adhesive tape
Inserting batteries
󰢠Insert supplied batteries (1.5V AAA) and close battery cover.
Nozzle Combiation
Nozzle Seperation
󰢠Remove adhesive from back of bracket and
place bracket where desired.
(Please check the polarity,
before insert the batteries.)
Adhesive
tape
Wall
INSTALLATION
MAINTENANCE FOR WINTER SEASON
󰢠When the “Posterior Wash (
/
)” button is pressed
for 3 seconds without occupying the seat, the nozzle can be
cleaned with a soft toothbrush.
󰢠After cleaning the nozzle, push the “Stop (
/
)”
button once again, and the nozzle retracts itself.
( : in Simple Operation panel -Remote Model)
1) Close the water shut off valve.
2) Flush the toilet to empty the water reservoir.
3) Unscrew the water filter nut.
4) Clean the strainer with a small brush or water.
5) Re-screw the water filter nut.
6) Open the water shut off valve.
This product will not operate
properly if the strainer is clogged.
Please clean the strainer regularly.
( : in Simple Operation panel -Remote Model)
CLEANING THE NOZZLE DRAINING THE WARM WATER TANK IN THE UNIT
󰢠When you clean this product, do not use thinner, benzene or
toilet bowl cleaner. It may cause damage to the surface of unit.
󰢠Use a wet cloth when you clean this product.
󰢠Do not spray water directly on to this product.
󰢠When you clean this product, disconnect the power plug.
CLEANING THE BODY OF UNIT
CLEANING THE STRAINER
If you do not intend to use this product for 14 days or longer,
drain the water from this product’s warm water tank.
1) Disconnect the power plug.
2) Close the water shut off valve.
3) Press the drain lever until the water is
completely drained from water tank.
4) To re-supply water after draining,
open the water shut off valve.
Do not drink the drained water.
Do not insert finger into the drain hole.
Before draining, unplug the power cord and wait 30 minutes until the unit has cooled down.
Check the power cord if it is plugged in or not.
1
Keep the water temperature on “Middle or High Level” to prevent water from freezing.
2
If you do not intend to use the unit for 14 days or longer, disconnect the power
plug and drain the water.
3
Installation Manual and Operating Instructions
22 23
8
Maintenance
9
Water Draining
MAINTENANCE
BB-2000
BB-1700
Trouble Cause Remedy
1. The water tank is not filled.
2. The shut off valve is closed.
3. Freezing inside the main unit or the
water supply pipe.
1. Disconnected the power cord.
2. The seat is not occupied.
3. The battery of remote controller is
exhausted.
(Only BB-2000 model)
1. Check the water supply system
1. The water pressure level is set to
“LOW”.
2. The strainer is clogged.
1. The water temperature is set to
“LOW”.
2. Continuous operation has depleted
the supply of warm water.
1.The seat & dryer temperature is set
to “LOW”.
1. Wait about one minute.
2. Press the desired washing button once
again.
3. Turn on the shut off valve to open.
4. Heat the room (for about two hours).
Operating the unit while parts are
frozen will cause a malfunction.
1.Connect the power cord.
2. Check the power supply system in
your house.
3. Occupy the seat (The unit has an
occupied sensor).
4. Replace the battery.
1. If water is leaking from the main unit,
call the service center or the place you
purchased unit.
1.Set the water pressure to “HIGH”.
2.Clean the strainer.
1.Set the water temperature to “HIGH”.
2. Wait about three minutes.
1. Set the seat & dryer temperature to
“HIGH”.
The washing water
does not spray
The unit is not
operating
Water is leaking
The washing water
pressure is weak
The washing water
is not warm
The seat and dryer is
not warm
Feminine Wash
Wash
Device
Heated Seat
Warm
Air Dryer
Device
Posterior Wash
Water Pressure
Adjustable
Warm Water
Temperature
Heater
Safety Devices
Temperature
Heater
Safety Device
Adjustable Dry Temperature
(Room Temp~45)
Deodorizer
Turbo& Vortex Function
Remote control
Inlet water temperature
3~ 35 ( 37.4 ~ 95 )
3~ 40 ( 37.4 ~ 104 )
Ambient Temperature
Dimension
Weight (kg)
Heater
(250W)
Safety Device
(Themal fuse, bimetal)
Power Rating
Power cord
Type
Water inlet type
Water inlet pressure
Specification
Direct Inlet flow type
0.4 ~ 7.5 kgf/( 5.69 psi ~ 106.7psi )
1.2m (4 feet): AMERICA
Max. 0.7/min ( Max. 0.32 GPM )
5 Levels
Room Temp - 40
( Room Temp. 104
)
1340 W
Thermal fuse, Thermal switch, Float switch
Room Temp ~ 41
( Room Temp. ~ 105.8
)
55 W
Thermal fuse
4.9kg 4.8kg
BB-1700 BB-2000
-
-
W : 460mm / L : 531mm / H : 152mm
W : 392mm / L : 531mm / H : 152mm
America or Canada: 120Vac, 60Hz, 1400W
Elongated(Control) Elongated (Remote)
Installation Manual and Operating Instructions
24 25
10
Trouble Shooting
11
Specifications
MAINTENANCE
  • Page 1 1
  • Page 2 2
  • Page 3 3
  • Page 4 4
  • Page 5 5
  • Page 6 6
  • Page 7 7
  • Page 8 8

Bio Bidet SLIM TWO Installation guide

Type
Installation guide

Ask a question and I''ll find the answer in the document

Finding information in a document is now easier with AI