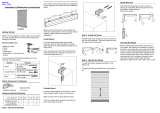
1) Pencil mark the mounting screw holes at the
back or top of the bracket.
• Pre-drill holes for mounting screws.
• Use level at top of brackets to ensure
straight alignment.
2) Attach the brackets with the mounting
Swing support rods into square brackets that are attached to the back
of the shade. Snap in place by pressing firmly sideways and install support
rod screws A to lock into position.
screws provided and tighten the screws in
place.
• For wider widths and added support, install
the center support bracket when provided.
Install at approximate center of the
headrail.
• When mounting brackets on wall board or
plaster, use the plastic screw plugs
provided.
3) Insert the top front of the head rail into the
front lip of the brackets. Push the rail into
place.
1
HOW TO MEASURE
Outside Window Frame:
Measure window width, including
frame. Measure window opening.
Blind should overlap window opening
2" or more. Attach bracket to window
frame or wall.
Inside Window Frame:
Accurately measure the width of your
window opening. Select size that is
nearest to this dimension.
HOW TO INSTALL BLIND—For Best results mount on window frame or wall.
Outside Window Frame or On Wall:
Installation Instructions for Cordless Roman Shade
TOOLS NEEDED
• Metal Tape Measure
• Pencil
• Step Stool or Step Ladder
• Phillips Head Screw Driver
• Drill
• Drill Bit (Drywall): 1/16”
Drill Bit (Screw Plugs): 1/4”
• Level
HARDWARE CONTENTS
• Mounting Screws
• Support Rod Screws A
• Plastic Screw Plugs
(For Use with Mounting on Plaster)
• Spacers for
Inside or Ceiling Mount
• Mounting Brackets
Outside Mount
Window
Opening
Outside Mount
Inside Mount
Window
Opening
1) Marque con lápiz los orificios para los tornillos de
instalación en la parte trasera del soporte.
• Perfore previamente los orificios para los
tornillos de instalación.
• Utilice el nivel en la parte superior de los
soportes para asegurarse de que estén bien
alineados.
2) Instale los soportes con los tornillos de
instalación que se incluyen y ajústelos en
su lugar.
• Cuando el ancho sea mayor y se necesite más
capacidad de soporte, instale el soporte central,
si se incluye. Instálelo aproximadamente en el
centro del riel superior.
• Cuando instale los soportes en una pared de
madera o yeso, use los tornillos plásticos que
se incluyen.
3)
Introduzca la parte superior delantera del riel
superior en el borde delantero de los
soportes. Empuje el riel superior hasta
colocarlo en su lugar.
Recomendamos que el riel superior
sobrepase el soporte en al menos 2" (5 cm).
1
CÓMO TOMAR MEDIDAS
Marco exterior de la ventana:
Mida el ancho de la ventana, incluido
el marco. Mida la abertura de la ventana.
La persiana debe sobrepasar en 2" (5 cm) o más
la abertura de la ventana. Instale el soporte en el marco de
la ventana o en la pared.
Marco interior de la ventana:
Tome la medida exacta del ancho
de la abertura de la ventana.
Seleccione el tamaño más
cercano a esa dimensión.
CÓMO INSTALAR LA PERSIANA: Para obtener resultados óptimos, se debe instalar en el marco de la ventana o en la pared.
Pared o marco exterior de la ventana:
Instrucciones para la instalación de una persiana romana sin cordón
HERRAMIENTAS NECESARIAS
• Cinta métrica metálica
• Lápiz
• Banqueta o escalera pequeña
• Destornillador Phillips
• Taladro
• Broca (Panel de yeso): 1/16”(0.16 cm)
Broca (Tornillos): 1/4”(0.64 cm)• Nivel
TORNILLERÍA INCLUIDA
• Tornillos de instalación
• Tornillos A
• Tornillos plásticos
(para usar en instalaciones en yeso)
• Separadores para instalar
en el interior o en el techo
• Soportes de instalación
En la pared
En el marco
Instalación exterior
Ventana
Abertura
Instalación exterior
Instalación interior
Ventana
Abertura
On Wall
On Frame
2 Screws “A”
2 Tornillos“A”
Haga girar las barras de
soporte de manera que se ajusten en los soportes
instalados en
la parte trasera.
que las barras de
Ajústelas presionando con firmeza. Luego de
soporte estén en su lugar, vuelva a colocar los tornillos “A”.
* Note: The spacer provides the
minimum required space above
the mounting bracket to install the
headrail of the shade when
attaching the mounting brackets to
the ceiling or when the depth of
the recess exceeds 1-1/2".
* Nota: El espaciador suministra el
espacio mínimo requerido sobre el
soporte de montaje para instalar el
riel superior de la persiana al unir
los soportes de montaje al
cielorraso o cuando la profundidad
del hueco excede 1-1/2".

HOW TO INSTALL BLIND (Continued)
Inside Window Frame Or On Ceiling:
On Ceiling
Inside Window
Frame
1) Pencil mark the mounting screw
holes at the back or top of the
bracket.
• Pre-drill holes for mounting
screws.
2) Attach the brackets with the
mounting screws provided and
tighten the screws in place.
• For wider widths and added
support, install the center
support bracket when provided.
Install at approximate center of
the headrail.
3) Insert the top front of the head rail into
the front lip of the brackets. Push the
rail into place.
When installing inside the window
opening, it requires a 1-1/2" deep
recess.
CÓMO INSTALAR LA PERSIANA (continuación)
Marco interior de la ventana:
En el techo
Marco interior
de la ventana
1) Marque con lápiz los orificios para
los tornillos de instalación en la
parte trasera del soporte.
• Perfore previamente los orificios
para los tornillos de instalación.
2) Instale los soportes con los tornillos
de instalación que se incluyen y
ajústelos en su lugar.
• Cuando el ancho sea mayor y
se necesite más capacidad de
soporte, instale el soporte
central, si se incluye. Instálelo
aproximadamente en el centro
del riel superior.
3)
Introduzca la parte superior delantera
del riel superior en el borde delantero de
los soportes. Empuje el riel superior
hasta colocarlo en su lugar.
Cuando la instalación se realiza en el interior de la
abertura de la ventana, es necesario dejar un espacio
mínimo de 1-1/2” (3,8 cm) de profundidad.
2
HOW TO OPERATE THE SHADE
2
FUNCIONAMIENTO DE LA PERSIANA
2 Screws “A”
To lower your blind,
simply pull to the
desired position and
release.
To raise your blind,
push up to desired
position and release.
2 Tornillos“A”
Para bajar la persiana,
sólo tire hasta llegar a
la posición deseada y
suéltela.
Para levantar la persiana,
sólo levántela hasta llegar
a la posición deseada y
suéltela.
Periodic cleaning is suggested. For best
results, use a vacuum cleaner. For
spot-removal use a mild fabric cleanser,
suitable for polyester and follow the
manufacturers directions.
CLEANING YOUR SHADE
CÓMO LIMPIAR LA PERSIANA
Se recomienda una limpieza periódica. Para
obtener resultados óptimos,
utilice una aspiradora. Para quitar las
manchas utilice un limpiador
suave para telas, que se pueda aplicar al
poliéster, y siga las
instrucciones del fabricante.
Haga girar las barras de
soporte de manera que se ajusten en los soportes
instalados en
la parte trasera.
que las barras de
Ajústelas presionando con firmeza. Luego de
soporte estén en su lugar, vuelva a colocar los tornillos “A”.
Swing support rods into square brackets that are attached to the back
of the shade. Snap in place by pressing firmly sideways and install support
rod screws A to lock into position.
/


