Page is loading ...

STAPLE DOWN INSTRUCTIONS
Notes:
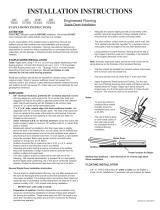
Staple Down
Proper location for Staple
Trim pieces available from your Mullican Flooring Distributor.
POST OF),&(%2;:22'/<152$'
JOHNSON CIT<T1
Engineered Flooring
Staple Down Installation
$TTENTION
Inspect $// materials carefully %()25(installation. Warranties DO NOT
cover materials with visible defects once they are installed.
It is the responsibility of the installer/owner to determine if the job site
subfloor and job site conditions are environmentally and structurally
acceptable for wood floor installation. Mullican Flooring declines any
responsibility for wood floor failure resulting from or connected with subfloor,
subsurface, job site damage or deficiencies after hardwood flooring has been
installed.
ST$P/('2:1,NST$//$TION
Tools: 3/8 and 1/2 thick products can use a 1 1/4 or 1 1/2 inch 18 gauge
staple, 7/32 or 1/4 inch crown or 1 1/4 inch 20 gauge cleat. 9/16 and 5/8
thick products can use a 1 1/2 inch 18 gauge staple. Cleat should be 1 3/4
inch 18 gauge cleat. Do not use staples or nails intended for 3/4 inch
solid flooring products.
Wood type subfloors should also be checked for moisture using a reliable
moisture meter.Wood or plywood subfloors should not exceed 14% moisture
content, the moisture content difference between hardwood flooring and
subfloor should not exceed 4%. Check with your local distributor for your
geographical variances.
68%)/225
´PLQLPXPWKLFNQHVVSUHIHUUHG´RUWKLFNHUSO\ZRRG installed
with long edges at a right angle to the 16” on center floor joists and
staggered so that the end joints in adjacent panels break over different
joists. Nail at each bearing with 6d threaded or 8d common nails spaced
10” on center along intermediate joists.
´[´WR´ZLGHVTXDUHHGJHNLOQGULHGFRQLIHURXVOXPEHU, laid
diagonally over 16” on center wooden joists. The ends of all boards are
to be cut parallel to the center of the joists for solid bearing. Face nail
each board solidly at every bearing on the joists with two nails (7d
threaded or 8d common).
´PLQLPXP26%RQLQFKPLQLPXP center floor joists with
system properly nailed or minimum 7/8” subfloor with 24” on center floor
joists or trusses.
Baseboards should be installed so that their lower edge is slightly above
the level of the finished floor, but not nailed into the finished floor.
Basement and crawl spaces must be dry and ventilated when plank or
strip flooring is to be installed over them. In crawl spaces a vapor barrier
should be provided. Black vapor barrier must be provided below
subfloor on the
ground. (6 mil. black)
Subfloor should be flat or made to be flat to 3/16” in a 8’ ft. radius.
Particle board of any thickness is NOT ALLOWED!
Adequate and proper nailing as well as soundness of the subfloor
should be ascertained. Foreign material shall be removed from the
subfloor surface and swept clean.
The clean subfloor shall be covered wall to wall with 15lb. asphalt
saturated felt, Aquabar
®
B(12526,13$3(5), or Mullican Moisture
Mat. Butt the edges when positioning one or the above mentioned
moisture retarder. Double the felt around heat ducts that may be in the
floor.
General Staple Down Installation Instruction:
Time at which to install hardwood flooring: Lay only after sheetrock and
tile work are thoroughly dried and all but the final woodwork and trim
have been completed. The building interior should have been dried and
seasoned and a comfortable working temperature (at least 60° F) and a
relative humidity of 35 – 55% should exist during and after installation.
DO NOT open until ready to install.
Preparation of subfloor: Subfloor irregularities and undulation may
cause any wood flooring installation to develop hollow spots between
the flooring and subfloor. These hollow spots are NOT the result of any
wood floor manufacturing defect and are NOT covered by the Mullican
Flooring warranty.
Adequate and proper stapling as
well as soundne
ss of the
subfloor should be ascertained. Foreign material shall be
re
moved from the subfloor surface and swept clean.
The clean subfloor surface shall be covered, wall to wall, w
ith
15 lb aspha
lt saturated felt, Aquabar
®
B, or Mullican moisture
mat (
12526,13$3(5. Butt the edges of this felt w
hen
positionin
g it.
Laying direction for plank flooring: Flooring should be laid
at
right angles to the floor joists and, if possible, in the direction
of the longest
dimension of the room.
Note: Normally, expansion space around the room should be the
same distance as the thickness of the hardwood flooring.
The floor should be installed from several cartons at the same
time to ensure color and shade mix.
End joi
nts should never be closer than 4” from each other.
Staple Engineered Plank Hardwoo
d Flooring: The first and
last row of flooring should be face nailed and filled,as well as
staples placed at Tongue. Staple or Nail (cleat) each board
along the tongue every 4 to 6 inches apart and within 2 inches
of each end joint. This should be done to the entire floor.
To avoid movement in
hardw
ood floor relative
hu
midity should be
ma
intained year round
at 35-55%. Temperature
should be kept between
68°F-78°F year round.
The use of matching
wood flooring putty to
cover small cracks or
face nail holes should
be considered norm
al in
hardw
ood flooring
insta
l
lation.
5DGLDQW+HDW6XEIORRUV2$.21/<±6He instructions on reverse
SDJHGlue Down InstallatLRQRUgo to: www.mullicanflooring.com
)/O$TING INST$//$TION
3/8”, 9/16“, 5/8” or ½” prod
NOTE:
** Do not use any type of tape on the hardwood finish surface. If a
covering is needed after installation the wood floor should be completely
covered and covering taped to itself, not the finish of wood flooring.
uct 3” width or wider can be floated in
some, not all, installations. If necessary call your supplier for details
or go to: www.mullicanflooring.com
"61/9 5/8"
14mm 15mm
3/8" 1/2"
10mm 12.7mm
M-2 04/09/15

Engineered Flooring
Glue Down Installation
GLUE DOWN INSTRUCTIONS
$77(17,21
Inspect $// materials carefully %()25( installation. Warranties DO NOT cover
materials that are installed with visible defects.
It is the responsibility of the installer/owner to determine if the job site Subfloor and
job site conditions are environmentally and structurally acceptable for wood floor
installation. Mullican flooring declines any responsibility for wood floor failure
resulting from or connected with subfloor, subsurface, job site damage or
deficiencies after hardwood flooring has been installed.
G/UE DO:N INST$//$TION
$'+(6,9( Use the appropriate Mullican adhesive, or quality urethane adhesive is
recommended.
722/6 The required tools for installation of these products include a hammer,
hand power saw, chalk line, wood floor adhesive and recommended trowel.
5HFRPPHQGHG7URZHO Follow adhesive manufacturer’s guidelines.
General Installation Instruction:
Time at which to install hardwood flooring: Lay only after sheetrock and tile work
are thoroughly dried and all but the final woodwork and trim have been completed.
The building interior should have been dried and seasoned and comfortable
working temperature (at least 60°F) should exist during installation.
Preparation of subfloor:
Subfloor irregularities and undulation may cause any wood floor installation to
develop hollow spots between the flooring and subfloor. These hollow spots are
NOT the result of any wood floor manufacturing defect and are NOT covered by
the Mullican Flooring warranty.
As part of your subfloor preparation remove any existing base, shoe mold or
doorway thresholds. These items can be replaced after installation, but should be
replaced in such a way as to allow at least ¼” room for expansion around the
perimeter of the room. All door casings should be notched out or undercut to allow
for ¼” room expansion and to avoid difficult scribe cuts. This is easily done by
placing a piece of the engineered product on the subfloor as a height guide for your
handsaw or jamb saw.
Note: Normal expansion space around the room should be the same distance as
the thickness of the hardwood flooring.
Thoroughly clean subfloor:
Remove paint, wax, oil, plaster, “sheetrock mud” and other foreign materials, as
well as obvious surface irregularities. #3-1/2 grit open coat paper may need to be
used to grind a concrete subfloor. This will loosen any dirt, loose concrete or
contaminates. Sweep or vacuum thoroughly. All previous or existing glues or
adhesives must be removed before installing new hardwood floor. Concrete
subfloors must be clean, flat, sound and sufficient compression strength (3000 lbs.
P.S.I.) being sure that the surface is NOT slick.
Sections not flat due to waviness, trowel marks, ect. are to be flattened by grinding
or the use of leveling compound. Especially along the walls, the subfloor flatness
must be checked and if necessary improved. Flatten to 3/16” in 10’ radius. In
addition to cement subfloors, these wood flooring products can be installed over
dry, flat subfloors such as plywood. No Particle board.
Time at which to install hardwood flooring: Lay only after sheetrock and tile work
are thoroughly dried and all but the final woodwork and trim have been completed.
The building interior should have been dried and seasoned and a comfortable
working temperature (at least 60° F) and a relative humidity of 35 – 55% should
exist during installation. If subfloor is concrete, check for dryness see below. If
moisture is presen
t, do not lay. All concrete subfloors on or below grade need to be
tested.
Concrete subfloor Moisture Testing:
Electrical Impedance Test and Electrical Resistance Test (Concrete Moisture
Meters) Follow Moisture Meter MFG Guidelines. If Meter shows possibility of
excess moisture further testing is required. Calcium Chloride Test. See below.
Relative Humidity Test (Standard test method for determining relative humidity on
concrete floor slabs using Situ Probes. If test shows over 75% vapor retarder must
be used or wait for further curing.
Calcium Chloride Test ASTM F-1869 Readings over 3 lbs and up to 7 lbs vapor
retarder needed.
Check floor in several locations. Consult with your local Mullican Flooring
distributor for graphical variances.
Note: Normal expansion space around the room should be the same distance as
the thickness of the hardwood flooring.
The use of Mullican Flooring putty to cover small cracks or face nail
holes should be considered normal in hardwood flooring installation.
New wood type subfloors should also be checked for moisture using a moisture
meter. In general, wood or plywood subfloors should not exceed 14% moisture
content and no more than 4% MC difference between wood flooring and subfloor.
Check with your local distributor for your geographical variances. If the plywood is
used as an overlay over the existing subfloor, the thickness of the overlay material
must be such as to yield a total ¾” subfloor thickness.
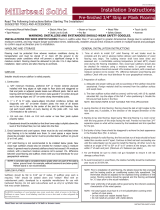
6XJJHVWHG/D\RXW:RUNLQJ/LQH EXAMPLE: For 3” Material, snap a chalk line
30 ¼” from the wall on the door side of the room. The small area will be your
working space and the last to be installed. Temporarily nail straight board on chalk
line.
Caution: Proper humidity must be controlled between 35 – 55% for successful
performance before, during and after installation.
Installing the floor:
The floor should be installed from several cartons at the same time to
ensure color and shade mix.
End joints should never be closer than 4 inches from each other.
Install tongue into groove.
Tongue and groove should be engaged by hand.
Lift a plank periodically to check adhesive transfer.
Remove nailed board and install remainder of flooring.
Install base and mould after floor installation.
Clean adhesive off surface of wood with cleaner and soft cloth. (see
adhesive manufacturer’s recommendations)
For Unfinished Products
Do not start sanding product until adhesive has cured.
Radiant heat subfloors – See below.
&RQFUHWHRU3O\ZRRG5DGLDQW+HDW2$.21/<
Radiant Heat Subfloors on or above grade.
The maximum temperature of subfloor under normal use should not
exceed 80°F (Check with heat system manufacturer.)
For correct water temperature inside heating pipes, check with
manufacturer’s suggested guidelines.
Heating pipes must be covered with 1 ¼” of concrete or minimum of
1/8” below bottom side of plywood subfloor.
Before installation of hardwood flooring, heat system must be operated
at normal living temperature for a minimum of 14 days. One to two
days before the flooring is laid, switch off heating unit. (At time of
installation, subfloor should be 64°F to 68°F)
Room temperature should not vary more than 15°F season to season.
Mullican Flooring approved systems must not exceed 8 watts per
square foot heating.
"61/9 5/8"
14mm 15mm
3/8" 1/2"
10mm 12.7mm
M-2 04/09/15
See NWFA installation guidelines chapter 3 Moisture Testing for full information of
testing.
NOTE:
** Do not use any type of tape on the hardwood finish surface. If a covering is
needed after installation the wood floor should be completely covered and covering
taped to itself, not the finish of wood flooring.
/