Page is loading ...

6 Litre Oil-Less
Air Compressor
Operator’s Manual
WARNING!
Before using this appliance, read the Operator’s manual and follow
all its safety rules and instructions.

SPECIFICATION
ITEM
2
1.1 kW / 1.5 HP
230 V @50 Hz
HWKAC1
2 P
2850 rpm
5.7 cfm
115 psi / 0.8 MPa
6 L
485mm x 265mm x550mm
16 kg

8
1
4
3
7
2
5
6
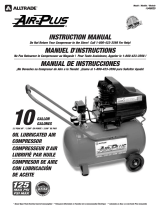
MAIN COMPONENTS
3
1. On/O Switch
2. Outlet Valve
3. Regulating Valve
4. Pressure Gauge
5. Drain Cock
6. Air Tank
7. Release Valve
8. Fan Cover

PREPARATION
4
1. Check all nuts and bolts are tight before starting.
2. Before Starting the Compressor; Ensure power switch is set to “OFF”.
3. Plug compressor in to socket.
4. Pull up the red power switch and tun for 30 minutes to break in pump
parts.
5. Bleed air by turning the regulator know fully counter clockwise.
6. Attach tool and hose to the compressor using the quick release
couplings.

OPERATION & ADJUSTMENT
5
1. The compressor is controlled by a pressure switch. It can be
stopped automatically as the pressure increases to the maximum
and restarted as pressure decreases to the minimum. The rated
pressure has been adjusted during the manufacturing process -
do not alter it carelessly.
2. As soon as the motor is switched o the compressed air in the
discharge pipe should be released through the release valve
under the switch. This is a necessary condition before restarting
or the motor will be damaged.
3. The output pressure of compressed air can be regulated by using the
regulating valve. turn the regulation valve knob clockwise to
increase the pressure.
4. When the compressor needs to be stopped, set the power switch to
the ‘OFF’ position.
5. If the compressor should overheat, the Thermal Overload will
intervene and shut down the compressor. Should this happen, switch
OFF the machine by pushing the STOP/START switch downwards, and
wait for at least 5 minutes before pressing the red RESET button
underneath the air lter and try to start the compressor again.

6
1. Never unscrew any connecting parts while the tank is pressured.
2. Never disassemble any electrical parts before disconnecting the plug.
3. Never adjust the safety valve carelessly.
4. Never use the compressor when the voltage is too low or too high.
5. Never use an electric wire more than 5m long with less than a 1.5mm²
section rated to 16A.
6. Never disconnect the plug to stop the compressor. Set the switch knob
to “o” and follow instructions on page 5.
7. If the release valve doesn’t work when the motor is stopped nd the
cause immediately so as not to damage motor.
8. After motor has been switched o and compressed air has been
safely discharged, Switch o and disconnect the plug to cut o the
power supply. Never leave compressor plugged in when not in use.
9. Never operate near ammable gas or vapour.
WARNINGS

MAINTENANCE
7
1. Do not carry out any maintenance whilst compressor is on - ensure
motor is not running, compressed air and condensation is bled and
compressor is disconnected from any power supply (see pages 5 + 6).
2. Pull ring on safety valve an allow it to snap back in to normal position.
Safety valve must be replaced if it cannot be actuated or it leaks air
after ring is released.
3. Turn compressor o and release pressure from system. Drain moisture
from tank by opening drain cock located on the underside of the tank.
4. Clean dust and dirt from the motor, tank, airlines, pump and cooling
ns while compressor is o.
5. Unclip the air lter cover, remove the lter and blow away any loose
dirt. If damaged or badly contaminated, it must be replaced.
6. Clean the ns of the compressor cylinder and the cylinder head to
receiver pipe.
7. Locate the compressor as far away from spraying area as possible,
Extending the hose will help prevent overspray which may clog the
lter. Take care not to over extend.
8. Do not lubricate. Oil-Less compressors require no lubrication.

Symptom Possible Cause (s) Corrective Action
Compressor will
not run
1. No electrical power
2. Blown fuse
3. Breaker open
4. Thermal overload open
5. Pressure switch bad
1. Plugged in? Check fuse/breaker or motor
overload
2. Replace blown fuse
3. Reset, determine cause of problem
4. Motor will restart when cool
5. Replace
Symptom Possible Cause (s) Corrective Action
Motor hums but cannot
run or runs slowly
1. Defective check valve or
unloaded
2. Poor contacts, line voltage
low
3. Shorted or open motor
winding
1. Replace or repair
2. Check connections, eliminate extension cork if
used, check circuit with voltmeter
3. Replace motor
DANGER! Do not disassemble check valve with air
in tank; bleed tank
Fuses blow/circuit
breaker trips
repeatedly
CAUTION! Never
use an extension cord
with this product
1. Incorrect size fuse, circuit
overloaded
2. Defective check valve or
unloaded
1.Check for proper fuse, use time-delay fuse.
Disconnect other electrical appliances from circuit or
operate compressor on its own branch circuit
2.Replace or repair
DANGER! Do not disassemble check valve with air
in tank; bleed tank
Thermal overload
protector cuts out
repeatedly
1. Low voltage
2. Clogged air filter
3. Lack of proper
ventilation/room temperature
too high
4. Check valve malfunction
5.
Compressor valves failed
1. Eliminate extension cord, check with voltmeter
2. Clean filter (see Maintenance section)
3. Move compressor to well ventilated area
4. Replace
5. Replace valve assembly
DANGER! Do not disassemble check valve with air
in tank; bleed tank
Knocks, rattles,
excessive vibration
1. Loose bolts, tank not level
2. Defective bearing on
eccentric or motor shaft
3. Cylinder or piston ring is
worn or scored
1. Tighten bolts, shim tank to level position
2. Replace
3. Replace or repair as necessary
Tank pressure drops
when compressor shuts
off
1. Loose drain cock
2. Check valve leaking
3. Loose connections at
pressure switch or regulator
1. Tighten
2. Disassemble check valve assembly, clean or
replace
3. Check all connections with soap and water
solution and tighten
Compressor runs
continuously and air
output is lower than
normal/low discharge
pressure
1. Excessive air usage,
compressor too small
2. Clogged intake filter
3. Air leaks in piping (on
machine or in outside
system)
4. Broken inlet valves
5. Piston ring worn
1. Decrease usage or purchase unit with higher air
delivery (SCFM)
2. Clean or replace
3. Replace leaking components or tighten as
necessary
4. Replace compressor valves
5. Replace piston and cylinder
Excessive moisture in
discharge air
1. Excessive water in tank
2. High humidity
1. Drain tank
2. Move to area of less humidity; use air line filter
NOTE: Water condensation is not caused by
compressor malfunction
Compressor runs
continuously and
safety valve opens as
pressure rises
1. Defective pressure switch
2. Defective safety valve
1. Replace switch
2. Replace safety valve with genuine replacement
part
Excessive starting and
stopping (auto start)
Excessive condensation in tank Drain more often
Air leaking from
unloader on pressure
switch
Check valve stuck in an open
position
Remove and replace check valve
DANGER! Do not disassemble check valve with air
in tank; bleed tank
8
TROUBLESHOOTING

PARTS
9

NO PART QTY
NO PART QTY
1 Bolt M6×25 2 35 Spring washer 4 1
2 Bolt M6×35 2 36 Tooth washer 4 1
3 Spring washer 6 4 37 Screw M3×6 2
4 Cylinder head 1 38 Spring washer 3 2
5 Circle 1 39 Nut M3 2
6 Valve plate subassembly 1 40 Capacitance 1
7 Cylinder seals 1 41 Tooth washer 8 1
8 Cylinder 1 42 Discharge pipe D10mm 1
9 Connection Stud 1 43 Elbow connecter 1
10 Screw M5×16 2 44 Air filter 1
11 Connecting rod cover 1 45 Fan cover 1
12 Piston ring 1 46 Big washer 8 2
13 Connecting rod 1 47 Bolt M8×12
2
14 Bolt M6×16 1 48 Handle 1
15 Big washer 6 1 49 Thermal protector 1
16 Fan 1 50 Base board 1
17 Bolt M4×20 1 51 Bolt M8×25 4
18 Spring washer 4 1 52 Washer 8 4
19 Bearing 6005-2RS 1 53 Flange nut M8 1
20 Pin 4x14 1 54 6L tank 1
21 Crank 1 55 Absorber 4
22 Bolt M8×35-left 1 56 Washer 5 4
23 Crankcase 1 57 Bolt M5×25 4
24 Bearing 6204-RS 1 58 Drain valve 1/4 inch 1
25 Rotor 1 59 Quick coupler 1
26 Stator subassembly 1 60 Pressure gauge 40 1
27 Bearing 6202-RS 1 61 Regulate valve 1
28 Corrugate washer 34 1 62 Three way connecter 1
29 Motor bracket 1 63 Safety valve 1
30 Circlip 1 64 Power cord 1
31 Fan 1 65 Pressure gauge 50 1
32 Bolt M5×105 4 66 Pressure switch 1
33 Spring washer 5 4 67 Release pipe 1
34 Screw M4×10 1 68 Checking valve 1
PARTS LIST
10
PART
ITEM QTY PART
ITEM QTY

11
SAFETY
1. Prior to use, become familiar with the instructions given in this manual.
In particular, become familiar with the ON/OFF control for stopping
the compressor in the event of an emergency.
2. When operating the air compressor, always use eye protection such as
goggles, making sure that other people in the work area are also
using eye protection.
3. Eye protectors must provide protection from ying particles both
from the front and from the side.
4. Hearing protection should be worn when operating this compressor,
use ear plugs or ear defenders.
5. Never place your hand near any moving parts on the air compressor or
operate with the covers removed.
6. Never operate the air compressor in wet or damp locations.
7. Loose clothing or jewellery may be caught in moving parts. Always tie
long hair back, and wear suitable clothing.
8. Clear the work area of all unnecessary tools, debris and furniture.
9. During operation, the motor, connections, compressor body, cylinder
head and tubes may get hot, do not touch.
10. Do not direct the air stream at people or animals. Compressed air can
cause soft tissue damage and propel dirt and other particles at high
speed.
11. This compressor should not be used to supply breathing quality air.
Never use it as breathing apparatus.
12. When connecting the air compressor to the mains supply make sure
the red button on top of the air compressor is in the OFF (down) position.
13. When not in use the air compressor should be stored in a secure, dry
place out of the reach of children. Always lock up the storage area.
14. If the air compressor is damaged in any way, have it repaired by a
qualied engineer.
15. Using extension leads can cause your compressor motor to burn out.
Only use extension hoses.

WARNING!
Before using this appliance, read the Operator’s manual and follow
all its safety rules and instructions.
™
/