Page is loading ...

USER’S MANUAL

ii 4VetJ Ultrasound Scanner User’s Manual
tel: 435.753.1881
l
web: www.junipersys.com
1132 W. 1700 N. Logan, UT 84321
Copyright
©
February 2018 Juniper Systems, Inc. All rights
reserved. Information is subject to change without notice.
Juniper Systems
®
is a registered trademark of Juniper
Systems, Inc. 4VetJ Ultrasound Scanner
™
, EmberEquine
Ultrasound Reproduction Solution
™
, EmberEquine Field
Software
™
, and Mesa 2 Rugged Tablet
™
are recognized
trademarks of Juniper Systems, Inc.
Windows, Windows 10, and the Windows logo are
trademarks or registered trademarks of Microsoft
Corporation in the United States and/or other countries.
Adobe
®
Acrobat
®
and Adobe
®
Reader
®
are registered
trademarks of Adobe Systems Incorporated in the United
States and/or other countries.
The names of other companies and products mentioned
herein may be the trademarks of their respective owners.
WARNING! This symbol indicates that failure to follow
directions could result in serious injury.
CAUTION: This symbol indicates that failure to follow
directions could result in damage to equipment or loss of
information.
Part Number 27208-00
The 4VetJ is jointly manufactured by Dramiński S.A., ul.
Owocowa 17, 10-860 Olsztyn, Poland and Juniper Systems,
Inc. It is distributed by Juniper Systems, Inc. in the U.S.
!
!

Contents iii
Contents
1 Getting Started 1
System Overview 2
Features of the 4VetJ Ultrasound Scanner 3
Probes 4
Battery Pack and AC Power Supply 5
Display and Touchscreen 6
Perform Initial Tasks 6
Clean and Disinfect the 4VetJ and Components 10
Prepare the Animal 11
Safety of Use 11
2 4VetJ Settings and Functions 13
Elements of the Basic Panel 14
Active Fields 16
Imaging Modes 16
Optimize Image Parameters 19
Freeze 22
Cine Loops 22
Measurements 22
Optimization of B+M and M modes 31
Saving and Uploading Images and Cine Loops 31
Patient Data Function 34
Needle Echo Enhancement Tool 36
Full Screen 36
Printing Images 36
Presets 37
Look 39
Clinic 40
Info 40
Time 42
Display 42

iv 4VetJ Ultrasound Scanner User’s Manual
Audio 43
Measurements 43
DICOM 44
Wi-Fi 45
Troubleshooting 46
A Clean, Store, Transport, and Recycle 49
Clean and Disinfect 50
Store 51
Transport or Ship 51
Recycle 52
B Warranty and Repair Information 53
Limited Product Warranty 54
Repairs, Upgrades, and Evaluations 57
C Warnings, Regulatory Information, and
Licensing 59
Product Warnings! 60
D Specications 63
Index 67

CHAPTER
Getting Started
1

2 4VetJ Ultrasound Scanner User’s Manual
Getting Started
System Overview
The Draminski 4VetJ Ultrasound Scanner
™
from Juniper
Systems is a diagnostic tool used in veterinary medicine.
Clear ultrasound images and other parameters can be
captured on the resistive touchscreen during an exam and
saved.
The compact dimensions and ergonomic design allow the
4VetJ to be used as a mobile or stationary device. Use the
4VetJ to evaluate the physiological condition of specic
organs during gynecological and obstetrical exams as well
as conduct exams of the musculosketetal system, lungs, etc.
The standard 4VetJ includes the following components:
Ultrasound scanner
Endorectal linear probe and cord for obstectrical exams
(other probes are available as options)
Rechargeable Li-Ion battery pack (internal)
AC power supply and charger
Stylus and tether
Durable carrying case
You can also attach a keyboard, mouse, printer, or extra
monitor to the 4VetJ using the appropriate connector ports.
The 4VetJ can be used as a stand-alone unit or as part of
our EmberEquine Ultrasound Reproduction Solution
™
.
This manual focuses on the 4VetJ Ultrasound Scanner.
EmberEquine Ultrasound Reproduction Solution
An EmberEquine solution includes the 4VetJ and a Mesa
2 Rugged Tablet
™
running EmberEquine software. Exams
are performed on mares using the 4VetJ ultrasound to view
and save images with measurements. This information is
transferred to the Mesa 2 running EmberEquine software.
Exam records and images are saved on the Mesa 2 and
can be pushed to the Microsoft Cloud for secure storage
and to provide wide access to animal data.

Chapter 1 Getting Started 3
Features of the 4VetJ Ultrasound Scanner
Front View
Connector Ports
1
8
2 3
4
5
7
1 Resistive Touchscreen
2 Handle
3 Probe Cord Strap
4 Stylus with Tether
5 Door to Connector Ports
6 Stylus Holder
7 Speaker
8 On/O Button
6
1 Ethernet Port
2 HDMI Port
3 USB 2.0 Port
4 USB 3.0 Port (higher speed)
5 Door to Connector Ports
1
2
3
5
4

4 4VetJ Ultrasound Scanner User’s Manual
Back View
Probes
A standard 4VetJ comes with an endorectal linear probe,
4-9 MHz, for pregnancy and gynecological exams on large
animals like cattle or horses.
1 Battery Charge Indicators
- green = fully charged
- orange = charging
- red = external power applied
2 Power Input Jack
3 Battery Pack (internal)
4 Tilt Stand (adjustable)
5 Probe
6 Cord Strap
7 Probe Connector (attached
to socket)
8 Probe Cord Wrap
9 Probe Connector Lock
(locked position)
5
6 7 8
1
4
2
3
9

Chapter 1 Contents 5
There is a 7.6 foot long cord with the probe on one end and
a probe connector on the other end. The 4VetJ is shipped
with the probe connector attached to the probe socket
and the cord wrapped around the probe cord wrap.
We also offer the following probes for varying veterinary
needs (contact your sales representative):
Convex, 2–8 MHz
Microconvex, 4–9 MHz
Linear, 60 mm 5–10 MHz
Linear, 40 mm 6–14 MHz
Battery Pack and AC Power Supply
The 4VetJ has an internal, rechargeable, Li-Ion battery
pack that lasts 6 + hours. It is not user replaceable. An AC
power supply and charger is included. The battery can be
charged during use.
CAUTION: Always use the AC power supply included with
the 4VetJ to charge the battery pack or power the unit. The
use of any other power supply unit can cause harm to the
user or permanently damage the device.
All maintenance work must be carried out when the power
supply is disconnected.
In order to avoid the risk of an electric shock, the device
must be connected to a power outlet with protective
grounding.
!

6 4VetJ Ultrasound Scanner User’s Manual
Display and Touchscreen
The high quality LCD display produces clear, high resolution
images in a variety of conditions. The resistive touchscreen
enables the operation of the 4VetJ software with a gloved
hand or a stylus. Many tasks, like measurements, are best
performed with the stylus.
Note: If you are using your ngers, make sure you are
pressing hard enough on the touchscreen for your
selections and measurements to be recognized. Use a light
touch when the stylus is used.
Perform Initial Tasks
Before you use the 4VetJ for an exam, perform the tasks
described in this section.
Review Documentation
Owner’s manuals (4VetJ, EmberEquine, Mesa 2), quick start
guides, videos, Windows and Ember license agreements,
release notes, and other documents are available on our
website at: www.junipersys.com/emberequine/support.
If you have an EmberEquine system, the manuals are
also located on the Mesa 2 Rugged Tablet in the Ember
Help folder tile located in the Windows Start menu. View,
download, and print documents as desired. (You need a
PDF reader on the device you are viewing documents with.
Options include the Windows 10 Edge browser and Adobe
Reader, which is available from Adobe’s website at: www.
adobe.com.)
Documentation will be updated during the lifetime of the
products. Compare version numbers on the inside covers to
see if a document has changed.
Charge the Battery Pack
When you rst receive the 4VetJ, we recommend that you
fully charge the internal battery pack. Follow these steps:
1. Turn the 4VetJ off while the battery pack is being
charged to shorten the time it takes to reach a full
charge.

Chapter 1 Contents 7
2. Use the AC power supply included with the 4VetJ to
charge the battery pack or power the unit. Plug the
AC adapter into a wall socket. Plug the power input
end into the DC power input jack on the back of the
4VetJ. Verify that the red and orange battery charge
indicators are on.
3. Charge the battery pack at room temperature (68° F or
20° C) for 6 hours for the rst charge.
Power Options
You can operate the 4VetJ while you are charging it, but it
takes longer to charge the battery pack. If the 4VetJ is off,
a completely discharged battery pack takes about 4 to 5
hours to charge. If the 4VetJ is in use while charging, it takes
about 20% longer to fully charge the battery.
Battery Indicators
When the 4VetJ is turned on, the battery charge level shown
on the status bar at the top of the display does not report
the correct charge until the battery pack is fully charged
for the rst time. After the battery pack is fully charged, the
indicator shows the correct charge.
A low battery message might be shown in the middle of the
screen that tells you to charge the battery pack.
There are three battery charge indicators on the back of
the 4VetJ that indicate the following:
Off: The LEDs are always off when the AC power adapter
is not applied.

8 4VetJ Ultrasound Scanner User’s Manual
Red: When the power supply is plugged in, the red LED
immediately lights up.
Orange or Green: Within a few seconds either the orange
or green LED lights up. Orange indicates that the battery
pack is charging. Green indicates a full charge.
Note: If the 4VetJ is left on when it is not being used and it is
not being powered by the AC adapter, the battery pack is
completely discharged and the 4VetJ automatically shuts
off.
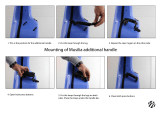
Attach or Remove a Probe
To remove or replace a probe, follow these steps:
1. The 4VetJ can be on or off when a probe is removed or
replaced.
2. Unhook the probe and cord strap, and unwind the
probe cord from the cord wrap.
3. Unlock the probe by turning the probe connector lock
counter-clockwise to a horizontal position (see the
symbols near the lock).
CAUTION: Handle the probe, connector, and cord with
care to avoid mechanical damage. Do not drop, hit,
or scrub the probe head. Protect the probe connector
from dirt and moisture (it is not waterproof). Avoid
excessive force, bending, and pulling of the cord.
!

Chapter 1 Contents 9
4. Pull the probe connector free from the socket. A
message saying Probe OFF appears on the display.
With the probe removed, certain functions are no longer
available.
Note: If you are not going to have a probe attached
to the 4VetJ, slide the socket cover closed to keep out
debris.
5. Attach the probe connector into the socket for the
probe you are attaching.
6. Lock the probe in place by turning the lock clockwise
to a vertical position. The probe type is recognized
automatically by the system. A message saying Probe
ON appears on the display.
Note: It can take a minute or more for the new probe to
be recognized. You might need to restart the 4VetJ.
7. Wrap the probe and cord around the probe cord wrap
and hold it in place with the cord strap. The probe is
ready to be used or stored.
Note: The cord wrap is designed for the endorectal
linear probe. The cord length of other probes requires

10 4VetJ Ultrasound Scanner User’s Manual
the cord to be doubled back near the probe to allow
the probe to be held in place under the cord strap.
CAUTION: The crystals in the probes have a limited life.
If the 4VetJ is running but no exam is being done, either
turn the unit off or unhook the probe from the probe
socket. This helps extend the life of the crystals.
Clean and Disinfect the 4VetJ and Components
The 4VetJ and probe should be cleaned and disinfected
before each use and before they are stored, transported, or
sent to our service department for servicing or repairs.
CAUTION: It is important to note that the 4VetJ and the
probe connector are not waterproof. Use caution when
cleaning or disinfecting them.
In addition to the information below regarding the cleaning
and disinfecting of the 4VetJ and components, refer to
Appendix A, Clean, Store, Transport, and Recycle.
4VetJ
The 4VetJ must be powered off and unplugged for thorough
cleaning. Use warm water or a mild cleaning solution on the
casing. Remember that the 4VetJ is not waterproof.
Touchscreen
For dry cleaning of the touchscreen, rub it with a soft cloth.
Avoid substances that can scratch or damage the screen.
For damp cleaning use a spray or foam agent designed for
such use, warm water, or a mild detergent.
Probe
Clean and disinfect the probe before each examination.
The probe and cord are waterproof. The probe connector
(which attaches to the probe socket) is not waterproof, so
use caution when you are cleaning or disinfecting the area
near it. Do not scrub the head of the probe. Clean it gently
with a soft cloth and a mild cleaning solution approved for
ultrasound probes. Do not use concentrated, aggressive, or
abrasive agents or substances like alcohol or bleach that
could deteriorate the probe head.
!
!

Chapter 1 Contents 11
Prepare the Animal
Preparing animals for ultrasonography varies depending on
the animal, the type of exam being done, and the type of
probe being used.
WARNING! It is assumed by Draminski and Juniper Systems,
Inc. that the user of this equipment is properly trained to
safely and correctly perform ultrasonography on animals.
Special, certied gel designed for ultrasound examinations
must be used. Using other substances may be dangerous
for the animal and cause undesirable effects. It can also
have a negative inuence on the head of the probe. Proper
gelling improves penetration of the signals and helps obtain
correct and more legible images.
For external probes, prepare the skin of the animal in the
area to be examined. You might need to shave fur and
wipe the area with a disinfecting agent. Cover the skin of
the patient with the gel.
Safety of Use
Review the following list of safety issues before using the
4VetJ. More safety information is located in Appendix C,
Warnings, Regulatory Information, and Licensing.
The 4VetJ ultrasound is only for use on animals. It is not for
human use.
The 4VetJ is a mobile computer with solid construction.
Handle the touch panel, probe, and other components
carefully to avoid mechanical damage.
To limit the inuence of acoustic energy emitted by the
ultrasound probe on the operator and the animal, follow
the recommended standards of ultrasound examinations.
Technical inspection of the 4VetJ by the manufacturer
every two years is recommended to help guarantee the
highest level of performance and safety.
Carry out periodic inspections of the probe, cable
and the connector. If mechanical damage is found or
suspected, it is necessary to send these components to
the manufacturer for servicing.
!

12 4VetJ Ultrasound Scanner User’s Manual
Do not modify the device.
The warranty is void if unauthorized repairs are done.
The 4VetJ should be used for diagnostic purposes only.
The device is not recommended for esophageal
examinations.
Do not use the 4VetJ near explosive devices.
Ultrasound exams should not be carried out in
conjunction with a debrillator.
Avoid exposing the device to strong sunlight or heat for
extended periods of time.
During examinations the device should not be
connected to LAN (via Ethernet).
In order to avoid the risk of electric shock, never mix
water and electricity. Install Ground Fault Circuit
Interrupters (GFCI). Make sure you’re using the right size
circuit breakers and fuses.
Before transporting or shipping the 4VetJ and
components, they must be protected against damage.
The carrying case offers protection when it is properly
packed and securely closed and latched.
Make sure that nothing is touching the touch panel
except for the carrying case lid during shipping or severe
screen damage can occur. Put the stylus in the stylus
holder and place the stylus tether where it won’t touch
the screen.

2CHAPTER
4VetJ Settings and
Functions

14 4VetJ Ultrasound Scanner User’s Manual
4VetJ Settings and Functions
This chapter discusses the 4VetJ settings and functions that
can be used for ultrasound examinations.
WARNING! Ultrasound examinations using the 4VetJ and
probesmustbeconductedbyqualiedandproperly
trained personnel.
Press and release the on/off button . It takes about 60
seconds for the system to load, then the basic panel is
shown.
Elements of the Basic Panel
During an examination, use the buttons on the basic panel
and subsequent screens to set up operating parameters
and to complete specic tasks. These settings, indicators,
modes, and functions are described in more detail in this
chapter.
!

Chapter 2 4VetJ Settings and Functions 15
1. Grey scale indicator / change negative - positive
2. Probe marker indicator (direction)
3. Ruler
4. Indicator of focus level
5. Gamma setting button
6. Name of practice or user and currently used preset
7. List of current working parameters
8. Information about the probe that is currently being used
9. Symbols showing communication status between 2
devices, Wi-Fi hotspot and Wi-Fi access status, date and
time
10. Battery charge indicator
Control Panel
11. Gain adjustment: Gain 1 – general gain; Gain 2 – far
eld gain
12. Probe frequency adjustment
13. Scanning depth adjustment
14. Focus level adjustment
15. Zoom level adjustment
16. Postprocessing on/off (adjust this in Settings/Look)
17. Loading and saving images and cine loops
Mode Panel
18. Freeze button (freezing/unfreezing of the image)
19. Selection of imaging mode: B, B+B, 4B
20. Selection of imaging mode: M, B+M
21. Needle echo enhancement tool
22. Send Image to the Mesa 2 via Wi-Fi (option)
23. Presets
24. Full screen mode
25. Menu of measurements
26. Patient’s data
2 7. Print images
28. Settings, additional options

16 4VetJ Ultrasound Scanner User’s Manual
Active Fields
Active elds are areas on the image used to change
parameter settings with the use of your nger or stylus
instead of using buttons located in the control panel.
Within the image sector the following active elds can be
changed:
General gain
Gain in the far eld
Level of focus
Depth of scanning
Imaging Modes
The basic activities associated with the operating modes
are described in this section.
Modes B, B+B, and 4B
Press the B mode button. From the submenu that appears,
select the mode associated with the desired screen view.
/