Brandt DFH14524X Owner's manual
- Category
- Dishwashers
- Type
- Owner's manual
This manual is also suitable for

Dishwasher
DFH14524W
DFH14524X
DFH14524B

cleaning..............................16
Programme..................................15
able...........................................14
Dishwasher Basket.......................12
time...............................
To review the section on troubleshooting Tips
will help you to solve some common problems
by yourself .
NOTE:
Dear Customer,
Please carefully read this manual before using the
dishwasher, it will help you to use and maintain the
dishwasher properly.
Pass it on to any subsequent owner of the appliance.
This manual contains sections on safety Instructions,
Operating Instructions, Installation Instructions and
Troubleshooting Tips, etc.
Read this Manual
Before Calling for Service
Keep it as a refer in the later days.
If you can not solve the problems by yourself ,
please ask for the help of professional technicians.
Dishwasher Features....................................
4) Prior using for the first
A Water Softener...........................................
5) Loading the
Attention before or after loading the Dishwasher
Baskets........................................................ 12
7) Maintenance and
Filtering System.............................................16
Caring for the Dishwasher...............................17
B Loading the Salt into the Softener.................8
C Fill the Rinse Aid Dispenser.........................8
D Function of Detergent .................................9
Loading the upper Basket...............................13
Loading the Lower Basket...............................13
6) Starting a washing programme........................14
Wash Cycle T
Turning on the Appliance................................14
Change the
At the end of the Wash Cycle...........................15
8) Installation instruction...................... ..............
9) Troubleshooting Tips......................................21
Before calling for service.................................21
Error codes...................................................22
Technical information.....................................23
1) Safety Information..........................................1
3) Operation Instructions.................................
Control Panel...................................................
............................. 18
................................18
............................................. 19
...................................... 20
Loading the baskets according to En50242
2) Quick operation guide.....................................
If lost or out-of-date, you can receive a new user
manual from the manufacturer or responsible vendor.
The manufacturer, following a policy of constant
development and updating of the product, may
make modifications without giving prior notice.
555
6
6
6
7
7
18
Positioning the Appliance
About power connection
Water Connection
Start of Dishwasher
8) Installation instruction
1) Safety Information..........................................1
2) Quick operation guide.....................................
3) Operation Instructions.................................
6
time...............................4) Prior using for the first
7
Dishwasher Basket.......................125) Loading the
6) Starting a washing programme........................14
cleaning..............................167) Maintenance and
9) Troubleshooting Tips......................................21
Loading the baskets according to En50242

1

2

3
14

4

For each wash cycle.
For programs with pre-wash, please put detergent anywhere inside the inner tank
except in compartment A.
(Follow the user instructions!)
B:B:
Close the door, press the program button until the selected program lights up.
(see the section entitled "Operation instruction")
1.A running cycle can only be modified if it has been running for a short time. Otherwise the detergent may
have already been released and the water already drained. If this is the case, the detergent dispenser
must be refilled.
2.Press the Start/Pause Button to stop washing. Then press program button for more than 3 seconds, the
program will be cancelled.
3.Press the program button to select a new program.
4.Press the Start/Pause Button, the dishwasher will run after 10 seconds.
1.Press the Start/Pause Button to stop the washing.
2.Open the door a little.
3.After the spray arms stop working, you can open the door completely.
4.Add forgotten dishes.
5.Close the door.
6.Press the Start/Pause Button, the dishwasher will run after 10 seconds.
If the appliance is switched off during a wash cycle, when switched on again, please re-select the washing
cycle and operate the dishwasher according to the original Power-on state.
When the working cycle has finished, it stops.Turn off the appliance using On/Off button.
B:
Turn on the water tap. The appliance will start working after 10 seconds.
(On models with water softener system only.)
Electric indicator on control panel (if provided).
If there is no salt warning light in the control panel
(for some models), you can estimate when to fill the salt into
the softener by the number of cycles the dishwasher has run.
Scrap off any large amount of leftover food.Soften remnants of burned food in pans, and then load the
baskets. Refer to the section entitled “Preparing and Loading Dishes”.
Warning: wait a few minutes (about 15 minutes) before unloading the dishwasher to avoid handling the
dishes and utensils while they are still hot and more susceptible to break.They will also dry better.Unload
the appliance, starting from the lower basket.
Press the power switch button to switch on the appliance, open the door.
5

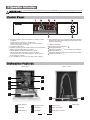
Dishwasher FeaturesDishwasher Features
3.Operation Instruction3.Operation Instruction
Control PanelControl Panel
before using it for the first time.
To get the best performance from your dishwasher, read all operating instructions
IMPORTANTIMPORTANT
6. Start/ Pause button: To start the selected washing
program or pause the washing program when the
machine is working.
7. Display indicator:
All in one function indicator:
Rinse Aid indicator:
I
Indicates when the dispenser needs to be refilled.
Child lock indicator.
ndicates when the dispense needs to be refilled.
Add salt indicator:
1. Program Button: Press the button to select a wash
Program
Press the two buttons for 3 seconds
simultaneously to select the all in one function.
Press them again to cancle.
2. Program indicators
3. Display screen: to show the remaining time and the
state(running state,delay time etc)
4. Delay Button: Press the button to dela
y.
When press the two bu ttons for 3 seco
nds
simultaneously to lock the program, when press
them again to cancle.
5. On/ Off Button: To turn on/ off the power su
pply.
9
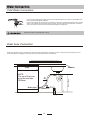
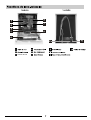
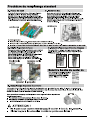
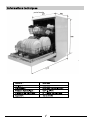
Front view
Dispenser
Cup Shelf
Spray arms
Filter assembly
Inlet pipe connector
Drain pipe
Lower Basket
Inner pipe
Upper Basket
1
Salt Container
5
6
7
8
9
10
3
2
4
10
1
2
3
4
5
6
7
8
Back View
6
11
22
33
77
55
66
44

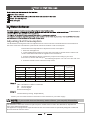
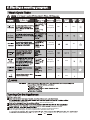
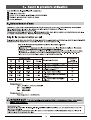
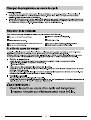
Adjusting Salt
Consumption
The dishwasher
is designed to allow for adjustment in the amount of salt consumed based on the hardness of
the water used. This is intended to optimise and customise the level o f salt consumption.
WATER SOFTENER
The hardness of the water varies from place to place. If hard water is used in the dishwasher, deposits will
form on the dishes and utensils.
The appliance is equipped with a special softener that uses a salt container specifically designed to eliminate
lime and minerals from the water.
Contact your local water board for information on the hardness of your water supply.
NOTE:NOTE:
If your model does not have any water softener, you may skip this section.
Clark:
British degree
fH: French degree
dH: German degree
Note:1Note:1
dH=1.25
Clarke=1.78 fH=0.178mmol/l
1
Note:2Note:2
The
manufactory setting: H3 (EN 50242)
dH
mmol/l
0~90~5
0~0.94
H1
0
10-20
6-1
1
1.0-2.0
H2
9
21-30
12-17
2.1-3.0
H3
12
H4
20
fH
0~6
7-14
15-21
Clarke
W
ATER HARDNESS
Selector Position
Salt c onsumption
(gram/cycle)
18-22
31-40 22-28 3.1-4.0
41-60
23-34 4.1-6.0
H5
30
H6
60
29-42
35-55
61-98 43-69 6.1-9.8
1. Switch
on the appliance
2. Press the Start/Pause button for more than 5 seconds to start the water
softener set
model within 60seconds after the appliance was switched on
3. Press the Start/Pause button to select the proper set according to
your local
environment, the sets will change in
the following
sequence: H1->H2->H3->H4->H5->H6
4. Press the On/Off button to end the set up model.
Please follow the steps below for adjustment in salt consumption.
a detrimental or

1. The salt container must only be refilled when the salt warning light in the control panel comes on.
Depending on how well the salt dissolves, the salt warning light may still be on even though the
salt container is filled.
If there is no salt warning light in the control panel (for some Models),you can estimate when to fill
the salt into the softener by the cycles that the dishwasher has run.
2. If there are spills of the salt, a soak or a rapid program should be run to remove the excessive salt.
Always use the salt intended for use with dishwasher.
The salt container is located beneath the lower basket and should be filled as explained
in the following:
Attention!
Only use salt specifically designed for the use in dishwashers! Every other type of
salt not specifically designed for the use in a dishwasher, especially table salt, will
damage the water softener. In case of damages caused by the use of unsuitable
salt the manufacturer does not give any warranty nor is liable for any damages caused.
Only fill with salt just before starting one of the complete washing programs.
This will prevent any grains of salt or salty water, which may have been spilled,
remaining on the bottom of the machine for any period of time, which may cause
corrosion.
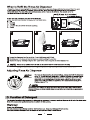
B. Loading the Salt Into the SoftenerB. Loading the Salt Into the Softener
C. Fill the Rinse Aid DispenserC. Fill the Rinse Aid Dispenser
The rinse aid is released during the final rinse to prevent water from forming droplets on your dishes, which can
leave spots and streaks. It also improves drying by allowing water to roll off the dishes. Your dishwasher is
designed to use liquid rinse aids. The rinse aid dispenser is located inside the door next to the detergent dispenser.
To fill the dispenser, open the cap and pour the rinse aid into the dispenser until the level indicator turns completely
black. The volume of the rinse aid container is about 110ml.
Rinse Aid Dispenser
Function of Rinse Aid
Rinse aid is automatically added during the last rinse, ensuring thorough rinsing, and spot and streak free drying.
Attention!
Only use branded rinse aid for dishwasher. Never fill the rinse aid dispenser with any other substances
(e.g. Dishwasher cleaning agent, liquid detergent). This would damage the appliance.
NOTE:NOTE:
Full fill the salt container with water,It is normal for a small amount of water to come out of the
salt container.
11
22
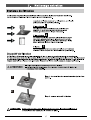
A After the lower basket has been removed, unscrew and remove the cap from the salt container.
B Place the end of the funnel (supplied) into the hole and introduce about 1.5kg of dishwasher salt.
C
D After filling the container , screw the cap tightly back clockwise.
E The salt warning light will stop being after the salt container has been filled with salt.
F Immediately after filling the salt into the salt container, a washing program should be started (We suggest to use a short
program). Otherwise the filter system, pump or other important parts of the machine may be damaged
by salty water. This is out of warranty.
11 22
OpenOpen
8

9

10

Be aware that depend on the soiling level and water hardness, setting may be different.
detergent dose inside the tub. This detergent will take effect during the pre-wash phase.
11

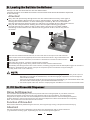
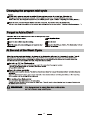
5.Loading the Dishwasher Baskets5.Loading the Dishwasher Baskets
For washing in the dishwasher the following cutlery/dishesFor washing in the dishwasher the following cutlery/dishes
Cutlery with wooden, horn china or
mother-of-pearl handles
Plastic items that are not heat resistant
Older cutlery with glued parts that are not
temperature resistant
Bonded cutlery items or dishes
Pewter or cooper items
Crystal glass
Steel items subject to rusting
Wooden platters
Items made from synthetic fibres
Some types of glasses can become
dull after a large number of washes
Silver and aluminum parts have a
tendency to discolour during washing
Glazed patterns may fade if machine
washed frequently
Are not suitable
Are of limited suitability
Dishes and items of cutlery must not lie inside one another, or cover each other.
To avoid damage to glasses, they must not touch.
Load large items which are most difficult to clean into the lower basket.
The upper basket is designed to hold more delicate and lighter dishware such as glasses, coffee
and tea cups
Long bladed knives stored in an upright position are a potential hazard!
Long and/or sharp items of cutlery such as carving knives must be positioned
horizontally in the upper basket.
Please do not overload your dishwasher. This is important for good results and for
reasonable consumption of energy.
Load hollow items such as cups, glasses, pans etc. With the opening facing downwards so that
water cannot collect in the container or a deep base.
RecommendationRecommendation
Consider buying utensils which are identified as dishwasher-proof.
Use a mild detergent that is described as 'kind to dishes'. If necessary, seek further
information from the detergent manufacturers.
For particular items, select a program with as low a temperature as possible.
To prevent damage, do not take glass and cutlery out of the dishwasher immediately
after the programme has ended.
(For best performance of the dishwasher, follow these loading guidelines.
Features and appearance of baskets and cutlery baskets may vary from your model.)
Scrape off any large amounts of leftover food. Soften remnants of burnt food in pans.
It is not necessary to rinse the dishes under running water.
Place objects in the dishwasher in following way:
1.Items such as cups, glasses, pots/pans, etc. are faced downwards.
2.Curved items, or ones with recesses, should be loaded aslant so that water can run off.
3.All utensils are stacked securely and can not tip over.
4.All utensils are placed in the way that the spray arms can rotate freely during washing.
NOTE:NOTE:
Very small items should not be washed in the dishwasher as they could easily fall out of the basket.
Attention before or after loading the Dishwasher BasketsAttention before or after loading the Dishwasher Baskets
To prevent water dripping from the upper basket into the lower basket, we recommend that you
empty the lower basket first and then the upper basket.
Removing the DishesRemoving the Dishes
12

Lift the basket for higher position
Lift the handle to lower the basket
For better stacking of pots and pans,the spikes can be folded
down as shown on the picture below.
For better stacking of pots and pans,the spikes can be folded
down as shown on the picture below.
13

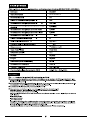
60
70
190
1.7
5/27.5g
1or2 pieces
1or2 pieces
13.5
11~15
1or2 pieces
1or2 pieces
195
1piece
130
0.9
13
15
0.02
will start the selected washing cycle.
14
s
"Preparing and loading dishes").
“Prior to first time use").
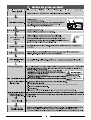
Press the program Button , the wash program will be changed as follows direction:
ECO->Fragile->Trempage->Cyclone->Opti A60 min->Normal->Auto->ECO
pressure
5/27.5g
5/27.5g
5/27.5g
5/27.5g
5/27.5g
45
14
0.93
23.2

15

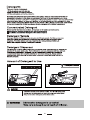
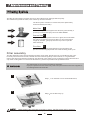
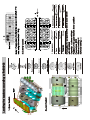
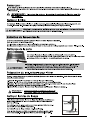
The filter prevents larger remnants of food or other objects from getting inside the pump.
The residues may block the filter, in this case they must be removed.
The filter system consists of a coarse filter,a flat (Main filter)
And a microfilter(Fine filter).
Food and soil particles trapped in this filter are pulverized by a
special jet on the lower spray arm and
Larger items, such as pieces of bones or glass, that could block
the drain are trapped in the coarse filter. To remove the items
caught by the filter, gently squeeze the tap on the top of this
filter and lift out.
This filter holds soil and food residues in the sump area and
prevents it from being deposited on the dishes during wash cycle.
Main filter
1
Coarse filter
2
Fine filter
3
2
3
1
Filter assembly
The filter efficiently removes food particles from the wash water, allowing it to be recycled during the cycle.
For best performance and results, the filter must be cleaned regularly. For this reason, it is a good idea to
remove the larger food particles trapped in the filter after each wash cycle by rinsing the semicircular filter and
cup under running water. To remove the filter device, pull the cup handle in the upward direction.
WARNING! WARNING!
The dishwasher must never be used without the filters.
Improper replacement of the filter may reduce the performance level of the appliance
and damage dishes and utensils.
nn
nn
Step 1 Turn the filter in anti-clockwise direction,
Step 2 lift the filter assy up
7.Maintenance and Cleaning7.Maintenance and Cleaning
Filtering SystemFiltering System
NOTE:NOTE:
When following this procedure from step1 to step 2, the filter system will be removed;
when following it from Step 2 to Step 1, the filter system will be installed.
1
2
OpenOpen
to be drained
16

The control panel can be cleaned by using a lightly dampened cloth.
After cleaning, make sure to dry it thoroughly.
For the exterior, use a good appliance polish wax.
Never use sharp objects, scouring pads or harsh cleaners on any part of the dishwasher.
Protect Against Freezing
1.Cut off the electrical power to the dishwasher.
2.Turn off the water supply and disconnect the water inlet pipe from the water valve.
3.Drain the water from the inlet pipe and water valve. (Use a pan to gather the water)
4.Reconnect the water inlet pipe to the water valve.
5.Remove the filter at the bottom of the tub and use a sponge to soak up water in the sump.
please take frost protection measures on the dishwasher in winter. Every time after washing cycles,
please operate as follows
Caring for the DishwasherCaring for the Dishwasher
Cleaning the Filter
Cleaning The Door
To clean the coarse filter and the fine filter, use a cleaning brush. Reassemble the filter parts as shown in the figures
on the last page and reinsert the entire assembly in the dishwasher, positioning it in its seat and pressing downwards.
When cleaning the filters, don't knock on them. Otherwise, the filters could be
contorted and the performance of the dishwasher could be decreased.
WARNING! WARNING!
To clean the edge around the door, you should use only a soft warm, damp cloth.
To avoid penetration of water into the door lock and electrical components, do not
use a spray cleaner of any kind.
WARNING! WARNING!
Never use a spray cleaner to clean the door panel as it may damage the door lock
and electrical components.
Abrasive agents or some paper towels should not be used because of the risk of
scratching or leaving spots on the stainless steel surface.
nn
nn
Cleaning the Spray Arms
NOTE:NOTE:
If your dishwasher cannot work because of the ice,
please contact professional service persons.
It is necessary to clean the spray arms regularly for hard
water chemicals will clog the spray arm jets and bearings.
- Inspect the filters for blocking after every time the dishwasher has been used.
- By unscrewing the coarse filter, you can remove the filter system. Remove any food remnants and
clean the filters under running water.
Remarks:
The entire filter assembly should be cleaned once a week.
NOTE:NOTE:
To remove the lower spray arm, pull out the spray arm upward.
To remove the upper spray arm, hold the nut, rotate the arm
clockwise to remove it.
Wash the arms in soapy and warm water and use a soft brush to
clean the jets. Replace them after rinsing them thoroughly.
OpenOpen
17

It is recommend that you run a wash cycle with the
dishwasher empty and then remove the plug from the
socket, turn off the water supply and leave the door of
the appliance slightly open. This will help the door
seals to last longer and prevent odours from forming
within the appliance.
If the appliance must be moved, try to keep it in the
vertical position. If absolutely necessary, it can be
positioned on its back.
One of the factors that cause odours to form in the
dishwasher is food that remains trapped in the seals.
Periodic cleaning with a damp sponge will prevent this
from occurring.
Before cleaning or performing maintenance, always
remove the plug from the socket.
To clean the exterior and rubber parts of the dishwasher,
do not use solvents or abrasive cleaning products.
Only use a cloth with warm soapy water.
To remove spots or stains from the surface of the
interior, use a cloth dampened with water an a little
vinegar, or a cleaning product made specifically for
dishwashers.
Remove the Plug
No Solvents or Abrasive Cleaning
Moving the Appliance
Seals
How to Keep Your Dishwasher in Shape
After every wash, turn off the water supply to the
appliance and leave the door slightly open so that
moisture and odours are not trapped inside.
After Every Wash
When not in Use for a LongTime
8.8.
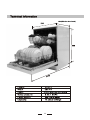
Position the appliance in the desired location. The back should rest against the wall behind it, and the sides,
along the adjacent cabinets or walls. The dishwasher is equipped with water supply and drain hoses that can
be positioned either to the right or the left sides to facilitate proper installation.
Levelling the Appliance
Once the appliance is positioned for levelling, the height of the dishwasher
may be altered via adjustment of the screwing level of the feet.
Positioning the AppliancePositioning the Appliance
Electrical Requirements
Electrical Connection
Insure proper ground
exists before use
Please look at the rating label to know the rating voltage and connect the dishwasher to the appropriate power supply.
Use the required fuse 10 amp, time delay fuse or circuit breaker recommended and provide separate circuit serving
only this appliance.
About Power ConnectionAbout Power Connection
WARNING! WARNING!
For personal safety:
Do not use an extension cord or an adapter plug
with this appliance.
Do not, under any circumstances, cut or remove the
earthing
Connection from the power cord.
nn
nn
nn
Ensure the voltage and frequency of the power being corresponds to
those on the rating plate. Only insert the plug into an electrical socket which is earthed
properly. If the electrical socket to which the appliance must be connected is not
appropriate for the plug , replace the socket, rather than using a adaptors or the like as
they could cause overheating and burns.
18
Page is loading ...
Page is loading ...
Page is loading ...
Page is loading ...
Page is loading ...
Page is loading ...
Page is loading ...
Page is loading ...
Page is loading ...
Page is loading ...
Page is loading ...
Page is loading ...
Page is loading ...
Page is loading ...
Page is loading ...
Page is loading ...
Page is loading ...
Page is loading ...
Page is loading ...
Page is loading ...
Page is loading ...
Page is loading ...
Page is loading ...
Page is loading ...
Page is loading ...
Page is loading ...
Page is loading ...
Page is loading ...
Page is loading ...
Page is loading ...
Page is loading ...
Page is loading ...
Page is loading ...
Page is loading ...
Page is loading ...
Page is loading ...
Page is loading ...
Page is loading ...
Page is loading ...
-
 1
1
-
 2
2
-
 3
3
-
 4
4
-
 5
5
-
 6
6
-
 7
7
-
 8
8
-
 9
9
-
 10
10
-
 11
11
-
 12
12
-
 13
13
-
 14
14
-
 15
15
-
 16
16
-
 17
17
-
 18
18
-
 19
19
-
 20
20
-
 21
21
-
 22
22
-
 23
23
-
 24
24
-
 25
25
-
 26
26
-
 27
27
-
 28
28
-
 29
29
-
 30
30
-
 31
31
-
 32
32
-
 33
33
-
 34
34
-
 35
35
-
 36
36
-
 37
37
-
 38
38
-
 39
39
-
 40
40
-
 41
41
-
 42
42
-
 43
43
-
 44
44
-
 45
45
-
 46
46
-
 47
47
-
 48
48
-
 49
49
-
 50
50
-
 51
51
-
 52
52
-
 53
53
-
 54
54
-
 55
55
-
 56
56
-
 57
57
-
 58
58
-
 59
59


Brandt DFH14524X Owner's manual
- Category
- Dishwashers
- Type
- Owner's manual
- This manual is also suitable for
Ask a question and I''ll find the answer in the document
Finding information in a document is now easier with AI
in other languages
Related papers
-
Brandt VH1542X User manual
-
Groupe Brandt VH1505X Owner's manual
-
-
Brandt VH1544X User manual
-
Groupe Brandt VH15W Owner's manual
-
Brandt VH15W User manual
-
Brandt DFH13114W User manual
-
Groupe Brandt BDF324DB Owner's manual
-
Brandt DFH13117X User manual
-
Groupe Brandt VH1505J Owner's manual
Other documents
-
Gorenje GV61212 Owner's manual
-
DeLonghi Dishwasher DEDW645S User manual
-
DeLonghi DEDW645SI User manual
-
-
-
Midea MDWF1W User manual
-
Whirlpool GSX 941 FD User guide
-
Whirlpool ADG 196 User guide
-
Technika TDX7SS-5 User manual
-
Technika TDX6SS-5 User manual