Kenwood KDC-610U Quick start guide
- Category
- Car media receivers
- Type
- Quick start guide

KDC-610U
CD-RECEIVER
Quick Start Guide
AMPLI-TUNER LECTEUR DE CD
Guide de démarrage rapide
REPRODUCTOR DE DISCOS COMPACTOS RECEPTOR DE FM/AM
Guía de inicio rápido
B59-2804-00/01 (KW)© 2013 JVC KENWOOD Corporation
Take the time to read through this instruction manual.
Familiarity with installation and operation procedures will help you obtain the best
performance from your new CD-Receiver.
For your records
Record the serial number, found on the back of the unit, in the spaces designated on the
warranty card, and in the space provided below. Refer to the model and serial numbers
whenever you call upon your Kenwood dealer for information or service on the product.
Model KDC-610U Serial number
US Residence Only
Register Online
Register your Kenwood product at www.Kenwoodusa.com

2
|
Quick Start Guide
Contents
About the Quick Start Guide.......................... 2
Before use .............................................................3
Preparations .........................................................4
General operations ............................................ 6
Listening to the radio/
SiriusXM™ Satellite Radio ............................7
Playing music (CD/USB/iPod).........................8
Appendix .............................................................. 9
Before installation ............................................10
Connecting wires to terminals ....................12
Installing/Removing the unit .......................14
Specifications .....................................................15
About the Quick Start
Guide
This Quick Start Guide describes basic
functions of this unit.
For functions not described in this Guide,
refer to the Instruction Manual on the
following website:
manual.kenwood.com/edition/im378/
To refer to the Instruction Manual, a browser
such as Internet Explorer® 7 or later, Firefox®
3.6 or later, Chrome™ 20 or later, Safari® 5.1
or later, iOS Safari® 4.0 or later, or Android™
2.2 or later is required.
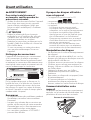
! CAUTION
• Keep battery out of reach of children
and in original package until ready to
use. Dispose of used batteries promptly.
If swallowed, contact a physician
immediately.
• Do not leave the battery near fire or
under direct sunlight. A fire, explosion
or excessive heat generation may result.
• Do not set the remote control in hot
places such as on the dashboard.
• The Lithium battery is in danger of
explosion if replaced incorrectly.
Replace it only with the same or
equivalent type.
The illustrations of the display and panel appearing
in this manual are examples used to explain more
clearly how the controls are used. Therefore, what
appears on the display in the illustrations may differ
from what appears on the display on the actual
equipment, and some of the images on the display
may be inapplicable.

English
|
3
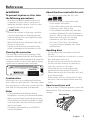
Before use
# WARNING
To prevent injuries or a fire, take
the following precautions:
• Stop the car before operating the unit.
• To prevent a short circuit, never put or
leave any metallic objects (such as coins
or metal tools) inside the unit.
!
CAUTION
• Adjust the volume so that you can hear
sound outside the car. Driving with the
volume adjusted to a too high level may
cause an accident.
• Wipe off the dirt on the panel with a dry
silicon or soft cloth.
Failure to observe this precaution may
result in damage to the monitor or unit.
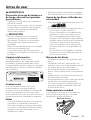
Cleaning the connector
The unit may not function properly if the
connector between the unit and faceplate
are dirty. Detach the faceplate and clean the
connector with a cotton swab gently, being
careful not to damage the connector.
Connector
Condensation
When the car is air-conditioned, moisture
may collect on the laser lens. This may cause
disc read errors. In this case, remove the disc
and wait for the moisture to evaporate.
Notes
• If you experience problems during
installation, consult your Kenwood dealer.
• When you purchase optional accessories,
check with your Kenwood dealer to make
sure that they can work with your model
and in your area.
• Characters that conform to ISO 8859-1
can be displayed.
About the discs used with this unit
• This unit can only play the CDs with
.
• The following discs cannot be used:
- A disc that is not round
- A disc with coloring on the recording
surface or a disc that is dirty
- A recordable/rewritable disc that has
not been finalized (For the finalization
process, refer to the instruction manual
that came with your disc writing
software or your disc recorder.)
- An 8 cm (3 inch) disc (An attempt
to insert using an adapter can cause
malfunction.)
Handling discs
• Do not touch the recording surface of
the disc.
• Do not stick tape etc. on the disc, or use a
disc with tape stuck on it.
• Do not use any accessories for the disc.
• Do not use any solvents to clean discs.
Use a dry silicon or soft cloth.
• Clean the disc by moving the cloth
outward from the center of the disc.
• When removing a disc from this unit, pull
it out horizontally.
• If the center hole or outside rim of a disc
has burrs, remove them before inserting
a disc.
How to reset your unit
If the unit fails to operate properly, press the
Reset button. The unit returns to the factory
settings.
Reset button

4
|
Quick Start Guide
[SRC]
[
1
/
6
]
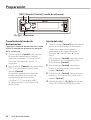
Preparations
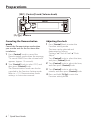
Canceling the Demonstration
mode
Cancel the Demonstration mode when
you use the unit for the first time after
installation.
Press [Control] knob to cancel the
Demonstration mode when the message
“To cancel DEMO Press the volume knob”
appears (approx. 15 seconds).
Turn [Control] knob to select “YES”, and
then press [Control] knob.
The Demonstration mode can also be
canceled in the Function Setting mode.
Refer to <11-5. Demonstration mode
setting> in Instruction manual.
Adjusting the clock
Press [Control] knob to enter the
Function setting mode.
The item can be selected and
determined as follows.
”Settings” Á “Clock & Date” Á “Clock
Adjust”
Turn [Control] knob to select the item,
and press [Control] knob.
Turn [Control] knob to adjust the hour,
and then press [Control] knob.
Turn [Control] knob to adjust the
minute, and then press [Control] knob.
Press and hold [1/6] to exits the
Function setting mode.
Release
[Control] knob (Volume knob)

English
|
5
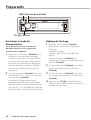
Preparations
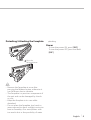
Detaching/ Attaching the faceplate
Press the
Release button.
!
• Remove the faceplate at once after
pressing the Release button; otherwise it
can fall down due to vibration.
• The faceplate is a precision component of
the unit and can be damaged by shocks
or jolts.
• Keep the faceplate in its case while
detached.
• Do not place the faceplate (and case) in
areas exposed to direct sunlight, excessive
heat or humidity. Also avoid places with
too much dust or the possibility of water
splashing.
Power
To turn the power ON, press [SRC].
To turn the power OFF, press and hold
[SRC].

6
|
Quick Start Guide
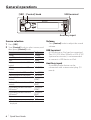
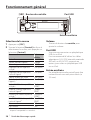
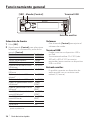
General operations
Source selection
Press [SRC].
Turn [Control] knob to select source, and
then press [Control] knob.
Source Display
Standby “STANDBY”
SiriusXM (optional accessory)
[1]
“SiriusXM”
Tuner “TUNER”
USB device connected to front USB
terminal
“USB (FRONT)”
USB device connected to rear USB
terminal
“USB (REAR)”
iPod connected to front USB terminal
[1]
“iPod (FRONT)”
iPod connected to rear USB terminal
[1]
“iPod (REAR)”
Pandora® of iPod connected to front USB
terminal
[1]
“Pandora
(FRONT)”
Pandora of iPod connected to rear USB
terminal
[1]
“Pandora
(REAR)”
iHeartRadio of iPod connected to front
USB terminal
[1]
“iHeartRADIO
(FRONT)”
iHeartRadio of iPod connected to rear
USB terminal
[1]
“iHeartRADIO
(REAR)”
CD
[1]
“CD”
Auxiliary Input “AUX”
[1]
This source can be selected only when it can
be played.
[SRC]
Auxiliary input
USB terminal
Volume
Turn [Control] knob to adjust the sound
volume.
USB terminal
A USB device or iPod can be connected.
The CA-U1EX (Max. 500mA) or KCA-iP102
(optional accessories) is recommended
to connect a USB device or iPod.
Auxiliary input
A portable audio device can be
connected with a stereo mini-plug (3.5
mm ø).
[Control] knob

English
|
7
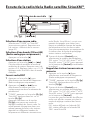
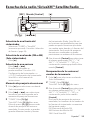
Listening to the radio/SiriusXM™ Satellite Radio
Selecting a tuner source
Select “TUNER” or “SiriusXM” (optional
accessory). Refer to <Source selection>
(page 6).
Selecting a band (FM or AM)
(Tuner only)
Press [R].
Selecting a station
Press [E] or [F].
The seek mode can be changed. Refer to
<9-5. Tuner setting> or <12-20. SiriusXM
tuner setting> in Instruction manual.
Station preset memory
Press [R] to select a band. (Tuner only)
Press [E] or [F] to select the station
you want to save in the station preset
memory.
“TUNER”: Press [1/6].
“SiriusXM”: Press [1/6] twice.
Press [1/6] again to enter the Mix
Station preset mode. In this mode,
different bands and tuner sources (Radio,
SiriusXM etc.) can be saved in the same
preset layer, which allows you to recall
a desired station without switching
between bands and/or tuner sources.
Maximum of 6 stations can be preset in
the Mix Station preset mode.
Turn [Control] knob to select preset
number (FM: “1” – “18”, AM: “1” – “6”,
SiriusXM: “1” – “24”), and then press and
hold [Control] knob.
Recalling the stations/Channel in
the memory
Press [R] to select a band. (Tuner only)
“TUNER”: Press [1/6].
“SiriusXM”: Press [1/6] twice.
Turn [Control] knob to select a preset
number (FM: “1” – “18”, AM: “1” – “6”,
SiriusXM: “1” – “24”), and then press
[Control] knob.
In the Mix Station preset mode, band
names of tuner sources are displayed as
follows:
FM: FM broadcast station
AM: AM broadcast station
SXM: SiriusXM channel
[SRC]
[
1
/
6
] [
E
/
F
]
[
R
]
[Control] knob

8
|
Quick Start Guide
CA-U1EX
[1]
KCA-iP102
[1]
[
1
/
6
]
[
G
]
[
E
/
F
] [
R
/
S
]
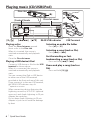
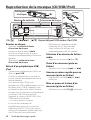
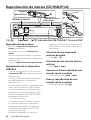
Playing music (CD/USB/iPod)
Playing a disc
Open the Disc slot cover upward.
Insert a disc in the Disc slot.
When it is inserted, the source is
switched automatically and playback
starts.
Close the Disc slot cover.
Playing a USB device/ iPod
Connect a USB device or iPod to the USB
terminal as shown above.
When it is connected, the source is
switched automatically and playback
starts.
You can connect the iPod or USB device
to either one of the USB terminals
provided at the front and rear of this unit.
If you connect it to the rear USB terminal,
the “REAR USB” indicator stays lit.
[1]
optional accessories
When connecting devices featuring the
Lightning connector, KCP-iP102 (optional
accessory) and Apple Lightning to 30-pin
Adapter are necessary.
Do not keep Apple Lightning to 30-pin
Adapter in your car to avoid the damage
by heat.
Selecting an audio file folder
Press [R] or [S].
Selecting a song (track or file)
Press [E] or [F].
Fast-forwarding or fast-
backwarding a song (track or file)
Press and hold [E] or [F].
Pause and play a song (track or
file)
Press and hold [1/6].
USB TerminalREAR USB indicator
[Control] knob
Disc slot
Disc slot cover

English
|
9
Playing music (CD/USB/iPod)
Music search
You can search for the song you want to
play.
Press [1/6].
Search for a song.
Operation type Operation
Selecting items Turn [Control] knob.
Determining selection Press [Control] knob.
Returning to previous item Press [1/6].
To cancel music search in audio files or
iPod, Press and hold [1/6].
Ejecting disc
Open the Disc slot cover upward, and
press [G].
Removing USB device/ iPod
Switch to a source other than USB, iPod,
Pandora, and iHeartRadio, and then
remove the USB device.
Data contained in the USB device/ iPod
may be damaged if you remove it when
it is used as the active source.
Appendix
About Audio file
• Playable Audio files
AAC-LC (.m4a), MP3 (.mp3), WMA (.wma),
WAV (.wav) of USB device
• Playable disc media
CD-R/RW/ROM
• Playable disc file formats
ISO 9660 Level 1/2, Joliet, Long file name.
• Playable USB devices
USB mass storage class
• Playable USB device file systems
FAT12, FAT16, FAT32
The online manual about
audio files is put on the site,
www.kenwood.com/cs/ce/audiofile/.
Models of iPods/iPhones that can
be connected to this unit
Made for
• iPod touch (5th generation)
• iPod touch (4th generation)
• iPod touch (3rd generation)
• iPod touch (2nd generation)
• iPod touch (1st generation)
• iPod classic
• iPod with video
• iPod nano (7th generation)
• iPod nano (6th generation)
• iPod nano (5th generation)
• iPod nano (4th generation)
• iPod nano (3rd generation)
• iPod nano (2nd generation)
• iPod nano (1st generation)
• iPhone 5
• iPhone 4S
• iPhone 4
• iPhone 3GS
• iPhone 3G
• iPhone
For information on the compatibility with
iPod/iPhone software, visit www.kenwood.
com/cs/ce/ipod/.

10
|
Quick Start Guide
# WARNING
• The unit can only be installed in a car with
a 12V DC power supply, negative ground.
• If you connect the ignition wire (red)
and the battery wire (yellow) to the car
chassis (ground), you may cause a short
circuit, that in turn may start a fire. Always
connect those wires to the power source
running through the fuse box.
!
CAUTION
• Install this unit in the console of your
vehicle.
• Do not touch the metal parts of this unit
during and shortly after use of the unit.
Metal parts such as the heat sink and
enclosure become hot.
• Mounting and wiring this product
requires skills and experience. For safety’s
sake, leave the mounting and wiring work
to professionals.
• If you experience any problem during
installation, consult your Kenwood dealer.
• Disconnect the battery’s negative terminal
before installing the unit.
• Insulate unconnected wires with vinyl
tape or other similar materials. To prevent
a short circuit, do not remove the caps on
the ends of the unconnected wires and
terminals.
• Be sure to ground this unit to the car’s
chassis again after mounting.
• If the fuse blows, first make sure the wires
are not touching other parts to cause a
short circuit, and then replace the old fuse
with one with a new the same rating.
• When connecting only two speakers,
connect the connectors either to both
of the front output terminals or to both
of the rear output terminals (do not mix
front and rear terminals). For example, if
you connect the + connector of the left
speaker to a front output terminal, do
not connect the - connector to a rear
output terminal.
• Connect the speaker wires correctly to the
corresponding terminals. The unit may
be damaged or fail to work if you share
the - wires or ground them to any metal
part in the car.
• If your car’s ignition key switch does
not have an ACC position, connect the
ignition wires to a power source that can
be turned on and off with the ignition
key. If you connect the ignition wires to
a constant-voltage power source, as with
battery wires, the battery may die.
• If the console has a lid, make sure to
install the unit so that the faceplate will
not hit the lid when it is closed or opened.
• After the installing the unit, check
whether the brake lamps, blinkers, wipers,
etc. on the car are working properly.
• Mount the unit so that the mounting
angle is 30° or less.
Before installation

English
|
11
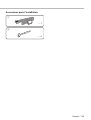
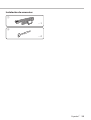
Installation accessories
1
.....1
2
.....2

P.CONT
ILLUMI
REMOTE CONT
REMOTE INPUT
STEERING WHEEL
ANT.
CONT
MUTE
–
+
FRONTSW REAR
LR
LR
12
|
Quick Start Guide
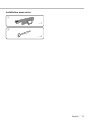
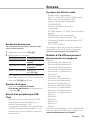
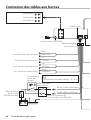
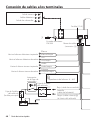
Connecting wires to terminals
FM/AM antenna input
Front output
Fuse (10A)
White/Black
Gray/Black
Green/Black
Purple/Black
White
Gray
Green
Purple
To front left speaker
To front right speaker
To rear right speaker
To rear left speaker
Subwoofer output
Rear output
Wiring harness
(Accessory1)
Red (Ignition wire)
Yellow (Battery wire)
Black (Ground wire) · (To car chassis)
Ignition key
switch
Car fuse box
(Main fuse)
ACC
Car fuse
box
Battery
<
• Speaker Impedance: 4 – 8 Ω

P.CONT
ILLUMI
REMOTE CONT
REMOTE INPUT
STEERING WHEEL
ANT.
CONT
MUTE
–
+
FRONTSW REAR
LR
LR
English
|
13
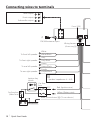
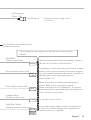
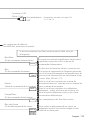
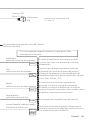
Connecting wires to terminals
To SiriusXM Connect Vehicle Tuner.
(optional accessory)
USB connector
(0.8m, 2.5ft)
To USB device.
If no connections are made, do not let the wire come out from
the tab.
Blue/White
(Power control wire)
Blue (Antenna control wire)
Orange/ White
(Dimmer control wire)
When using the optional power amplifier, connect
this wire to its power control terminal.
To car light control switch.
Depending on what antenna you are using, connect
either to the control terminal of the motor antenna,
or to the power terminal for the booster amplifier of
the film-type or short pole type antenna.
(Max. 300mA, 12V)
Brown (Mute control wire)
To use the steering wheel remote control feature,
an exclusive remote adapter (not supplied) that
matches your car is required.
Light Blue/ Yellow
(Steering remote control wire)
When connecting to the Kenwood navigation
system: Refer to your navigation manual.
When connecting to a car telephone: To connect
the terminal that is grounded when the telephone
rings or during conversation.
USB maximum power supply current
: DC 5 V = 1 A

14
|
Quick Start Guide
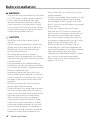
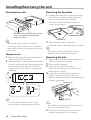
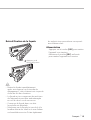
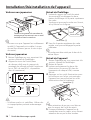
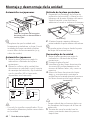
Installing/Removing the unit
Non-Japanese cars
Bend the tabs of the mounting sleeve
with a screwdriver or the like and
attach it in place.
<
• Make sure that the unit is installed
securely in place. If the unit is unstable, it
may malfunction (for example, the sound
may skip).
Japanese cars
Remove the trim plate with reference to
<Removing the trim plate>.
Align the holes in the unit (two locations
on each side) with the vehicle mounting
bracket and secure the unit with the
screws (M5 x 8 mm MAX.; commercially
available).
8 mm
MAX.
M5mm
M5mm
8mm
MAX.
!
• Use only the specified screws. Using
wrong screws might damage the unit.
Removing the trim plate
Engage the catch pins on the extraction
key (Accessory2) and release the two
locks on the upper part of frame.
Lift up and pull the frame forward as
shown in the figure.
Catch
Lock
Accessory
2
When the upper part of frame is
removed, remove the lower part of frame.
<
• The frame can be removed from the
bottom side in the same manner.
Removing the unit
Remove the trim plate with reference to
<Removing the trim plate>.
Remove the faceplate.
Insert the two extraction keys
(Accessory2) deeply into the slots on
both sides as shown.
Lower the extraction key toward the
bottom, and then pull out the unit
halfway while pressing the extraction key
towards the inside.
Accessory2
!
• Be careful to avoid injury from the catch
pins on the extraction key.
Pull the unit all the way out with your
hands, being careful not to drop it.

English
|
15
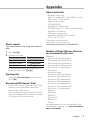
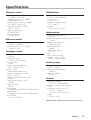
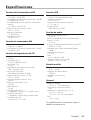
FM tuner section
Frequency range (200 kHz step)
: 87.9 MHz – 107.9 MHz
Usable sensitivity (S/N = 30dB)
: 9.3dBf (0.8 μV/75 Ω)
Quieting Sensitivity (S/N = 46dB)
: 10.2 dBf (1.13 μV/75 Ω)
Frequency response (±3 dB)
: 30 Hz – 15 kHz
Signal to Noise ratio
: 75 dB (MONO)
Stereo separation
: 45 dB (1 kHz)
AM tuner section
Frequency range (10 kHz step)
: 530 kHz – 1700 kHz
Usable sensitivity (S/N = 20dB)
: 28 dBµ (25 µV)
CD player section
Laser diode
: GaAlAs
Digital filter (D/A)
: 8 Times Over Sampling
D/A Converter
: 24 Bit
Spindle speed (Audio files)
: 500 – 200 rpm (CLV)
Wow & Flutter
: Below Measurable Limit
Frequency response (±1 dB)
: 10 Hz – 20 kHz
Total harmonic distortion (1 kHz)
: 0.010 %
Signal to Noise ratio (1 kHz)
: 105 dB
Dynamic range
: 93 dB
MP3 decode
: Compliant with MPEG-1/2 Audio Layer-3
WMA decode
: Compliant with Windows Media Audio
AAC decode
: AAC-LC “.m4a” files
USB interface
USB Standard
: USB1.1/ 2.0 (Full speed)
File System
: FAT12/ 16/ 32
Maximum Supply current
: DC 5 V = 1 A
Decode
: MP3, WMA, AAC, WAV
Audio section
Maximum output power
: 50 W x 4
Full Bandwidth Power (at less than 1% THD)
: 22 W x 4
Preout level/ Load (CD)
: 2,500 mV/10 kΩ
Preout impedance
: ≤ 600 Ω
Speaker Impedance
: 4 – 8 Ω
Tone
Bass : 100 Hz ±8 dB
Middle : 1 kHz ±8 dB
Treble : 12.5 kHz ±8 dB
Auxiliary input
Frequency response (±3 dB)
: 20 Hz – 20 kHz
Input Maximum Voltage
: 1,200 mV
Input Impedance
: 10 kΩ
General
Operating voltage
: 14.4 V (11 – 16V allowable)
Maximum Current consumption
: 10 A
Installation Size (W x H x D)
: 182 x 53 x 159 mm
7-3/16 x 2-1/16 x 6-1/4 inch
Weight
: 2.7 lbs (1.2 kg)
Specifications subject to change without notice.
Specifications
Page is loading ...
Page is loading ...
Page is loading ...
Page is loading ...
Page is loading ...
Page is loading ...
Page is loading ...

Français
|
23
Recherche de morceau
Vous pouvez rechercher le morceau que
vous voulez écouter.
Appuyez sur la touche [1/6].
Recherchez un morceau.
Type d’opération Description
Sélection d'éléments Tourner le [Bouton de
contrôle].
Confirmation d'une sélection Appuyez sur le [Bouton
de contrôle].
Retour à l'élément précédent Appuyez sur la
touche[1/6].
Pour annuler la recherche musicale dans
les fichiers audio ou sur l'iPod, maintenez
la touche [1/6] enfoncée.
Éjection du disque
Soulevez le cache de la fente
d'insertion de disque puis appuyez sur
la touche [G].
Retrait d'un périphérique USB/
iPod
Basculez sur une source autre qu'USB,
iPod, Pandora, et iHeartRADIO, puis
retirez le périphérique USB.
Les données stockées sur le périphérique
USB/iPod risquent d'être altérées si vous
le retirez lorsqu'il est utilisé en tant que
source active.
Reproduction de la musique (CD/USB/iPod) Annexe
À propos des fichiers audio
• Fichiers audio compatibles
AAC-LC (.m4a), MP3 (.mp3), WMA (.wma),
WAV (.wav) du périphérique USB
• Supports de disque compatibles
CD-R/RW/ROM
• Formats de fichiers de disques
compatibles
ISO 9660 niveau 1/2, Joliet, Nom de fichier
étendu.
• Périphériques USB compatibles
Classe de stockage de masse USB
• Systèmes de fichier de périphérique USB
compatibles
FAT12, FAT16, FAT32
Un guide en ligne sur les fichiers audio est
disponible sur le site à l'adresse suivante :
www.kenwood.com/cs/ce/audiofile/.
Modèles d'iPod/iPhone pouvant
être connectés à cet appareil
Made for
• iPod touch (5th generation)
• iPod touch (4th generation)
• iPod touch (3rd generation)
• iPod touch (2nd generation)
• iPod touch (1st generation)
• iPod classic
• iPod with video
• iPod nano (7th generation)
• iPod nano (6th generation)
• iPod nano (5e génération)
• iPod nano (4th generation)
• iPod nano (3rd generation)
• iPod nano (2nd generation)
• iPod nano (1st generation)
• iPhone 5
• iPhone 4S
• iPhone 4
• iPhone 3GS
• iPhone 3G
• iPhone
Pour plus d'informations sur la compatibilité
avec les logiciels iPod/iPhone, visitez le site
www.kenwood.com/cs/ce/ipod/.
Page is loading ...
Page is loading ...
Page is loading ...
Page is loading ...
Page is loading ...
Page is loading ...
Page is loading ...
Page is loading ...
Page is loading ...
Page is loading ...
Page is loading ...
Page is loading ...
Page is loading ...

Español
|
37
Búsqueda de música
Puede buscar la canción que desea
reproducir.
Pulse [1/6].
Busque una canción.
Tipo de operación Operación
Selección de elementos Gire el mando [Control].
Confirmación de la selección Pulse el mando [Control].
Vuelta al elemento anterior Pulse [1/6].
Para cancelar la búsqueda de música en
archivos de audio o en el iPod, mantenga
pulsado [1/6].
Expulsión del disco
Abra la tapa de la ranura para discos
y pulse [G].
Extracción del dispositivo USB/
iPod
Cambie a una fuente distinta de
USB, iPod, Pandora, y iHeartRADIO, a
continuación, retire el dispositivo USB.
Los datos contenidos en el dispositivo
USB/iPod pueden resultar dañados si lo
retira mientras lo está utilizando como
fuente activa.
Reproducción de música (CD/USB/iPod) Apéndice
Acerca de los archivos de audio
• Archivos de audio reproducibles
AAC-LC (.m4a), MP3 (.mp3), WMA (.wma),
WAV (.wav) de un dispositivo USB
• Soportes de disco que se pueden
reproducir
CD-R/RW/ROM
• Formatos de archivo de disco
reproducibles
ISO 9660 Level 1/2, Joliet y archivos con
nombre largo.
• Dispositivos USB reproducibles
Clase de almacenamiento masivo USB
• Sistemas de archivos del dispositivo USB
reproducibles
FAT12, FAT16, FAT32
Puede encontrar un manual en línea
sobre los archivos de audio en el sitio web
www.kenwood.com/cs/ce/audiofile/.
Modelos de iPod/iPhone que
pueden conectarse a esta unidad
Made for
• iPod touch (5th generation)
• iPod touch (4th generation)
• iPod touch (3rd generation)
• iPod touch (2nd generation)
• iPod touch (1st generation)
• iPod classic
• iPod with video
• iPod nano (7th generation)
• iPod nano (6th generation)
• iPod nano (5th generation)
• iPod nano (4th generation)
• iPod nano (3rd generation)
• iPod nano (2nd generation)
• iPod nano (1st generation)
• iPhone 5
• iPhone 4S
• iPhone 4
• iPhone 3GS
• iPhone 3G
• iPhone
Para obtener información sobre la
compatibilidad con el software iPod/iPhone,
visite www.kenwood.com/cs/ce/ipod/.
Page is loading ...
Page is loading ...
Page is loading ...
Page is loading ...
Page is loading ...
Page is loading ...

2CAUTION
Use of controls or adjustments or performance of
procedures other than those specified herein may
result in hazardous radiation exposure.
In compliance with Federal Regulations, following
are reproductions of labels on, or inside the
product relating to laser product safety.
JVC KENWOOD Corporation
2967-3, ISHIKAWA-MACHI,
HACHIOJI-SHI, TOKYO, JAPAN
THIS PRODUCT COMPLIES WITH DHHS RULES
21 CFR SUBCHAPTER J IN EFFECT AT DATE OF
MANUFACTURE.
Location : Top plate
FCC WARNING
This equipment may generate or use radio
frequency energy. Changes or modifications to
this equipment may cause harmful interference
unless the modifications are expressly approved
in the instruction manual. The user could lose
the authority to operate this equipment if an
unauthorized change or modification is made.
FCC NOTE
This equipment has been tested and found to
comply with the limits for a Class B digital device,
pursuant to Part 15 of the FCC Rules. These limits
are designed to provide reasonable protection
against harmful interference in a residential
installation. This equipment may cause harmful
interference to radio communications, if it is
not installed and used in accordance with the
instructions. However, there is no guarantee
that interference will not occur in a particular
installation. If this equipment does cause harmful
interference to radio or television reception, which
can be determined by turning the equipment off
and on, the user is encouraged to try to correct
the interference by one or more of the following
measures:
• Reorient or relocate the receiving antenna.
• Increase the separation between the equipment
and receiver.
• Connect the equipment into an outlet on a
circuit different from that to which the receiver
is connected.
• Consult the dealer or an experienced radio/TV
technician for help.
CALIFORNIA, USA
This product contains a CR Coin Cell Lithium
Battery which contains
Perchlorate Material – special handling may apply.
See www.dtsc.ca.gov/hazardouswaste/perchlorate
Información acerca de la eliminación
de equipos eléctricos y electrónicos
al final de la vida útil (aplicable a los
países que hayan adoptado sistemas
independientes de recogida de
residuos)
Los productos con el símbolo de un contenedor
con ruedas tachado no podrán ser desechados
como residuos domésticos.
Los equipos eléctricos y electrónicos al final de la
vida útil, deberán ser reciclados en instalaciones
que puedan dar el tratamiento adecuado a
estos productos y a sus subproductos residuales
correspondientes. Póngase en contacto con su
administración local para obtener información
sobre el punto de recogida más cercano. Un
tratamiento correcto del reciclaje y la eliminación
de residuos ayuda a conservar los recursos y evita al
mismo tiempo efectos perjudiciales en la salud y el
medio ambiente.

Requirements iHeartRadio™:
Requirements for listening to the iHeartRadio™ are
as follows:
• Use an Apple iPhone or iPod touch running
iOS4 or later.
• Search for “iHeart Link for KENWOOD” in the
Apple iTunes App Store to find and install
the most current version of the iHeart Link
application on your device.
• iPhone/ iPod touch connected to this unit with
a KCA-iP102.
NOTE
• In the application on your device, log in and
create a free account with iHeartRadio.
• Internet connection by LTE, 3G, EDGE, or WiFi.
• Because iHeartRadio™ is a third-party service,
the specifications are subject to change
without prior notice. Accordingly, compatibility
may be impaired or some or all of the services
may become unavailable.
• Some iHeartRadio™ functionality cannot be
operated from this unit.
Requirements Pandora:
Requirements for listening to the Pandora are as
follows:
• Use an Apple iPhone or iPod touch running
under iOS3 or later.
• Search for “Pandora” in the Apple iTunes App
Store to find and install the most current
version of the Pandora application on your
device.
• iPhone/ iPod touch connected to this unit with
a KCA-iP102.
NOTE
• In the application on your device, log in and
create an account with Pandora.
(If you are not already a registered user, an
account can also be created at www.pandora.
com.)
• Internet connection by LTE, 3G, EDGE, or WiFi.
• Pandora is available only in the U.S, Canada,
Australia and New Zealand.
• Because Pandora is a third-party service, the
specifications are subject to change without
prior notice. Accordingly, compatibility may
be impaired or some or all of the services may
become unavailable.
• Some functions of Pandora cannot be
operated from this unit.
• For issues using the application, please contact
Pandora at [email protected]
Page is loading ...

• The “AAC” logo is a trademark of Dolby
Laboratories.
• “Made for iPod” and “Made for iPhone” mean that
an electronic accessory has been designed to
connect specifically to iPod or iPhone, respectively,
and has been certified by the developer to meet
Apple performance standards. Apple is not
responsible for the operation of this device or its
compliance with safety and regulatory standards.
Please note that the use of this accessory with iPod
or iPhone may affect wireless performance.
• iPhone, iPod, iPod classic, iPod nano, and iPod
touch are trademarks of Apple Inc., registered in
the U.S. and other countries.
• Lightning is a trademark of Apple Inc.
• iTunes and Safari are trademark of Apple Inc.
• IOS is a trademark or registered trademark of
Cisco in the U.S. and other countries and is used
under license.
• Sirius, XM and all related marks and logos are
trademarks of Sirius XM Radio Inc. All rights
reserved.
• Adobe, Acrobat and Reader are either registered
trademarks or trademarks of Adobe Systems
Incorporated in the United States and/or other
countries.
• Internet Explorer and Windows Media are
registered trademark of Microsoft Corporation in
the United States and other countries.
• Firefox is a registered trademark of Mozilla
Foundation in the United States and other
countries.
• Chrome is a trademark of Google Inc.
• PANDORA, the PANDORA logo, and the Pandora
trade dress are trademarks or registered trademarks
of Pandora Media, Inc., used with permission.
Page is loading ...
-
 1
1
-
 2
2
-
 3
3
-
 4
4
-
 5
5
-
 6
6
-
 7
7
-
 8
8
-
 9
9
-
 10
10
-
 11
11
-
 12
12
-
 13
13
-
 14
14
-
 15
15
-
 16
16
-
 17
17
-
 18
18
-
 19
19
-
 20
20
-
 21
21
-
 22
22
-
 23
23
-
 24
24
-
 25
25
-
 26
26
-
 27
27
-
 28
28
-
 29
29
-
 30
30
-
 31
31
-
 32
32
-
 33
33
-
 34
34
-
 35
35
-
 36
36
-
 37
37
-
 38
38
-
 39
39
-
 40
40
-
 41
41
-
 42
42
-
 43
43
-
 44
44
-
 45
45
-
 46
46
-
 47
47
-
 48
48


Kenwood KDC-610U Quick start guide
- Category
- Car media receivers
- Type
- Quick start guide
Ask a question and I''ll find the answer in the document
Finding information in a document is now easier with AI
in other languages
- français: Kenwood KDC-610U Guide de démarrage rapide
- español: Kenwood KDC-610U Guía de inicio rápido
Related papers
-
Kenwood KDC-BT755HD User manual
-
Kenwood KDC-358U User manual
-
Kenwood DPX302U User manual
-
Kenwood KDC-X502 Owner's manual
-
Kenwood DPX308U Quick start guide
-
Kenwood KMR-D368BT User manual
-
Kenwood KDC-X303 Owner's manual
-
Kenwood KDC-X598 User manual
-
Kenwood KDC-X798 User manual
-
Kenwood DPX792BH User manual