Page is loading ...

PB
1
5-IN-1 DIGITAL MULTI-FUNCTION KITCHEN SYSTEM
SISTEMA DE COCINA MULTIFUNCIÓN DIGITAL 5 EN 1
use and care manual
manual de uso y cuidado
BL1275BGFP

2
3
• Read all instructions.
• To protect against risk of electrical shock, do not put appliance
base, cord or plug in water or other liquid.
• Close supervision is necessary when any appliance is used by
or near children.
• Turn the appliance OFF, then unplug from the outlet when not
in use, before assembling or disassembling parts and before
cleaning. To unplug, grasp the plug and pull from the outlet.
Never pull from the power cord.
• Avoid contacting moving parts.
• Do not operate any appliance with a damaged cord or plug or
after the appliance malfunctions or is dropped or damaged
in any manner. Contact Customer Service for examination,
repair or electrical or mechanical adjustment by calling
the appropriate toll-free number listed in this manual. This
appliance has important markings on the plug blade. The
attachment plug or entire cordset (if plug is molded onto cord)
is not suitable for replacement. If damaged, the appliance
must be replaced.
• The use of attachments, including canning jars, not
recommended or sold by the appliance manufacturer may
cause a risk of injury to persons.
• Do not use outdoors.
• Do not let cord hang over the edge of table or counter, or touch
hot surfaces.
• Keep hands and utensils out of container while operating
appliance to reduce the risk of severe injury to persons or
damage to the appliance. A scraper may be used, but must be
used only when the appliance is not running.
• Blades are sharp. Handle carefully.
• To reduce the risk of injury, never place the blades or disc on
the base without the blending jar, single serve blender jar, or
workbowl properly attached.
• When blending, always operate the appliance with the dual
opening lid in place on the blending jar.
• Do not blend hot liquids.
• Do not use appliance for other than intended use.
• This appliance is not intended for use by persons (including
children) with reduced physical, sensory or mental
capabilities, or lack of experience and knowledge, unless they
have been given supervision or instruction concerning use of
the appliance by a person responsible for their safety.
• Children should be supervised to ensure that they do not play
with the appliance.
• Do not place on or near a hot gas or electric burner or in a
heated oven.
• Do not operate with damaged blades.
• Be certain the workbowl cover is securely locked in place
on the workbowl before operating the appliance as a food
processor.
• This appliance has a protection system. The unit will not
operate as a food processor unless the workbowl is on the
base and the workbowl cover is securely locked onto the
workbowl.
• When operating the appliance as a food processor, never feed
food by hand. Always use food pusher.
• Do not attempt to defeat the workbowl cover interlock
mechanism.
• Do not fill the workbowl above the marked maximum fill line to
avoid risk of injury due to damage to the cover or bowl.
• Do not open workbowl cover until blade or disc stops
completely.
• Note: Processing items with low moisture content may dull the
finish of the workbowl.
PLEASE READ AND SAVE THIS USE AND CARE BOOK.
IMPORTANT SAFEGUARDS.
When using electrical appliances, always follow basic safety precautions to reduce the
risk of fire, electric shock, and/or injury, including the following:
SAVE THESE INSTRUCTIONS.
This product is for household use only.
POLARIZED PLUG
This appliance has a polarized plug (one blade is wider
than the other). To reduce the risk of electric shock, this
plug is intended to fit into a polarized outlet only one way.
If the plug does not fit fully into the outlet, reverse the
plug. If it still does not fit, contact a qualified electrician.
Do not attempt to modify the plug in any way.
TAMPER-RESISTANT SCREW
Warning: This appliance is equipped with a tamper-
resistant screw to prevent removal of the outer cover.
To reduce the risk of fire or electric shock, do not
attempt to remove the outer cover. There are no user-
serviceable parts inside. Repair should be done only by
authorized service personnel.
ELECTRICAL CORD
1) A short power-supply cord is provided to reduce the risk
resulting from becoming entangled in or tripping over a
longer cord.
2) Extension cords are available and may be used if care
is exercised in their use.
3) If an extension cord is used,
a) The marked electrical rating of the extension cord
should be at least as great as the electrical rating of
the appliance,
b) If the appliance is of the grounded type, the extension
cord should be a grounding-type 3-wire cord, and
c) The cord should be arranged so that it will not drape
over the countertop or tabletop where it can be pulled
on by children or tripped over.
Note: If the power cord is damaged, please call our
Customer Service line listed in these instructions.

2
3
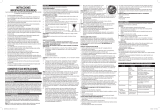
GETTING TO KNOW YOUR
POWERCRUSH
5-IN-1 DIGITAL MULTI-FUNCTION KITCHEN SYSTEM
Product may vary slightly from what is illustrated.
18
17
14
13
4
6
7
11
16
9
5
2
10
12
15
3
1
1. Dual-opening lid
(Part# BL1275-01 )
2. Pour Spout
3. Ingredient Slot
4. Blending jar (Part# BL1275-02)
5. Blade assembly (Part# BL1400-01)
6. Jar base (Part# BL1275-03)
7. Base
8. Digital Control Panel
9. Cord storage (under base)
10. Single serve jar travel lid
(Part# BL1275-04)
11. Single serve jar (Part# BL1275-05)
12. Food pusher (Part # BL1275-06)
13. Feed chute
14. Workbowl cover (Part # BL1275-07)
15. Slicing/shredding disc
(Part # BL1275-08)
16. Chopping blade (Part # BL1275-09)
17. Workbowl (Part # BL1275-10)
18. Center shaft/workbowl base
assembly (Part # BL1275-11)

4
5
GETTING STARTED
• Remove all packing material, any stickers, and the plastic band around
the power plug.
• Remove and save literature.
• Please visit www.prodprotect.com/blackanddecker to register your
warranty.
• Wash all removable parts as instructed in CARE AND CLEANING
section of this manual.
HOW TO USE
This product is for household use only.
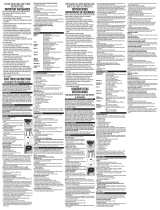
BLENDING JAR ASSEMBLY
1. Turn blending jar upside down and place flat on
counter top or work surface.
2. Place the blade assembly in bottom opening of the jar
with blades down. (A)
Caution: Blades are sharp. Handle carefully.
3. Place the jar base onto the blending jar and rotate
clockwise until tight. It is important to tighten to avoid
leaking while blending.
4. Turn assembled jar right side up.
5. Place the dual-opening lid on blender jar.
6. Uncoil power cord from storage area under the blender
base.
7. Place the jar assembly on blender base. (B).
8. Blender is now ready for use.
USING THE BLENDER
Important: Appliance should always have lid in place when in use.
Caution: Do not place blender jar onto base when motor is running.
1. Make sure appliance is OFF.
2. Place ingredients to be blended into jar. For best results, add ingredients
in the following order:
a. Liquids
b. Powders
c. Soft foods
d. Hard foods
e. Ice cubes last
Tip: When using frozen fruits it is not necessary to also add ice.
3. Place lid on jar; make sure the pour spout and ingredient slot are closed.

4
5
4. Plug power cord into outlet. Press ON/OFF button. LED should turn a
solid color to signify the blender is in standby mode. After 2 ½ minutes
the unit will automatically power off if no buttons are pressed.
Note: When in use, do not leave blender unattended. When using hard foods,
such as ice or cheese, keep one hand on the lid to keep blender in place.
5. Select the speed that best suits your desired task. (See SPEED CHART)
Important: Do not hold speed button. Simply press the desired speed,
watch, and press ON/OFF when the desired consistency is achieved.
Holding the button for longer than 30 seconds will cause the blender to shut
off. Unit must be shut off to reset.
6. When blending thick mixtures, such as smoothies and milkshakes, use
the PULSE/Ice Crush button for several seconds, then release. Repeat to
mix ingredients and then run continuously until food has reached desired
consistency. Releasing pulse stops the blending and the unit returns to
STANDBY. You may use a spatula or utensil to move
ingredients and thick mixtures around in the blender jar,
but only after stopping the blender. Turn the blender OFF
before using a utensil.
7. Open the
ingredient slot
to add ingredients while the blender
is running. Drop ingredients through the opening. (C).
Important: Do not remove the lid while the blender is running.
8. When finished, press ON/OFF to stop blending. Make sure blades have
completely stopped before attempting to remove the blending jar from
the base (refer to TROUBLESHOOTING for any issues).
9. Press ON/OFF to power off and unplug the blender.
10. To remove the jar, grasp the handle and lift up.
11. Open pour spout to serve.
Note: Unit will auto shutoff after 2 ½ minutes without use.
12. Always unplug the appliance when not in use.
USING THE PREPROGRAMMED FUNCTIONS
• Fill the assembled blender jar with the desired ingredients.
• Place the dual-opening lid on the jar.
• Place the jar on the base.
• Press desired preprogrammed button. The blender will automatically mix
and blend the following recipes with the press of a button:
- Smoothie: 30 seconds to blend fruits and vegetables to a smooth
consistency.
- Icy drinks: Perfect for classic icy drinks like Margaritas with small ice
crystals.

6
7
USING THE SINGLE SERVE BLENDER JAR
Note: Do not blend hot liquids in the single serve jar.
1. Place the single serve blender jar on a flat surface with the open end
facing up. Fill the jar with ingredients. Do not fill ingredients past the
Max fill line.
Note: For best results, add ingredients in the following order:
a. Liquids
b. Ice
c. Hard Foods
d. Soft Foods
e. Powders
2. Place blade assembly in the jar opening with blades down.
3. Place jar base onto jar and rotate clockwise until it is tight. It is
important to tighten to prevent leaking during blending.
4. Turn single serve jar upside down and place on the blender base.
5. Select speed 1 or use PULSE/Ice Crush to blend to desired consistency.
While blending, keep one hand holding the single serve jar.
6. Once blending has finished, remove the single serve jar by lifting off the
base. Turn the jar over and place it on a flat surface.
Note: Always make sure blades have stopped moving before removing jar.
Important: If the jar gets stuck on the blending base or begins to loosen
from the jar base, follow these steps:
a. Unplug the unit
b. Turn the jar clockwise to tighten jar onto the jar base
7. Remove the jar base from the single serve jar by turning
counterclockwise. Then carefully remove blade assembly
8. Place the single serve jar drinking lid on the single serve jar and enjoy
your delicious drinks on-the-go.
Caution: Blades are sharp. Handle carefully.
BLENDING TIPS AND TECHNIQUES
• Cut food into pieces no larger than ¾" for use in the blender.
• When preparing foods that have several different kinds of ingredients,
always add liquid ingredients first.
• When ingredients splatter onto the sides of the jar or the mixture is
very thick, press the ON/OFF button to turn appliance off. Remove the
lid and use a rubber spatula to scrape down the sides of the jar and to
redistribute the food, pushing food toward the blades. Replace the lid and
continue blending.
• When making bread crumbs or blending dry goods, make sure blending
jar and blade assembly are completely dry.

6
7
• The PULSE/ICE CRUSH function is helpful when short bursts of power
are needed, such as when preparing thick smoothies or milkshakes. Do
not use pulse for more than 10 seconds at a time. Release the PULSE/ICE
CRUSH button regularly, allow the blender to rest briefly, then continue.
• Do not run blender for longer than 1 ½ minutes at a time.
• Do not use if blender jar is chipped or cracked.
• It is helpful to begin the blending process on the lowest speed and then
increase to a higher speed, if necessary.
• To stop blending at any time, press the ON/OFF button.
• Always operate the blender with the lid on the jar.
• Do not store foods in the blending jar.
• Do not overfill the blender (the blender is more efficient with less rather
than more).
DO NOT USE BLENDER TO BLEND:
• Large pieces of frozen foods
• Tough foods such as raw turnips, sweet potatoes and potatoes
• Bones
• Hard salami, pepperoni
• Boiling liquids (cool for 5 minutes before place in blending jar)
• Egg whites
• Dough
• Meats
SPEED AND FUNCTION CHART
Function Food Type Speed Setting
1 Stir
Mix
Crumb
Prepare salad dressings.
Mix ingredients for baked goods.
Make crumbs: cookie, cereal, bread.
Blend in the single serve jar.
2 Chop
Whip
Blend
Chop fruits, vegetables.
Whip whipped cream or butter.
Blend smoothies, sauces
3 Dressings
Batters
Dips
Puree fruits and vegetables.
Blend milkshakes and malts.
Grind hard cheeses and coconut.
Pulse/Ice Crush Pulse
Ice
Pulse to desired consistency.
Crush ice to snow texture.
30 Second
Smoothie
Smoothies Preset function
Icy Drinks Margaritas
Daiquiris
Preset function

8
9
ASSEMBLING THE FOOD PROCESSOR ATTACHMENT
Important: Always make sure the base of the
appliance is unplugged and placed on a flat, level
surface before starting to assemble.
Important: For your protection this appliance
has an interlock system. The appliance will not
operate as a food processor unless the cover is
properly locked in place.
1. Lower workbowl over center shaft/workbowls'
base assembly and rotate bowl clockwise to
lock the two parts together.
2. Place either the chopping blade or the slicing/
shredding disc onto center shaft.
3. Place cover on work bowl with the latch
closest to the feed chute counter clockwise
from the latch to the right of the workbowl’s
handle. Line up the pin on the lid with the pin
on the center shaft.
4. Gently press down the lid to depress the lower
pin and rotate the cover clockwise until cover
locks into place.
5. Place workbowl onto base and twist clockwise to lock.
GENERAL TIPS FOR
USING THE FOOD PROCESSOR ATTACHMENT
• Organize processing tasks to avoid multiple cleanups of the bowl; process
dry before wet.
• Do not process foods that are so frozen or hard that the tip of a knife
cannot be inserted into the food.
• If a piece of hard food, such as a carrot, becomes wedged or stuck on
the blade, stop the appliance and unplug, then remove the blade. Gently
remove food from the blade.
• Meat and cheese should be well chilled before slicing or shredding.
• Insert a funnel into the feed chute when adding ingredients such as, oil,
flour and sugar.
• Do not use the food processor attachment to:
- Grind coffee beans, bones, grains or hard spices
- Slice or chop warm meat

8
9
TIPS FOR USING THE CHOPPING BLADE
• The chopping blade works very quickly. Watch carefully to avoid over-
processing foods.
• For best results, process foods that are about the same size.
• The appliance will be more efficient if workbowl filled no more than 1/2
to 2/3 full.
• Processing nuts or other hard foods may scratch the surface finish on the
inside of the workbowl.
• Never walk away from the appliance while it is on.
• Use hot, but never boiling liquids.
• The PULSE feature offers the best control.
TIPS FOR SLICING OR SHREDDING
• Before slicing round fruits and vegetables with the disc, cut a thin slice
from the bottom so food will be more stable. Place food cut side down in
the feed chute.
• Always remove seeds, core and pits before processing
• Select foods that are firm and not over ripe.
• When slicing thinner vegetables cut them just short of the length of the
feed chute; stand them vertically in the feed chute so they are solidly
packed and cannot turn or tilt.
• Soft and semi hard cheeses should be well chilled before shredding.
• Do not let the food accumulate too high (over 2/3 full); stop and empty
the workbowl.
WHAT SPEED TO USE
PUREE CHOP SLICE SHRED
1, 2, or 3 PULSE 1 1

10
11
CARE AND CLEANING
This product contains no user serviceable parts. Refer service to qualified
service personnel.
1. Before cleaning, turn off and unplug the appliance.
2. If using blending jar, lift the blending jar by the handle off the base.
3. Remove jar base by turning it counterclockwise until loose.
4. Remove the blade assembly.
Caution: Blades are sharp. Handle carefully.
5. Remove lid.
6. Wash removable parts by hand or in the dishwasher. Place the jar on the
bottom rack and the rest of the parts on the top rack only.
• Rinse removable parts immediately after using appliance for easier
cleaning.
• Completely disassemble blender or food processor attachment parts
before washing.
• All removable parts can be washed by hand in hot water with dish soap or
in the dishwasher, top rack only. Hand-washing of plastic parts will help to
maintain the appliance’s appearance.
• Do not use rough scouring pads or cleansers on any plastic or metal parts
to clean.
• Do not allow blade or disc to soak in water for long periods of time.
• Remember to clean the internal shaft of the chopping blade. Use a brush
to remove any residual food particles.
Important:
• Do not place the parts in boiling liquids.
• Do not immerse the base in liquid. Wipe the base with a damp cloth and
dry thoroughly.
• Remove stubborn spots by rubbing with a damp cloth and nonabrasive
cleaner.
Note: If liquids spill onto the base, wipe with a damp cloth and dry thoroughly.
Do not use rough scouring pads or cleansers on parts or finish.
TROUBLESHOOTING
Problem
Possible Cause Solution
Blender is
having difficulty
blending
Mixture is too thick or
air bubble has formed
between mixture and
blade.
Turn blender off. Use rubber spatula
to scrape down sides of jar and
redistribute, pushing food towards
blades. Add more liquid.
Blender stops/
goes into
STANDBY mode
Blending time exceeds
2.5 minutes.
Re-select appropriate speed
setting to start blender.

10
11
RECIPES
CLASSIC SMOOTHIE
4 cups apple juice
4 medium bananas, cut into 2 pieces
4 cups frozen whole strawberries
Place ingredients in blender in order shown above. Cover and blend for 15
seconds, or until smooth.
Makes 6 (1 cup) servings
Tip: Substitute orange juice for apple juice
EASY FROZEN MARGARITA
½ cup orange flavored liquor
1 cup tequila
1 (6 oz.) can frozen limeade mix
4 cups ice cubes
Place ingredients in blender with liquids first and ice last; cover. Blend on
AUTO setting ICE DRINK. Serve with lime wedges if desired.
Makes 6 servings
SIMPLE SALSA
Total Time: 5 minutes
Servings: makes 2 cups
Ingredients
2 medium fresh tomatoes, quartered
1/3 cup loosely packed cilantro
1/ 3 cup diced tomatoes and green
chilies*
1/4 small yellow onion
1 tsp. minced garlic
2 Tbsp. fresh lime juice
1/2 tsp. salt
1/2 tsp. sugar
1/ 2 jalapeño, stem and seeds removed
(optional)
Directions
1. Place the tomatoes into the food processor attachment workbowl with the chopping
blade and pulse 4 to 5 times to chop.
2. Add the remaining ingredients into the bowl with the chopped tomatoes and process
on Low (speed 1) for about 30 seconds, or until desired consistency
is reached.
3. Serve with tortilla chips.
*Look for cans of diced tomatoes with green chilies in the Mexican or International section of
the grocery store.

12
13
BLACK BEAN HUMMUS
Total Time: 5 minutes
Servings: 7
Serving Size: 1/4 cup
Ingredients
1 (15 oz) can black beans, drained and
rinsed
2 Tbsp. fresh lime juice
1/4 cup tahini
1/4 cup olive oil
1 Tbsp. minced garlic
2 tsp. cumin
1/2 tsp. chili powder
2 Tbsp. cilantro
1/2 tsp. salt
1/8 tsp. pepper
1/2 small yellow onion
Directions
1. Add all ingredients into the food processor attachment workbowl with the chopping
blade. Process on High (speed 3) for about 1 minute until the hummus is a smooth
consistency.
2. Serve with your favorite chips or crackers.
JALAPEÑO PEPPER DIP
Prep Time: 5 minutes
Total Time: 20–25 minutes
Servings: makes 3 1/2 cups
Ingredients
2 jalapeño peppers, stems and seeds
removed
16 oz. cream cheese, softened
1/2 cup sour cream
1 Tbsp. minced garlic
1/2 tsp. salt
8 slices cooked bacon, chopped
2 1/4 cups shredded pepper jack cheese,
divided
Directions
1. Preheat oven or toaster oven to 350°F.
2. In the food processor attachment workbowl with the chopping blade, place the seeded
jalapeño in and pulse 3 to 4 times to dice.
3. Put the remaining ingredients, and 1 3/4 cup of the shredded cheese into the bowl with
the diced jalapeño. Process on High for about 30 seconds to reach a smooth consistency.
4. Pour the mixture into an oven safe dish and smooth out. Top with the remaining 1/2 cup
shredded cheese.
5. Bake for 15–20 minutes until the cheese is bubbly.
6. Serve with tortilla chips or crackers.

12
13
• Lea todas las instrucciones.
• A fin de protegerse contra el riesgo de una descarga eléctrica,
no coloque la base, el cable ni el enchufe del aparato en agua ni
ningún otro líquido.
• Todo aparato eléctrico utilizado cerca de la presencia de los niños
o por ellos mismos, requiere la supervisión de un adulto.
• Apague el aparato, luego desenchúfelo del tomacorriente cuando
no esté en uso, antes de ensamblar o desensamblar las piezas y
antes de limpiar. Para desenchufar, sujete firmemente el enchufe
y hálelo fuera del tomacorriente. Nunca hale el cable para sacar el
enchufe del tomacorriente.
• Evite el contacto con las piezas móviles.
• No opere ningún aparato eléctrico que tenga el cable o el enchufe
dañado, que presente un problema de funcionamiento inadecuado
o si éste se ha caído o dañado de manera alguna. Comuníquese
con el área de Servicio al Cliente, llamando al número de teléfono
gratuito que aparece en este manual. Este aparato contiene
marcas importantes en la clavija del enchufe. Ni el enchufe
accesorio ni el enchufe conector (si el enchufe esta moldeado en
el cable) son aptos para ser reemplazados. Si se han dañado, el
aparato debe ser reemplazado.
• El uso de accesorios, incluyendo frascos de vidrio para enlatado,
no recomendados o que no sean vendidos por el fabricante puede
ocasionar un riesgo o daños a las personas.
• No utilice este aparato a la intemperie.
• No permita que el cable cuelgue del borde de la mesa o del
mostrador ni que toque superficies calientes.
• Mantenga las manos y los utensilios fuera del recipiente mientras
utiliza el aparato a fin de reducir el riesgo de lesiones personales
severas o causar daños al aparato. Una espátula puede ser
utilizada, pero solo cuando el aparato no esté funcionando.
• Las cuchillas tienen filo. Manéjelas con cuidado.
• A fin de reducir el riesgo de una lesión, nunca coloque las
cuchillas ni el disco en la base sin que la jarra licuadora, el vaso
de la licuadora personal o el recipiente de procesamiento esté
instalado correctamente.
• Para licuar, siempre opere el aparato con la tapa de doble
abertura colocada sobre la jarra licuadora.
• No licue líquidos calientes.
• El aparato se debe usar sólo para el fin previsto.
• Este aparato no está diseñado para ser usado por personas
(incluyendo los niños) con su capacidad física, psíquica o sensorial
reducida, o con falta de experiencia o sabiduria, a menos que sean
supervisadas o instruidas acerca del uso del aparato por una
persona responsable de su seguridad.
• Los niños deben ser supervisados para asegurar que no jueguen
con el aparato.
• No coloque sobre ni cerca de una hornilla de gas o eléctrica que
esté caliente ni adentro de un horno caliente.
• No opere con cuchillas que estén dañadas.
• Asegúrese de que la tapa del recipiente esté cerrada de forma
segura en su lugar antes de operar el aparato como un procesador
de alimentos.
• Este aparato está equipado con un sistema de protección. La
unidad no funcionará como procesador de alimentos a menos
que el recipiente de procesamiento esté colocado sobre la base
y la tapa del recipiente esté cerrada aseguradamente sobre el
recipiente.
• Cuando utilice el aparato como procesador de alimentos, nunca
empuje los alimentos con la mano. Siempre utilice el empujador
de alimentos.
• No intente ignorar el mecanismo de entrecierre de la tapa del
recipiente de procesamiento.
• No llene el recipiente de procesamiento por encima de la línea de
llenado que indica “maximum” (máximo) a fin de evitar el riesgo de
una lesión por daños ocasionados a la tapa o el recipiente.
• No abra la tapa del recipiente de procesamiento hasta que la
cuchilla o el disco se detenga completamente.
• Nota: Procesar alimentos bajos en humedad podría opacar el
acabado del recipiente.
ENCHUFE POLARIZADO
Este aparato cuenta con un enchufe polarizado (un contacto
es más ancho que el otro). A fin de reducir el riesgo de un
choque eléctrico, este enchufe encaja en un tomacorriente
polarizada en un solo sentido. Si el enchufe no entra en el
tomacorriente, inviértalo y si aun así no encaja, consulte con
un electricista. Por favor no trate de alterar esta medida de
seguridad.
TORNILLO DE SEGURIDAD
Advertencia: Este aparato cuenta con un tornillo de
seguridad para evitar la remoción de la cubierta exterior
del mismo. A fin de reducir el riesgo de incendio o de
choque eléctrico, por favor no trate de remover la cubierta
exterior. Este producto no contiene piezas reparables
por el consumidor. Toda reparación se debe llevar a cabo
únicamente por personal de servicio autorizado.
CABLE ÉLECTRICO
a) Un cable de alimentación corto es provisto para reducir los
riesgos de enredarse o tropezar con un cable más largo.
b) Existen cables de extensión disponibles y estos pueden ser
utilizados si se toma el cuidado debido en su uso.
c) Si se utiliza un cable de extensión:
1) La clasificación eléctrica marcada del cable de extensión
debe ser, como mínimo, igual a la clasificación eléctrica del
aparato;
2) Si el aparato es del tipo de conexión a tierra, el cable de
extensión debe ser un cable de tres alambres de conexión a
tierra; y
3) El cable debe ser acomodado de manera que no cuelgue
del mostrador o de la mesa para evitar que un niño tire del
mismo o que alguien se tropiece sin darse cuenta.
Nota: Si el cable de alimentación está dañado, por favor
llame nuestro número de Servicio para el Cliente que
aparece en estas instrucciones.
CONSERVE ESTAS INSTRUCCIONES.
Este aparato eléctrico es para uso doméstico solamente.
Por favor lea este instructivo antes de usar el producto.
INSTRUCCIONES IMPORTANTES DE SEGURIDAD
Cuando se utilizan aparatos eléctricos, siempre se deben respetar las precauciones básicas de seguridad
para reducir el riesgo de incendio, descarga eléctrica, y/o lesiones personales, incluyendo las siguientes:

14
15
CONOZCA SU
SISTEMA DE COCINA MULTIFUNCIÓN DIGITAL 5 EN 1
POWERCRUSH
El producto puede variar ligeramente del que aparece ilustrado
.
18
17
14
13
4
6
7
11
16
9
5
2
10
12
15
3
1
1. Tapa de doble abertura
(pieza no. BL1275-01)
2. Boquilla de verter
3. Ranura para ingredientes
4. Jarra licuadora
(pieza no. BL1275-02)
5. Montaje de cuchillas
(pieza no. BL1400-01)
6. Base de la jarra
(pieza no. BL1275-03)
7. Base
8. Panel de control digital
9. Guardacable (debajo de la base)
10. Tapa de viaje del vaso personal
(pieza no. BL1275-04)
11. Vaso personal (pieza no. BL1275-05)
12. Empujador de alimentos
(pieza no. BL1275-06)
13. Tubo de alimentación
14. Tapa del recipiente de
procesamiento
(pieza no. BL1275-07)
15. Disco para rebanar/rallar
(pieza no. BL1275-08)
16. Cuchilla para cortar
(pieza no. BL1275-09)
17. Recipiente de procesamiento
(pieza no. BL1275-10)
18. Vástago central/montaje de la base
del recipiente de procesamiento
(pieza no. BL1275-11)

14
15
PRIMEROS PASOS
• Retire todo material de empaque y cualquier etiqueta adherida al
producto.
• Retire y conserve la literatura.
• Por favor, visite www.prodprotect.com/blackanddecker para registrar su
garantía.
• Lave todas las piezas removibles según las instrucciones en la sección de
CUIDADO Y LIMPIEZA de este manual.
COMO USAR
Este producto es para uso doméstico solamente.
ENSAMBLAJE DE LA JARRA
1. Voltee la jarra boca abajo y colóquela de forma plana
sobre el mostrador o superficie de trabajo.
2. Coloque el montaje de cuchillas en la apertura inferior de
la jarra con las cuchillas mirando hacia abajo. (A)
Precaución: Las cuchillas tienen filo. Manéjelas con cuidado.
3. Coloque la base de la jarra sobre la jarra y gírela hacia
la derecha hasta que esté ajustada. Es importante que
la base quede ajustada para evitar goteos durante el
licuado.
4. Voltee la jarra ensamblada boca arriba.
5. Coloque la tapa de dos aperturas sobre la jarra.
6. Desenrolle el cable de alimentación del guardacable
debajo de la base de la licuadora.
7. Coloque el ensamble de la jarra sobre la base de la licuadora. (B)
8. La licuadora ya está lista para ser utilizada.
USO DE LA LICUADORA
Importante: La licuadora siempre debe tener la tapa colocada en su lugar
cuando está en uso.
Precaución: No coloque la jarra en la base cuando la licuadora está en uso.
1. Asegúrese de que el aparato esté apagado (OFF).
2. Coloque los ingredientes en la jarra. Para obtener mejores resultados,
añada los ingredientes en el orden siguiente:
a. Líquidos
b. Polvos
c. Alimentos suaves
d. Alimentos duros
e. Cubos de hielo último
Consejo: Cuando utilice frutas congeladas, no es necesario añadir hielo.
3. Coloque la tapa sobre la jarra; asegúrese de que la boquilla vertedora y la
ranura para los ingredientes estén cerradas.

16
17
4. Enchufe el cable de alimentación a un tomacorriente. Presione el
botón de encendido/apagado (ON/OFF). La luz digital debe iluminarse
de un color sólido para indicar que la licuadora está en el modo de
espera (STANDBY). Después de 2 ½ minutos, la unidad se apagará
automáticamente si no se ha presionado ningun botón.
Nota: No deje la licuadora desatendida cuando esté en uso. Cuando utilice
alimentos duros, tal como el hielo o el queso, mantenga una mano sobre la tapa
para mantener la licuadora en su lugar.
5. Seleccione la velocidad que mejor se acomoda a la tarea que desee realizar
(consulte la TABLA DE VELOCIDADES).
Importante: No mantenga presionado el botón de velocidad. Simplemente
presione la velocidad deseada, observe y presione el botón de encendido/
apagado (ON/OFF) cuando se alcanza la consistencia deseada. Mantener
el botón presionado por más de 30 segundos, causará que la licuadora se
apague. La unidad debe estar apagada para su reinicio.
6. Para licuar mezclas espesas, tal como batidos de frutas y de leche, use el
botón de pulso/triturar hielo (PULSE/Ice Crush) por varios segundos y
luego suéltelo. Repita para mezclar los ingredientes y luego haga funcionar
continuamente hasta que los alimentos alcancen la consistencia deseada. El
soltar el botón de pulso detiene el licuado y la unidad regresa al modo de
espera (STANDBY). Usted puede usar una espátula o un utensilio para mover
los ingredientes y la mezclas espesas alrededor del interiror de la jarra, pero
sólo después de haber detenido el funcionamiento de la licuadora. Apague
la licuadora antes de usar un utensilio.
7. Abra la ranura para ingredientes para añadir los
ingredientes mientras la licuadora está funcionando.
Deje caer los ingredientes a través de la apertura. (C)
Importante: No retire la tapa mientras la licuadora esté
funcionando.
8. Cuando haya terminado, presione el botón de encendido/
apagado (ON/OFF) para detener el ciclo de licuado. Asegúrese de que
las cuchillas se hayan detenido completamente antes de intentar retirar
la jarra de la base (consulte la Tabla de Resolución de Problemas si tiene
algún problema).
9. Presione el botón de encendido/apagado (ON/OFF) para apagar y
desenchufar la licuadora.
10. Para retirar la jarra, sujete firmemente el asa y álcela.
11. Abra la boquilla vertedora para servir.
Nota: La unidad se apagará después de 2 ½ minutos de Inactividad.
12. Siempre desenchufe el aparato cuando no esté en uso.

16
17
USO DE LAS FUNCIONES PREPROGRAMADAS
• Llene la jarra ensamblada con los ingredientes deseados.
• Coloque la jarra de dos aperturas sobre la jarra.
• Coloque la jarra sobre la base.
• Presione el botón preprogramado deseado. La licuadora licuará y
mezclará las siguientes recetas con solo presionar un botón:
- Batido cremosos: 30 segundos para licuar frutas y vegetales a una
consistencia suave.
- Bebidas congeladas: Perfecto para bebidas congeladas clásicas como
las Margaritas con pequeños cristales de hielo.
USO DEL VASO DE PORCIÓN INDIVIDUAL
Precaución: No licue ingredientes calientes en el vaso personal.
1. Cologe el vaso de porción individual sobre una superficie plana con el
extremo abierto mirando hacia arriba. Llene el vaso con los ingredientes.
No llene de ingredientes pasado de la línea de llenado Max.
Nota: Para mejores resultados, añada los ingredientes en el orden siguiente:
a. Líquidos
b. Hielo
c. Alimentos duros
d. Alimentos suaves
e. Polvos
2. Coloque el montaje de cuchillas en la apertura del vaso con las cuchillas
hacia abajo.
3. Coloque la base del vaso sobre el vaso y gire hacia la derecha hasta
que esté ajustada. Es importante adjustar la base para prevenir goteos
durante el licuado.
4. Voltee el vaso boca abajo y colóquelo en la base de la licuadora.
5. Seleccione la velocidad 1 ó use la función de pulso/triturar hielo
(PULSE/Ice Crush) para licuar a la consistencia deseada. Mientras licúa,
mantenga una mano sujetando el vaso personal.
6. Una vez que haya terminado el ciclo de licuado, retire el vaso alzándolo
fuera de la base. Voltee el vaso y colóquelo sobre una superficie plana.
Nota: Siempre asegúrese de que las cuchillas se hayan detenido
completamente antes de retirar el vaso.
Importante: Si el vaso se traba en la base o comienza a aflojarse de la base,
siga estos pasos:
a. Desenchufe la unidad.
b. Gire el vaso hacia la derecha para ajustarlo en la base
7. Retire la base del vaso girándolo hacia la izquierda. Luego retire
cuidadosamente el montaje de cuchillas.
8. Coloque la tapa del vaso sobre el vaso y disfrute de sus deliciosas
bebidas en el camino.
Precaución: Las cuchillas tienen filo. Manéjelas con cuidado.

18
19
CONSEJOS Y TRUCOS PARA LICUAR
• Corte los alimentos en trozos de no más de ¾ de pulgada antes de
introducirlos en la licuadora.
• A la hora de preparar alimentos con diferentes tipos de ingredientes,
vierta siempre los ingredientes líquidos en primer lugar.
• Si los ingredientes salpican en las paredes de la jarra o si la mezcla es
demasiado espesa, presione el botón de encendido/apagado (ON/OFF)
para apagar el aparato. Retire la tapa y use una espátula de plástico para
raspar las paredes de la jarra y redistribuir los alimentos empujándolos
hacia las cuchillas. Vuelva a colocar la tapa y continue licuando.
• Para hacer migas de pan o mezclar ingredientes secos, asegúrese de que
la jarra y el ensamble de cuchillas estén completamente secos.
• La función de pulso/triturar hielo (PULSE/Ice Crush) ayuda cuando
es necesario usar impulsos cortos de potencia, como cuando se está
preparando batidos espesos o licuados de leche. No use la función de
pulso por más de 10 segundos a la vez. Suelte el botón de pulso/triturar
hielo (PULSE/Ice Crush) regularmente; permita que la licuadora descanse
por un momento, luego continue su funcionamiento.
• No haga funcionar la licuadora por mas de 1
½ minutos al mismo tiempo.
• No use la licuadora si la jarra está astillada o rajada.
• Sirve de ayuda empezar el proceso de batido en la velocidad más baja y,
si fuera necesario, ir aumentado la velocidad de manera progresiva.
• Para detener el ciclo de licuado en el momento deseado, presione el
botón de encendido/apagado (ON/OFF).
• Para licuar ingredientes calientes, abra la ranura para los ingredientes.
Cubra la tapa con un paño para evitar salpicaduras y use la velocidad 1.
No licue más de 2
½ a 3 tazas a la vez.
• Siempre utilice la licuadora on la tapa colocada en la jarra.
• No almacene alimentos en la jarra.
• No llene la licuadora en exceso (la licuadora funciona más eficiente con
cantidades menores).
NO INTRODUZCA NINGUNO DE ESTOS PRODUCTOS EN LA LICUADORA:
• Pedazos grandes de alimentos congelados
• Alimentos duros como nabos, boniatos/batatas o papas
• Huesos
• Salami o chorizo curado
• Líquidos hirviendo (deje enfriar 5 minutos antes de verter en la jarra)
• Claras de huevo
• Masa
• Carnes

18
19
GUÍA DE LAS VELOCIDADES Y FUNCCIÓNES
Función Tipo de alimento Ajuste de velocidad
1 Agitar
Mezclar
Hacer Migas
Preparar aderezos para ensaladas.
Mezclar ingredientes para
alimentos horneados.
Hacer migas: galletica, cereal, pan.
Licúe en el vaso de porción
individual.
2 Picar
Batir
Licuar
Picar frutas, vegetales.
Batir crema o mantequilla.
Licuar batidos, salsas.
3 Aderezos
Mezclas
Dips
Hacer puré de frutas y vegetales.
Licuar batidos de leche y
malteadas.
Rallar quesos duros y coco.
Pulso/Triturar
Hielo
Pulso
Hielo
Presionar el botón de pulso hasta
alcanzar la consistencia deseada.
Triturar hielo a una textura de nieve.
30 segundos
Batido Cremoso
Batidos Cremosos Función preprogramada
Bebidas
Congeladas
Margaritas
Daiquirís
Función preprogramada
ENSAMBLAJE DEL ACCESORIO DE PROCESADOR
DE ALIMENTOS
Importante: Siempre asegúrese de que la base
del aparato esté desenchufada y colocada
sobre una superficie plana y nivelada antes de
ensamblarlo.
Importante: Para su protección, este aparato
está equipado con un sistema de entrecierre. El
aparato no funcionará a menos que la tapa del
recipiente de procesamiento esté asegurada
correctamente en su lugar.
1. Baje el recipiente de procesamiento sobre
el vástago central/montaje de la base
del recipiente y gire el recipiente hacia la
derecha para asegurar las dos piezas juntas.
2. Coloque la cuchilla para picar o el disco
para rebanar/rallar sobre el vástago central.
3. Coloque la tapa sobre el recipiente de
procesamiento con el cierre de traba más
cercano al tubo de alimentación hacia la
izquierda del cierre de traba situado a la derecha del asa del recipiente.
Alinee la barrita en la tapa con la barrita en el vástago central.

20
21
4. Presione suavemente hacia abajo la tapa para presionar la barrita
inferior y gire la tapa hacia la derecha hasta que la misma se asegure en
su lugar.
5. Coloque el recipiente sobre la base y gírelo hacia la derecha para cerrar
de forma segura.
CONSEJOS GENERALES PARA EL USO DEL
ACCESORIO DEL PROCESADOR DE ALIMENTOS
• Organice las tareas de procesamiento para evitar que el recipiente de
procesamiento se limpie varias veces; procese los alimentos secos antes
que los húmedos.
• No procese alimentos que estén tan congelados o duros que no se
pueda introducir la punta de un cuchillo.
• Si un pedazo de un alimento duro, tal como la zanahoria, se traba en la
cuchilla, detenga el procesador y desenchúfelo, luego retire la cuchilla.
Retire con suavidad el alimento de la cuchilla.
• La carne y el queso deben estar bien enfriados antes de rebanar o
rallarlos.
• Inserte un embudo dentro del tubo de alimentación al añadir
ingredientes tales como aceite, harina y azúcar.
• No use el accesorio del procesador de alimentos para:
- Moler granos de café, huesos, granos o especias duras
- Rebanar o picar carne caliente
CONSEJOS GENERALES PARA EL USO DE LA
CUCHILLA PARA PICAR
• La cuchilla para picar trabaja con gran rápidez. Supervise
cuidadosamente para evitar que los alimentos se procesen demasiado.
• Para mejores resultados, se recomienda procesar alimentos similares en
tamaño.
• El procesador funcionará con más eficiencia si no se llena más de ¾ a 2/3
de su capacidad.
• Procesar nueces u otros alimentos de textura dura podría rayar el
acabado de la superficie en el interior del recipiente de preparación.
• Nunca desatienda el procesador mientras está en funcionamiento.
• Puede utilizar líquidos calientes, pero que no estén hirviendo.
• La función de pulso ofrece el mejor control.
CONSEJOS PARA REBANAR/RALLAR
• Antes de rebanar frutas y vegetales en el procesador, corte una rebanada
fina de la parte inferior para que los alimentos estén más estables.
Coloque los alimentos con la parte cortada hacia abajo en el tubo de
alimentación.
• Siempre extraiga las semillas, el centro y las semillas grandes antes de
procesar.
• Escoja alimentos que sean firmes y no demasiado maduros.
/