Page is loading ...

GPS Car Dash Camera
M308 User Manual

Ⅰ.Button function description
Button diagram
1、Power 2、GPS socket 3、Mini USB port 4、Menu/Mode
5、Up 6、OK 7、Down 8、TF card slot 9、Reset
Button function introduction
1. Power
1) Power on/off
Press power button for 3 seconds to power on/off device.
2) Close the screen
Press power button once to turn off the screen, press again to open the
screen.
2. Menu/Mode
1) Menu setting
At status of suspending recording, press Menu button once to enter
“Movie Mode”.At “Movie Mode”, long press Menu button to enter
“General Setting”.

2) Lock file function
At being recording status, press Menu button once to lock current file,
this file will not be overwritten.
3) Mode function
At status of suspending recording, long press Menu button to enter into
Photo mode, then long press again enter into Playback mode.
3. Up
Up page function
At menu setting and playback mode, it is for up page function.
4. Down
1) Down page function
At menu setting and playback mode, it is for down page function.
2) Mute record
At status of power on and being recording, press Down button 1
second to turn off/on audio record function.
5. OK
1) Record/photograph
At mode of recording, press OK button once to start
recording/suspending recording. At photographing mode, press OK
button once to photograph.
2) Confirm/play/suspend
OK button is for confirming/playing/suspending function at menu
setting/playback mode.
6. Reset
If device is breakdown, press Reset button 1 second to restart device.
7. Mini USB port
Connect DV 5V power for device.
8. GPS socket
For connecting GPS antenna (optional)
9. TF card slot
Insert TF card, videos files will be stored inside.

Ⅱ.Operation guide
1.Shut down the car engine.
2.Insert the TF card into the card slot (Attention)Please use the high-speed
TF card (class 10 )and the capacity is 8G to 64G.
3.Fix the recorder in front of windshield by holder .
4.Insert the car charger into the car cigarette lighter.
5.Connect the USB interface of recorder to car charger with charger cable.
(Attention)please fix the charger cable along the car windshield when fixing
the extension wire.
6.Start the engine ,check whether the dash cam is installed correctly
(Attention)When the dash cam is installed correctly, dash cam will turn on
automatically and start to recording, the light is turn on. Pay attention to
checking the image on the screen and make sure whether it is normal.
7.In the first time use TF card,please format the TF card, and go to menu
setting,set correct date/time and save the setting.
8. Please format TF card 1 time for one to two months according to usage.
Ⅲ.Function introduction
1.Auto recording function
When engine starts, device will start and record, When engine shuts down,
device will be power off and files will be saved automatically. Files are saved
by segments, when TF card is full, early files will be overwritten.
A.The recording time can be setting in the movie mode, ranging as the
following 4 items, 0min,1 min,3mins,5mins,
B.The recorded videos and photos are saved in TF card, files name are
movie and photo separately
【Remark】time segment of recording can be set to be 1/3/5 minutes.
2.Photographing function
1)At status of suspending recording, press Menu button long time to enter
photographing function.
2)At status of suspending recording or recording mode, press OK button 1
second to take photo.

3)At photographing function, press Menu button once to enter setting of
photograph.
3.Lock file function
At status of being recording, press Menu button once to lock present file.
4.G-sensor function
The dash cam is built in G-sensor ,if a serious vehicle collision
happens,recorders will lock current video file immediately at accident, the
locked video is saved as a special file, which never can be covered. The
G-sensor sensitivity have 0-4level, or if you don’t need, you can choose OFF.
In General Setting-Protect Level setting.
【Remark】G-sensor sensitivity can be adjusted.
5.Time and date setting
Under suspending recording mode, press Menu button once to “Movie
Mode”, then long press Menu button, enter into “General Setting”, select
“Clock Settings” option, press OK button to set.
【Remark】Up and Down key is for adjusting time and date, press OK key is
for next option; to record right time and date for accident proof, please select
local correct time before using device.
6.Sound record
At status of being recording, press Down button once to turn off/on audio
record.
Or at status of suspending recording, press Menu button to enter Movie
Mode -Sound Record -ON/OFF
【Remark】Setting will be saved automatically.
7.File playback
At status of suspending recording, long press Menu button to be
photography mode, then long press Menu button to be playback interface,
look for file in need, press OK button to play it back. Press Menu button
once entry into setting of the playback (you can press OK button into video
type to enter emergency, the emergency is lock video).
At playback interface, then long press Menu button to be photo interface,
look for photos in need, press OK button to view image. Press Meun button

to setting of photograph, Finally press Menu button until to be pause
recording status.
【
Remark
】
“FILE” means normal video.
“EMER” means files locked(including parking monitoring files)
“IMG” means photos.
8.Parking monitoring(Optional)
At status of suspending recording, enter menu setting to open parking
monitoring function. Even if device is power off ,if vehicle suffers crash,
device will start and record for 8 seconds, device will be power off, this file
will not be overwritten.
9.GPS
Before GPS antenna is connected to device, screen of device will show “No
GPS”, when GPS is connected to device, GPS icon will become “00 MPH”,
when GPS icon becomes green, it means GPS orientate successfully. When
device is working, GPS database will record and save in TF card, the driving
speed, longitude and latitude, driving route can be shown on a special player
that manufacturer provides.
If you don’t need GPS function, please press Menu button then long press
Menu button, entry into General Setting, find Toggle GPS , then set it
ON/OFF.
10.LDWS and FCWS(Lane Departure Warning System and Forward
Collision Warning System)
At status of suspending recording, press Menu button entry into Movie
mode,find LDWS and FCWS function, then press OK button to turn on/off.
11.Language
Press Menu button, then long press Menu button again,entry into General
Setting, select your need language via UP/Down button, then press OK
button to save it, currently have eight languages available, if you want other
language, message to us, we will help you.
12.Movie off time
You can setting Movie off time in the Movie Mode, press Menu button
entry into Movie mode, ranging as the following 5items,

0min,5sec,30sec,1min,3,min.
13.Back to factory default setting
If you want to restore the factory settings, please press Menu button then
long press Menu button, find Reset Setup in General setting,then press
OK button to reset.
Ⅳ.Specification
Chipset
Mstar_8328P
Imaging sensor
AR0238 Night Vision Sensor
Aperture
F 1.8
Viewing angle
170 degree
GPS tracker
Support
Speed information
Support
Video solution
FHD 1080P
Format compression format
H.264
Video format
MOV
Photo resolution
4032×3024
Photo format
JPG
Frame rate
30FPS
Storage temperature
-10
℃
~70
℃
Operation temperature
-5
℃
~60
℃
Operation humidity
15-65%RH
TF card capacity
8B~64GB Class 10
Working current
1500Mah(Suggest use original charger)
Power
Mini USB 5V
Screen Size
3 inch IPS Screen
Number of lenses
6 lens
Build-in battery
350Mah
Tips * Specific parameters are just for reference,please use real
product as standard.

Ⅴ.Q&A
If have problems when using,please try these methods
below:
Q:How many capacity memory cards are supported?
A:Its maximum supported memory card capacity is 64G, and the dash cam
only supported class 10 memory card.
Q:I opened the loop recording, but the memory card is still full.
A:Because the dash cam locks important files without being overwritten, you
need to remove the memory card and format the memory card with your
computer.
Q:How to see my driving route
A:You need to download GVPlayer on your computer and then use your
computer to read the video information from the memory card(There are
detailed operations below).
Q:Can I see my speed on the dash cam?
A:You can see your current speed in the lower right corner of the dash cam
screen being recorded.
Q:Can’t take photo and recording
A:Check if the TF card has enough space or locked
Q:Automatically stop when recording
A:Use the high quality high-speed TF card with SDHC because of big FHD
video data, only suggest use Class 10 TF card
Q:Unclear video
A:Checks if there are any dirt or fingerprint,please use lens paper to clear
the camera lens.
Q:Cross stripe interference in image
A:Because of wrong “light frequency”, please set it to 50Hz or 60Hz
according to the local power supply frequency. When stop recording, press
Menu button then long press Menu button, find Flicker in General Settings,
then press OK to change the frequency.
Q:Crash
A:Restart by pressing shortly on “RESET” button after crash.

Q:My dash camera GPS can't work
A:Please make sure your connect with original GPS antenna tightly, and in
outside road because the GPS antenna can't find satellites successfully if at
enclosed environment.
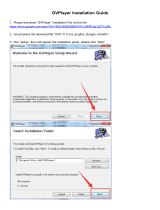
Ⅵ.GVPlayer Installation Guide
1.Please download “GVPlayer” Installation File via the link
https://drive.google.com/open?id=1vsezW3bVJLQo9QzPOJdL7Ir8VsjmYC
W_
2.Uncompress the the download file:
“GVP V1.0.2.6_English_Google_OneWin”
3.Run “setup”, then will appear the installation guide, please click “Next”


4.After Installation incomplete, please click “Close” to finish installation.
5.Please go to your “Installation Folder”(Such as C:\Program Files
(x86)\GVPlayer\), find and run “GVP” software
6.Please open video file, then can playback the recorded videos

Ⅶ.Installation Display
Tips: There are 2 positions to put GPS Antenna, please put it at your want.

Ⅷ.After Services
You also can download our this User Manual of PDF from our amazon page.
Please fell free to contract with us if still have any questions/problems, we
will help you solve all in 24 hours normally.
Our email is e-ace.china@hotmail.com
Please don't return it back to Amazon without contract with us, thanks very
much ahead.
/