Page is loading ...

Uts B
Mod MPU 13
IMPORTANT!
We are committed to the highest quality in the manufacture of this RACK IT UP! pot rack. The components of
each rack are carefully inspected before shipment.
However, in case there is a problem, PLEASE LET US HELP YOU FIRST. Do not return the item to where you
purchased it. First, call us and explain what is missing or wrong. We will do our best to help with any question
or problem you have—and as fast as possible.
Call us TOLL FREE 1 (877) 362-5863 and ask for customer service. Thank you!
TOOLS NEEDED - We provide all tools required for assembly: hex wrench, fastener hardware (nuts, bolts).
Note under attaching instructions on page 3 of this booklet, the list of tools you will need to provide.
RACK IT UP! 5-Year Limited Warranty
This product is warranted to be free of material defects for a period of five years from the date of purchase. Your exclusive
remedy is the repair or replacement of the defective product, and shall be subject to the following conditions: (1) You send
a notice of any defect to Enclume within the warranty period, and (2) You return the defective product, to Enclume
Design Products, Inc., 24 Colwell Street, Port Hadlock, WA 98339, postage prepaid, within 20 days following receiving a
return authorization number. (A return authorization number may be obtained from Enclume by calling the number at the
bottom of this booklet.) There are no other warranties expressed or implied. There are no warranties of merchantability or
fitness for a particular purpose. Enclume specifically disclaims any and all incidental or consequential damages arising out
of purchase, installation or use of this product.
RACK IT UP! ™ is a trademark of Enclume Design Products.
All rights reserved. Made in China. Packed in the U.S.A.

How To Attach Utensil Bar to Wall
Item No.
Qty.
33 Utensil Bar 1
Installation Hardware
19C Button head screw - 2” 2
25A Pot hook straight 4
25B Pot hook angled 4
26A Hex wrench 1
27A Toggle 2
30A Wood Screws 2
MISSING A PART?
Please call our TOLL FREE
SERVICE CENTER
1 (877) 362-5863
TIP!
FIRST, REMOVE PAINT FROM BOLT HOLES. Because the powder coat finish applied at the
factory also adheres to the inside of bolt holes, pushing a bolt through it during assembly may be difficult.
Therefore, before connecting parts, we recommend that you check to see that bolts slip easily through all
holes. If they do not, carefully clear paint from holes in side bars, ends and arms using a small knife.
SECOND, be certain that barrel nuts and bolts screw together easily BEFORE beginning assembly. Resi-
due from the black finish may cause some bolts to stick a bit, therefore use the two hex wrenches enclosed
(one for each end of the barrel) and screw them together to clear away extra paint.
TIP! SAVE TIME AND HASSLE.
PLEASE READ ENTIRE INSTRUCTIONS
BEFORE BEGINNING ASSEMBLY.

Paintable:
Want a different color? The finish on this pot rack can be spray painted any color. We recommend Rustoleum
“Hammered” colors for their metal-like finishes, however any quality spray-can paint may be used. See a paint retailer for
guidance.
Tools Needed:
Provided: Installation wall anchors, bolts and hex wrench.
You will need: level, tape measure, pencil, drill and 1/8” drill bit, hammer and nail
STEP 1: Location
Decide where you want to place your utensil bar. Consider the height of the wall where the bar will hang, keeping in mind
how far below the bar your pot and utensils will hang.
On the wall (use a level to ensure that the bar is horizontal) mark the two points where the bar will attach. Then tap a
small nail through each mark to be certain a stud is not in the way. (NOTE: because your utensil bar includes toggle an-
chors that can hold 100s of pounds, you DO NOT need to locate and bolt to studs.)
STEP 2: INSTALL DRYWALL ANCHORS
RACK IT UP!’s drywall togglers eliminate the need to bolt your pot rack to a stud. The steel anchors are very strong and
when installed in drywall each drywall anchor holds about 50 lbs. Two anchors hold about 100 lbs., many times the weight
you will likely hang from your pot rack.
See Back of this Booklet for Toggle Instructions.
INSTALL IN WOOD
If you need to install one or both sides of your rack in wood, use as the two wall screws (30A) included. See back page of
booklet under Step 1.
CLEANING
Your bar has a durable powder coat finish designed to provide years of protection. Cleaning is done easily using soap and
a damp cloth. Dry thoroughly after cleaning.
______________________________________
ACCESSORIES
RACK IT UP ™ is a trademark of Enclume Design Products. All rights reserved. Made in China. Packed in the U.S.A.
.
RACK IT UP
24 Colwell Street, Port Hadlock WA 98339
TOLL FREE (877) 362-5863
8 Pot Hooks
There’s always a need for extra
hooks. Set of eight hooks
(4 straight, 4 angle). Steel
with powder coat finish for
extra durability.

IMPORTANT! If your house is older (maybe a Victorian?) with lath board plaster ceilings and walls, DO NOT use the new dry-
wall anchor system. Old lath board plaster walls are not strong enough to hold drywall anchors. In this case, you must attach
the wall rack to wood studs with wood lag screws (not included with your rack).
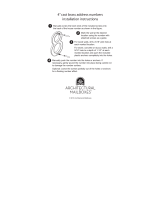
1) Using an electric drill with ½” bit, drill a hole at each of your
marked points . Hold metal channel flat alongside plastic
straps and slide channel through hold. Minimum clearance
behind wall should be 1 ⅞”.
NOTE: If a wood stud happens to be located at one or both of
those points, we recommend that you use 3/16” x 1 1/2” wood
Screws to attach to the stud. (Pre-drill a 1/8” hole in the
stud so the screws are easier to insert into the hole.)
2) Hold ends of straps between thumb and forefinger and pull
toward you until channel rests flush behind wall. Slide
Plastic cap along straps with other hand until flange of cap
is flush with the wall
.
3) Bend straps at wall by pushing side to side, snapping
off straps level with flange of cap.
4) Repeat for other anchor point.
5) Now position Utensil Bar on the wall lining up holes with
holes In wall. With your fingers, screw button head bolt
(19C) through each hole and into anchor until nearly to wall.
Then with hex wrench provided, tighten both bolts snugly.
Toggler ® Independent Lab Results
(anchor load before failure per attachment point)
TENSILE SHEAR
½” drywall – 265 lbs. ½” drywall – 241 lbs.
5/8” drywall – 356 lbs. 5/8” drywall – 324 lbs.
Industry safety standards recommend ¼ of ultimate test load.
That’s It! You are now ready to hang hooks, pots and utensils!
U.S. Patent no. 6, 161,999 and foreign counterparts thereof and of 4, 650, 386.Other patents pending. TOGGLER and SNAPTOOGLE
are worldwide registered trademarks of Mechanical plastics Corp
TOGGLER® brand SNAPTOGGLE® Toggle Bolt Installation Instructions
Installation of Drywall Anchors
/