Precision Balances
XS-X Ex2 models
Operating Instructions


Table of Contents
1 Introduction 9
1.1 Conventions and symbols used in these operating instructions 9
2 Safety Information 10
2.1 Definition of signal warnings and symbols 10
2.2 Product specific safety notes 10
3 Design and Function 13
3.1 Overview 13
3.1.1 S weighing platform with SmartPan 13
3.1.2 S weighing platform 14
3.1.3 L weighing platform 15
3.1.4 Terminal 16
3.2 User interface 17
3.2.1 Display 17
3.2.2 Input dialog boxes 18
3.2.3 Firmware 19
3.2.3.1 System settings 19
3.2.3.2 Applications 19
3.2.4 Security system 20
4 Installation and Putting into Operation 22
4.1 Unpacking 22
4.1.1 Unpacking the draft shield Pro (model dependent) 22
4.2 Scope of delivery 23
4.3 Location 24
4.4 Assembling the balance 24
4.4.1 Installing the draft shield and weighing pan 24
4.4.2 Placing the terminal on the L weighing platform 26
4.4.3 Installation of the AC adapter PSX2 28
4.4.3.1 Installation in the Ex hazardous area (zone 2) 28
4.4.3.2 Installation outside the Ex hazardous area 28
4.4.3.3 Connection to the balance 29
4.4.3.4 Dismantling 30
4.4.4 Marking the balance and the AC adapter 30
4.5 Setting up the balance 31
4.5.1 Weighing for the first time 31
4.5.1.1 Switching on the balance 31
4.5.1.2 Leveling the balance 31
4.5.1.3 Performing a simple weighing 31
4.6 Transporting the balance 32
4.6.1 Transport over short distances 32
4.6.2 Transport over long distances 33
5 Connection of Peripheral Devices and System Integration 34
5.1 Usage of data interface "RS232" in the Ex hazardous area (zone 2) 34
5.1.1 The peripheral device «P» is located inside the Ex hazardous area 34
5.1.2 The peripheral device «P» (e.g. PC or printer) is located outside the Ex hazardous
area 35
5.2 Usage of the optional data interface "Bluetooth" in the Ex hazardous area 35
5.2.1 The peripheral device «P» is located inside the Ex hazardous area 35
5.2.2 The peripheral device «P» (e.g. printer) is located outside the Ex hazardous area 36
6 System Settings 37
6.1 Adjustment/Test 39
6.1.1 Test/Adjustment - weight settings 41
Table of Contents 3Precision Balances

6.1.2 Test sequences 41
6.1.2.1 Method 43
6.1.2.2 Action if failure 49
6.1.3 Tasks 50
6.1.3.1 Assigning a test sequence to a task 51
6.1.4 FACT/int. Adjustment 51
6.1.4.1 Definition of parameters for FACT_XS 52
6.1.5 Test history 53
6.1.6 Protocol – Definition of adjustment and test reports 54
6.2 Weighing parameters 54
6.2.1 Weighing mode 54
6.2.2 Ambient conditions 55
6.2.3 Measured value release 55
6.2.4 AutoZero 55
6.3 Language 56
6.4 Peripherals 56
6.5 Option 58
6.6 Terminal 59
6.6.1 Brightness 59
6.6.2 Contrast 59
6.6.3 Beep 59
6.6.4 Touch function 60
6.6.5 Touch adjustment 60
6.7 Date/Time 60
6.8 Rights 61
6.9 Standby 62
6.10 Switch 62
6.11 Factory 62
6.12 Info 63
7 Weighing Application 64
7.1 Weighing application settings 64
7.1.1 Selecting function keys 66
7.1.1.1 Function key overview 66
7.1.2 Selecting information fields 67
7.1.3 Specifications for automatic protocol printout 68
7.1.4 Selecting weighing units 68
7.1.5 Defining free weighing units 69
7.1.6 Protocol definition 70
7.1.7 Specifications for manual protocol printout 72
7.1.8 Output data formatting (transfer key) 72
7.1.8.1 Output format 73
7.1.8.2 Data output to the printer 74
7.1.9 Definition of identifications 75
7.1.10 Instructions for processing barcode data 75
7.1.11 Instructions for processing keyboard entries 76
7.1.12 MinWeigh function settings 76
7.2 Working with the weighing application 77
7.2.1 Changing the weighing result resolution 77
7.2.2 Working with the lot counter 77
7.2.3 Working with identifications 78
7.2.4 Working with the "MinWeigh" function 79
7.3 Balance adjustment and testing 80
7.3.1 Adjustment 81
7.3.1.1 Fully automatic adjustment FACT 81
7.3.1.2 Adjustment with internal weight 81
7.3.1.3 Adjustment with external test weight 81
7.3.2 Testing 82
Table of Contents4 Precision Balances

7.3.2.1 Testing the adjustment with internal weight 82
7.3.2.2 Testing the adjustment with external test weight 82
7.3.3 Protocols 83
7.3.3.1 Adjustment and test records (sample records) 83
7.4 Working with the test sequence function 85
7.4.1 Starting a task 85
7.4.1.1 EC - eccentric load test 86
7.4.1.2 RP1 - repeatability test 86
7.4.1.3 RPT1 - repeatability test with tare weight 87
7.4.1.4 SE1 - sensitivity test with one weight 87
7.4.1.5 SE2 - sensitivity test with two weights 87
7.4.1.6 SERVICE - reminder 88
7.4.1.7 SET1 - sensitivity test with tare and one test weight 88
7.4.1.8 SET2 - sensitivity test with tare and two test weights 88
8 Statistics Application 90
8.1 Settings for the Statistics application 90
8.1.1 Specific function keys for using statistics 90
8.1.2 Specific information fields for statistics 91
8.1.3 Specific protocol information for statistics 92
8.1.4 Enable additive mode 94
8.2 Working with the Statistics application 95
8.2.1 Capturing statistics from a weighing series 95
8.2.2 Weighing out to a nominal value 97
8.2.3 Example protocol with statistical values 98
8.2.4 Formulas used for the calculation of statistical values 99
9 Formulation Application 101
9.1 Formulation application settings 101
9.1.1 Specific formulation function keys 101
9.1.2 Specific formulation information fields 102
9.1.3 Specific formulation protocol information 103
9.1.4 Specific formulation identifications 104
9.2 Working with the formulation application 105
9.2.1 Initial settings 105
9.2.2 Formulation 106
9.2.3 Sample protocol of a formulation 107
10 Density Application 109
10.1 Density application settings 109
10.1.1 Selecting the density determination method 110
10.1.2 Selecting an auxiliary liquid 110
10.1.3 Activation or deactivation of statistics 110
10.1.4 Specifications for calculation and result display 111
10.1.5 Specific function keys for density determination 111
10.1.6 Specific information fields for density determination 112
10.1.7 Specific protocol information for density determination 113
10.2 Working with the density application 114
10.2.1 Determination of the density of non-porous solids 115
10.2.2 Determination of the density of liquids using a sinker 116
10.2.3 Determination of the density of pasty substances using a gamma sphere 117
10.2.4 Example protocol of a density determination 118
10.3 Using density statistics 119
10.4 Formulae used to calculate density 121
10.4.1 Formulae for determining the density of solids 121
10.4.2 Formulae for determining the density of liquids and pasty substances 121
10.5 Density table for distilled water 122
10.6 Density table for ethanol 122
Table of Contents 5Precision Balances

11 Percent Weighing Application 123
11.1 Settings for percent weighing application 123
11.1.1 Specific function key for percent weighing 123
11.1.2 Specific information fields for percent weighing 124
11.1.3 Additional unit for percent weighing 125
11.1.4 Specific protocol information for percent weighing 125
11.2 Working with the percent weighing application 126
11.2.1 Simple percent weighing 126
11.2.2 Percent weighing to a nominal weight 127
11.2.3 Sample protocol of a percent weighing 128
12 Piece Counting Application 129
12.1 Piece counting application settings 129
12.1.1 Defining the fixed reference unit quantity 129
12.1.2 Specific function keys for piece counting 130
12.1.3 Specific information fields for piece counting 131
12.1.4 Additional unit for piece counting 132
12.1.5 Specific protocol data for piece counting 132
12.2 Working with the Piece Counting application 134
12.2.1 Simple piece counting 134
12.2.2 Totalizing and acquiring statistics from piece counts 135
12.2.3 Counting to a nominal value 137
12.2.4 Example protocol of a piece count with statistical values 138
13 Dynamic Weighing Application 140
13.1 Dynamic weighing application settings 140
13.1.1 Specific function keys for dynamic weighing 141
13.1.2 Adapting the application to the dynamic behavior of the weighing material 141
13.1.3 Settings for the start of weighing 142
13.1.4 Settings for the beep at the end of the measurement cycle 142
13.1.5 Settings for the automatic tare function 143
13.1.6 Specific information fields for dynamic weighing 143
13.1.7 Specific protocol data for dynamic weighing 144
13.1.8 Automatic or manual reporting of individual values 145
13.1.9 Selecting the destination for the output data 146
13.1.10 Formatting the output data 146
13.1.11 Activate or deactivate statistics 148
13.2 Working with the Dynamic weighing application 149
13.2.1 Dynamic weighing with automatic start 149
13.2.2 Dynamic weighing with manual start 150
13.2.3 Capturing statistics of dynamic weighing 151
13.2.4 Example protocol of a dynamic weighing 151
14 Maintenance 153
14.1 Cleaning 153
14.2 Cleaning the draft shield (1mg models) 154
14.3 Disposal 154
14.4 Firmware (Software) Updates 154
14.4.1 How it Works 155
14.4.2 Update Procedure 155
15 Troubleshooting 156
15.1 Error messages 156
15.2 Status messages/Status icons 156
15.3 What to do if....? 157
16 Technical Data 158
16.1 General data 158
16.2 Model-specif data of the XS-X Ex2 precision balances 160
Table of Contents6 Precision Balances

16.2.1 Balances with readability of 0.1 mg, S platform with draft shield 160
16.2.2 Balances with readability of 1 mg, S platform with draft shield and SmartPan 161
16.2.3 Balances with readability of 0.1 mg, S platform with SmartPan 162
16.2.4 Balances with readability of 10 mg, S platform with SmartPan 163
16.2.5 Balances with readability of 1 mg / 5 mg, L platform 164
16.2.6 Balances with readability of 0.1 g, S / L platform 165
16.3 Dimensions 166
16.3.1 Balances with readability of 0.1 mg, S platform with draft shield 166
16.3.2 Balances with readability of 1 mg, S platform with draft shield and SmartPan 167
16.3.3 Balances with readability of 10 mg, S platform with SmartPan 168
16.3.4 Balances with readability of 0.1 g, S platform 169
16.3.5 Balances with readability of 1 mg / 5 mg, L platform 170
16.3.6 Balances with readability of 0.1 g, L platform 171
16.4 Interfaces 172
16.4.1 Specifications of RS232C 172
17 Accessories and Spare Parts 173
17.1 Accessories 173
17.2 Spare parts 177
18 Power supply PSX2 180
19 Balances XS-Ex2 182
20 Certificate of the Issuing Institution 185
20.1 Power supply PSX2 186
20.2 Balances XS-Ex2 188
21 Appendix 191
21.1 MT-SICS interface commands and functions 191
21.2 Procedure for certified balances 191
21.3 Recommended printer settings 192
Glossary 194
Index 196
Table of Contents 7Precision Balances


Introduction 9Precision Balances
1 Introduction
Thank you for choosing a METTLER TOLEDO balance.
The balances offers numerous weighing and adjustment options with exceptional operating convenience.
The different models have different characteristics regarding equipment and performance. Special notes in
the text indicate where this makes a difference to operation.
METTLER TOLEDO is a leading manufacturer of balances for laboratory and production use as well as
analytical measuring instruments. A globally present customer service network with highly trained personnel
is always available to assist with the selection of accessories or provide advice on the optimal use of the
balance.
The balance conforms to current standards and directives. It supports requirements, work techniques and
protocols as specified by all international quality assurance systems, e.g. GLP (Good Laboratory Practice),
GMP (Good Manufacturing Practice). The balance has a CE Declaration of Conformity and METTLER
TOLEDO, as the manufacturer, is certified to ISO 9001 and ISO 14001. This provides the assurance that
your capital investment is protected in the long term by high product quality and a comprehensive service
package (repairs, maintenance, servicing, adjustment service).
Finding more information
u www.mt.com/xs-ex-balances
Software version
These operating instructions refer to the originally installed firmware (software) version V 5.40.
1.1 Conventions and symbols used in these operating instructions
Key and button designations are shown in graphic or text form in square brackets (e.g. [
] or
[Define].
These symbols indicate an instruction:
§ prerequisites
1 steps
2 ...
ð results
This symbol indicates press key briefly (less than 1.5 s).
This symbol indicates press and hold key down (longer than 1.5 s).

Safety Information10 Precision Balances
2 Safety Information
2.1 Definition of signal warnings and symbols
Safety notes are indicated by signal words and warning symbols and contain warnings and information
about safety issues. Ignoring safety notes can lead to personal injury, damage to the instrument,
malfunctions and erroneous results.
Signal words
WARNING
for a hazardous situation with medium risk, possibly resulting in severe
injuries or death if not avoided.
CAUTION
for a hazardous situation with low risk, resulting in damage to the device
or the property or in loss of data or minor or medium injuries if not
avoided.
Attention
(no symbol)
for important information about the product.
Note
(no symbol)
for useful information about the product.
Warning symbols
General hazard Electrical shock
2.2 Product specific safety notes
Approved for use in zone 2 hazardous areas
The AC adapter PSX2 supplies the power to the XS-X Ex2 precision balances for their
intended use in the Ex hazardous area classified as zone 2. In this zone, ignitable concen-
trations of flammable gases, vapors or liquids are not likely to occur in normal operation,
and if they do occur, will exist for only a short period. The AC adapter can be installed
inside or outside the Ex hazardous area.
Use in zone 1 and 0 is not permitted.
General safety information
Your instrument corresponds to the state of the art technology and complies with all recognized safety rules,
however, certain hazards may arise in extraneous circumstances. Do not open the housing of the
instrument: It does not contain any parts which can be maintained, repaired or replaced by the user. If you
ever have problems with your instrument, contact your authorized METTLER TOLEDO dealer or service
representative.
Always operate and use your instrument only in accordance with the instructions contained in this manual.
The instructions for setting up your new instrument must be strictly observed.
If the instrument is not used according to these Operating Instructions, protection of the instrument
may be impaired and METTLER TOLEDO assumes no liability.
Staff safety
In order to use the instrument, you must have read and understood the operating instructions. Keep the
operating instructions for further reference.
Never make any modifications to the instrument and use only original spare parts and optional equipment
from METTLER TOLEDO.

Safety Information 11Precision Balances
Safety notes
WARNING
Risk of electric shock
Use only the AC adapter PSX2 delivered with your balance, and check that the voltage
printed on its the same as your local power supply voltage.
WARNING
Heavy object
– Single person lift could cause injury.
– Do not move or lift this equipment without assistance.
CAUTION
Damage of device
– For use only in dry interior rooms.
– Do not use sharply pointed objects to operate the keyboard! Although your balance is
very ruggedly constructed, it is nevertheless a precision instrument. Treat it with
corresponding care.
Safety instructions regarding installation and operation in the Ex hazardous area, zone 2
CAUTION
Safety instructions
– The installation may be performed only by a qualified electrician as described in this
installation information.
– Check whether special clothing or special tools are needed for work in the hazardous
area of the end-user and then wear or use these if required.
– Find out whether the use of certain electronic devices (cell phones, computers, etc.) is
prohibited in the hazardous area of the end-user, and then follow these regulations.
– Establishing and separating the connections to the power supply are exclusively the
task of the electrician(s) of the end user.
– Any modifications to the balance and AC adapter, as well as repairs to the assemblies,
are prohibited. These actions endanger the safety of the system, result in loss of the Ex
Approval, and nullify any warranty and product liability claims.
– Service work and repairs may be performed only by personnel authorized by METTLER
TOLEDO.
– The classification as zone 2 must be confirmed by the regulatory body of your
profession.
– Check that the balance and AC adapter are in perfect condition before putting into
operation for the first time and at least every 3 years.
– It is important to observe the European Directive on Equipment Intended for Use in
Potentially Explosive Atmospheres (94/9/CE)!
– Only accessories which are explicitly mentioned in this document may be used, and
they must be installed and operated as described here.
– Installation work on the balance must be carried out outside the hazardous area.

Safety Information12 Precision Balances
Safety measures during operation in the Ex hazardous area, zone 2
CAUTION
Damage of device
– AC adapter and balance may be operated only when the housing is closed.
– The instrument must only be cleaned with a damp cloth.
Note
– According to Directive 94/9/EU (ATEX 95), XS-X Ex2 precision balances and the AC
adapter PSX2 are Group II, Category 3G devices that, according to Directive 99/92/EU
(ATEX 137), can be used in zone 2, as well as in Gas Groups IIA, IIB and IIC, which are
potentially ignitable by combustible substances in the range of Temperature Classes T1 to
T5.
– For use/installation, the requirements of EN 60079-14 must be observed.
Special conditions X for the AC adapter PSX2
CAUTION
Damage of device
– The power supply cable of the METTLER TOLEDO Type AC adapter PSX2 must be
installed with protection against mechanical damage.
– Only the special plug-connector of the output circuit may be plugged into, or unplugged
from, a power-consuming device such as a balance while it is under voltage.
– The internal inductance (including the connecting cable) of any power-consuming
device connected to the AC adapter must not exceed ≤ 30 µH, and its internal capacity
must not exceed ≤ 4.9 µF.
Special condition X for the balance
CAUTION
Damage of device
– XS-X Ex2 precision balances can only be used in closed and clean interior spaces.
– The instrument must only be cleaned using a damp cloth.
Technical data of the precision balances in the XS-X Ex2 line and the AC adapter PSX2.
See Technical Data [}158].

Design and Function 13Precision Balances
3 Design and Function
3.1 Overview
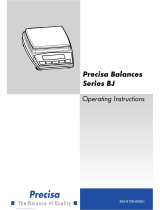
3.1.1 S weighing platform with SmartPan
1
2
3
4
11
10
9
10
13
13
9
12
5
11
5
7
7
6
8
6
10
9
1
Terminal
2
Display "Touch screen"
3
Operating keys
4
Type designation
5
Level indicator/Level sensor
6
Handle for operation of the draft-shield door
7
SmartPan and weighing pan for 1mg
models
8
Glass draft shield
9
Safety feet
10
Foot screws
11
SmartPan and standard weighing pan for
10mg models
12
Drip tray for 10mg models
13
SmartPan and standard weighing pan for
0.1mg models

Design and Function14 Precision Balances
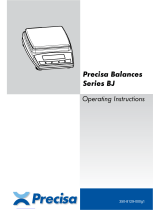
3.1.2 S weighing platform
1
2
3
4
12
5
10
11
5
6
7
8
9
8
11
10
1
Terminal
2
Display “Touch screen”
3
Operating keys
4
Type designation
5
Level indicator
6
Draft shield element
7
Weighing pan for 0.1mg models
8
Handle for operation of the draft-shield door
9
Glass draft shield
10
Safety feet
11
Foot screws
12
Weighing pan for 0.1g models
Rear to the S weighing platform
65421 3 7
1
Slot for second interface (optional)
2
Socket for AC adapter
3
Fastening for auxiliary display stand or
terminal stand (optional)
4
Aux 1 (connection for "ErgoSens", hand- or
foot-switch)
5
Aux 2 (connection for "ErgoSens", hand- or
foot-switch)
6
RS232C serial interface
7
Fastening point for anti-theft device

Design and Function 15Precision Balances
3.1.3 L weighing platform
8
1
2
4
5
5
9
67
6
3
10
10
11
12
13
15
14
17
1618
19
1
Terminal
2
Display “Touch screen”
3
Operating keys
4
Type designation
5
Weighing pan
6
Foot screws
7
Cover
8
Fastening point for anti-theft device
9
Draft shield
10
Points of attachment for terminal or cover
11
Fastening for terminal stand (optional)
12
Level indicator
13
Aux 1 (connection for “ErgoSens”, hand- or
foot-switch)
14
Aux 2 (connection for “ErgoSens”, hand- or
foot-switch)
15
RS232C serial interface
16
Socket for AC adapter
17
Connector for terminal cable
18
Slot for second interface (optional)
19
Cover plate for below-the-balance weighing
(hook optional)

Design and Function16 Precision Balances
3.1.4 Terminal
Key assignments and terminal connection.
5
4
7
6
1
2
3
3
1: Front view
Designation Explanation
1
Configuration For displaying menus for the configuration of a current application.
The application can be adjusted to a specific task via numerous
settings.
2
Print This key is used to transfer data via the interface, e.g. to a printer.
Other devices, e.g. a PC can also be connected. The data to be
transferred can be freely defined.
3
Zeroing This key is used for setting a new zero point manually (only
required if the balance is used for normal weighings).
4
Tare This key is used to tare the balance manually (only necessary for
normal weighings). When the balance has been tared, the Net
symbol is displayed to indicate that all displayed weights are net.
5
On/Off For switching the balance on and off (standby mode).
Note
It is recommended not to disconnect the balance from the power
supply unless it is not going to be used for an extended period.
6
Select
application/System
This key is used to select a required application.
7
Home This key takes you directly from any menu level back to the active
application.

Design and Function 17Precision Balances
1
1
2
1
Levers
2
System connection (terminal cable)
3.2 User interface
3.2.1 Display
The illuminated display of the terminal is a touch screen, i.e. a touch-sensitive screen. It can be used for
displaying data, entering settings and selecting functions by tapping the screen.
Note
Depending on country-specific requirements, non-calibrated decimal places are highlighted on approved
balances.
CAUTION
Do not touch the touch screen with pointed or sharp objects!
This may damage the touch screen.
5
6
7
4
3
1
2
8
Note
The factory setting of the balance displays the weighing result at a large size, without SmartTrac and
information fields.
Designation Explanation
1
Application name Select application.
The application menu can be selected by tapping this zone. This menu can
also be displayed by pressing [
].
2
Date The date can be changed by tapping this zone.

Design and Function18 Precision Balances
3
Status icons These status icons indicate special balance statuses (e.g. service due,
adjustment required, battery replacement, out of level).
If you tap the icon, the function is explained.
4
Weight value Tapping the weight displays a window showing the result in a large format.
This is useful for reading a weight from a certain distance.
5
Weighing unit The required weighing unit can be changed by tapping the weighing unit, e.g.
from mg to g.
6
SmartTrac SmartTrac is a graphic weighing-in aid, which shows at a glance an already
used and still available weighing range.
7
Function keys
This area is reserved for Function Keys enabling direct access to frequently
required functions and application settings. If more than 5 function keys are
activated, these can be selected with the arrow keys.
8
Information fields
This area is used for displaying additional information (information fields)
relating to an active application.
Large display
By pressing the function key [Display], the weighing result can be displayed larger and still allow the use of
the terminal function keys.
Screen saver
If the balance is not used for 15 minutes, the display is automatically dimmed and the pixels are inverted
about every 15 seconds. When the balance is used again (e.g. load weight, press key), the display returns
to a normal state.
3.2.2 Input dialog boxes
The keyboard dialog box is used to enter characters such as letters, numbers and special characters.
1
2
3
Designation Explanation
1
Data field Displays (entered) alphanumeric and numeric characters.
2
Keyboard Data input area
3
Selection Select various keyboard layouts.

Design and Function 19Precision Balances
1 Enter the designation.
2 Confirm with [OK].
Function
Delete last character
Tap once to place the cursor at the end of the data field.
3.2.3 Firmware
The firmware controls all balance functions. It enables the balance to be adjusted to a specific working
environment.
The firmware is divided as follows:
• System settings
• Applications
• Application-specific settings
Note
A displayed menu can be left at any time by repressing the same menu key.
3.2.3.1 System settings
System settings (e.g. settings for peripheral devices) are independent of the applications and apply to the
entire weighing system.
Navigation: [
] > [System]
1
2
3
Designation Explanation
1
Title bar The title bar displays elements for user orientation and information.
2
Contents area The contents area is the main work area for menus and applications. The
contents depend on the specific application or initiated action.
3
Action bar The action bar contains action buttons for performing specific actions required
in the active dialog box and are available (e.g. [Exit], [STD], [C], [OK]).
1 Settings can be changed by tapping the respective button.
2 To leave the settings, tap [Exit].
3.2.3.2 Applications
Applications are firmware modules for performing specific weighing tasks. The balance is delivered with
various applications pre-installed. After switching on the balance, the last used application are loaded. The
applications are available under the [
] key. Instructions for working with standard applications are
provided in the respective sections.

Design and Function20 Precision Balances
Navigation: [
]
1
2
3
Application-specific settings
These settings can be used to adjust the applications. The available setting options depend on the selected
application. Pressing [
] opens the multipage menu with settings for a currently active application.
Information on the individual setting options is provided in the section relating to the respective application.
Navigation: [
]
1
2
3
5
4
Designation Explanation
1
Title bar The title bar displays elements for orientation and information.
2
Contents area The contents area is the main work area for menus and applications. The
contents depend on the specific application or initiated action.
3
Action bar The action bar contains action buttons for performing specific actions required
in the active dialog box and are available (e.g. [Exit], [STD], [C], [OK]).
4
Button
Edit/Select settings (e.g. [Define], [On], [Off]). The contents depend on the
application.
5
Arrow The arrow buttons are used to page forward or back.
1 Settings can be changed by tapping the respective button.
2 Confirm with [OK].
3 To leave the settings, select [Exit].
4 To change the system settings, tap [System].
3.2.4 Security system
The balance has a comprehensive security system with which individual access rights can be defined at
administrator. Access to protected menu areas requires the entry of a password. On delivery of the balance,
a password is defined. The menu settings are chosen, so that you have unrestricted access to all system
settings.
When an password protected menu area is selected, an alphanumeric keyboard is initially displayed for
entry of the password.
Page is loading ...
Page is loading ...
Page is loading ...
Page is loading ...
Page is loading ...
Page is loading ...
Page is loading ...
Page is loading ...
Page is loading ...
Page is loading ...
Page is loading ...
Page is loading ...
Page is loading ...
Page is loading ...
Page is loading ...
Page is loading ...
Page is loading ...
Page is loading ...
Page is loading ...
Page is loading ...
Page is loading ...
Page is loading ...
Page is loading ...
Page is loading ...
Page is loading ...
Page is loading ...
Page is loading ...
Page is loading ...
Page is loading ...
Page is loading ...
Page is loading ...
Page is loading ...
Page is loading ...
Page is loading ...
Page is loading ...
Page is loading ...
Page is loading ...
Page is loading ...
Page is loading ...
Page is loading ...
Page is loading ...
Page is loading ...
Page is loading ...
Page is loading ...
Page is loading ...
Page is loading ...
Page is loading ...
Page is loading ...
Page is loading ...
Page is loading ...
Page is loading ...
Page is loading ...
Page is loading ...
Page is loading ...
Page is loading ...
Page is loading ...
Page is loading ...
Page is loading ...
Page is loading ...
Page is loading ...
Page is loading ...
Page is loading ...
Page is loading ...
Page is loading ...
Page is loading ...
Page is loading ...
Page is loading ...
Page is loading ...
Page is loading ...
Page is loading ...
Page is loading ...
Page is loading ...
Page is loading ...
Page is loading ...
Page is loading ...
Page is loading ...
Page is loading ...
Page is loading ...
Page is loading ...
Page is loading ...
Page is loading ...
Page is loading ...
Page is loading ...
Page is loading ...
Page is loading ...
Page is loading ...
Page is loading ...
Page is loading ...
Page is loading ...
Page is loading ...
Page is loading ...
Page is loading ...
Page is loading ...
Page is loading ...
Page is loading ...
Page is loading ...
Page is loading ...
Page is loading ...
Page is loading ...
Page is loading ...
Page is loading ...
Page is loading ...
Page is loading ...
Page is loading ...
Page is loading ...
Page is loading ...
Page is loading ...
Page is loading ...
Page is loading ...
Page is loading ...
Page is loading ...
Page is loading ...
Page is loading ...
Page is loading ...
Page is loading ...
Page is loading ...
Page is loading ...
Page is loading ...
Page is loading ...
Page is loading ...
Page is loading ...
Page is loading ...
Page is loading ...
Page is loading ...
Page is loading ...
Page is loading ...
Page is loading ...
Page is loading ...
Page is loading ...
Page is loading ...
Page is loading ...
Page is loading ...
Page is loading ...
Page is loading ...
Page is loading ...
Page is loading ...
Page is loading ...
Page is loading ...
Page is loading ...
Page is loading ...
Page is loading ...
Page is loading ...
Page is loading ...
Page is loading ...
Page is loading ...
Page is loading ...
Page is loading ...
Page is loading ...
Page is loading ...
Page is loading ...
Page is loading ...
Page is loading ...
Page is loading ...
Page is loading ...
Page is loading ...
Page is loading ...
Page is loading ...
Page is loading ...
Page is loading ...
Page is loading ...
Page is loading ...
Page is loading ...
Page is loading ...
Page is loading ...
Page is loading ...
Page is loading ...
Page is loading ...
Page is loading ...
Page is loading ...
Page is loading ...
Page is loading ...
Page is loading ...
Page is loading ...
Page is loading ...
Page is loading ...
Page is loading ...
Page is loading ...
Page is loading ...
Page is loading ...
Page is loading ...
Page is loading ...
Page is loading ...
/