
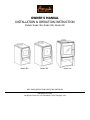
OWNER’S MANUAL
INSTALLATION & OPERATION INSTRUCTION
Models: Nordic 360, Nordic 380, Nordic 450
KEEP THESE INSTRUCTIONS FOR FUTURE REFERENCE
Manufactured in Chile
José Miguel Carrera n°6, los Libertadores, Colina, Santiago, Chile
Nordic 360
Nordic 380
Nordic 450

BEFORE INSTALLATION OF YOUR APPLIANCE
Firstly check all local building and heating regulations. Different states and different localities have varying regulations
about the installation and operation of wood stoves and you or your installer should be aware of these.
POSITIONING THE AMESTI
We enclose a sheet showing approved distances from the heater to combustible side and back walls. This also gives
details of the floor protector size. These clearance distances can only be reduced if the surrounding walls or floor are
made of noncombustible material (stone, brick or concrete).
CONSTRUCTING THE FLUE
A free standing appliance should have a flue kit made of stainless steel or requirement of AS/NZS2918/2001. The length
will depend on ceiling height and roof design but the top of the flue pipe must penetrate the roof line by a minimum of
1m or to be in excess of 3m from the roof in a horizontal line, or a minimum of 600mm higher than the ridge if within 3m
of the ridge.
If the draft is insufficient or periodic down drafting occurs and the appliance smokes or only burns slowly, extending the
flue or fitting a specialized cowl will usually cure it.
In the roof cavity and above the roof it is essential that the flue has two outer casings as it is important to prevent
condensation on the upper cooler parts of the flue as well as being a safety feature. Where the flue penetrates the
ceiling and roof, it must comply with AS/NZS2918/2001. If the stove is fitted into and existing chimney ensure that it is
sealed at the base of the chimney with a register plate and install the flue lengths up the chimney to atmosphere and fit
the appropriate termination chimney plate and cowl.
The flue kit must be installed according to the manufacturer’s instruction.

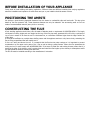
Figure 1Installation Diagram
SAFETY CLEARANCES
Metal Base
This must be used if the floor finish
is wood, carpet, or any other
flammable material.
Protection
If your wall is flammable and you want to
put the fireplace close to the wall, place a
metal or other non flammable plate on
the wall, leaving space behind it for air
circulation.
Main Flue
(Stainless steel)
It extends from the top of the
fireplace to the cowl.
Celing plate
(Stainless steel)
Distance from flammable Material
Any flammable material must be a minimum
distance of 15cm from the outer flue.
Rock Wool
Inserted between the main flue and the
outer flu for insolation.
Outer Flue
(Zinc-alum or galvanized)
It covers the main flue from the
ceiling to the cowl.
Flashing
(zinc-alum)
Funnel
(stainless steel)
Cowl
(stainless steel)

Figure 2 Safety Clearances
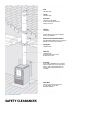
Distances to combustible walls (cm)
Model
X rear
(mm)
with
tertiary
shield
X rear
(mm)
with rear
heat shield
raised
100mm
Y (mm)
with
tertiary
shield
Z
side (mm)
Nordic 360
100
150
190
355
Nordic 380
100
150
190
355
Nordic 450
100
150
190
355
Note: these clearances are for heat sensitive materials. Clearance from heat resistant walls e.g. brick or stone can be
100mm. A heat resistant floor e.g. concrete slab with slate needs no floor protection.
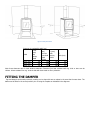
FITTING THE DAMPER
The steel damper can be easily removed, enabling one to clean with ease or replace in the event that it wears down. The
baffle must be fitted in the correct position prior to using the fireplace as indicated in the diagrams.

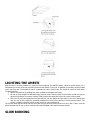
Figure 3 Fitting the damper
LIGHTING THE AMESTI
Now the stove is correctly installed it is ready for the first lighting The AMESTI feature a dual air control system. Air is
introduced into the fire at the top the firebox as well as the bottom. The top air is operated by the sliding control located
on the top of the unit. The bottom air control is located on the door of the heater. The bottom air control is used mainly
for starting the fire.
1. Place a few pieces of dry kindling onto some screwed up newspaper and ignite.
2. As soon as it has caught fire add some larger pieces of wood. Load the wood into the firebox so that the logs are
placed at right angles to the door opening. Close the door and make sure the top air control is fully opened.
3. When the fire has well established coal base add full size logs loaded at right angles to the door opening and
open the top air fully. Adjust the operating temperature of your fire by opening or closing the top control. The
normal or medium operating position is with the top air open at about half.
The first few times that the stove is lit the stove paint will give off some smoky fumes as it cures. Don`t panic, once the
paint has cured this will not re-occur. Keep the room well ventilated until these fumes have cleared.
SLOW BURNING

To make the heater burn for a long period fill with large pieces of dry hardwood, open the air control fully and burn
briskly for a few minutes to get the logs alight. The best setting for slow burning is with the air control fully closed. After
an extended combustion cycle, reset the fire by stirring the live coal under the ashes and add some sticks and small logs.
Slide the air control to the fully open position and allow the fireplace temperature recover before adding larger logs.
RAPID BURNING
To obtain maximum heat from your AMESTI firstly establish the fire and then leave it running with the top air control
open fully. Keep an eye on your stove when you do this as with a good flue draft and dry wood it is possible for the stove
to glow red hot.
Burning the fire with the top air control and bottom air control fully open will often not give the hottest fire as too much
heat is lost up the flue and so does not come into the room. Similarly running the stove with the door open will not
produce maximum heating in the room as the stove will draw a lot of warmed air out of the room.
MAINTENANCE
1. Removing the Ashes – Depending on the type of wood burned, the ashes will need removing every 2 to 6 weeks.
With a small shovel, push the hot coals to one side and shovel most of the ash into a metal bucket. Leave a small
bed of ash to retain the coals and insulate the base of the firebox. The fire burns the ashes extremely finely so
cover the bucket and take care not to stir up the ashes too much-
2. Cleaning Paint Work and Glass – The stove, when cool, can be cleaned with a damp cloth. Over the years the
black will fade and should be touched up with high temperature stove paint. We do not recommend graphite
based stove polish. To clean the glass we recommend cleaning with a damp cloth. Avoid using any abrasive
material that could scratch it.
3. Door Seal – The door seal is a 12,7mm round fiberglass braided rope. If it should need replacing fix it in its
groove with silicone mastic.
4. Fire Bricks - The bricks should last many years, but if any need replacing they can be placed in position vertically
and are held in place at the top by the angle brick retainer.
5. Chimney Cleaning - The frequency with which the chimney will need cleaning will depend on the way that the
heater has been used as well as the type and dryness of the wood burned. Keep an eye on the flue passages and
if there appears to be a buildup of soot is time to clean the flue. To get at the flue form inside the stove, remove
the smoke shelf from under the flue.
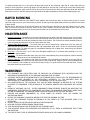
WARNING!
1. THE APPLIANCE AND FLUE-SYSTEM SHALL BE INSTALLED IN ACCORDANCE WITH AS/NZS2918 AND THE
APPROPRIATE REQUIREMENTS OF THE RELEVANT BUILDING CODE OR CODES.
2. APPLIANCE INSTALLED IN ACCORDANCE WITH THIS STANDARD SHALL COMPLY WITH THE REQUIREMENTS OF
AS/NZS4013 WHERE REQUIRED BY THE RECULATORY AUTHORITY, I.E. THE APPLIANCE SHALL BE
IDENTIFIABLE BY A COMPLIANCE PLATE WITH THE MARKING “TESTED TO AS/NZS 4013”.
3. ANY MODIFICATION OF THE APPLIANCE THAT HAS NOT BEEN APPROVED IN WRITING BY THE TESTING
AUTHORITY IS CONSIDERED TO BE IN BREACH OF THE APROVAL GRANTED FOR COMPLIANCE WITH AS/NZS
4013.
4. MIXING OF APPLIANCE OR FLUE - SYSTEM COMPONENTS FROM DIFFERENT SOURCES OR MODIFYING THE
DIMENSIONAL SPECIFICATION OF COMPONENTS MAY RESULT IN HAZARDOUS CONDITIONS. WHERE SUCH
ACTION IS CONSIDERED, THE MANUFACTURER SHOULD BE CONSULTED IN THE FIRST INSTANCE.
5. CRACKED AND BROKEN COMPONENTS, e.g. GLASS PANELS OR CERAMIC TILES, MAY RENDER THE
INSTALATION UNSAFE.
6. DO NOT USE FLAMMABLE LIQUIDS OR AEROSOLS TO START OR REKINDLE THE FIRE.
7. DO NOT USE FLAMMABLE LIQUIDS OR AEROSOLS IN THE VICINITY OF THIS APPLIANCE WHEN IT IS
OPERATING.
8. DO NOT STORE FUEL WITHIN HEATER INSTALLATION CLEARANCES.
9. OPEN AIR CONTROL BEFORE OPENING FIRING DOOR.
10. THIS APPLIANCE SHOULD NOT BE OPERATED WITH CRECKED GLASS.
11. THIS APPLIANCE SHOULD BE MAINTAINED AND OPERATED AT ALL TIMES IN ACCORDANCE WITH THESE
INSTRUCTIONS.
12. THE USE OF SOME TYPES OF PRESERVATIVE-TREATED WOOD AS A FUEL CAN BE HAZARDOUS.

REPLACEABLE COMPONENTS OF THE APPLIANCE
1. Door glass with gasket
2. Door gasket without glass
3. Door gasket Kit
4. Firebricks 230mm x 65mm x 25mm
5. Baffle
6. Ash pan
RECOMMENDED FUEL
Any dry hardwood that has been seasoned for at least 12 months. Al fuel should be stored with protection from the
weather to minimize any potential moisture content.
FLUE FIRE
In the event of a flue fire close air intake spindle right down to smother fire and do not open the fireplace door.
WARRANTY
LIMITED TO 5 YEAR FROM THE DATE OF PURCHASE TO THE ORIGINAL OWNER
Amesti warranties that all the parts in this fireplace, referring to the materials and manufacturing, will be free of defects
at the time of purchase.
The manufacturer extends the following warranties:
• Five Year Period:
Steel and welded joints in the firebox are covered for 5 years against breakage.
• One Year Period:
The baffle is a Replacement Part with a limited lifespan that will depend on the intensity of use and the
quality of wood used. The 1-year warranty will cover the damper against cracking of material and failures
of welded joint, but not the wear and tear.
• Warranty does not cover:
- Bricks: because only it’s possible to break with a knock
- Glass: Is a thermo-ceramic glass, resistant to 800ºC (1472ºF) and radical changes of
temperature, and it only can be broken by a knock.
- Aesthetics like paint and finishes are excluded.
- Damage from over-firing will void your warranty.
This warranty does not apply if damage occurs because of an accident, improper handling, improper installation,
improper operation, abuse, or unauthorized repair made or attempted to be made.
The manufacturer is not liable for indirect, incidental, or consequential damages in connection with the product
including any cost or expense providing substitute equipment or service during periods of malfunction or nonuse.
All liability for any consequential damage for breach of any written or implied warranty is disclaimed and
excluded. Consumers also have rights under relevant State and Commonwealth Laws.
-
 1
1
-
 2
2
-
 3
3
-
 4
4
-
 5
5
-
 6
6
-
 7
7


Ask a question and I''ll find the answer in the document
Finding information in a document is now easier with AI
Other documents
-
Heat & Glo CURVE 100 Owner's manual
-
Heatilator ECO CHOICE WS18-AU Owner's manual
-
 Drolet SAWMAN WOOD STOVE User manual
-
 Norseman Silhouette GL Owner's manual
-
 Drolet CLASSIC WOOD STOVE User manual
-
 Drolet GEMINI 1200 WOOD STOVE User manual
-
Hearth and Home Technologies 5100-I User manual
-
Heatiator ECO-WINS18 User manual
-
-
 Drolet GEMINI 1500 WOOD STOVE User manual


