Page is loading ...

Extra-Large Rotisserie Fryer and Steamer
For your safety and continued enjoyment of this product, always read the instruction book carefully before using.
CDF-500
INSTRUCTION AND
RECIPE BOOKLET

2
IMPORTANT
SAFEGUARDS
When using an electrical appliance, especially
when children are present, basic safety
precautions should always be taken, including
the following:
1. READ ALL INSTRUCTIONS.
2. Unplug from outlet when not in use and
before cleaning. Allow to cool before put-
ting on or taking off parts, and before
cleaning the appliance.
3. Do not touch hot surfaces. Use handles
and knobs.
4. To protect against electric shock, do not
immerse control panel, cord, plug or deep
fryer in water or other liquids.
5. This appliance should not be used by
or near children or individuals with
certain disabilities.
6. Never leave appliance unattended when it
is connected to the power outlet.
7. Always attach breakaway cord to appliance
first, then plug into wall outlet.
8. Do not operate any appliance with
a damaged cord or plug, or after the
appliance malfunctions or has been
damaged in any manner. Return appliance
to the nearest Authorized Service Center for
examination, repair or adjustment.
9. The use of attachments not recommended
or sold by the manufacturer may result in
fire, electric shock or injury.
10. Do not use outdoors.
11. Do not let cord hang over edge of table
or counter, or touch hot surfaces.
12. Do not place on or near a hot gas or
electric burner, or in a heated oven.
13. Extreme caution must be used when
moving the Cuisinart
®
Extra-Large
Rotisserie Fryer and Steamer
if it contains hot oil.
14. The appliance will automatically shut off if
operation exceeds 12 minutes without oil.
If this occurs, use the reset button to reset
the appliance.
15. If appliance still does not function after
following reset instructions, please contact
a Cuisinart Certified Consumer Service
Center for assistance.
16.
Be sure handles are properly attached to
basket and locked in place. See detailed
assembly instructions.
17. Do not use this appliance for other than its
intended use.
18. Periodically check for looseness of
screws or nuts and retighten them.
CAUTION: Overtightening can result in
stripping of screws or nuts or cracking
of handle or feet.
19. Do not exceed 60 minutes of ON time within
a period of 2 hours.
20. Do not operate your appliance in an
appliance garage or under a wall cabinet.
Indoor, countertop use only. When stor-
ing in an indoor appliance garage, always
unplug the unit from the electrical outlet.
Not doing so could create a risk of fire,
especially if the appliance touches the walls
of the garage or the door touches the unit as
it closes.
21. Follow all instructions for removal of
moisture/ice and thawing before cooking.
22.
Always cook with lid in closed position,
except when frying French fries and high
moisture foods. Ensure both the lid and
vessel are completely dry after washing
and before use.
23.
Follow the instructions on the frozen food
package for cooking time and temperature,
24. Due to their extremely low temperature,
frozen foods inevitably lower the tempera-
ture of the oil. For the best results, do not
overload the basket with food.
25.
See instructions on pages 6–8 regarding
cooking foods with cavities.
26. There is a risk of fire if you don't use the
basket or cage when cooking.

3
SAVE THESE
INSTRUCTIONS
FOR HOUSEHOLD
USE ONLY
BREAKAWAY CORD AND
POLARIZED PLUG
This appliance features a breakaway cord and
polarized plug (one blade is wider than the
other). The breakaway cord is designed to
quickly disconnect from the appliance
when a pulling force is applied.
NOTE: The breakaway cord can fit into
the appliance in only one direction.
Please refer to printing on the cord connector
that states “This Side Up.” To reduce the risk
of electric shock, a polarized plug is used.
This plug is intended to fit only into a polarized
outlet. If the plug does not fit into the outlet,
reverse the plug. If it still does not fit, contact a
qualified electrician. Do not attempt to modify
the plug in any manner. Always attach plug to
appliance first, then plug cord in the wall outlet.
To disconnect, turn any control to OFF, then
remove plug from wall outlet.
SHORT CORD
INSTRUCTIONS
CAUTION: A short power-supply cord is
provided to reduce the risk of personal injury
resulting from becoming entangled in or tripping
over a long cord.
EXTENSION CORD USE
An extension cord or longer detachable cord is
not recommended for use with deep fryers.
ELECTRIC POWER
If the electrical circuit is overloaded with other
appliances, your appliance may not operate. It
should be operated on an electrical circuit that
is free from other appliances. If you are not sure
of the reason for overloading or cannot find a
separate circuit, contact a qualified electrician.
This appliance is for 120 volts only and should
not be used with a converter.
IMPORTANT SAFETY TIPS
1. Always keep lid closed while deep fryer is
cooking food. Use basket handle to raise and
lower basket. Always raise basket out of hot
oil and rest on basket hook, to allow food to
drain completely before removing.
2. BEWARE OF STEAM WHEN
OPENING LID.
3. Wet food should be dried first with paper
towels. Remove loose ice from frozen foods.
Close the lid when frying. Beware of oil
splattering when food is put into the oil.
4. Keep appliance at least 4 inches away from
walls or other objects during operation. Do
not place any objects on top of appliance
while it is operating.
5. Be sure oil container is filled to at
least the minimum oil level. Do not
fill above the maximum. Do not operate
appliance without oil or with an insufficient
amount of oil. Never pour oil into heated
oil container.

4
6. Do not operate this appliance if the lid and
the oil container are not completely dry.
7. Keep this fryer out of reach of children while
in use and away from edges of countertops
where it could be pulled off or pushed over
by children.
8. Do not use any solid/hydrogenated oil,
shortening, olive oil, grapeseed oil or lard in
this deep fryer. DO NOT MIX OILS, as they
may have different smoke points. USE GOOD
QUALITY OIL that has a smoke point of
420°F or higher.
CAUTION: To prevent damage to countertop
or tabletop finish, use a nonflammable,
heat-resistant coaster or placemat between
the appliance and the countertop or tabletop
surface. Never place on carpet, furniture, or
other combustible materials.
CONTENTS
Important Safeguards................. 2
Important Safety Tips..................3
Parts and Features................... 5
Before the First Use .................. 6
Operating Instructions .................6
Cleaning, Care and Maintenance........ 9
Safety Features ..................... 9
Tips and Hints ......................10
Filtering and Changing the Oil ......... 10
Tips for Frying ......................11
Warranty ...........................11
Deep-Frying Guide ...................13
Recipes............................14

5
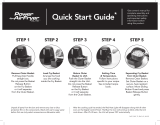
PARTS AND FEATURES
1. Stainless steel housing
2. Vented Lid with handle
3. Mesh Basket with handle
4. Small cage
5. Large cage
6. Spit rod
7. Double lifting handle
8. Oil container
9. Side handles
10. Timer control knob
11. Temperature control knob
12. Ready indicator light
13. Power On indicator light
14. Toggle switch ON/OFF
15. Heating element
16. Breakaway cord
17. Reset button
18. Control panel
19. Spigot
20. Drain hose
9
8
1018 1113
14
12
2
15
17
3
6
4
5
1
16
19
20
7

6
BEFORE THE FIRST USE
Remove all packaging and any promotional
labels or stickers from your deep fryer. Be sure
that all parts (listed in Parts and Features) of
your new deep fryer have been included before
discarding any packing materials. You may want
to keep the box and packing materials for use
at a later date.
Before using your Cuisinart
®
Extra-Large
Rotisserie Fryer and Steamer for the first time,
remove any dust from shipping by wiping the
base with a moist cloth. Thoroughly clean
the oil container, lid and basket. The lid and
basket are dishwasher safe. Never immerse the
appliance in water; water must not be allowed
to penetrate the interior of the appliance.
OPERATING
INSTRUCTIONS
This appliance is designed for household
use only. It is not intended for
commercial use.
1. Before your Rotisserie Fryer/Steamer is
used for the first time, remove all packing
materials and be sure all parts are fully dry
after cleaning and before use. See complete
cleaning instructions on page 9.
2. Place heating
element/control
panel in the unit.
Please make sure
that the heating
element/control
panel is properly
inserted into the
housing. This unit
is equipped with an
interlock feature that
will prevent it from
turning on until the
heating element/
control panel is in
place.
3. Be sure that the oil draining spigot is in
the closed position before adding oil.
Turn clockwise until secure.
4. Pour approximately 5 liters of good-quality
corn, canola, soybean, or peanut oil into
reservoir until it reaches between the MIN
and MAX marks inside container.
OIL WARNING
DO NOT OVER- OR UNDER-FILL. DO NOT
MIX OILS. DO NOT USE EXTRA VIRGIN
OLIVE OIL, SOLID/HYDROGENATED OIL,
SHORTENING, GRAPESEED OIL OR LARD
IN THIS FRYER. USE GOOD-QUALITY OIL
THAT HAS A SMOKE POINT OF 420ºF OR
HIGHER. TO PRESERVE OIL QUALITY, DO
NOT ADD SALT OR SPICES TO THE FOOD
UNTIL AFTER IT HAS BEEN REMOVED
FROM THE FRYER.
5. Do not operate unit near open burners
on stove.
6. Make sure the toggle switch is in the OFF
position and the temperature control knob is
in the standby location.
7. To turn on your fryer, attach breakaway cord
to back of the appliance, then plug into
outlet.
8. The power ON light will glow to show that
the unit is on.
9. Set the temperature control knob to the
desired temperature. The ready light will turn
green once the oil has reached the desired
temperature. It will take approximately
20–30 minutes for 5 liters of good quality oil
to reach the desired temperature.
10. Place lid onto unit to shorten heat–up time.
11. While the oil is heating, prepare the food
to be fried using Rotisserie or in a Frying
Basket.
ROTISSERIE FRYING
As previously noted, pour 5 liters of good-
quality vegetable, corn, canola, soybean or
peanut oil into the reservoir. Do not mix oils.
Then preheat while following the steps below.
Set temperature control knob to 375ºF.
1. Prepare food to be fried. If frying a whole
turkey, remove the neck and giblets. Make
sure the turkey is thawed completely and

7
contains no ice crystals. NOTE: If your
turkey came with a plastic piece holding
the legs together, remove this piece before
putting the turkey on the rotisserie spit.
Additionally, remove plastic pop-up timer.
2. Dry the food well with paper towels.
3. Prep the spit. Attach the spit rod to the base
of large cage. Align button on spit rod to
securely lock into large cage rod.
4. Place large cage on a
flat surface with spit
and spit rod pointing
upward. Slowly guide
the whole turkey,
shoulders first, down
the spit through the
turkey’s cavity. Pierce
the shoulders into the
tines inside the large
cage to secure turkey
to the cage.
5. Attach the small
cage. Hold the turkey
legs together and
place cage over the
rear portion of the
turkey. Attach the
cage to the spit, with the rear portion of
the turkey inside cage, using the screw to
tighten cage to secure
at marked location.
NOTE: No trussing
is required. Turkey
should be enclosed at
both ends with cages.
6.
Lift and place turkey in
resting position.
7. When the oil is hot
and green READY
indicator light is on,
use the double lifting
handle to lift turkey.
Handle will act in
a scissor motion.
Attach both hooks,
one at a time, on
each side of the
assembled rotisserie
spit, outside the cages.
8. Using both hands, one
on each handle, lift the
assembled rotisserie
spit over the unit and
guide the assembled
rotisserie spit through
the interior labyrinth. First left, then right,
down to the bottom lowest position.
9. Turn the toggle switch to the Rotisserie
On position.
10. Watch the rotisserie turn and check that the
turkey rotates completely without touching
the sides of the oil container.
11. Place the lid on the unit.
12. Set timer to the desired cooking time.
(Periodically check to see if the turkey is
still rotating.)
13. Timer will ring when the food is ready.
WARNING: THE TIMER DOES NOT SWITCH
THE APPLIANCE OFF.
14. To check for turkey doneness: WARNING:
Turn toggle switch from ON to OFF position.
Lift and place turkey in resting position
(top right notch of the labyrinth.) and insert
thermometer into the thickest part of the
turkey thigh. Do not let it touch the bone.
Turkey is done when the thigh reaches
170°F and the breast reaches 165°F.
Check for desired doneness. REMOVE
THERMOMETER FROM TURKEY.
If needed, turn rotisserie to ON to complete
frying until desired temperature is reached.
15. When the turkey is done, use the double
lifting handle, and attach it to both ends
of the spit using the same technique as
described for lowering the turkey.
16. Lift the assembled rotisserie spit straight up,
no need to navigate through the labyrinth,
and place in the top resting position.
See below.
17. When cooking is finished, shut down the
fryer by turning temperature control knob to
STANDBY and unplugging the breakaway
cord from the wall outlet.

8
18. Allow oil to cool to room temperature
before cleaning.
19. Rest turkey for 20–25 minutes. DO NOT
TENT WITH FOIL.
20. After the oil has cooled, and the turkey
has rested, using oven mitts, remove the
assembled rotisserie spit from unit and
place on a flat surface.
21. Remove cages. Remove small cage first,
using screw to loosen and detach. Then
remove larger cage by guiding the shoulders
off the tines and removing the spit through
the cavity. Spit rod can now be removed
from larger cage for cleaning.
BASKET FRYING
1. Preheat 5 liters of good-quality vegetable,
corn, canola, soybean or peanut oil to the
temperature indicated in your recipe. Do not
mix oils.
2. Prepare food to be fried per recipe
directions.
3. Dry wet foods with paper towels. Remove
excess ice crystals from frozen foods.
4. Place food to be fried into the basket
(maximum of 2 pounds).
5. Attach the basket handle.
6. When the oil is hot and the green READY
indicator light is on,
remove the lid and place
the basket on the unit
over the oil reservoir:
Lift the basket over the
unit and guide the basket
through the interior labyrinth. First left, then
right, down to the bottom lowest position.
7. Place the lid on the unit.
8. Set timer to the desired cooking time.
(Periodically check for doneness.)
9. Timer will ring when the food is ready.
WARNING: The timer does not switch the
appliance off.
10. Raise the basket. If the food is done,
carefully lift basket, straight up, no need to
navigate through the labyrinth, and place
basket in the top resting position.
11. After the food has drained, remove the
basket and place cooked food onto
absorbent paper towels.
12. When cooking is finished, shut down the
fryer by turning temperature control knob to
STANDBY and unplugging the breakaway
cord from the wall outlet.
13. Allow oil to cool to room temperature
before cleaning.
STEAMING
You can easily steam lobsters, oysters, clams
and vegetables using the Cuisinart
®
Extra-Large
Rotisserie Fryer and Steamer.
For steaming: Add approximately 8 cups of
water to the oil reservoir
.
1. Prepare food to be steamed.
2. Remove the turkey rotisserie and basket
from the unit.
3. Set to the maximum temperature and
bring water
to a boil. Once a rolling boil is
reached, turn temperature down to 235°F.
NOTE: Monitor water level and add more
water if necessary; heating element must be
covered at all times.
4. Fill basket with food to be steamed
(maximum of 2 pounds).
5. Place the basket on the unit over the water
reservoir: Lift the basket over the unit
and guide the basket through the interior
labyrinth. First left, then right, down to the
bottom lowest position.
6. Place the lid on the unit.
7. Steam to desired doneness.
WARNING: The timer does not switch the
appliance off.
8. Raise the basket. If the food is done,
carefully lift basket, with lifting handle. Lift
the basket straight up, no need to navigate
through the labyrinth, and place basket in
the top resting position.
9. After the food has drained, remove
the basket.

9
10. When cooking is finished, shut down the
steamer by turning temperature control
knob to STANDBY and unplugging the
breakaway cord from the wall outlet.
11. Allow water to cool to room temperature
before cleaning.
CLEANING, CARE AND
MAINTENANCE
1. Always unplug appliance first, detach the
breakaway cord and let the oil or water cool
down to room temperature before cleaning.
2. Remove lid.
3. Lift out basket.
4. Raise control panel/heater assembly and
allow oil to drain into the oil container.
5. The control panel should never be immersed
in water or other liquids. Before first use,
clean the outer surface of the heating
element with a damp cloth containing mild
soap solution or clean water.
6. Carefully remove oil or water using the oil
draining spigot located on the bottom of the
front housing. Place a container underneath
the spigot, attach the drain hose and turn
counterclockwise until the oil is fully drained.
Then, turn the spigot clockwise until it is
fully closed.
7. Once the oil has cooled, line a sieve
with cheesecloth. Grasp each side of the
removable oil container and lift upward.
Pour the oil through the sieve and strain the
used oil through it to remove food particles,
crumbs and impurities. Clean the outer
surface of the heating element with a damp
cloth containing mild soap solution or
clean water.
8. Lid and mesh basket are dishwasher safe.
Dry parts thoroughly after cleaning and
before assembling.
9. The stainless steel housing is not
submersible and should be washed by hand
with warm, soapy water.
10. Ensure that both the lid and the oil
container are completely dry after washing
and before use.
11. After cleaning, reassemble oil container,
heating element, basket and lid onto deep
fryer. The heating element must be seated
properly or appliance will not operate.
12. Warning: When cleaning, use care –
under-edge of deep fryer is sharp.
13. Tip: For ease in cleaning, wipe control panel
with damp microfiber cloth. Microfiber
cloths are available in most kitchenware
stores.
NOTE: Oil staining on the heating element
and oil container can be easily cleaned with
a plastic scrubbing pad.
14. IF DEEP FRYING DIRECTLY AFTER
STEAMING, REMOVE ALL MOISTURE
FROM INTERIOR OF UNIT.
Maintenance: Any other servicing should
be performed by an authorized service
representative.
SAFETY FEATURES
The Cuisinart
®
Extra-Large Rotisserie Fryer and
Steamer is equipped with the following features
to ensure safety:
• Safety Interlock – The control panel/heating
element must be properly seated or deep
fryer will not operate.
• Breakaway Cord – The cord is designed to
quickly disconnect from the appliance when a
pulling force is applied.
• Thermostat Overload Protection – Your
Cuisinart
®
Extra-Large Rotisserie Fryer and
Steamer is equipped with a thermostat
overload protection. If the unit heats up
beyond the recommended temperature level,
the deep fryer will automatically turn off. To
reset, unplug the unit from the wall outlet and
allow it to cool down. Remove the control
panel and heating element from the unit.
• 450°F Cutoff – If oil temperature reaches
over 450°F, unit will turn off automatically. The
oil temperature must cool and the red reset
button must be pressed manually to turn the
unit back on.

10
CAUTION: The heating element is extremely
hot. Allow it to cool thoroughly before
removing it. You will find a reset button on
the front of the control panel below controls.
Using a toothpick or another long, thin object,
push the reset button and place the control
panel back into its proper position.
NOTE: The unit will not work if the control
panel is not properly mounted. Plug the unit
back in, turn on and continue use. If the unit
still does not operate, repeat the steps above
or call a Cuisinart Certified Consumer Service
Center for assistance.
TIPS AND HINTS
• When cooking foods dipped in fresh batter,
first lower basket into hot oil. Using tongs,
add food directly to oil. Use basket to lift out
food when finished cooking.
• Do not exceed the MAX fill line in the basket.
• Sort or cut food into pieces of uniform size.
All the food will then be cooked in the same
amount of time. To reduce splattering, remove
excess moisture or ice from food.
• The oil does not need to be changed after
each use.
• Pour the oil through the sieve lined with
cheesecloth and strain the used oil through
it to remove food particles, crumbs and
impurities. This process is safe to repeat three
or four times without the oil deteriorating.
• It is important to follow the temperature
recommendation for every recipe. If the
temperature is too low, the fried food absorbs
oil. If the temperature is too high, a crust
quickly forms on the outside while the inside
remains uncooked. For best results, drop
freshly sliced food into basket one piece at a
time using tongs.
The rotisserie should never be used to fry
frozen foods or food that is partially frozen,
Partially frozen food will cook unevenly and
will result in areas that are undercooked or
overcooked.
FRYING FROZEN FOODS
• Due to their extremely low temperature,
frozen foods inevitably lower the temperature
of the oil. For best results, do not overload
the basket with food.
• Follow the instructions on the frozen food
package for cooking time and temperature.
• Frozen foods are frequently covered with
a coating of ice crystals, which should be
removed before frying. Lower the basket very
slowly into the oil.
• Follow all instructions for removal of moisture/
ice and thawing before cooking.
FILTERING AND CHANGING
THE OIL
• WARNING: Always remove the plug from wall
socket before cleaning. Allow the Cuisinart
®
Extra-Large Rotisserie Fryer and Steamer
and the oil to cool completely (approximately
2 hours) before cleaning or storing. Never
immerse the control panel, cord or plug in
water or any other liquids.
• The oil can be reused after your first frying
session. In general, the oil will be tainted
rather quickly when frying food containing a
lot of protein (such as poultry, meat or fish).
When oil is mainly used to fry potatoes and
it is filtered after each use, it can be used an
additional 3 to 4 times.
• Used oil can be successfully stored in a
cool, dark place for up to a month in a clean,
airtight container. Refrigeration or freezing
increases the oil’s lifespan by several months.
However, do not use the oil for longer than 6
months.

11
• DO NOT STORE THE OIL IN THE DEEP
FRYER. Add a little fresh oil each time
you reuse the oil.
TIPS FOR FRYING
• Heat oil to 375°F unless recipe specifies
otherwise. A cube of bread should brown in
approximately 60 seconds.
• Correct temperature is extremely important. If
the temperature is too high, bread will brown
before the inside has cooked; if it is too low,
the bread will absorb the fat and become
soggy and greasy.
• Cook only as much as will float easily in the
oil. Too much added to the Cuisinart
®
Extra-
Large Deep Fryer and Steamer will cause
the temperature to drop, and the food will be
difficult to turn. Turn bread when it rises to
the top of the oil, taking care not to pierce it.
Lift cooked breads from the fryer; allow them
to drain for a moment, then place on paper
towels to drain.
LIMITED THREE-YEAR
WARRANTY
(U.S. and Canada only)
This warranty is available to consumers only.
You are a consumer if you own a Cuisinart
®
Extra-Large Rotisserie Fryer and Steamer
that was purchased at retail for personal,
family or household use. Except as otherwise
required under applicable law, this warranty is
not available to retailers or other commercial
purchasers or owners.
We warrant that your Cuisinart
®
Extra-Large
Rotisserie Fryer and Steamer will be free of
defects in materials and workmanship under
normal home use for 3 years from the date of
original purchase.
We recommend that you visit our website,
www.cuisinart.com for a fast, efficient way to
complete your product registration. However,
product registration does not eliminate the need
for the consumer to maintain the original proof of
purchase in order to obtain the warranty benefits.
In the event that you do not have proof of
purchase date, the purchase date for purposes
of this warranty will be the date of manufacture.
If your Cuisinart
®
Extra-Large Rotisserie Fryer
and Steamer should prove to be defective within
the warranty period, we will repair it, or if we
think necessary, replace it. To obtain warranty
service, simply call our toll-free number 1-800-
726-0190 for additional information from our
Consumer Service Representatives, or send
the defective product to Consumer Service
at Cuisinart, 7475 North Glen Harbor Blvd.,
Glendale, AZ 85307.
To facilitate the speed and accuracy of your
return, please enclose $10.00 for shipping and
handling of the product.
Please pay by check or money order made
payable to Cuisinart (California residents need
only supply proof of purchase and should call
1-800-726-0190 for shipping instructions).
NOTE: For added protection and secure
handling of any Cuisinart
®
product that is being
returned, we recommend you use a traceable,
insured delivery service. Cuisinart cannot be
held responsible for in-transit damage or for
packages that are not delivered to us. Lost and/
or damaged products are not covered under
warranty.
Please be sure to include your return address,
daytime phone number, description of the
product defect, product model # (located on
bottom of product), original date of purchase,
and any other information pertinent to the
product’s return.
CALIFORNIA RESIDENTS ONLY
California law provides that for In-Warranty
Service, California residents have the option of
returning a nonconforming product (A) to the
store where it was purchased or (B) to another
retail store which sells Cuisinart products of the
same type.
The retail store shall then, at its discretion,
either repair the product, refer the consumer
to an independent repair facility, replace the
product, or refund the purchase price less the
amount directly attributable to the consumer’s
prior usage of the product. If the above two
options do not result in the appropriate relief

12
to the consumer, the consumer may then
take the product to an independent repair
facility if service or repair can be economically
accomplished. Cuisinart and not the consumer
will be responsible for the reasonable cost of
such service, repair, replacement, or refund for
nonconforming products under warranty.
California residents may also, according to their
preference, return nonconforming products
directly to Cuisinart for repair, or if necessary,
replacement, by calling our Consumer Service
Center toll-free at 1-800-726-0190.
Cuisinart will be responsible for the cost of the
repair, replacement, and shipping and handling
for such products under warranty.
BEFORE RETURNING YOUR
CUISINART
®
PRODUCT
Your Cuisinart
®
Extra-Large Rotisserie Fryer
and Steamer has been manufactured to the
strictest specifications and has been designed
for use only in 120 volt outlets and only with
authorized accessories and replacement parts.
This warranty expressly excludes any defects
or damages caused by attempted use of
this unit with a converter, as well as use with
accessories, replacement parts or repair service
other than those authorized by Cuisinart. This
warranty does not cover any damage caused
by accident, misuse, shipment or other than
ordinary household use. This warranty excludes
all incidental or consequential damages. Some
states do not allow the exclusion or limitation
of these damages, so these exclusions may not
apply to you.
This warranty gives you specific legal rights,
and you may also have other rights, which vary
from state to state.
Important: If the nonconforming product is to
be serviced by someone other than Cuisinart’s
Authorized Service Center, please remind the
servicer to call our Consumer Service Center
at 1-800-726-0190 to ensure that the problem
is properly diagnosed, the product is serviced
with the correct parts, and to ensure that the
product is still under warranty.

13
DEEP-FRYING GUIDE – Fresh or Uncooked Foods
Fresh indicates food prepared from a recipe or purchased fresh, not
frozen. Read package label to determine if prepared, packaged foods
are NOT precooked. If there are ice granules around prepared foods, set
pieces on a paper towel and pat dry. Moist vegetables will cause the oil
to splatter. Follow all instructions for removal of moisture/ice and thawing
before cooking.
Frying times may vary because of food temperature, quantity and size of
pieces. Best results are obtained when food is cooked in small batches
and size of pieces is uniform. Check deep-fried foods at the shortest
times given; deep-fry until fully cooked.
Low heat 325°F
Turkey thighs, bone in, skin on . . . . . . . . . . . . . . . . . 20–22 min.
Turkey breast, bone in, skin on . . . . . . . . . . . . . . . . . 30–35 min.
Breaded eggplant . . . . . . . . . . . . . . . . . . . . . . . . . 5–6 min.
Breaded portobello mushrooms . . . . . . . . . . . . . . . . 4½–5 min.
Medium heat 350°F
Frozen chicken nuggets . . . . . . . . . . . . . . . . . . . . . 5½–6 min.
Breaded chicken tender . . . . . . . . . . . . . . . . . . . . 3½–4½ min.
Breaded, boneless chicken breast . . . . . . . . . . . . . . . 5½–6 min.
Breaded bone-in pork chop . . . . . . . . . . . . . . . . . . . 7½–8 min.
Egg rolls . . . . . . . . . . . . . . . . . . . . . . . . . . . . . . . . 5 min.
Large shrimp . . . . . . . . . . . . . . . . . . . . . . . . . . . 1–2 min.
High heat 375°F
Red potato chips . . . . . . . . . . . . . . . . . . . . . . . . . 2–3 min.
Yam potato chips . . . . . . . . . . . . . . . . . . . . . . . . 2–2½ min.
American fries . . . . . . . . . . . . . . . . . . . . . . . . . . . 5–6 min.
Thin French fries . . . . . . . . . . . . . . . . . . . . . . . . . 3–3½ min.
Thick French fries . . . . . . . . . . . . . . . . . . . . . . . . 3½–4 min.
Curly French fries . . . . . . . . . . . . . . . . . . . . . . . . 4½–5 min.

14
RECIPES
Traditional Fried Turkey ...............14
Cajun Turkey........................14
Turkey Gravy .......................15
Fried Chicken .......................15
Five-Spice Chicken Wings
with Dipping Sauce ..................15
French Fries ........................16
Beer-Battered Onion Rings ............16
Indoor Clambake ....................16
Simple Mussels .....................17
Steamed Crab Legs with Garlic Butter ...17
Beer-Steamed Clams with Chorizo ......17
Cinnamon-Spice Doughnuts ...........18
Traditional Fried Turkey
Deep-frying a turkey takes only a fraction of
the time as traditional roasting, plus it frees
up the oven to accommodate the accompanying side
dishes and dessert!
Makes about 12 servings
1 12-pound turkey
2 teaspoons kosher salt
1 teaspoon freshly ground black pepper
1. Preheat the Cuisinart
®
Deep Fryer to 355°F.
2. Dry turkey thoroughly and completely. Any
excess moisture can cause the hot oil to splatter.
Massage bird well with salt and pepper, including
the cavity.
3. Secure the rotisserie assembly to the turkey and
place assembled turkey onto the resting position
of the deep fryer.
4. Once the light signals the oil is to temperature,
use the safety handle to lower the turkey carefully
into the hot oil.
5. Once turkey is in the lowest position and
submerged in the oil, remove handle and select
Rotisserie. Cover the deep fryer for the first 5
minutes of frying to minimize any splatter.
6. Cook turkey for approximately 1 hour and 10
minutes, about 6 minutes per pound. Turkey is
ready when the breast reads 165°F, the deepest
part of the thigh is 170°F, and the juices run clear.
7. Wait at least 15 to 20 minutes before carving.
Cajun Turkey
A twist on the traditional bird. The Cajun flavors
make this turkey the star of a classic Southern
spread, complete with macaroni and cheese,
collard greens and biscuits.
Makes about 12 servings
1 tablespoon garlic powder
1 tablespoon paprika
1 tablespoon kosher salt
2 teaspoons dried oregano
1 teaspoon cayenne pepper
1 teaspoon freshly ground black pepper
1 teaspoon dried thyme
1 12-pound turkey
1. Dry turkey thoroughly and completely. Combine
the spices together and generously rub over
the entire turkey, being sure to cover the interior
cavity as well as gently rubbing some of the
spice mixture underneath the skin and directly on
the meat.
2. Once the turkey is seasoned, let sit for about
2 hours. Turkey can stay covered and refrigerated
overnight.
3. When ready to cook, preheat the Cuisinart
®
Deep
Fryer to 355°F and secure turkey on the rotisserie
assembly.
4. Place assembled turkey onto the resting position
of the deep fryer.
5. Once the light signals the oil is to temperature,
use the safety handle to lower the turkey carefully
into the hot oil.
6.
When turkey is in the lowest position and
submerged in the oil, remove handle and
select Rotisserie. Cover the deep fryer for
the first 5 minutes of frying to minimize any
splatter.
7. Cook turkey for approximately 1 hour and 10
minutes, about 6 minutes per pound. Turkey is
ready when the breast reads 165°F, the deepest
part of the thigh is 170°F, and the juices run clear.
8. Wait at least 15 to 20 minutes before carving.

15
Turkey Gravy
This simple gravy is easy to prepare. For extra
flavor, simmer the turkey neck in store-bought
broth for about an hour; strain before using.
Makes about 2 cups
¼ cup unsalted butter
½ yellow onion, finely minced
¼ cup unbleached, all-purpose flour
2 cups chicken broth
½ teaspoon kosher salt
¼ teaspoon freshly ground black pepper
1. Melt the butter in a heavy-bottomed saucepan
over medium-low heat. Add the onion and cook
to soften, about 5 to 8 minutes.
2. Once the onion is soft, stir in the flour and cook
the mixture, while occasionally stirring, about 3
minutes.
3. While continuosly whisking, slowly pour the broth
into the pot, allowing the broth to incorporate
with the butter/flour mixture. Once all of the broth
is added, increase the heat to bring to a slight
boil, and then reduce the temperature to maintain
a simmer in order for the gravy to thicken.
4. Once thick, add the salt and pepper. Adjust
seasoning to taste before serving.
Fried Chicken
Plan ahead, for this chicken does need to
marinate overnight. The results
are well worth the planning!
Makes about 6 to 8 servings
2 cups buttermilk
1 tablespoon hot sauce
1 tablespoon Dijon mustard
1½ teaspoons kosher salt, divided
1½ teaspoons freshly ground pepper, divided
4 pounds bone-in chicken parts
2 cups unbleached, all-purpose flour
1½ teaspoons baking powder
1 teaspoon paprika
Oil for frying
1. In a medium non-reactive bowl, stir together the
buttermilk, hot sauce, Dijon, 1 teaspoon salt and 1
teaspoon freshly ground pepper. Add the chicken
pieces and coat well with buttermilk mixture.
2. Refrigerate overnight.
3. Mix together the flour, baking powder, paprika and
remaining salt and pepper.
4. Preheat the Cuisinart
®
Deep Fryer to 355°F.
5. While the oil is preheating, lightly coat each
chicken piece evenly with the flour mixture, tapping
away any excess.
6. Fry chicken in batches, about 5 minutes per side.
Internal temperature of chicken should register
170°F. The larger pieces may take longer. Finish
chicken in a 350°F oven until cooked through.
Five-Spice Chicken Wings
with Dipping Sauce
A fun and delicious twist to your
traditional chicken wings.
Makes about 6 servings
3 pounds chicken wings
1 teaspoon kosher salt
1 teaspoon five-spice powder
Dipping Sauce
¼ cup fish sauce
¼ cup granulated sugar
1 garlic clove, finely chopped
½ Thai chile, thinly sliced
(for ½ jalapeño, seeded and thinly
sliced)
1 tablespoon fresh lime juice
1 tablespoon chopped cilantro
1 tablespoon chopped mint
1 tablespoon shredded carrots
1. If necessary, cut wing tips from wings and discard.
If wings are whole, cut each at the joint, making
each two pieces.
2. Sprinkle the wings liberally with the salt and
Chinese five-spice powder.
3. Prepare dipping sauce. Heat the fish sauce, sugar,
garlic, and chile together over medium heat until
the sugar is just dissolved. Remove from heat and
stir in remaining herbs. Reserve.
4. Heat oil to 350°F. Cook wings in batches in the
frying basket, until golden and cooked through,
about 6 to 8 minutes per batch. Remove wings;
drain briefly on layered paper towel.
5. Serve immediately with the dipping sauce.

16
French Fries
Frying the potatoes twice ensures
the crispiest fries!
Makes about 6 servings
2 pounds russet potatoes
1 teaspoon kosher salt
Freshly ground black pepper
1. Preheat the Cuisinart
®
Deep Fryer to 300°F.
2. Cut the potatoes into uniform French fry batons
(thinly cut, 6mm thick). As you cut, place the
potatoes in a bowl of ice water to keep them
from turning brown.
3. When ready to fry, drain and dry the cut potatoes
completely and thoroughly. The oil will splatter
if they are only slightly wet. Fry the potatoes in
small batches for about 3 minutes. Remove and
drain on a single layer of paper towels.
4. Once all potatoes are fried once, increase the
temperature to 375°F. Fry potatoes a second
time in small batches until golden and crispy,
about 5 to 8 minutes, depending on the size
and thickness of the cut. Drain on fresh layers of
paper towels.
5. Season to taste and serve immediately.
Beer-Battered
Onion Rings
Beer batter lends a light and crispy texture to many
fried foods. These onion rings are no exception,
making it virtually impossible to have just one!
Makes about 4 servings
1¼ cups lager or ale
1½ cups unbleached, all-purpose flour,
divided
¾ teaspoon kosher salt
1 pound (about 3 medium) onions,
peeled
Kosher salt
1. In a medium bowl, whisk the beer and 1 cup of
flour until smooth. Let batter stand 30 minutes.
Stir in salt.
2. Place remaining flour in a dish. Cut the onions
crosswise into ¼-inch thick slices. Separate the
slices into rings. Toss lightly with flour.
3. Preheat the Cuisinart
®
Deep Fryer to 355°F.
Lower the frying basket into the hot oil. Working
in batches, dip each floured ring into batter and
allow any excess to drip off. Cook coated onion
rings by carefully lowering into the hot oil. Fry
until golden, turning as needed, about 1 to 2
minutes per side. Lift basket and place onion
rings on layered paper towels to drain. Sprinkle
with kosher salt while hot and serve.
Indoor Clambake
Take the beach party inside with this easy, but
impressive countertop recipe.
Makes about 4 servings
8 cups water
1 bottle (8 ounces) clam juice
1 teaspoon celery seed
2 teaspoons kosher salt
½ teaspoon freshly ground black
pepper
1 teaspoon paprika
1½ pounds small red potatoes
6 sprigs fresh thyme
1 large garlic clove, cut in half
1 medium sweet onion, peeled and
cut into quarters
1 pound kielbasa or chorizo
sausage, sliced (raw chorizo may
be used, leave whole)
1 dozen littleneck clams
1 lobster (approximately 1½ pounds)
or 4 lobster tails
2 ears of corn, shucked and cut in half
1 pound mussels
16 large shrimp, cleaned
2 sticks (16 tablespoons) unsalted butter
Lemon wedges for serving
Crusty bread for serving
1. Fill the Cuisinart
®
Deep Fryer with the water and
clam juice. Set the temperature to 355°F and cover.
2. Combine celery seed, salt, pepper, and paprika
and toss together in a mixing bowl with the
potatoes. Once the liquid comes to a boil, add
the basket to the fryer and then add the spiced
potatoes with the thyme, garlic, onion, and
sausage; cover and cook for 5 minutes. Evenly
add the clams, then the lobster, tucking the corn
halves into each corner of the basket and cook for
an additional 10 minutes. Add the mussels, and
shrimp and cook for 5 minutes, so that all of the
shellfish are open. The cover should be in place
while cooking
3. While the clam bake is steaming, melt the butter
for serving.

17
4. Once all is cooked, evenly divide the seafood
among 4 plates or shallow bowls. if desired,
remove the flavorful cooking liquid using the spout
to serve some in each dish. Serve with the melted
butter, lemon wedges and crusty bread.
*If desired, reduce amount of shellfish and/or
potatoes and corn to accommodate 2 lobsters.
Simple Mussels
Add a simple salad and crusty bread for a light
and easy dinner any night of the week.
Makes about 4 to 6 servings
6 cups water
1 cup dry white wine
2 pounds mussels, scrubbed with
beards removed
2 shallots, thinly sliced
3 garlic cloves, thinly sliced
1 celery stalk, thinly sliced
2 sprigs fresh thyme
½ teaspoon kosher salt
¼ teaspoon crushed red pepper
2 tablespoons extra virgin olive oil
1. Fill the Cuisinart
®
Deep Fryer with the water and
wine. Set temperature to 355°F.
2. Toss the mussels together with the shallots, garlic,
celery and thyme.
3. Once water is boiling, add the mussels to the
steamer basket and cover to cook until all of the
shells have opened, about 4 to 5 minutes.
4. Once open, remove mussels and transfer to
serving platter. Discard any mussels that have not
opened. Toss together with salt, red pepper and
olive oil.
5. Serve immediately.
NOTE: For a flavorful dipping sauce, remove
some steaming liquid from the fryer using
the spout. Dispense directly into a sauté pan
and place over medium heat. Bring to a boil
and then reduce heat to maintain a simmer to
reduce slightly. Whisk in butter or heavy cream
for extra richness!
Steamed Crab Legs
with Garlic Butter
Special-occasion meal made simple.
Makes about 3 to 4 servings
8 cups water
1½ pounds crab legs
½ cup unsalted butter
1 large garlic clove, finely chopped
Pinch kosher salt
1. Fill Cuisinart
®
Deep Fryer with water to
the minimum line. Set temperature to 355°F
and cover.
2. Once the water is boiling, add the crab legs to the
steamer basket and cover. Steam for about 10 to
12 minutes until cooked.
3. While the crab is steaming, put the butter and
garlic into a small, heavy-bottomed saucepan over
low heat to melt. Keep over low heat to infuse
the garlic. Skim any foam off the top. Slowly pour
contents through a strainer, leaving any milky
solids behind at the bottom of the pot. Season with
a pinch of salt.
4. Sever the crab legs with the butter on the side
for dipping.
Beer-Steamed Clams
with Chorizo
Use the clamshell halves to scoop up the chorizo
and broth while eating the clams to get a little
taste of everything in each bite.
Makes about 8 servings
6 cups water
1 lager-style beer (12 ounces)
2 dozen littleneck clams, scrubbed
1 fennel bulb, trimmed, cored and cut into
¼-inch strips
6 ounces cooked chorizo, sliced
½ teaspoon kosher salt
1. Fill the Cuisinart
®
Deep Fryer with water and
beer. Set temperature to 355°F and cover.
2. Once the liquid is boiling, add the clams,
fennel and chorizo to the steaming basket
and steam until the clams completely open,
about 10 minutes.
3. Remove ingredients from basket and
sprinkle with salt.
4. Serve immediately. If desired, pour a little bit
of the steaming liquid into each serving dish
using the spout.

18
NOTE: For a flavorful dipping sauce, remove
some steaming liquid from the fryer using
the spout. Dispense directly into a sauté pan
and place over medium heat. Bring to a boil
and then reduce heat to maintain a simmer to
reduce slightly. Whisk in butter or heavy cream
for extra richness!
Cinnamon-Spice
Doughnuts
Homemade doughnuts???? Need we say more?
Makes 10 doughnuts
3
1
⁄
3
cups unbleached, all-purpose flour, plus
extra for dusting
1 tablespoon baking powder
½ teaspoon kosher salt
1 teaspoon ground cinnamon
¼ teaspoon ground allspice
1
⁄
8
teaspoon freshly grated nutmeg
¾ cup granulated sugar
2 tablespoons non-hydrogenated
vegetable shortening
1 cup applesauce
2 large eggs
Powdered sugar or cinnamon sugar
for dipping
1. Put the flour, baking powder, salt and spices into
a medium bowl and stir with a whisk to blend;
reserve. Put the sugar and shortening into a large
bowl. Using a hand mixer on low speed, beat
to blend and break up the shortening. Add the
applesauce and eggs; beat until smooth. Add
the flour mixture in two additions and blend on
medium speed until just mixed. Cover dough and
chill for at least one hour.
2. Once rested, place the dough on a generously
floured surface and dust with flour, as the dough
will be rather sticky. Roll out to ½-inch thickness.
Cut dough with a floured round or doughnut cutter
(about 3½ inches). If using a round cutter, use a
smaller round cutter for the doughnut hole. Place
doughnuts and holes on a waxed paper-lined
baking sheet or tray.
3. Preheat the Cuisinart
®
Deep Fryer to 355°F. Fry
doughnuts in batches, about 3 minutes per side.
Remove and drain on layered paper towels. Toss in
powdered sugar or cinnamon sugar before serving.
Cuisinart Rotisserie Fryer and Steamer Instruction Manual CDF-500

19
NOTES:

IB-14200-ESP
©2018 Cuisinart
150 Milford Road
East Windsor, NJ 08520
Printed in China
18CE054436
Trademarks or service marks referred to herein are
the trademarks or service marks of their respective owners.
/