Epson TM-L90 User manual

Category
Label printers
Type
User manual

This manual is also suitable for

Printer Parts
DIP Switch Tables
cutter
cover
control panel
paper roll
cover
cover open
lever
4 1
5
Serial
SW Function ON OFF
1-1 Power switch function Disabled Enabled
1-2 Interface condition selec-
tion
by DIP
switch
by mem-
ory
switch
1-3 Handshaking XON/XOFF DTR/DSR
1-4 Data word length 7 bits 8 bits
1-5 Parity check Enabled Disabled
1-6 Parity selection Even Odd
1-7
1-8
Transmission speed (See table below.)
Transmission speed (bps)-bits per second 1-7 1-8
2400 ON ON
4800 OFF ON
9600 ON OFF
19200 OFF OFF
SW Function ON OFF
2-1 Reserved Fixed to Off.
Parallel
SW Function ON OFF
1-1 Power switch func-
tion
Disabled Enabled
1-2~
1-8
Reserved Fixed to Off.
SW Function ON OFF
2-1 Reserved Fixed to Off.
2
3
power switch
TM-L90 User’s Manual 1
English
All rights reserved. No part of this publication may be reproduced, stored in a retrieval system, or transmitted in
any form or by any means, electronic, mechanical, photocopying, recording, or otherwise, without the prior
written permission of Seiko Epson Corporation. No patent liability is assumed with respect to the use of the
information contained herein. While every precaution has been taken in the preparation of this book, Seiko
Epson Corporation assumes no responsibility for errors or omissions. Neither is any liability assumed for
damages resulting from the use of the information contained herein.
Neither Seiko Epson Corporation nor its affiliates shall be liable to the purchaser of this product or third parties
for damages, losses, costs, or expenses incurred by purchaser or third parties as a result of: accident, misuse, or
abuse of this product or unauthorized modifications, repairs, or alterations to this product, or (excluding the
U.S.) failure to strictly comply with Seiko Epson Corporation’s operating and maintenance instructions.
Seiko Epson Corporation shall not be liable against any damages or problems arising from the use of any options
or any consumable products other than those designated as Original Epson Products or Epson Approved
Products by Seiko Epson Corporation.
EPSON and ESC/POS are registered trademarks of Seiko Epson Corporation.
NOTICE: The contents of this manual are subject to change without notice.
Copyright © 2001 by Seiko Epson Corporation, Nagano, Japan.
Safety Precautions
This section presents important information intended to ensure safe
and effective use of this product. Please read this section carefully and
store it in an accessible location.
WARNING:
Shut down your equipment immediately if it produces smoke, a strange
odor, or unusual noise. Continued use may lead to fire. Immediately
unplug the equipment and contact your dealer or a SEIKO EPSON
service center for advice.
Never attempt to repair this product yourself. Improper repair work can
be dangerous.
Never disassemble or modify this product. Tampering with this product
may result in injury or fire.
Be sure to use the specified power source. Connection to an improper
power source may cause fire.
Do not allow foreign matter to fall into the equipment. Penetration by
foreign objects may lead to fire.
If water or other liquid spills into this equipment, unplug the power cord
immediately, and then contact your dealer or a SEIKO EPSON service
center for advice. Continued usage may lead to fire.
2 TM-L90 Users Manual
English
CAUTION:
Do not connect cables in ways other than those mentioned in this
manual. Different connections may cause equipment damage and
burning.
Be sure to set this equipment on a firm, stable, horizontal surface. The
product may break or cause injury if it falls.
Do not use in locations subject to high humidity or dust levels. Excessive
humidity and dust may cause equipment damage or fire.
Do not place heavy objects on top of this product. Never stand or lean
on this product. Equipment may fall or collapse, causing breakage and
possible injury.
To ensure safety, unplug this product before leaving it unused for an
extended period.
Caution Labels
WARNING:
Do not connect a telephone line to the drawer kick-out connector;
otherwise, the printer and the telephone line may be damaged.
CAUTION:
The thermal head is hot.
TM-L90 Users Manual 3
English
Control Panel
LEDs and Button
POWER LED
Lights when the power is on, and is off when the power is off.
ERROR LED
Off when the printer is online, lights when the printer is offline, and
flashes when an error occurs.
PAPER OUT LED
Lights when roll paper is nearly out.
FEED button
Feeds the roll paper.
Power Switch and Power Switch Cover
The power switch is on the front of the printer. Press it to turn on the
printer, and press and hold it for more than 3 seconds to turn off the
printer.
Power Switch Cover
You can use the enclosed power switch cover to make sure that the
power switch is not accidentally pressed. Peel off the backing tape and
press the cover into place to install it.
4 TM-L90 Users Manual
English
WARNING:
If an accident occurs when the power switch cover (shown below) is
attached, immediately remove the bottom cover and unplug the
power supply cable to avoid fire.
Unpacking
The following items are included for the standard specification printer.
If any items are damaged, contact your dealer.
Printer
Label paper roll
Power switch cover
Control panel label used for horizontal installation
Paper roll spacer
Paper exit guide for horizontal installation
Screw for installation of the paper roll spacer
Hexagonal lock screws (2 pieces) (only for the serial interface)
TM-L90 Users Manual 5
English
Installing Horizontally or Vertically
You can install the printer horizontally (with the paper exit on top) or
vertically (with the paper exit at the front) either on a flat surface or by
hanging it on a wall (using the optional hanging bracket set, WH-10).
Both the horizontal and vertical positions are shown below.
When you install the printer horizontally, attach the control panel
label and position the roll paper near end sensor as shown in the
illustrations. To move the sensor, follow these steps.
1. Loosen the screw with a coin or similar tool
and turn it at least 3 or 4 times.
2. Push the lever gently as far as it will go.
3. Turn the tab (in the direction of the arrow in
the illustration) while pushing the lever until it
clicks into place in hole A.
4. Secure the screw and make sure the lever moves smoothly.
Note:
To hang the printer on the wall, see
the Wall Hanging Bracket Set
Installation Manual provided with the
WH-10 for instructions.
tab
screw
A
6 TM-L90 Users Manual
English
Installing the Paper Roll
When you use the printer horizontally, peel off the backing sheet of the
paper exit guide and attach it as shown below to prevent cut paper
from falling inside the printer after paper is cut by the autocutter.
Note:
If you use roll paper with a
core that is smaller than
the specifications (inside
diameter of at least 25.4
mm and outside diameter
of at least 31.4 mm), be
sure not to attach the paper
exit guide. Otherwise a
paper jam might occur.
Be sure to use paper rolls that meet the specifications.
1. Open the paper roll cover, using the cover open lever.
2. Insert a paper roll and pull out a small amount of paper, aligning
the paper with the guide, as shown below.
3. Close the paper roll cover; then tear off the roll paper.
paper
exit
guide
TM-L90 Users Manual 7
English
Note:
Be sure to close the cover completely by pushing down on the middle of the
cover.
Troubleshooting
ERROR light on or blinking
Check to see that the paper roll cover is closed and check the
PAPER OUT light. Close the cover or replace the paper if necessary.
If the printer has been printing a lot, the head may be hot. Wait for
the head to cool. Printing will resume automatically.
If the autocutter is jammed, turn the printer off and then back on.
If the paper roll cover will not open, see the section below.
Turn off the printer and then turn it back on. If the light is still
blinking, call your supervisor or a service person.
Paper jam
Turn off the power and open the paper roll cover and check for a paper
jam. If there is a paper jam, remove the jammed paper and follow the
instructions in the Installing the Paper Roll section to prepare the
printer for printing.
The paper roll cover will not open
Turn on the printer and remove the cutter cover. To remove the cover,
use a tool such as a screwdriver, and insert it into one of the slots
indicated by a circle in the illustration below and push the cover
8 TM-L90 Users Manual
English
upward. After removing the cutter cover, use a ballpoint pen or
tweezers to turn the knob in the direction indicated by the arrow until
you see a triangle in the opening.
Cleaning the Print Head
CAUTION:
After printing, the print head can be very hot. Be careful not to touch it
and to let it cool before you clean it. Do not damage the print head by
touching it with your fingers or any hard object.
Turn off the printer, open the paper roll cover, and clean the thermal
element of the print head with a cotton swab moistened with an
alcohol solvent (ethanol, methanol, or IPA). See the illustration below.
EPSON recommends cleaning of the thermal head periodically
(generally every three months) to maintain receipt print quality.
.
Using Different Paper Widths
The TM-L90 accommodates 80 mm wide paper rolls with no
adjustments. For rolls from 38 mm to 70 mm wide you use the spacer
included with the printer. (If the rolls are from 61 to 70 mm wide, you
break two tabs off the spacer. See the width note below.)
TM-L90 Users Manual 9
English
1. Insert the paper roll spacer so that the front edge goes through the
notch and down to the shaft, as shown below.
2. Push the paper roll spacer until you feel it click onto the shaft.
Note:
Check that the paper roll spacer slides smoothly to the left and right.
3. Slide the roll paper spacer to the appropriate width, as shown
above. You can use the measurement printed inside the printer,
aligning the inside edge of the spacer with the desired
measurement.
notch
front edge
roll paper
spacer
shaft
inside edge of
the spacer
10 TM-L90 Users Manual
English
Width note:
When you want to set the roll paper width from 61 mm to 70 mm, break
off by hand the two tabs of the spacer shown in the illustration below.
(You can still also use widths from 38 mm to 60 mm with the spacer with
the tabs broken off.)
4. Insert the screw included with the spacer into the hole indicated
below and tighten it. (Even if you can see two holes, this is the only
one to put the screw in.)
tabs
hole for screw
TM-L90 Users Manual 11
English
Connecting Cables
To connect cables, first remove the bottom of the cover as shown in the
illustration below.
To place cables, first break off by hand any of the three portions
indicated by circles in the illustration (the other portion is on the right).
Then put the cables through the holes and replace the bottom of the
cover.
12 TM-L90 Users Manual
English
.
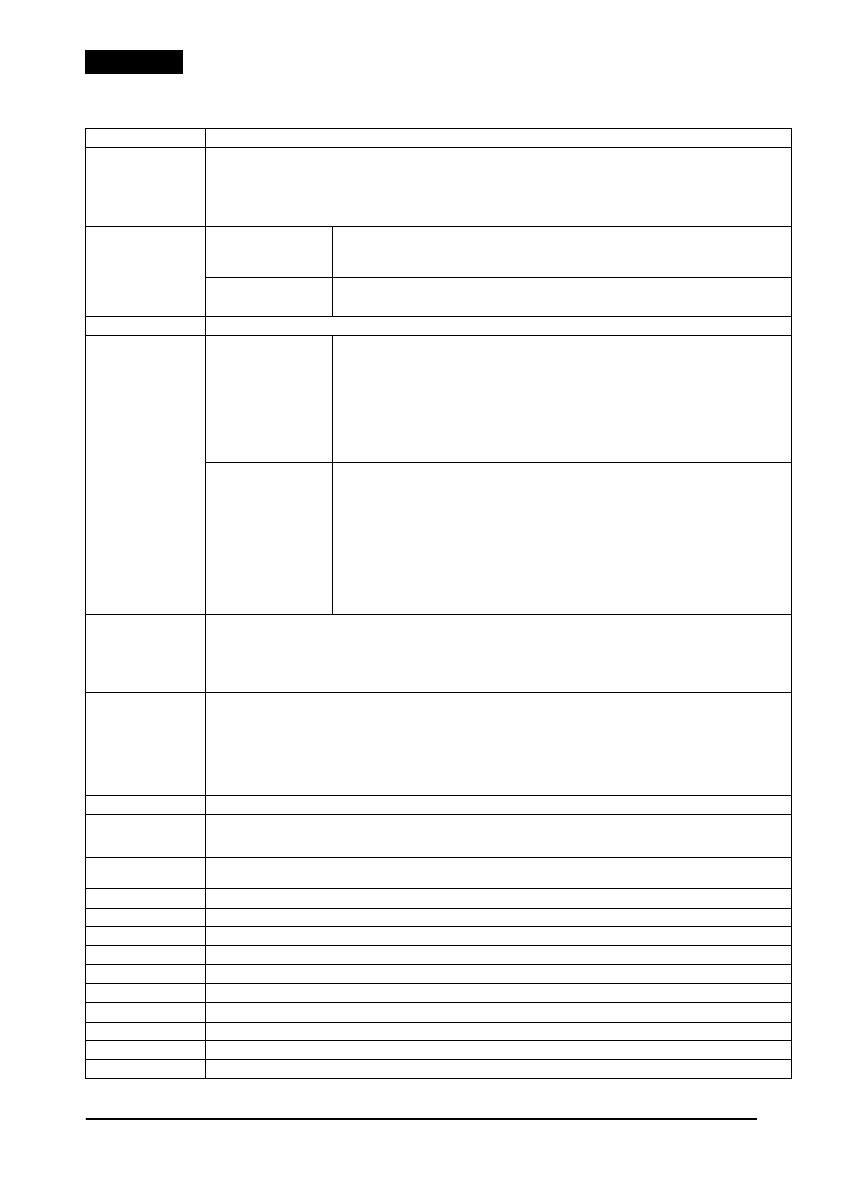
lps: lines per second, dpi: dots per 25.4 mm (dots per inch)
TM-L90 Specifications
Print method Thermal line 8 dots/mm × 8 dots/mm (203 dpi × 203 dpi)
Print font Font A: 12 × 24
Font B: 9 × 17, except for Japanese (10 × 24 )
Font C: 8 × 16 (only for Japanese)
Kanji font A: 24 × 24
Kanji font B/C: 20 × 24/16 × 16 (Both fonts are only for Japanese)
Thai: 12 × 72 / 9 × 51
Columns Models except for
Japanese
12 ×
××
× 24 / 9 ×
××
× 17 / 24 ×
××
× 24/12 ×
××
×
24 / 12 ×
××
× 72 / 9 ×
××
× 51
When paper width is 80:
48 / 64 / 24 / 48 / 64
Japanese
12
×
××
×
24 /10
×
××
×
24 / 8
×
××
×
16 /24
×
××
×
24 /20
×
××
×
24 / 16
×
××
×
16
When paper width is 80 mm:
48 / 57 / 72 / 24 / 28 / 36
Print width 72 mm, 576 dot positions (receipt paper roll with 80 mm width)
Character size
(W ×
××
× H)
Models except for
Japanese
Normal/ double-high/
double-width/
quadruple
Font A (12 × 24):
1.50 × 3.0 mm / 1.5 × 6.0 mm / 3.0 × 3.0 mm / 3.0 × 6.0 mm
Font B (9 × 17):
1.13 × 2.13 mm / 1.13 × 4.25 mm / 2.25 × 2.13 mm / 2.25 × 4.25 mm
Kanji font A (24 × 24):
3.0 × 3.0 mm / 3.0 × 6.0 mm / 6.0 × 3.0 mm / 6.0 × 6.0 mm
Thai (12 × 72):
1.50 × 9.0 mm / 1.50 × 18.0 mm / 3.0 × 9.0 mm / 3.0 × 18.0 mm
Thai (9 × 51):
1.13 × 6.38 mm / 1.13 × 12.75 mm / 2.25 × 6.38 mm / 2.25 × 12.75 mm
Japanese
Normal/ double-high/
double-width/
quadruple
Font A (12 × 24):
1.50 × 3.0 mm / 1.50 × 6.0 mm / 3.0 × 3.0 mm / 3.0 × 6.0 mm
Font B (10 × 24):
1.25 × 3.0 mm / 1.25 × 6.0 mm / 2.5 × 3.0 mm / 2.5 × 6.0 mm
Font C (8 × 16):
1.0 × 2.0 mm / 1.0 × 4.0 mm / 2.0 × 2.0 mm / 2.0 × 4.0 mm
Kanji Font A (24 × 24):
3.0 × 3.0 mm / 3.0 × 6.0 mm / 6.0 × 3.0 mm / 6.0 × 6.0 mm
Kanji Font B (20 × 24):
2.5 × 3.0 mm / 2.5 × 6.0 mm / 5.0 × 3.0 mm / 5.0 × 6.0 mm
Kanji Font C (16 × 16):
2.0 × 2.0 mm / 2.0 × 4.0 mm / 4.0 × 2.0 mm / 4.0 × 4.0 mm
Character sets 95 alphanumeric, 37 international characters, 128 × 11 graphic
Japanese: JIS (JISX0208-1990): 6879 characters, special characters: 845 characters
Simplified Chinese (GB2312) :7580 characters, China standard font GB5199 is used
Traditional Chinese (Big5): 13494 characters
Thai: 128 × 7 (133 character sets)
Korean: 8366
Print speed Normal:
Maximum: 120 mm/s
High speed:
Maximum: 150 mm/s
Ladder bar code, two-dimension bar-code printing:
Maximum: 90 mm/s
Two-color printing:
Maximum: 90 mm/s
Line spacing 3.75 mm
Paper dimensions 80mm: 79.5 ± 0.5 × max 90 mm
60mm: 59.5 ± 0.5 × max 90 mm
58mm: 57.5 ± 0.5 × max 90 mm
Thermal paper type Roll paper:Monochrome: ENTPD, ENTPE, Two-color: ENTPC
Label paper: Monochrome: ENTLA series, Two-color: ENTLB series
Interface (compatible) RS-232C / Bi-directional parallel , Dealer option: RS-485, USB, 10 Base-T I/F
Receive data buffer 4KB/45bytes
D.K.D. function 2 drives
Power supply +24 VDC ± 7%
Current consumption Normal: Approximately 1.7 A
Temperature Operating: 5 to 45 °C, Storage: –10 to 50 °C
Humidity 10 to 90%
Reliability MTBF: 360,000 hours, MCBF: 70,000,000 lines
Overall dimensions 203 × 140 × 148 mm
Weight (Mass) Approximately 1.9 kg
TM-L90
!"#$%
21
!" ( #$ )
TM-L90
%&'()
%&'()%&'()
%&'()
*+,-./0
&'()* 4 +,)
-./0* 1 +,)
12,)*34567 89:;<= >?@,)ABC34
5DEFG
HIJK LM Seiko Epson Corporation NO%GPQ :QRST UV =W XYZR[\]^_[
\`^=Y
ab>cdefgZhi&'(5[\,) jk!"lmno5pq r:st[\uvw
[
>xyl'(z
Seiko Epson Corporation {M|}~•
€lj?g5•‚Zƒ„:st[\w[
zj[\†k!"lmno5pq‡ˆ‰5Š‹r:st[\w[
†kŒ• ‚" ZŽ••‘&’“ R”LM•I‡j’“–—˜™ š› Z˜ˆ&’“ Z œ•ž
Ÿ
L ¡¢£¤ Seiko Epson Corporation 5•‘_¥¦§¨‡j©ª«Z1¬`ˆ‰Š- Š‹ ®¯Z
°±
Seiko Epson Corporation ”?²³´µj©ª«Z1¬`r:st[\w[
jk†k!"[\¶ Epson ·’Z Epson •I¸’5¹ºZ»¼‡ˆ‰5[\Š‹Z€½
Seiko Epson
Corporation r:¾K[\w[
EPSON _ ESC/POS ¿ Seiko Epson Corporation 56(ÀÁ
1(
&'(g5ÂÃÄKÅÆr:Ç—ÈÉ
HIJK © 2001 Ê
Seiko Epson Corporation
Ë&ÌÍ
ÎWU,º
ÏÐÑ
1. ÒÓÔ 6.
2. ÖÒÑÔ 7. ×Ø^ÏÐÑ
3. SÕ°Ù 8. ÐÚ
4. °ÔÛ
5. ÜYGÝ
!"
(
#$
)
!"#$%&"'()"**+',-*./**!0-12'34*506-*.74*.&&/**/89:*+;
  • Page 1 1
  • Page 2 2
  • Page 3 3
  • Page 4 4
  • Page 5 5
  • Page 6 6
  • Page 7 7
  • Page 8 8
  • Page 9 9
  • Page 10 10
  • Page 11 11
  • Page 12 12
  • Page 13 13
  • Page 14 14
  • Page 15 15
  • Page 16 16
  • Page 17 17
  • Page 18 18
  • Page 19 19
  • Page 20 20
  • Page 21 21
  • Page 22 22
  • Page 23 23
  • Page 24 24
  • Page 25 25
  • Page 26 26
  • Page 27 27
  • Page 28 28
  • Page 29 29
  • Page 30 30
  • Page 31 31
  • Page 32 32
  • Page 33 33
  • Page 34 34
  • Page 35 35
  • Page 36 36
  • Page 37 37
  • Page 38 38
  • Page 39 39
  • Page 40 40

Epson TM-L90 User manual

Category
Label printers
Type
User manual
This manual is also suitable for

Ask a question and I''ll find the answer in the document

Finding information in a document is now easier with AI

in other languages