Page is loading ...

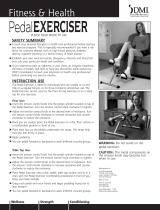
1 - Main Body
2 - Front Stabilizer
3 - Rear Stabilizer
4 - Right Pedal
5 - Left Pedal
6 - Monitor
7 - Tension Knob
8 - Crank Arm
9 - Non-skid Mat
10 - Wrench
11 - Hex Bolts (4) — Not Shown
12 - Washers (4) — Not Shown
M M M M M M M M M M M M
Components List
NOTE: Tighten all hex bolts (11) and pedals (4,5) with the included wrench (10).
1. Attach the front stabilizer (2) to the main body (1) with two hex bolts (11) and
two washers (12), Fig 1.
2. Attach the rear stabilizer (3) to the main body (1) with two hex bolts (11) and
two washers (12), Fig. 1.
3. The right pedal (4), marked “R” on the end of the pedal, connects to the crank
arm (8), Fig. 2. NOTE: The right pedal should be threaded on clockwise. Do
not over tighten as it could strip the threads.
4. The left pedal (5), marked “L” on the end of the pedal, connects to the crank arm
(8), Fig. 3. NOTE: The left pedal should be threaded on counter-clockwise.
Do not over tighten as it could strip the threads.
5. Make sure all bolts are tightened securely before use.
WARNING: Periodically check assembly for tightness. Do not use if any parts
appear to be loose or damaged as personal injury may result.
NOTE: If any parts are missing do not return to place of purchase. Contact Customer
Care at 877-505-6190.
Assembly Instructions
M M M M M
1
2
3
4
5
6
7
8
8
9
10
Fig. 1
Fig. 2
Fig. 3
Consult your physical therapist or health care professional before starting any
exercise program.
Establish your own exercise routine, (frequency, intensity and time) that best suits
your particular needs and condition.
If you experience pain or tightness in your chest, an irregular heartbeat, shortness of
breath, feel faint or have any discomfort while exercising, STOP immediately! Consult
your physician or health care professional before continuing any exercise routine.
WARNING: Do not stand on the Mini Bike.
CAUTION: The metal components on the tension knob may become
hot when in use.
M M M
PLEASE READ PRIOR TO USE
Safety Summary
1
2
3
4
8
8
5
EXERCISER
EXERCISER
Mini Bike
Mini Bike

Distributed by:
Duro-Med Industries
Div. of DMS Holdings Inc.
1931 Norman Drive South
Waukegan, IL 60085 USA
www.mabisdmi.com
Made in China
The Mini Bike is ideal for individuals who are unable to sit or ride on a regular bicycle, or for those limited to wheelchair
use. The Mini Bike can be used on the floor for leg exercises or on a table top for arm exercises.
Floor Use:
1. Place the non-skid mat (9) between the Mini Bike and the floor to help prevent slipping.
2. Adjust the tension knob (7) to the desired level of resistance. Turn the tension control knob clockwise to increase
resistance and counter-clockwise to reduce resistance.
3. Once seated, adjust the Mini Bike to a comfortable position in front of you.
4. Place each foot on the pedals in the straps and begin pedaling.
5. Pedal forward or backward to work different muscles groups.
Table Top Use:
1. Place the non-skid mat (9) between the Mini Bike and the table to help prevent slipping.
2. Adjust the tension knob (7) to the desired level of resistance. Turn the tension control knob clockwise to increase
resistance and counter-clockwise to reduce resistance.
3. Sit with the Mini Bike comfortably positioned in front of you. Keep your back straight.
4. Grasp each pedal with your hands and begin pedaling, trying not to lean forward.
5. Pedal forward or backward to work different muscles groups.
Fig. 4
1. Remove the monitor (6) from the top of the main body (1), Fig. 4.
2. Insert or replace one AAA battery in the compartment, matching the
indicated polarity symbols.
3. Replace the monitor back in the top of the main body.
NOTE: When removing monitor from the top of the main body the wire connecting
the monitor to the Mini Bike may become disconnected. Before replacing the
monitor reconnect the wire to the Mini Bike, Fig. 5.
Removing the battery will automatically reset all the stored readings.
Battery Installation / Replacement
M M M
M M M M M
M M M M M
Instructions For Use
Exercise Monitor Modes
The red Mode button on the monitor (6) allows the user to switch between the various
modes of the exercise monitor.
Scan - Automatically scans through each mode in sequence.
Time - Counts upwards to 99:59 from zero in one second increments.
Calories - Accumulates an estimated total calorie consumption during exercise.
Count - Accumulates the total number of revolutions during different sessions of your workout.
Total Count - Accumulates the total number of revolutions during different sessions of your workout. Count cannot be
reset unless you replace the batteries.
NOTE: To reset all readings to “0”, press and hold the red Mode button for 4 seconds. This will reset all
modes except for the Total Count. To reset the Total Count, remove the battery.
Monitor operates with one (1) AAA battery included. Monitor will automatically shut-off after 4 minutes.
M M M M M
Fig. 5
Toll-Free Customer
Care Help Line
877-505-6190
Monday-Friday
8 am – 4:30 pm CST
#910-2003-0200 06/09
©2009 Duro-Med Industries
6
1
/