Page is loading ...

GUARDE ESTE MANUAL PARA REFERENCIA FUTURA
NOTICE TO INSTALLER:
LEAVE THESE INSTRUCTIONS WITH THE
GRILL OWNER FOR FUTURE
REFERENCE.
OWNER’S MANUAL
ASSEMBLY AND OPERATING INSTRUCTIONS
WARNING
READ AND FOLLOW ALL WARNINGS AND
INSTRUCTIONS IN THIS MANUAL TO AVOID
PERSONAL INJURY OR PROPERTY DAMAGE.
MANUAL DEL PROPIETARIO
INSTRUCCIONES DE ARMADO Y OPERACIÓN
SAVE THIS MANUAL FOR FUTURE REFERENCE
ADVERTENCIA
LEA Y SIGA TODAS LAS ADVERTENCIAS E
INSTRUCCIONES EN ESTE MANUAL PARA
EVITAR LESIONES PERSONALES O DAÑOS
MATERIALES.
AVISO PARA EL INSTALADOR:
ENTREGUE ESTAS INSTRUCCIONES AL
PROPIETARIO DE LA PARRILLA PARA
REFERENCIA FUTURA.
INS_810-3044-S_SNP.qxd 10/4/10 10:21 AM Page Cov1

1
WARNING
• Only use this grill on a hard, level, non-combustible, stable surface (concrete, ground, etc.) capable of supporting the weight of
the grill. Never use on wooden or other surfaces that could burn.
• DO NOT use grill without charcoal tray in place. DO NOT attempt to remove charcoal tray will tray contains hot coal.
• Proper clearance of 10 feet between the grill and combustible material (bushes, trees, wooden decks, fences, buildings, etc.) or
construction should be maintained at all times when grill is in use. Do not place grill under a roof overhang or other enclosed area.
• For outdoor use only. Do not operate grill indoors or in an enclosed area.
• For household use only. Do not use this grill for other than its intended purpose.
• We recommend the use of a Charcoal Chimney Starter to avoid the dangers associated with charcoal lighting fluid. If you choose
to use charcoal lighting fluid, only use lighting fluid approved for lighting charcoal. Carefully read manufacturer’s warnings and
instructions on the charcoal lighting fluid and charcoal prior to the use of their product. Store charcoal lighting fluid safely away
from grill.
• When using charcoal lighting fluid, allow charcoal to burn with grill lid and doors open until covered with a light ash
(approximately 20 minutes). This will allow charcoal lighting fluid to burn off. Failure to do this could trap fumes from charcoal
lighting fluid in grill and may result in a flash fire or explosion when lid is opened.
• Only use charcoal chimney starter if starting fire in second section after 1st fire is already burning. Lighter fluid may ignite from
heat causing flash fire. Otherwise, fires must be started in both cooking chambers at the same time.
• Never use charcoal that has been pre-treated with lighter fluid. Use only a high grade plain charcoal or charcoal/wood mixture.
• Do not use gasoline, kerosene or alcohol for lighting charcoal. Use of any of these or similar products could cause an explosion
possibly leading to severe bodily injury.
• Never add charcoal lighting fluid to hot or even warm coals as flashback may occur causing severe burns.
• Place grill in an area where children and pets cannot come into contact with unit. Close supervision is necessary when grill
is in use.
• Do not leave grill unattended when in use.
• When adding charcoal and/or wood, use extreme caution and follow instructions in “Adding Charcoal/Wood During Cooking”
section of this manual.
• Do not store or use grill near gasoline or other flammable liquids, gases or where flammable vapors may be present.
• Do not store lighter fluid or other flammable liquids or material under the grill.
• Use caution when adjusting charcoal grate height. Handle may be hot when in use.
• Never raise or lower charcoal grate when water smoking as hot water may splash onto coals creating a burst of hot steam and
coals.
Grill is hot when in use. To avoid burns:
• DO NOT attempt to move the grill.
• Brace grill so the unit does not accidentally move.
• Wear protective gloves or oven mitts.
• DO NOT touch any hot grill surfaces.
• DO NOT wear loose clothing or allow hair to come in contact with grill.
IMPORTANT SAFETY WARNINGS
WE WANT YOU TO ASSEMBLE AND USE YOUR GRILL AS SAFELY AS POSSIBLE.
THE PURPOSE OF THIS SAFETY ALERT SYMBOL
IS TO ATTRACT YOUR ATTENTION TO POSSIBLE HAZARDS AS YOU ASSEMBLE AND USE YOUR GRILL.
WHEN YOU SEE THE SAFETY ALERT SYMBOL, PAY CLOSE ATTENTION TO THE INFORMATION WHICH FOLLOWS!
READ ALL SAFETY WARNINGS AND INSTRUCTIONS CAREFULLY
BEFORE ASSEMBLING AND OPERATING YOUR GRILL.
INS_810-3044-S_SNP.qxd 10/4/10 10:21 AM Page 2

2
WARNING
• Check grease level in tin can often and empty or change when 3/4 full. Use extreme caution as the smoker, tin can and its
contents will be hot.
• When grilling, grease from meat may drip into the charcoal and cause a grease fire. If this should happen close lid to suffocate
the flame. Do not use water to extinguish grease fires.
• Use caution since flames can flare-up when fresh air suddenly comes in contact with fire. When opening the lid, keep hands, face
and body a safe distance from hot steam and flame flare-ups.
• Never place more than 15 pounds on front shelf. Do not lean on the front shelf.
• Do not exceed a temperature of 400°F. Do not allow charcoal and/or wood to rest on the walls of grill. Doing so will greatly
reduce the life of the metal and finish of your grill.
• Use caution when assembling and operating your grill to avoid scrapes or cuts from sharp edges of metal parts. Use caution
when reaching into or under grill.
• When opening lid, make sure it is pushed all the way open. If lid is not fully open, it could fall back to a closed position and cause
bodily injury.
• In windy weather, place grill in an outdoor area that is protected from the wind.
• Close lid, doors and smoke stack to suffocate flame.
• Never leave coals and ashes in grill unattended. Before grill can be left unattended, remaining coals and ashes must be removed
from grill. Use caution to protect yourself and property. Carefully place remaining coals and ashes in a non-combustible metal
container and saturate completely with water. Allow coals and water to remain in metal container 24 hours prior to disposing.
• Extinguished coals and ashes should be placed a safe distance from all structures and combustible materials.
• With a garden hose, completely wet the surface beneath and around grill to extinguish any ashes, coals or embers which may
have fallen during the cooking or cleaning process.
• After each use, clean the grill thoroughly and apply a light coat of vegetable oil to interior to prevent rusting. Cover the grill to
protect it from excessive rusting.
• Use caution when lifting or moving grill to prevent strains and back injuries.
• We advise that a fire extinguisher be on hand. Refer to your local authority to determine proper size and type of fire extinguisher.
• Accessory attachments not manufactured by The Brinkmann Corporation for this particular product are not recommended and
may lead to personal injury or property damage.
• Store the grill out of reach of children and in a dry location when not in use.
• Do not attempt to service grill other than normal maintenance as explained in “After-Use Safety” and “Proper Care &
Maintenance” sections of this manual. Repairs should be performed by The Brinkmann Corporation only.
• Remove all stickers and labels before first use.
• Properly dispose of all packaging material.
USE CAUTION AND COMMON SENSE WHEN OPERATING YOUR GRILL.
FAILURE TO ADHERE TO SAFETY WARNING AND GUIDELINES IN THIS MANUAL COULD RESULT
IN BODILY INJURY OR PROPERTY DAMAGE.
SAVE THIS MANUAL FOR FUTURE REFERENCE.
INS_810-3044-S_SNP.qxd 10/4/10 10:21 AM Page 3

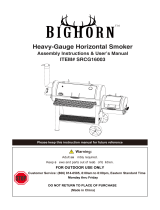
PARTS LIST - Smoke’N Pit:
2 Right Legs
2 Left Legs
1 Shelf
1 Axle
2 Wheels
2 Wheel Caps
2 Leg Braces
1 Firebox Support
1 Grill Base
1 Front Shelf
2 Front Table Supports
1 Charcoal Tray
1 Charcoal Grate
2 Charcoal Grate Adjusters
3 Cooking Grills
1 Warming Rack
1 Grill Lid
1 Smokestack Assembly
1 Smokestack Damper
1 Smokestack Damper Spring
1 Temperature Gauge
1 Thermometer Bezel
1 Grill Lid Handle
1 Firebox Lid Stop
1 Firebox Lid
1 Firebox Lid Handle/Heat Shield
26
25
24
23
22
21
20
19
18
17
16
15
14
13
12
11
10
9
8
7
6
5
4
3
2
1
ASSEMBLY INSTRUCTIONS
READ ALL SAFETY WARNINGS & ASSEMBLY INSTRUCTIONS CAREFULLY
BEFORE ASSEMBLING OR OPERATING YOUR GRILL.
FOR MISSING PARTS, PLEASE CALL CUSTOMER SERVICE AT 800-527-0717.
Inspect contents of the box to ensure all parts are included and undamaged.
3
We recommend two people work together when assembling this unit.
The following tools are required to assemble this Smoke’N Pit:
• Pliers
• Phillips & Flathead Screwdrivers
• Adjustable Wrench
1 Firebox Heat Shield
1 Side Handle
2 Firebox Cooking Grills
1 Firebox Charcoal Grate
1 Firebox Door Hinge
1 Firebox Door
1 Firebox Door Latch
1 Firebox Air Shutter
1 Firebox Base
1 Grease Cup Holder
36
35
34
33
32
31
30
29
28
27
WARNING
This product contains chemicals, including lead in the brass of certain component parts, that are known to the State of
California to cause cancer, and birth defects or other reproductive harm. Wash hands after handling. When used, this
product emits fuel combustion chemicals that are known to the State of California to cause cancer, and birth defects or
other reproductive harm. Follow all instructions in this manual and use only in well ventilated, outdoor area.
INS_810-3044-S_SNP.qxd 10/4/10 10:21 AM Page 4

4
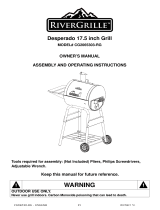
Parts Bag Contents
3 M6 X 25 mm Phillips Head Shoulder Bolts
5 M5 X 12 mm Phillips Head Bolts
1 M5 X 10 mm Phillips Head Shoulder Bolt
15 M6 Hexagonal Nuts
1 M6 Cap Nut
6 M5 Hexagonal Nuts
4 Cotter Pins
2 M6 X 25 mm Phillips Head Bolts
43 M6 X 12 mm Phillips Head Bolts
1 M6 Spring
10
9
8
7
6
5
4
3
2
1
M6 X 25 mm Phillips
Head Shoulder Bolts
M5 X 12 mm Phillips Head Bolts
Cotter Pins
M5 X 10 mm Phillips Head
Shoulder Bolt
M6 Hexagonal Nuts
M5 Hexagonal Nuts
M6 X 25 mm Phillips Head Bolts
M6 Spring
M6 Cap NutM6 X 12 mm Phillips Head Bolts
INS_810-3044-S_SNP.qxd 10/4/10 10:21 AM Page 5

5
Choose a good, cleared assembly area and get a
friend to help you put your grill together. Lay
cardboard down to protect grill finish and
assembly area. Turn the grill on its side to begin
assembly.
Step 1
Connect right (item #1) and left legs (item #2)
together (2 pairs). Front pair legs will have 2
extra holes for front shelf supports as
illustrated.
Step 2
Insert shelf (item #3) into holes on the inside of
legs.
Step 3
Put axle rod (item #4) through the holes on the
right legs. Put wheels (item #5) through the
axle rod (item #4) and place the wheel caps
(item #6) over the axle rod ends.
INS_810-3044-S_SNP.qxd 10/4/10 10:21 AM Page 6

6
Step 4
Install leg braces (item #7) with support
flange towards center of grill onto the legs
using eight M6 x 12 mm Phillips head
bolts. Do not tighten bolts until Step 6 is
completed.
NOTE: Leg brace with two holes for grease
cup holder must be mounted on right
side of grill legs.
Step 5
Install firebox support bracket (item #8)
onto the holes on the left legs using two
M6 x 12 mm Phillips head bolts. Do not
tighten bolts until Step 6 is completed.
Step 6
Install grill base (item #9) with firebox
opening towards left side on top of the legs
using four M6 x 12 mm Phillips head bolts.
Install two M6 x 12 mm Phillips head bolts
and M6 nuts thru grill base (item #9) and
leg braces (item #8).
NOTE: Now tighten all screws in Steps 1 thru
Step 6.
INS_810-3044-S_SNP.qxd 10/4/10 10:21 AM Page 7

7
Step 7
Attach front shelf (item #10) to front of
grill base using two M6 x 12 mm Phillips
head bolts and M6 nuts. Attach table
supports (item #11) with slotted holes
towards front shelf using four M6 x 12
mm Phillips head bolts.
Step 8
Attach side handle (item #28)
onto firebox lid (item #25) and firebox lid
handle/heat shield (item #26) using two
M6 X 25 mm Phillips head bolts and four
M6 nuts.
Step 9
Attach smaller handle (item #26) using
two M6 x 12 mm Phillips head bolts and
M6 nuts.
Slotted holes
Firebox Lid
Handle/Heat Shield
INS_810-3044-S_SNP.qxd 10/4/10 10:21 AM Page 8

Step 10
Attach firebox lid stop (item #24) using one
M5 x 12 mm Phillips head bolt and M5 nut.
Step 11
Attach air shutter (item #34) onto firebox
door (item #32) using one M6 x 12 mm
Phillips head bolt and M6 nut. Do not over
tighten air shutter, air shutter should move
freely.
Attach door latch (item #33) using one
M5 x 10 mm Phillips head shoulder bolt
and M5 nut as illustrated.
Step 12
Connect firebox door hinge (item #31) to
the outside of door (item #33) and firebox
base (item #35) using four M5 x 12 mm
Phillips head bolts and M5 nuts.
Attach one M6 x 25 mm Phillips head
shoulder bolt onto firebox base (item #35)
for door latch (item #33).
8
INS_810-3044-S_SNP.qxd 10/4/10 10:21 AM Page 9

Step 13
Connect firebox lid (item #25) and firebox
base (item #35) using six M6 x 12 mm
Phillips head bolts.
Step 14
Connect firebox and grill base (item #9)
together using six M6 x 12 mm bolts.
Step 15
Connect firebox support (item #8)
with firebox base (item #35) using two
M6 x 12 mm Phillips head bolts and
M6 nuts.
9
INS_810-3044-S_SNP.qxd 10/4/10 10:21 AM Page 10

Step 16
Install smokestack assembly (item #18)
into grill lid (item #17) using two
M6 x 12 mm bolts and M6 nuts.
Step 17
Install smokestack damper (item #19)
and spring onto smokestack assembly
(item #18). Secure smokestack damper
and spring using one M6 cap nut.
Step 18
Install the temperature gauge
(item #21)and temperature thermometer
bezel (item #22) as illustrated.
10
INS_810-3044-S_SNP.qxd 10/4/10 10:21 AM Page 11

11
Step 19
Attach grill lid handle (item #23) using
two M6 x 12 mm bolts and M6 nuts
as illustrated.
Step 20
Install grill lid (item #17) on grill base (item
#9) using two M6 x 25 mm shoulder bolts
and two cotter pins.
Step 21
Attach the charcoal tray (item #12) to
charcoal grate (item #13) by hooking tray
edges onto grate frame.
HOT CAUTION
PRECAUCION CALIENTE
INS_810-3044-S_SNP.qxd 10/4/10 10:21 AM Page 12

Step 22
Use charcoal grate adjusters (item #14) to
lower charcoal grate assembly into grill
base (item #9). Rest charcoal grate
adjusters on supports in grill base
(item #9).
Step 23
Install the warming rack (item #16) inside
the grill lid (item #17). Insert the rack pin
through the holes from the outside of grill
lid (item #17).
Align the warming rack support arm holes
with the holes on the side panel of grill
base (item #9).
12
Cotter Pin
INS_810-3044-S_SNP.qxd 10/4/10 10:21 AM Page 13

13
Step 24
Place cooking grills (item #15) on
support lips of grill base (item #9).
Step 25
Place firebox charcoal grate (item #30)
inside the bottom of firebox.
Step 26
Place firebox cooking grills (item #29)
inside the top of firebox base (item #35).
INS_810-3044-S_SNP.qxd 10/4/10 10:21 AM Page 14

14
Smoke’N Pit
(Assembled)
Step 27
Insert grease cup holder (item #36) into
holes on right leg brace (item #8).
INS_810-3044-S_SNP.qxd 10/4/10 10:21 AM Page 15

15
PREPARATION FOR USE
& LIGHTING INSTRUCTIONS
PLACE THE GRILL OUTDOORS ON A HARD, LEVEL, NON-COMBUSTIBLE SURFACE
AWAY FROM ROOF OVERHANG OR ANY COMBUSTIBLE MATERIAL. NEVER USE ON WOODEN OR OTHER SURFACES THAT
COULD BURN. PLACE THE GRILL AWAY FROM OPEN WINDOWS OR DOORS TO PREVENT SMOKE FROM ENTERING YOUR
HOUSE. IN WINDY WEATHER, PLACE THE GRILL IN AN OUTDOOR AREA THAT IS PROTECTED FROM THE WIND.
READ ALL SAFETY WARNINGS AND INSTRUCTIONS CAREFULLY
BEFORE OPERATING YOUR GRILL.
Prior to your first use of the Brinkmann Smoke’N Pit, follow the
instructions below carefully to cure your grill. Curing your grill will
minimize damage to the exterior finish as well as rid the grill of paint
odor that can impart unnatural flavors to the first meal prepared on
your Brinkmann Smoke’N Pit.
IMPORTANT: To protect your grill from excessive rust, the unit must be
properly cured and covered at all times when not in use. A
cover for your Smoke’N Pit may be ordered directly from
Brinkmann by calling 800-468-5252.
Step 1
Lightly coat all interior surfaces of the Smoke’N Pit including cooking
grills with vegetable oil or vegetable oil spray. Do not coat charcoal
grates or charcoal tray.
Step 2
Place a tin can on the grease cup holder. A tin can must be placed
under the grease hole at all times.
Step 3
Follow the instructions below carefully to build a fire. You may use
charcoal and/or wood as fuel in the Smoke’N Pit (see “Adding
Charcoal/Wood During Cooking” section of this manual).
WARNING: Never use charcoal that has been pre-treated with lighter
fluid. Use only a high grade plain charcoal or charcoal/wood
mixture.
If using a Charcoal Chimney Starter, follow all manufacturer’s warnings
and instructions regarding the use of their product. Start with 8
pounds of charcoal in cooking chamber and 3.5 pounds of charcoal in
firebox. This should be enough charcoal to cook with, once the curing
process has been completed. When charcoal is burning strong,
carefully place hot coals in center of each charcoal grate.
WARNING: DO NOT use grill without charcoal ash tray in place. DO NOT
attempt to remove charcoal ash tray while tray contains hot
coals.
NOTE: To extend the life of your grill, make sure that hot coals and
wood do not touch the walls of grill.
IF USING CHARCOAL CHIMNEY STARTER, PROCEED TO STEP 6
Start with 8 pounds of charcoal in cooking chamber and 3.5 pounds of
charcoal in firebox. This should be enough charcoal to cook with once
the curing process has been completed. Open the firebox air shutter
approximately 1" to 2" and smokestack damper halfway.
Curing Your Grill
INS_810-3044-S_SNP.qxd 10/4/10 10:21 AM Page 16

Step 4
Saturate charcoal with lighting fluid. With lids open wait 2 to 3
minutes to allow lighting fluid to soak into charcoal. Store charcoal
lighting fluid safely away from the grill.
Step 5
With grill lids open, stand back and carefully light charcoal and allow
to burn until covered with a light ash (approximately 20 minutes).
Charcoal lighting fluid must be allowed to completely burn off prior to
closing grill lids.
WARNING: Charcoal lighting fluid must be allowed to completely burn off
prior to closing grill lid (approximately 20 minutes). Failure to
do this could trap fumes from charcoal lighting fluid in grill
and may result in a flash-fire or explosion when lid is
opened.
WARNING: Keep hot coals away from the firebox air shutter to prevent
coals from falling out.
Step 6
With coals burning strong, close the lids. Allow the temperature to
reach 250°F on heat indicator. Maintain this temperature for 2 hours.
Step 7
Increase the temperature to approximately to 400°F. This can be
achieved by opening the smokestack damper and adding more
charcoal and/or wood (see “Adding Charcoal/Wood During Cooking”
section of this manual). Maintain this temperature for 1 hour then
allow unit to cool completely.
NOTE: Never exceed a temperature of 450°F in cooking chamber. It
is important that the exterior of the smoker is not scraped or
rubbed during the curing process.
IMPORTANT: To protect your smoker from excessive rust, the unit must
be cured periodically and covered at all times when not in
use. A smoker cover can be ordered directly from
Brinkmann by calling 800-468-5252.
YOUR BRINKMANN SMOKE’N PIT IS NOW CURED AND
READY FOR USE.
16
INS_810-3044-S_SNP.qxd 10/4/10 10:21 AM Page 17

17
Step 1
Place a charcoal grate in firebox. Place cooking grills in cooking
chamber, then follow instructions below carefully to build a fire. You
may use charcoal and/or wood as fuel in the Smoke’N Pit (see “Adding
Charcoal/Wood During Cooking” section of this manual).
WARNING: Never use charcoal that has been pre-treated with
lighter fluid. Use only a high grade plain charcoal or
charcoal/wood mixture.
If using a Charcoal Chimney Starter, follow all manufacturer’s warnings
and instructions regarding the use of their product. Carefully place
3.5 pounds of hot coals on charcoal grate.
WARNING: Keep hot coals away from the firebox air shutter to prevent
coals from falling out.
NOTE: To extend the life of your grill, make sure that hot coals and
wood do not touch the walls of grill.
IF USING CHARCOAL CHIMNEY STARTER, PROCEED TO STEP 5
If you choose to use charcoal lighting fluid, ONLY use charcoal
lighting fluid approved for lighting charcoal. Do not use gasoline,
kerosene, alcohol or other flammable material for lighting charcoal.
Follow all manufacturer’s warnings and instructions regarding the
use of their product. Place 3.5 pounds of charcoal on charcoal grate
in firebox.
Step 2
Place a tin can on the grease cup holder. A tin can must be placed
under the grease hole at all times.
Step 3
Saturate charcoal with lighting fluid. With firebox lid open wait 2 to 3
minutes to allow lighting fluid to soak into charcoal. Store charcoal
lighting fluid safely away from the grill.
Step 4
Open the firebox air shutter approximately 1" to 2" and smokestack
damper half way. With firebox lid open, stand back and carefully light
charcoal and allow to burn until covered with a light ash
(approximately 20 minutes). Charcoal lighting fluid must be
allowed to completely burn off prior to closing firebox lid.
WARNING: Failure to do this could trap fumes from charcoal lighting
fluid in grill and may result in a flash-fire or explosion when
lid is opened.
Smoking
OPERATING INSTRUCTIONS
PLACE THE GRILL OUTDOORS ON A HARD, LEVEL, NON-COMBUSTIBLE SURFACE
AWAY FROM ROOF OVERHANG OR ANY COMBUSTIBLE MATERIAL. NEVER USE ON WOODEN OR OTHER
SURFACES THAT COULD BURN. PLACE THE GRILL AWAY FROM OPEN WINDOWS OR DOORS TO PREVENT SMOKE
FROM ENTERING YOUR HOUSE. IN WINDY WEATHER, PLACE THE GRILL IN AN OUTDOOR AREA THAT IS
PROTECTED FROM THE WIND.
READ ALL SAFETY WARNINGS AND INSTRUCTIONS CAREFULLY
BEFORE OPERATING YOUR GRILL.
INS_810-3044-S_SNP.qxd 10/4/10 10:21 AM Page 18

18
Step 5
With coals burning well, carefully add wood chunks using long
cooking tongs (see “Flavoring Wood” and “Adding Charcoal/Wood
During Cooking” sections of this manual.)
Step 6
Place cooking grills on grill support lips. Use charcoal grate adjusters
to position charcoal grate to lowest level.
WARNING: Always wear oven mitts/gloves when adjusting cooking levels
to protect your hands from burns.
Step 7
Place food on cooking grills and close lids.
Step 8
The ideal smoking temperature is between 175°F and 250°F. For large
cuts of meat, allow approximately one hour of cooking time per pound
of meat. Always use a meat thermometer to ensure food is fully
cooked before removing from grill.
Step 9
Allow grill to cool completely, then follow instructions in the
“After-Use Safety” and “Proper Care & Maintenance” sections of this
manual.
During the smoking process, avoid the temptation to open lid to check
food. Opening the lid allows heat and smoke to escape, making
additional cooking time necessary.
Food closest to the firebox will cook and brown faster. Rotate food
midway through the cooking cycle. If food is excessively browned or
flavored with smoke, wrap food in aluminum foil after the first few
hours of smoking. This will allow food to continue cooking without
further browning or smoke flavoring.
When cooking fish or extra lean cuts of meat, you may want to try
water smoking to keep the food moist. Before starting a fire, place
charcoal grate to lowest level. Use a flat bottom metal pan shallow
enough to fit between charcoal grate and cooking grills as a water pan.
Set the metal pan on charcoal grate under food and cooking grills. Fill
with water or marinade until q full.
CAUTION: Always use oven mitts/gloves to protect your hands. Liquid
in water pan will be extremely hot and can scald or burn.
Always allow liquid to cool completely before handling. Do
not allow liquid to completely evaporate from water pan.
CAUTION: Charcoal grate must be set at lowest level. Never raise or
lower charcoal grate when water smoking as hot water may
splash onto coals creating a burst of hot steam and coals.
Smoke Cooking Tips
INS_810-3044-S_SNP.qxd 10/4/10 10:21 AM Page 19

19
Step 1
Remove cooking grills from cooking chamber and set aside. Place
charcoal grate assembly to lowest level of cooking chamber.
Step 2
Place a tin can on the grease cup holder. A tin can must be placed
under the grease hole at all times.
Step 3
Lightly coat all interior surfaces of the Smoke’N Pit including cooking
grills with vegetable oil or vegetable oil spray. Do not coat charcoal
grates or charcoal tray.
Step 4
Follow the instructions below carefully to build a fire. You may use
charcoal and/or wood as fuel in the Smoke’N Pit (see “Adding
Charcoal/Wood During Cooking” section of this manual).
WARNING: Never use charcoal that has been pre-treated with lighter
fluid. Use only a high grade plain charcoal or charcoal/wood
mixture.
If using a Charcoal Chimney Starter, follow all manufacturer’s warnings
and instructions regarding the use of their product. Start with 8
pounds of charcoal. When charcoal is burning strong, carefully place
hot coals in center of each charcoal grate.
WARNING: DO NOT use grill without charcoal ash tray in place. DO NOT
attempt to remove charcoal ash tray while tray contains hot
coals.
NOTE: To extend the life of your grill, make sure that hot coals and
wood do not touch the walls of grill.
IF USING CHARCOAL CHIMNEY STARTER, PROCEED TO STEP 7
If you choose to use charcoal lighting fluid, ONLY use charcoal lighting
fluid approved for lighting charcoal. Do not use gasoline, kerosene,
alcohol or other flammable material for lighting charcoal. Follow all
manufacturer’s warnings and instructions regarding the use of their
product. Start with 8 pounds of charcoal. Place the charcoal in center
of each charcoal grate.
Step 5
Saturate charcoal with lighting fluid. With lid open wait 2 to 3 minutes
to allow lighting fluid to soak into charcoal. Store charcoal lighting fluid
safely away from the grill.
Step 6
Open the firebox air shutter approximately 1" to 2" and smokestack
damper half way. Stand back and carefully light charcoal. With firebox
and cooking chamber lid open, allow charcoal to burn until covered
with a light ash (approximately 20 minutes). Charcoal lighting fluid
must be allowed to completely burn off prior to closing cooking
chamber lid.
WARNING: Charcoal lighting fluid must be allowed to completely burn off
prior to closing grill lid and doors (approximately 20
minutes). Failure to do this could trap fumes from charcoal
lighting fluid in grill and may result in a flash-fire or explosion
when lid is opened.
Grilling In Cooking Chamber
INS_810-3044-S_SNP.qxd 10/4/10 10:21 AM Page 20
/