Page is loading ...

®
FPC Corporation - 355 Hollow Hill Drive - Wauconda, IL 60084
Phone: (847) 487- 4583 Fax: (847) 487-0174
website: www.surebonder.com e-mail: [email protected]
Read All Safety Rules and Instructions Carefully
Save this manual for Future Reference
0312
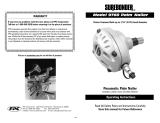
Operating Instructions
Gauge - ” Nailer
Includes: Allen wrench & oil
23 ½” 1-3/8 Pin
Model 97 10 Pin Nailer
1/2” thru 1-3/8"
23
Gauge
Pin Nails
Visit us at surebonder.com for our full line of products
WARRANTY
If you have any problems with this tool, please call FPC Corporation
toll-free at 1-800-860-3838 before returning it to the place of purchase.
FPC Corporation warrants this product to be free from defects in material and
workmanship, under normal conditions of use and when used in accordance with
FPC operating instructions, for a period of 90 days from the date of purchase by the
user. Within the 90 day warranty FPC at its option shall repair or replace product.
The product must be returned at the distributor/user expense, either within
warranty or out. Repaired or replaced products will receive a 60 day warranty.
USER MUST BE USING THE PROPER NAILS FOR THIS WARRANTY TO BE VALID.
WARRANTY IS VOID IF INCORRECT TYPE OF NAILS ARE USED.

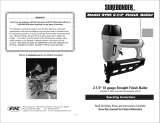
1. Exhaust valve 21. Upper Remote Housing 41. "O" Ring 29*3 61. Base Plate Nail Tank
2. Screw 4*20 22. Remote Core 42. Tall Cover 62. Spring
3. Washer #4*1.1t 23. "O" Ring 3.5*1.6 43. Air Plug 63. Base Plate
4. Cylinder Cap 24. Remote Housing 44. Grip 64. Base Plate
5. Gasket 25. "O" Ring 9.8* 1.9 45. Ring ф 3.1*2.9 65. Spring
6. Air Seal 26. Catch Guide Plate 46. Click Lever 66. Pin
7. "0" Ring 11.8*2.4 27. Pin 2.5*22 47. Step Pin 67. "O" Ring 2.3-1.4
8. Spring 28. Spring 48. Driver Guide Cover 68. Click Lever
9. Firing Valve Piston 29. Release Catch 49. Screw 4*6 69. Upper Mag
10. "0" Ring 21.8*2.4 30. Grip 50. Ring 70. Screw 4*10
11. "0" Ring 8* 3 31. Spring 51. Magnet 71. Tall Cover
12. "0" Ring 16* 3 32. Release Lade 52. Screw 4*16 72. Firing Vave Piston Set
13. "0" Ring 32*2.5 33. Trigger 53. Driver Guide 73. Trigger Valve Set
14. Collar 34. Pin 2.5*14 54. Pusher 74. Piston Set
15. "0" Ring 22.4*2.65 35. Ring 5.5*2 55. Spring Holder 75 Spring Pin 2*11
16. Cylinder 36. Pin 56. Screw 4*10 76. Washer
17. Bumper 37. "O" Ring 14.8*2.4 57. Screw 4*12 77. Screw 4*14
18. Body 38. Piston Head 58. Magazine Support 78. Spring
19. Nozzle 39. Outer Spring Pin 59. Lower Mag
20. Air Seal 40. Driver Blade 60. Stopper
Parts Kits (No other replacement parts available)
9710-400
9710-420 Fastener Kit Includes Numbers: 2, 3, 8, 19, 27, 28, 31, 34, 35, 36, 39, 45, 47, 49, 50,
51, 52, 56, 57, 62, 65, 66, 70, 75, 76, 77, 78
9710-410 Drive Pin Kit Includes Numbers: 38, 39, 40
9710-72 Firing Valve Piston Set Includes Numbers: 9,10,11,12
9710- 73 Trigger Valve Set Includes Numbers: 21, 22, 23, 24, 25
Seal Kit Includes Numbers: 5, 6, 7, 10, 11, 13, 15, 17, 20, 23, 35, 37, 41, 67
To order parts go to: www. fastener-products .com
9710 Micro Pin Nailer Part Identification

1
8
THE SAFETY WARNINGS BELOW CANNOT COVER ALL POSSIBLE SITUATIONS THAT MAY
OCCUR. THESE BASIC SAFETY PRECAUTIONS SHOULD ALWAYS BE FOLLOWED TO PROTECT
AGAINST PERSONAL INJURY TO THE OPERATOR OR OTHER PERSONNEL IN THE AREA, AS
WELL AS DAMAGE TO THE EQUIPMENT. READ AND UNDERSTAND THESE WARNINGS BEFORE
USING EQUIPMENT.
Keep tool away from children, and DO NOT allow children near work area.
Do not allow children or untrained personnel to handle this nailer.
DO NOT operate this nailer while tired, or under the influence of drugs,
alcohol, or medication that makes you drowsy.
Never point the nailer at yourself or others - always assume that the
nailer is loaded, and proceed with caution.
Wear safety glasses and ear protection. The nailer operator and all
personnel in the work area must wear safety glasses that protect the front and side, to avoid eye
injury. Ear plugs should be worn to avoid
hearing damage.
If operator will be working in a situation where overhead work will
be done (i.e. on a ladder, stairs, or scaffolding) a hard hat must be worn.
Never wear loose clothing or jewelry because it can get caught
in the moving parts of this nailer. Make sure long hair is covered,
To avoid getting it caught in nailer.
Keep the nailer pointed away from yourself and others at all times. Keep hands and all body
parts away from rear area of nailer (near air hose) to guard against injury. Keep hands and feet
away from firing head during use.
Keep proper balance and footing at all times - do not over-reach.
Never use oxygen, bottled gas or any type of combustible fuel as
a power source - it can cause an explosion and serious injury.
Do not use near flammable liquids or gases - the stapler sparks
During operation, and could cause an explosion and serious injury.
Use an air hose that will withstand at least 150 psi, OR 150% of the maximum pressure of the
compressor.
Never connect this tool to compressed air if the pressure could exceed 200 psi, as the nailer
could burst. Use only clean, dry, regulated compressed air, with pressure not exceeding 120 psi.
Do not use a non-relieving coupler with this nailer - if used, the nailer could remain charged with
air after disconnecting, and would still be able to drive a nail even after being disconnected. The
nailer and air hose must have a coupling so that all pressure is removed from the nailer when the
coupling is disconnected.
Do not depress the trigger or safety mechanism while loading nails - accidental firing of a nail
can occur. Keep your fingers away from the trigger when not firing nails. Always keep the nailer
pointed downward during loading.
Do not use an air hose that is too long - nailer operator can trip over it. Make sure all connections
are tight.
(Warnings continued next page)
Improper use of this nailer can result in death or serious injury.
This manual contains important information about product safety.
Read and understand this entire manual before operating this nailer
IMPORTANT SAFETY WARNINGS:
! DANGER
AIR
Troubleshooting
The following form lists the common operating system with problems and solutions. Please
read the form carefully and follow it.
WARNING: If any of the following symptoms appear during your operation, stop using the tool
immediately, or serious personal injury could result. Only a qualified person or an authorized
service center can perform repairs or replacement of tool. Disconnect tool from air supply
before attempting repair or adjustment. When replacing O-rings or cylinders, lubricate with air
tool oil before assembly.
Problem
Nailer operates but no nail is
driven.
Week drive. Slow to cycle.
Drives too deep.
Skipping nails, Intermittent
feed.
Nails jam, Driven nail is bent
Drives properly at normal
speed but does not drive fully
drive at faster nailing speed.
Check
Check for jam
Check feeder function
Ribbon spring damaged or week?
Check for proper nails
Check air pressure
Drive blade worn?
Piston O-ring worn or damaged?
Check air pressure.
Check for proper nails.
Check nail feeder function.
Ribbon spring worn or damaged?
Piston O-ring cut or worn out?
Check for proper nails.
Drive blade worn?
Check inside hose diameter.
Correction
Clear a nail jam.
Clean and lubricate.
Replace ribbon spring.
Use correct nails.
Increase air pressure. Do not
exceed 120 psi.
Use pneumatic oil.
Replace tool.
Reduce air pressure 70-100 psi.
Use only recommended nails.
Clean and lubricate.
Replace ribbon spring.
Use pneumatic oil.
Replace tool.
Use only recommended nails.
Replace tool.
Use larger air hose.

2
Disconnect air hose from nailer:
before performing maintenance.
when clearing a jam.
when tool is not in use.
when moving it to another location.
when handing nailer to another person.
DO NOT place finger on trigger when disconnecting air hose - the nailer could fire
when reconnected to the air supply.
Carry nailer by the handle only, not by the air hose.
Do not drive nails close to the edge of the workpiece. It could split, allowing a nail to
fly or ricochet and causing personal injury. Do not try to drive nails at too steep an
angle. Make sure nailer is held firmly during firing to minimize recoil.
Do not drive a nail into very hard material, thin material, or on top of an existing nail-
the nail could ricochet, causing personal injury.
Never use the nailer if it is leaking air, the contact safety mechanism is not working,
nailer has missing or damaged parts, or requires repair. Make sure all screws and
caps are securely tightened.
Inspect the nailer before each use to insure that the trigger, safety mechanism, and
spring are operating properly. Lock the nailer in a clean, dry storage area between
uses.
Only use parts, nails, and accessories supplied or recommended by FPC Corporation.
Unauthorized parts or fasteners can lead to malfunction and serious injury. Only
personnel trained by FPC Corporation or the distributor shall repair the nailer. Do not
modify this tool in any way.
Never use in presence of flammable liquids or gases. The nailer produces sparks
during operation.
Never use the nailer in sites containing lacquer, paint, benzine, thinner, gasoline,
gases, adhesive agents, and other materials which are combustible or explosive.
Check for live wires. Avoid the risk of electrical shock by checking for live wires that
may be hidden by walls, floors, or ceilings. Turn off the breaker switch pertaining to
that work area.
Do not store the nailer in a cold weather environment. Keep the nailer in a warm area
until the start of work. If it is in a cold area, bring it in a warm area and allow it to
warm up before use.
Manufacturer assumes no responsibility for consequential or indirect damages from
the use of this product.
Save this manual and have it available for tool operators
reference!
IMPORTANT SAFETY WARNINGS: continued
Mode of Operation
This nailer is equipped with a contact safety mechanism and does not operate unless the contact
mechanism is depressed. There is only one method of operation to drive nails with this nailer.
- Intermittent operation (Trigger fire).
- Position the nail outlet on the workpiece with finger off the trigger.
- Depress the push lever firmly until it is completely depressed.
- Pull the trigger to drive a nail.
- Remove finger from the trigger.
- To drive another nail, move the nailer along the workpiece and repeat this procedure.
Lubrication
It is important that the nailer be properly lubricated. Without proper lubrication the nailer will not
work properly and parts will wear prematurely. Use pneumatic tool lubricant. Do not use
detergent oil or additives. These lubricants will harm the O-rings and other rubber parts. This will
cause the nailer to malfunction. Filter-regulator-lubricator units should always be used. Keep the
lubricator filled with pneumatic tool lubricant. If a lubricator is unavailable supply 3-5 drops of
pneumatic tool lubricant into the air plug on the nailer twice a day.
Cold Weather Care
Do not store the nailer in a cold weather environment. If the nailer is cold bring the nailer into a
warm area and allow to warm up before use. To warm the nailer: Reduce the air pressure to 40 psi
( 2.8bar 2.8kgf/cm²). Remove all nails from the nailer. Connect the air hose and blank-fire the nailer.
The lowered air pressure will be enough to blank-fire the nailer. Slow speed operation of the nailer
tends to warm the moving parts.
Inspecting the magazine
Disconnect the air hose. Keep magazine and nose of tool clean and free of any dirt, lint or abrasive
particles. Clean the magazine by removing plastic tips or wood chips which may have
accumulated in the magazine. Lubricate it with pneumatic tool lubricant.
Storing
When not in use for an extended period of time apply a thin coat of pneumatic tool lubricant to the
steel parts in order to avoid rust. Do not store the nailer in a cold weather environment. Keep the
nailer in a warm and dry place.
In order to avoid double fire:
- Do not push nailer on workpiece with strong force.
- Take nailer away from workpiece using recoil.
- Release trigger quickly when performing trigger fire.
- Do not drive nails into thin boards or near corners and edges of work piece.
- Nails can be driven through or away from workpiece and hit someone.
- Never drive nails from both sides of a wall at the same time. Nails can be driven into and through
the wall and hit a person on the opposite side.
- Never use nailer which is defective or operating abnormally.
- Do not use nailer as a hammer.
- Disconnect air hose from nailer when performing maintenance:
MAINTENANCE
7

5
Exhaust Deflector
Exhaust deflector can be positioned to
point in any 360° direction. Reposition
deflector by grasping firmly and rotating to
the desired position.
Jam Clearing
replace 4 nosepiece screws.
Disconnect air supply. Push track release button
and remove nails. Unscrew 4 nosepiece screws
to release nosepiece. Clear jam. Replace
nosepiece and
Loading Nails (continued)
To load:
Nailer has easy drop-in side loading. To open: push in track release button and slide track backward.
Drop strip of pin nails onto track magazine making sure that nails are flat against track. Nailer will
not close if improperly loaded.. Push track closed until it locks into place
Push release button Drop pin nails in
Load nails flat against track Push closed
To remove fasteners: Push release button and slide track backward. Remove nails.
Adjusting Air Pressure
Do not exceed 120 psi. Adjust the air pressure at recommended operating pressure 70 to 120
psi according to the length of nails and the hardness of the workpiece.
The correct air pressure is the lowest pressure which will do the job. Using the Nailer at a
higher then required air pressure unnecessarily over stresses the Nailer.
Testing The Nailer
Operators and all others within the work area must wear safety glasses
with side shields conforming to ANSI Z87.1 specifications.
Before actually using the nailer test the nailer using the checklist below.
Disconnect air hose connection from the nailer. Remove all nails for the nailer.
1) Pull the trigger and push the contact safety mechanism.
THE CONTACT SAFETY MECHANISM AND TRIGGER MUST MOVE FREELY.
2) Adjust the air pressure to 70 psi (4.9 bars 5 kgf/cm²).
Connect air hose.
DO NOT LOAD NAILS IN THE NAILER.
THE NAILER MUST NOT LEAK AIR.
3) Hold the Nailer downward without touching the workpiece with the contact safety
mechanism. Pull and hold the trigger for 5 seconds or longer.
THE NAILER MUST NOT OPERATE.
4) Remove your finger from the trigger and press the contact safety mechanism to the
workpiece.
THE NAILER MUST NOT OPERATE.
5) If no abnormal operation is observed, you may load nails in the Nailer. If abnormal operation
occurs, stop using the nailer and contact the service center immediately.
Loading Nails
When loading nails into Nailer:
Disconnect tool from compressed air supply.
Do not depress trigger..
Keep Nailer pointed downward.
! WARNING
! DANGER
! WARNING
ANSI Z87.1
4

SPECIFICATIONS
Overall Dimensions: 9.50” x 7.75" x 1.75”
Capacity: 100 Pin nails
Nail Length: 1/2” -1-3/8” Pin nails
Nail size: 23 Gauge
Operating Pressure: 60 - 100 SI (4-7 bar)
Air Inlet Size: 1 /4” N .P.T
Weight of Tool: 2..05 lbs.
NAIL SELECTION
23 Gauge 1/2”-1-3/8” Pin Nails
Nosepiece
Trigger
Rubber Grip
Nail magazine
Track
Release Button
Nail reload indicator
Adjustable
Exhaust Cover
OPERATION
1/2” to 1-3/8 “
6
Pin Nail Length
1/4” Male Quick
Release Connector
3
APPLICATIONS
Including but not limited to: Finish / Trimwork, Cabinets, Molding, Furniture Making & Picture
Frames
FEATURES
- Lightweight Housing
- Adjustable Exhaust
- Soft Grip Handle Reduces Fatigue
NEVER use oxygen or other bottled gases. Explosion may occur.
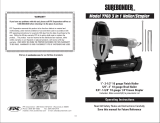
This nailer is designed to operate on clean, dry, regulated compressed air, between 70 and 100
psi. It is preferable to include an air filter, pressure regulator, and automatic oiler within 15 feet
of the tool, if possible.
An air filter is needed to remove contaminates and moisture that are contained in compressed
air; filtering will significantly prolong the life of the tool. If an automatic oiler is not installed,
place 3-5 drops of oil into the tool's air inlet twice a day. Do not install a quick coupler
directly into the tool. Higher pressure drastically reduces tool life.
The nailer comes factory-equipped with a male quick connector. The nailer must always be
connected to the air supply with a coupling that removes all pressure when it is disconnected.
NOTE: all components used with this nailer (air hose, connectors, regulators, filters, etc) must
be rated at 120 psi, OR 120% of the maximum compressor potential, whichever is higher. Do
not connect this nailer to a system with maximum potential air pressure greater than 200 psi.
! DANGER
20
0
40
60
80
100
120
140
160
Lubricator Regulator Filter
To Nailer
Quick Connector Quick Coupler
AIR CONNECTION SET UP
To compressor
/