Page is loading ...

HDMI Video Switcher
VS410HDMIR
VS810HDMIR
Instruction Manual
*VS810HDMIR displayed, actual
product may vary from photo
4 to 1 HDMI Switcher with Remote/RS-232 control
8 to 1 HDMI Switcher with Remote/RS-232 control

TTaabbllee ooff CCoonntteennttss
Introduction . . . . . . . . . . . . . . . . . . . . . . . . . . . . . . . . . . . . . . . . . . . . . . . . . . . . .1
Features . . . . . . . . . . . . . . . . . . . . . . . . . . . . . . . . . . . . . . . . . . . . . . . . . . . . . . . .1
Before You Begin . . . . . . . . . . . . . . . . . . . . . . . . . . . . . . . . . . . . . . . . . . . . . . . . .1
System Requirements . . . . . . . . . . . . . . . . . . . . . . . . . . . . . . . . . . . . . . . . . . .1
Contents . . . . . . . . . . . . . . . . . . . . . . . . . . . . . . . . . . . . . . . . . . . . . . . . . . . . .1
Installation - VS410HDMIR . . . . . . . . . . . . . . . . . . . . . . . . . . . . . . . . . . . . . . . . .2
Installation - VS810HDMIR . . . . . . . . . . . . . . . . . . . . . . . . . . . . . . . . . . . . . . . . .3
Using the remote control . . . . . . . . . . . . . . . . . . . . . . . . . . . . . . . . . . . . . . . . . .4
RS-232 Remote Control Protocol . . . . . . . . . . . . . . . . . . . . . . . . . . . . . . . . . . .4
RS-232 Remote Control Commands . . . . . . . . . . . . . . . . . . . . . . . . . . . . . . . . .5
Technical Support . . . . . . . . . . . . . . . . . . . . . . . . . . . . . . . . . . . . . . . . . . . . . . . .5
Warranty Information . . . . . . . . . . . . . . . . . . . . . . . . . . . . . . . . . . . . . . . . . . . . .7
Instruction Manual
i

IInnttrroodduuccttiioonn
Thank
you for purchasing a StarTech.com HDMI Video Switcher. This device allows you to
connect multiple HDMI signal sources to a single HDMI input on your HDTV, eliminating
the need to manually swap out connections to your display. With the ability to control this
device using a serial connection as well as the added convenience of the included
remote control, you can switch between up to 4 (VS410HDMIR) or 8 (VS810HDMIR)
HDMI signal sources, at the push of a button.
FFeeaattuurreess
• Easy-to-use remote control and RS-232 Serial control for switching between devices
• DCE/DTE mode selectable
• HDMI 1.1, HDCP 1.1 compliant
• Signal Enhance feature improves signal quality for added distance transmissions
BBeeffoorree yyoouu BBeeggiinn
Contents
• HDMI Switcher (1)
• Remote Control (1)
• Instruction Manual (1)
• Universal power adapter (1)
System Requirements
• HDMI signal sources (1-4: VS410HDMIR), (1-8: VS810HDMIR)
• A display with an available HDMI input
Instruction Manual
1

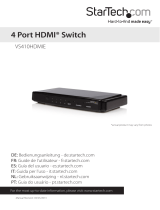
1 - Remote Control Sensor
2 - Input Select/Indicators
- Press the Input button repeatedly to switch to the
desired input source. The LED will illuminate to
indicate which input source is being selected.
3 - Signal Enhancement/Indicator - Pressing the Signal Enhance button will turn on
this feature, to improve signal quality over long
distance transmissions. Pressing this button a
second time will turn this feature off. The Signal
Enhance LED will illuminate, when the signal is
enhanced.
4 - Power LED Indicator - This LED will illuminate to indicate that power is connected
to the video switch.
1 - HDMI Output - Connect the HDMI output to the HDMI input of your display, using
standard HDMI cable. (Please see Accessories)
2 - HDMI Inputs - Connect your HDMI sources to each of the HDMI inputs of the uni.,
using standard HDMI cable.
3 - Power - Plug the included 5V DC power supply into this port. Plug the opposite
end of the power cable into an available power receptacle.
4 - RS232 - Connect your serial control consoles to this 9-pin D-sub female
connectors, as an added remote control option. Please refer to the table
of serial commands listed on pages 3 & 4 for further information
Instruction Manual
2
Front Panel
IInnssttaallllaattiioonn
- VS410HDMIR
Rear Panel

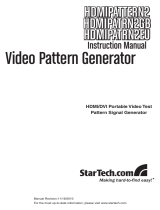
1 - Remote Control Sensor
2 - HDMI Inputs
- Connect your HDMI sources to each of the HDMI inputs, using
standard HDMI cable.
3 - Input select indicators - Press the Input button repeatedly to switch to the
desired input source. The LED will illuminate to indicate
which input source is being selected.
4 - Signal Enhancement/Indicator - Pressing the Signal Enhance button will turn on
this feature, to improve signal quality over long
distance transmissions. Pressing this button a
second time will turn this feature off. The Signal
Enhance LED will illuminate, when the signal is
enhanced.
5 - Power LED Indicator - This LED will illuminate to indicate that power is connected
to the video switch.
1 - HDMI Output - Connect the HDMI output to the HDMI input of your display, using
standard HDMI cable. (Please see Accessories)
2 - HDMI Inputs - Connect your HDMI sources to each of the HDMI inputs of the uni.,
using standard HDMI cable.
3 - Power - Plug the included 5V DC power supply into this port. Plug the opposite
end of the power cable into an available power receptacle.
4 - RS232 - Connect your serial control consoles to this 9-pin D-sub female
connectors, as an added remote control option.Please refer to the table of
serial commands listed on pages 3 & 4 for further information
Instruction Manual
3
Front Panel
Rear Panel
IInnssttaallllaattiioonn
- VS810HDMIR

UUssiinngg tthhee RReemmoottee CCoonnttrrooll
1 - Power - Press the Power button to turn the video switch on and off.
2 - Direct Input Selector - Press the number that corresponds to to the input you wish
to use.
VS410HDMIR / VS410HDMIR RS-232 Remote Control Protocol
The connection between VS410HDMIR/VS810HDMIR and Remote Controller with
RS-232 modem cable:
RS-232 Transmission format:
Baud rate: 9600 bps
Data bits: 8 bits
Parity: None
Stop bit: 1 bit
Instruction Manual
4
VS410HDMIR / VS810HDMIR Remote Controller
Pin Definition Pin Definition
1
NC 1 NC
2 TxD 2 RxD
3 RxD 3 TxD
4 NC 4 NC
5 GND 5 GND
6 NC 6 NC
7 NC 7 NC
8 NC 8 NC
9 NC 9 NC

VS410HDMIR / VS410HDMIR RS-232 Remote Control Commands
• Commands are combined with words and digits
• Combination commands must be seperated by the ASCII character SPACE
• The command will be executed after the ASCII character “CR” is entered
• After the CR character is entered, the unit will reply “OK” if the command is legal
• If the command is illegal, the unit will reply with “NG”
• DB9 Straight-through cable is required
SSppeecciiffiiccaattiioonnss
Instruction Manual
5
Command Code Comment
“Port” + “Space” + “1” + “CR” Port 1 ON
“Port” + “Space” + “2” + “CR” Port 2 ON
“Port” + “Space” + “3” + “CR” Port 3 ON
“Port” + “Space” + “4” + “CR” Port 4 ON
“Port” + “Space” + “?” + “CR” Query port status
“Signal” + “Space” + “1” + “CR” Enable Signal Enhance
“Signal” + “Space” + “0” + “CR” Disable Signal Enhance
“Signal” + “Space” + “?” + “CR” Query Signal Status
“Power” + “Space” + “1” + “CR” Power ON
“Power” + “Space” + “0” + “CR Power OFF
“Power” + “Space” + “?” + “CR Query Power Status
Product dimensions 280x104x44mm (L x W x H)
Maximum bandwidth Frequency Bandwidth 1.65Gbps
Input resolutions supported
PC: VGA, SVGA, XGA, SXGA, and UXGA
HDTV: 480i / p, 576i / p, 720p, 1080i, and 1080p
Power adapter 5V DC 2.6 Amp Universal Power Supply (included)
Connections
VS410HDMIR: HDMI female input (4)
HDMI female output (1)
RS-232 DB9 female (1)
VS810HDMIR: HDMI female input (8)
HDMI female output (1)
RS-232 DB9 female (1)

TTeecchhnniiccaall SSuuppppoorrtt
StarTech.com’s lifetime technical support is an integral part of our commitment to provide
industry-leading solutions. If you ever need help with your product, visit
www.startech.com/support and access our comprehensive selection of online tools,
documentation, and downloads.
WWaarrrraannttyy IInnffoorrmmaattiioonn
This product is backed by a one-year warranty. In addition, StarTech.com warrants its
products against defects in materials and workmanship for the periods noted, following
the initial date of purchase. During this period, the products may be returned for repair, or
replacement with equivalent products at our discretion. The warranty covers parts and
labor costs only. StarTech.com does not warrant its products from defects or damages
arising from misuse, abuse, alteration, or normal wear and tear.
Limitation of Liability
In no event shall the liability of StarTech.com Ltd. and StarTech.com USA LLP (or their
officers, directors, employees or agents) for any damages (whether direct or indirect,
special, punitive, incidental, consequential, or otherwise), loss of profits, loss of business,
or any pecuniary loss, arising out of or related to the use of the product exceed the
actual price paid for the product.
Some states do not allow the exclusion or limitation of incidental or consequential
damages. If such laws apply, the limitations or exclusions contained in this statement
may not apply to you.
Instruction Manual
5

Revised: November 7 2006 (Rev. A)
About StarTech.com
StarTech.com is “The Professionals’ Source for Hard-to-Find Computer
Parts”. Since 1985, we have been providing IT professionals with the
quality products they need to complete their solutions. We offer an
unmatched selection of computer parts, cables, server management
solutions and A/V products and serve a worldwide market through our
locations in the United States, Canada, the United Kingdom and Taiwan.
Visit www.startech.com for complete information about all our products
and to access exclusive interactive tools such as the Parts Finder and the
KVM Reference Guide. StarTech.com makes it easy to complete almost
any IT solution. Find out for yourself why our products lead the industry in
performance, support, and value.
/