Page is loading ...

Cells-to-cDNA™ II Kit
Reverse Transcription without RNA Isolation
Part Number AM1722, AM1723
Cov_CellsII.fm Page 1 Tuesday, September 7, 2010 11:40 AM

Cells-to-cDNA™ II Kit
(Part Number AM1722, AM1723)
Protocol
I. Introduction. . . . . . . . . . . . . . . . . . . . . . . . . . . . . . . . . . . . . . . . . . . . . . . . . . . . . . . 1
A. Background
B. Materials Provided with the Kit and Storage Conditions
C. Materials Not Provided with the Kit
D. Related Products Available from Applied Biosystems
II. Cells-to-cDNA II Procedure. . . . . . . . . . . . . . . . . . . . . . . . . . . . . . . . . . . . . . . . . . . 6
A. Important Experimental Parameters
B. Cell Lysis, DNase I Treatment and Inactivation
C. RT-PCR
C.I. Two-Step RT-PCR
C.II. One-Step RT-PCR
D. Analysis of the Data
III. Troubleshooting . . . . . . . . . . . . . . . . . . . . . . . . . . . . . . . . . . . . . . . . . . . . . . . . . . 17
A. Positive Control Reactions
B. No PCR Product or Unexpected PCR Products
C. RT-PCR Products in the Negative Control(s)
IV. Appendix . . . . . . . . . . . . . . . . . . . . . . . . . . . . . . . . . . . . . . . . . . . . . . . . . . . . . . . . 23
A. References
B. Safety Information
C. Quality Control

P/N 1722M Revision D Revision Date: September 7, 2010
For research use only. Not for use in diagnostic procedures. By use of this product, you accept the
terms and conditions of all applicable Limited Label Licenses. For statement(s) and/or disclaimer(s) applica-
ble to this product, see below.
Information in this document is subject to change without notice. Applied Biosystems assumes no responsibil-
ity for any errors that may appear in this document.
Applied Biosystems disclaims all warranties with respect to this document, expressed or implied, including but
not limited to those of merchantability or fitness for a particular purpose. In no event shall Applied Biosystems
be liable, whether in contract, tort, warranty, or under any statute or on any other basis for special, incidental,
indirect, punitive, multiple or consequential damages in connection with or arising from this document,
including but not limited to the use thereof.
Literature Citation: When describing a procedure for publication using this product, please refer to it as the
Cells-to-cDNA™ II Kit.
Warranty and Liability: Applied Biosystems is committed to delivering superior product quality and perfor-
mance, supported by industry-leading global service and technical support teams. Warranty information for
the accompanying consumable product is available at www.ambion.com/info/warranty in “Limited Warranty
for Consumables,” which is subject to the exclusions, conditions, exceptions, and limitations set forth under
the caption “EXCLUSIONS, CONDITIONS, EXCEPTIONS, AND LIMITATIONS” in the full warranty
statement. Please contact Applied Biosystems if you have any questions about our warranties or would like
information about post-warranty support.
Patents and Licensing Notifications: US and foreign patents are pending for the Cells-to-cDNA II pro-
cess. This product is compatible with the 5' nuclease detection and dsDNA-binding dye processes covered by
patents owned or licensable by Applied Biosystems. No license under these patents is conveyed expressly, by
implication, or by estoppel to the purchaser by the purchase of this product. Further information on purchas-
ing licenses may be obtained by contacting the Director of Licensing, Applied Biosystems, 850 Lincoln Centre
Drive, Foster City, California 94404, USA.
Trademarks: Applied Biosystems, AB (Design), Ambion, and RNaseZap are registered trademarks, and
Cells-to-cDNA, DNAZap and QuantumRNA are trademarks of Applera Corporation or its subsidiaries in the
US and/or certain other countries. AmpliTaq is a registered trademark of Roche Molecular Systems, Inc.
Armored RNA is a patented technology jointly owned by Asuragen, Inc. and Cenetron Diagnostics, Ltd. U.S.
Patents #5,677,124, #5,919,625, #5,939,262 and patents pending. The trademark "Armored RNA" is owned
by Asuragen, Inc. and Cenetron Diagnostics, Ltd. SYBR is a registered trademark of Molecular Probes, Inc. All
other trademarks are the sole property of their respective owners.
© 2010 Life Technologies Corporation. All Rights Reserved.

I.A. Background
Introduction
1
I. Introduction
A. Background
The Cells-to-cDNA™ II Kit is designed to produce cDNA from mam-
malian cells in culture without isolating RNA. The cDNA produced is
specifically intended for use in the polymerase chain reaction (PCR).
RT-PCR is one of the main methods used for measuring mRNA levels
from a small number of cells. Traditionally, the substrate for RT-PCR
has been RNA isolated from the sample. RNA isolation is fairly time
consuming, and with small samples, it can lead to loss of material. By
eliminating most of the RNA isolation procedure using
Cells-to-cDNA II, the RT-PCR analysis of a large number of samples
becomes much faster and simpler.
Klebe et al., (1996) developed a strategy of adding placental RNase
inhibitor to a crude cell lysate. Although successful, this method is lim-
ited because placental RNase inhibitor is only effective against members
of the RNase A superfamily. There are many other types of cellular
RNases that can contribute to RNA degradation that are not inhibited
by placental RNase inhibitor. The Cells-to-cDNA II procedure inacti-
vates all RNases present in cultured mammalian cells by heat treatment
in the Cell Lysis II Buffer included with the kit.
Procedure overview In the Cells-to-cDNA II Kit, a crude cell lysate is subjected to RT-PCR
without purifying the RNA. Cells from tissue culture are washed in PBS
and then heated in Cell Lysis II Buffer. This treatment has two impor-
tant effects. First, it ruptures the cells, releasing the RNA into the Cell
Lysis II Buffer. The heating step also inactivates endogenous RNases,
protecting the RNA from degradation. Next the crude cell lysate is
treated with DNase 1 to degrade genomic DNA, and the mixture is
heated a second time to inactivate the DNase 1. At this point the cell
lysate is ready for reverse transcription and PCR using either a one-step
or two-step RT-PCR strategy.
Applications The Cells-to-cDNA II Kit is well suited to the analysis of a large num-
ber of differentially treated cultures. For example, the regulation of an
mRNA may be followed as cells are treated with increasing concentra-
tions of a particular chemical (Sumida et al., 1999). Alternatively, cells
may be treated with a panel of different drugs to screen for candidates
that have the desired effect on a particular mRNA, or a time course can
be followed (Su et al., 1997). Ambion® QuantumRNA™ Internal Stan-
dards are ideal for these types of quantification studies, because they
enable the use of 18S rRNA as an internal standard. Cells-to-cDNA II
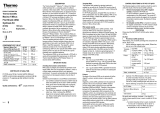
products can be used in real-time PCR*, as shown in Figure 1, and the
procedure lends itself to automation in 96-well plates.

Cells-to-cDNA™ II Kit
I.A. Background
2
Of course, this procedure can also be used simply to amplify a particular
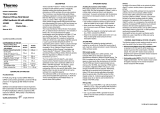
sequence for cloning or as an efficient method for generating an
RT-PCR template for samples consisting of very few cells (Figure 2).
* This product is compatible with the 5' nuclease detection and dsDNA-binding dye processes covered by patents owned or licens-
able by Applied Biosystems. No license under these patents is conveyed expressly, by implication, or by estoppel to the purchaser
by the purchase of this product. Further information on purchasing licenses may be obtained by contacting the Director of
Licensing, Applied Biosystems, 850 Lincoln Centre Drive, Foster City, California 94404, USA.
Figure 1. Real time RT-PCR of GAPDH using Cells-to-cDNA™ II
A serial dilution of HeLa cells was used as template in the Cells-to-cDNA II procedure. A sample of the cDNA produced
(20% of the reaction product) was then used as a template for amplification of GAPDH in real-time PCR. A) 12,500 cell
equivalents B) 6250 cell equivalents C) 2500 cell equivalents D) 500 cell equivalents E) 100 cell equivalents F) 20 cell
equivalents G) 5 cell equivalents. The graph shows the fluorescence of each PCR product plotted against the PCR cycle
number. Inset: The standard curve of Ct value vs. cell concentration. The correlation was 0.99.
0 2 4 6 8 10 12 14 16 18 20 22 24 26 28 30 32 34 36 38 40
10
0
10
-1
10
-2
45.00
40.00
35.00
30.00
25.00
20.00
15.00
10.00
5.00
0.00
-5.00
101102103
Cycle
ΔRn
ABC D E F G

I.A. Background
Introduction
3
Cell types compatible with
the Cells-to-cDNA II Kit
The cell types listed below have been shown to work well with the
Cells-to-cDNA II Kit:
• HeLa (Human)
• HeLa S3 (Human)
• K562 (Human)
• CHO (Chinese Hamster)
• COS-7 (African Green Monkey)
• J558 (mouse)
• MCF-7 (Human)
Figure 2. Linear Detection of CDC2 Using the Cells-to-cDNA™ II Kit
K562 cells were serially diluted and cell lysates were prepared using the
Cells-to-cDNA II Kit according to the protocol to give the indicated lysate con-
centrations. For this experiment, 2 μL of each cell lysate was used as a template for
amplification of CDC2 in a 10 μL one-step real-time RT-PCR in a 384-well plate
using an ABI 7900-HT real-time thermal cycler.
30
25
15
20
1 10 100 1000
Cell Lysate Concentration (cell/µL)
Ct Value
R2=0.997
Slope=-3.31

Cells-to-cDNA™ II Kit
I.B. Materials Provided with the Kit and Storage Conditions
4
B. Materials Provided with the Kit and Storage Conditions
Storage at –20°C should be in a non frost-free freezer. Properly stored
kits are guaranteed for 6 months from the date of shipment.
C. Materials Not Provided with the Kit
• Compatible thermostable DNA polymerase
• PCR primers for the target of interest
Verify that PCR primers function well with cDNA made from puri-
fied RNA before trying to use them with cDNA made from this kit.
•10
XPCR Buffer
• Thermal cycler for PCR
• Materials and equipment for analyzing DNA on agarose gels
P/N AM1722
40 rxn
P/N AM1723
100 rxn Component Storage
40 mL 40 mL 1X PBS (pH 7.4) –20°C*
*The Armored RNA
® Control and the 1X PBS may alternatively be stored at 4°C.
4mL 10 mL Cell Lysis II Buffer –20°C
80 μL 200 μL DNase 1 (2 U/μL) –20°C
200 μL 500 μL 10X RT Buffer –20°C
40 μL 100 μL M-MLV Reverse Transcriptase –20°C
40 μL 100 μL RNase Inhibitor (10 U/μL) –20°C
160 μL 400 μL dNTP Mix (2.5 mM each dNTP) –20°C
80 μL 200 μL Random Decamers (50 μM) –20°C
80 μL 200 μL Oligo(dT)
18
Primers (50 μM) –20°C
50 μL 120 μL Armored RNA® Control –20°C*
80 μL 200 μL Armored RNA® Primer Pair (10 μM ea) –20°C
80 μL 200 μL Endogenous Primer Pair (5 μM ea) –20°C
1.75 mL 3.5 mL Nuclease-free Water any temp†
† Store Nuclease-free Water at –20°C, 4°C, or room temp.
Table 1. Compatible thermostable DNA Polymerases
Conventional thermostable
DNA polymerases
Hot start thermostable DNA
polymerases
Ambion® SuperTaq™ Polymerase Sigma JumpStart Taq
ABI AmpliTaq® Invitrogen Platinum® Taq
Roche Taq Eppendorf HotMaster® Taq
Epicenter MasterAmp™ Tfl Qiagen HotStarTaq

I.D. Related Products Available from Applied Biosystems
Introduction
5
D. Related Products Available from Applied Biosystems
*SuperTaq™ Polymerase
P/N AM2050, AM2052
* Use of this product is covered by US patent claims and patent claims outside the US. The purchase of this product includes a lim-
ited, non-transferable immunity from suit under the foregoing patent claims for using only this amount of product for the pur-
chaser’s own internal research. No right under any other patent claim (such as the patented 5’ Nuclease Process), no right to perform
any patented method, and no right to perform commercial services of any kind, including without limitation reporting the results
of purchaser's activities for a fee or other commercial consideration, is conveyed expressly, by implication, or by estoppel. This prod-
uct is for research use only. Diagnostic uses under Roche patents require a separate license from Roche. Further information on pur-
chasing licenses may be obtained by contacting the Director of Licensing, Applied Biosystems, 850 Lincoln Centre Drive, Foster
City, California 94404, USA.
Thermostable DNA Polymerase (includes 10X buffers and dNTPs)
†SuperTaq™ Plus Polymerase
P/N AM2054, (50U)
P/N AM2056, (250U)
† Use of this product is covered by US patent claims and patent claims outside the US. The purchase of this product includes a lim-
ited, non-transferable immunity from suit under the foregoing patent claims for using only this amount of product for the pur-
chaser’s own internal research. No right under any other patent claim (such as the patented 5’ Nuclease Process) and no right to
perform commercial services of any kind, including without limitation reporting the results of purchaser's activities for a fee or other
commercial consideration, is conveyed expressly, by implication, or by estoppel. This product is for research use only. Diagnostic
uses require a separate license from Roche. Further information on purchasing licenses may be obtained by contacting the Director
of Licensing, Applied Biosystems, 850 Lincoln Centre Drive, Foster City, California 94404, USA.
Extended Range Thermostable DNA Polymerase
Super Taq Plus has a proof reading activity, and produces significantly higher
yields of PCR products than ordinary Taq polymerase (includes 10X buffers
and dNTPs)
DNA
Zap
™ Solution
P/N AM9890
DNA degradation solution to avoid PCR contamination. This mixture is able
to degrade high levels of contaminating DNA and RNA from surfaces
instantly.
RNase
Zap
®
Solution
P/N AM9780, AM9782, AM9784
RNaseZap RNase Decontamination Solution is simply sprayed, poured, or
wiped onto surfaces to instantly inactivate RNases. Rinsing twice with dis-
tilled water will eliminate all traces of RNase and RNaseZap Solution.
QuantumRNA™ 18S Internal
Standards
P/N AM1716–AM1718
Exclusive kit containing blocked 18S primers that can be used in conjunction
with the supplied unblocked 18S primers to attenuate the amount of PCR
product amplified from 18S RNA. Use this kit to do multiplex relative
RT-PCR, comparing the RT-PCR signal from the gene of interest to that
amplified from the desired fraction of 18S RNA.

Cells-to-cDNA™ II Kit
II.A. Important Experimental Parameters
6
NOTE
II. Cells-to-cDNA II Procedure
A. Important Experimental Parameters
The Cells-to-cDNA II procedure was designed for mammalian cells
grown in tissue culture. It was primarily tested with HeLa S3 cells
grown in DMEM medium (Gibco BRL) supplemented with fetal
bovine serum (FBS), but it has also been successfully used with other
cells lines such as CHO, COS-7, J558, and MCF-7 cells. The cells
should be grown using the conditions and treatments under study. Any
type of culture vessel can be used. The parameters important for the suc-
cess of the procedure are discussed below.
1. Cell lysis, RNase
inactivation temperature
In step B.2 on page 10, it is crucial that the temperature of the sample
itself reach 75°C. To achieve this, use a calibrated heating device, and
preheat it well in advance of starting the procedure. Also, in some cases
it will be necessary to set the temperature of the heating device above the
target temperature to heat samples rapidly and hold them at 75°C.
Some guidelines are provided below for different types of heating
devices and sample containers:
We recommend performing all
heating steps in a thermal cycler,
rather than in a dry heat block. For
cells growing in 96-well plates,
better results can be obtained by
transferring the cell lysate into a PCR
plate or into strip tubes, and
performing all heating steps in a
thermal cycler.
• Microcentrifuge tubes heated in a heat block or water bath: Use a
recently calibrated device, and set it to 75°C. Since it is so important
that the cell lysis and RNase inactivation temperature is at least
75°C, it is a good idea to measure whether a mock sample reaches
75°C using a thermometer with a microprobe. If necessary, increase
the temperature setting of the heat source until the sample reaches
and holds at 75°C.
• Thin wall, 0.5 mL PCR tubes should be heated in a thermal cycler
set to 75°C.
• To use 96-well plates for optimization experiments, be aware that
there may be as much as a 10–20°C temperature difference between
the temperature setting of the heating device and the temperature of
solutions in the wells of the plate. Set the heating device so that the
contents of the 96-well plate will reach 75°C in ~10–12 min, and
increase the incubation time in step II.B.2 on page 10 to 15 min.
Turn on the heating device so that it will reach the target tempera-
ture before it is needed. For oven incubators, we recommend heating
96-well plates on an aluminum block placed (and preheated) inside
the incubator.
2. Volume and temperature
of Cell Lysis II Buffer
Use 100 μL ice-cold Cell Lysis II Buffer per sample.
It is important to lyse the cells in 100 μL of ice-cold Cell Lysis II Buffer.
The Cell Lysis II Buffer should be ice-cold to protect the RNA from
degradation; as soon as the cells are exposed to it they will lyse, and

II.A. Important Experimental Parameters
Cells-to-cDNA II Procedure
7
RNases have minimal activity at 0°C. The 100 μL volume is recom-
mended so that the temperature of the cell lysate will ramp to 75°C rap-
idly. Be sure that the lysate reaches a final temperature of 75°C for
complete RNase inactivation.
3. Cell concentration The maximum concentration of cells that can be used varies somewhat
with the cell type. To obtain maximum sensitivity, the optimal cell con-
centration for HeLa cells is 2500 cells/μL Cell Lysis II Buffer
(2.5 x 10⁵cells total). At higher concentrations, it may still be possible
to amplify messages, but a less intense band may be produced compared
to the optimal cell concentration. Determining the ideal cell concentra-
tion is crucial, because if the cell concentration is too high (typically
>2500 cells/μL), then RNases in the sample may not be totally inacti-
vated and/or the high concentrations of cellular components (debris)
may inhibit reverse transcription.
Ambion strongly recommends doing a pilot experiment with
the Armored RNA® Control to determine the ideal cell
concentration for each of your cell types.
In a pilot experiment, a constant amount of the Armored RNA Control
is added to a serial dilution of cells; the mixture is lysed and DNase
treated, and the lysates are reverse transcribed. cDNA is then amplified
using the Armored RNA Primer Pair. The highest cell concentration
that produces an Armored RNA PCR product equivalent to the amount
amplified in the absence of cells is considered the optimal cell concen-
tration. Instructions for doing this pilot experiment are included in the
protocol alongside the instructions for experimental samples.
4. PCR primer selection For the most efficient design of PCR primers for RT-PCR applications,
use primer design software. These programs can identify and avoid
primers that are likely to generate unwanted side products, and they
provide useful information about primer annealing temperature and
other cycling parameters. If possible, primers should be designed to
avoid regions of high secondary structure (free energies less than
–14 kcal/mol), as these may inhibit read-through of reverse tran-
scriptase (Pallansch et al., 1990). It is also useful to choose primers that
span an exon-exon boundary in the target mRNA to minimize amplifi-
cation from genomic DNA, or to distinguish PCR products amplified
from genomic DNA.
5. Test the PCR reagents on
cDNA from purified RNA
Make sure the PCR works well on cDNA reverse transcribed from puri-
fied RNA from the same cell line before trying to use those primers and
reagents on cDNA from Cells-to-cDNA II. Remember that in a typical
Cells-to-cDNA II reaction, the RNA from ~12,500 cells will be reverse
transcribed; this will be ≤50 ng of total RNA. Try doing RT-PCR on a
titration of purified RNA from your source. If a product can be

Cells-to-cDNA™ II Kit
II.B. Cell Lysis, DNase I Treatment and Inactivation
8
amplified from ~50–200 ng RNA, there should be no problem amplify-
ing the same fragment from Cells-to-cDNA II reactions. Otherwise,
work on optimizing the PCR with purified RNA as template before try-
ing to amplify cDNA from Cells-to-cDNA II (e.g. denaturation tem-
perature, cycle times, primer sequence, etc.).
6. One-step or two-step
RT-PCR
Traditionally reverse transcription (RT) and PCR are done as
two separate sequential reactions. Using the Cells-to-cDNA II Kit,
however, a one-step RT-PCR can be used to save time and to facilitate
higher throughput. In one-step RT-PCR, the reverse transcription and
PCR reagents are added to the template in a single vessel at the same
time. Combining the RT and PCR into a single reaction greatly reduces
the amount of time it takes to go from a cell lysate to PCR product. The
Cells-to-cDNA II Kit contains reagents for reverse transcription, but
thermostable DNA polymerase (available from Ambion®) and gene spe-
cific primers must be purchased separately. Both one- and two-step
RT-PCR procedures are included in section II.C starting on page 11.
B. Cell Lysis, DNase I Treatment and Inactivation
1. Detach cells (if necessary)
and wash once in cold
PBS
The main purpose for washing the cells is to remove the serum in the
medium because it contains ribonucleases and inhibitors of reverse tran-
scription. The type of vessel in which the cells were grown and the
adherence property of the cells will dictate the method used for washing.
Use the method commonly employed in your lab to wash cells in cold
PBS, or follow the instructions provided below for adherent cells grown
in a 96-well plate (step 1a on page 8), Adherent cells grown in other ves-
sels (step 1b on page 9) or cells in suspension (step 1c on page 9). It may
be possible to omit the washing step entirely if the growth medium has
very little serum or if only a few cells will be added to the Cell Lysis II
Buffer. (This can be determined using the Armored RNA control.)
1a. Adherent cells grown in
a 96-well plate
a. Count or estimate the number of cells. Make sure that each well
doesn’t contain more than 100,000 cells because that would result in
a final cell concentration that could inhibit RT-PCR. If your cells
grow to >100,000 cells per well, we recommend determining the
optimal cell concentration by doing the pilot experiment described
below.
b. Aspirate the medium from the well.
c. Add 0.2 mL of cold 1X PBS to the well.
d. Aspirate the PBS from the well.
The cells are now ready for lysis (step 2 on page 10).

II.B. Cell Lysis, DNase I Treatment and Inactivation
Cells-to-cDNA II Procedure
9
1b. Adherent cells grown in
other vessels
If adherent cells are grown in any vessel larger than a 96-well plate, they
must be detached from the growing surface. Any method can be used to
detach the cells as long as they remain intact through the procedure.
Some cell types can be removed by simply scraping them with a rubber
spatula (Freshney, 1987), but this method is not recommended for pilot
experiments because cells may not be completely dispersed in PBS, com-
promising the accuracy of cell concentrations in serial dilutions.
a. Detach the cells (use the method routinely followed in your tissue
culture facility for the cell type).
If trypsin is used, inactivate it before proceeding (typically this is done
by rinsing in 1XPBS and resuspending in culture medium containing
serum).
b. Resuspend cells in culture medium and count or estimate the number
of cells.
c. Pilot experiment: Aliquot different amounts of cells into RNase-free
tubes and place on ice (cells should be in culture medium at this
step—not in Cell Lysis II Buffer). We recommend testing from about
104 cells to ~106 cells in increments of 2- to 5-fold, (i.e. 104, 5 x10⁴,
105, 5 x10⁵, 106 cells). Be sure to include a control with no cells.
Subsequent experiments: Place an aliquot containing the optimal
number of cells (as determined in the pilot experiment) in a clean
microfuge tube on ice.
d. Rinse cells at least once in cold (4°C) 1XPBS.
e. Pellet the cells at 4°C, discard the 1XPBS, and replace in ice. To
pellet the cells, use the centrifugal force and time typical for the
particular cell line; this is often ≤1200 xg for ~5 min.
The cells are now ready for lysis (step 2 on page 10).
1c. Cells grown in
suspension
a. Count or estimate the number of cells. Cells grown in suspension can
be counted directly in their growth medium using a hemocytometer.
b. Pilot experiment: Aliquot different amounts of cells into RNase-free
tubes, and place on ice (cells should be in culture medium at this
step—not in Cell Lysis II Buffer). We recommend testing from about
104 cells to ~106 cells in increments of 2-fold to 5-fold, (i.e. 104,
5x10⁴, 105, 5 x10⁵, 106 cells). Be sure to include a control with no
cells.
Subsequent experiments: Place an aliquot containing the optimal
number of cells (as determined in the pilot experiment) in a clean
microfuge tube on ice.
c. Pellet the cells at 4°C, discard the growth medium (e.g. by aspiration),
and replace them on ice. To pellet the cells, use the centrifugal force
typically used for the particular cell line; this is often ≤1,200 xg for
~5 min.

Cells-to-cDNA™ II Kit
II.B. Cell Lysis, DNase I Treatment and Inactivation
10
d. Add ~1 mL cold (4°C) 1XPBS and flick the tube gently to resuspend
the cell pellet.
e. Re-pellet the cells, remove the 1XPBS by aspiration, and replace the
cells in ice.
The cells are now ready for lysis (step 2 below).
2. Add 100 μL ice-cold Cell
Lysis II Buffer, mix, and
incubate 10 min at 75°C
This step lyses the cells, releasing their RNA. It also inactivates RNases
that are either released from the cells or that are present in any remain-
ing growth medium. It is very important that the samples are heated to
at least 75°C, see section A.1 on page 6 for recommendations on using
different heating devices for this step.
Pilot experiment:
a. Mix 1 μL Armored RNA Control per 100 μL of Cell Lysis II Buffer.
You will need 100 μL of solution per sample.
b. Add 100 μL ice-cold Cell Lysis II Buffer + Armored RNA Control to
each sample, mix by vortexing or pipetting, and leave on ice until Cell
Lysis II Buffer has been added to all samples. Include a sample that
has no cells, only the Armored RNA Control. This sample will be the
standard to which the samples with cells will be compared.
c. Immediately transfer to a heating device, and incubate for 10 min at
75°C—for 96-well plates, incubate 15 min.
Subsequent experiments:
a. Add 100 μL ice-cold Cell Lysis II Buffer to cells on ice and mix by
vortexing or pipetting. Keep the experiment on ice until Cell Lysis II
Buffer has been added to all samples.
b. Once Cell Lysis II Buffer has been added to all the samples,
immediately transfer to a heating device, and incubate for 10 min at
75°C—for 96-well plates, incubate 15 min.
3. Cool the sample on ice Remove the sample from the heat source and place on ice.
4. Add 2 μL DNase I per
100 μL Cell Lysis II Buffer
The final DNase I concentration should be 0.04 U/μL.
Mix the solution thoroughly by vortexing gently, centrifuge briefly to
bring the solution to the bottom of the tube or plate.
5. Incubate at 37°C for
15 min
Incubate the DNase I reaction at 37°C for 15 min to degrade the
genomic DNA in the sample. This is especially important if the primer
pair for PCR does not span an exon-exon boundary or if there are
pseudogenes for the target in the genome. Otherwise, PCR products
generated from the genomic DNA will be indistinguishable from those
amplified from cDNA.

II.C. RT-PCR
Cells-to-cDNA II Procedure
11
6. Inactivate the DNase at
75°C for 5 min
It is important to inactivate the DNase by heating to 75°C for 5 min
because otherwise it would degrade the products of reverse transcription.
NOTE
Lysates made from
≥
2.5 x 10
4
cells can be stored at –20°C for periods up to
1 week, or at –80°C for up to 2 months.
Lysates made from <2.5 x 10
4
cells should be used for RT-PCR immediately.
C. RT-PCR
One- or two-step RT-PCR Procedures for both two-step and one-step RT-PCR are shown below.
We recommend using the two-step procedure for initial experiments
with new targets and/or cells. If two-step RT-PCR produces easily
detectable products from most or all of the samples, then it is feasible to
try one-step RT-PCR. The major advantage of one-step RT-PCR is that
it is considerably quicker than the two step strategy.
C.I. Two-Step RT-PCR
1. Primers for reverse
transcription
Type of primers
Generally reverse transcription reactions in two-step RT-PCR are
primed with one of the following types of primers:
• random primers: random sequence oligonucleotides
• oligo(dT) primers: oligo(dT)17–24 oligonucleotides
• gene specific primers: oligonucleotide that can hybridize with the
specific RNA under study, for example a reverse (antisense) PCR
primer
The choice of first strand primer is mostly based on user preference. The
greatest yield of cDNA is usually obtained by using short random prim-
ers, however, this yield advantage is often no longer seen at the end of
the PCR. In fact the yield of specific product after the PCR step may be
the same using either random primers or oligo(dT). When template is
limiting, final RT-PCR yield may be somewhat higher when the
first-strand reaction is primed with random primers as opposed to
oligo(dT) or gene-specific primers (see Innis et al., Chapter 3, for fur-
ther discussion).
Past experience with a particular target may indicate which type of
primer is preferable, either for maximizing yield or for maximizing spec-
ificity of the RT-PCR product. In the absence of prior experience, it
may be desirable to compare the yield and purity of products between
reactions primed with random primers, oligo(dT), and the reverse PCR
primer.

Cells-to-cDNA™ II Kit
II.C.I. Two-Step RT-PCR
12
Concentration of primers for RT
The concentration of both the Random Decamers and the Oligo(dT)
Primers supplied with the Cells-to-cDNA II Kit is 50 μM, yielding a
final concentration of 5 μM in the RT reaction. If a gene specific primer
is used to prime the reverse transcription, its final concentration should
be 0.25–5 μM (Innis et al, Chapter 3).
2. Heat denaturation of the
RNA template
The template RNA is usually heated just before reverse transcription in
two-step RT-PCR experiments. This denatures any secondary structure
that could impede the ability of the enzyme to make a full-length copy
of the template RNA. Since heating can reduce or inactivate reverse
transcriptase activity, the reaction is typically assembled in two parts.
There is some flexibility in choosing which components to add before or
after the heat denaturation; the idea is to heat denature the RNA in the
lysate, and to avoid heat denaturing the heat-labile RT reaction compo-
nents. The reaction volume at the heating step should be at least ~5 μL;
otherwise, the contents of the tube may evaporate.
NOTE
It is often possible to omit preheating of the lysate prior to assembling the
reaction. Good yields of the expected product can often be obtained in
reverse transcription reactions, even for G+C rich targets, without prelimi-
nary heating of the sample.
3. Procedure for reverse
transcription
a. Assemble the following in a nuclease-free microfuge tube, then mix
gently and centrifuge briefly:
NOTE
When multiple reactions are carried out, cocktails of the RT reagents can
be prepared to minimize labor.
Pilot experiment: Use 5 μL cell lysate, and use random primers.
Minus-RT control: Because the cell lysate may have contaminating
genomic DNA even after the DNase treatment, it is important to do
a minus-reverse transcriptase control to demonstrate that the tem-
Amount Component
5–10 μL cell lysate (RNA)
4μL dNTP Mix
2μL first-strand primers*
* Use 2 μL of the supplied Random Decamers or Oligo(dT)18 Primers. If you
use a gene specific primer, its final concentration should be 0.25–5 μM (in
20 μL final reaction volume).
to 16 μL Nuclease-free Water

II.C.I. Two-Step RT-PCR
Cells-to-cDNA II Procedure
13
plate for the PCR product was cDNA, and not genomic DNA. Typ-
ically, the control is a mock reverse transcription, containing all the
RT reagents except the Reverse Transcriptase.
b. (optional) Heat 3 min at ~70°C.
c. Place reaction on ice for 1 min; centrifuge tube briefly and replace on
ice.
d. Add the remaining RT reagents, then mix gently and centrifuge
briefly:
e. Incubate at 42°C for 15–60 min.
f. Incubate at 92–95°C for 10 min to inactivate the reverse
transcriptase.
g. Store reaction at –20°C or proceed to amplification step.
4. PCR amplification a. Assemble the components on ice in thin-walled microcentrifuge tubes
and mix gently:
IMPORTANT
Ambion recommends a hot start for PCRs. At a minimum, assemble reac-
tions on ice, start preheating the thermal cycler to 95°C, and put the tubes
in the thermal cycler when the temperature has reached
≥
85°C.
Pilot experiment: Use 5 μL of the RT reaction, and use 2 μL of the
Armored RNA Primer Pair.
Negative Controls: Include two negative controls. One is the
minus-RT control from the previous step, and the other is a
minus-template PCR. The minus-template PCR should have all the
Amount Component
2μL 10X RT Buffer
1μL M-MLV Reverse Transcriptase
(for the minus-RT control add water here)
1μL RNase Inhibitor
Amount Component
1–5 μL RT reaction
(for the minus-template control use water here)
5μL 10X PCR Buffer
4μL dNTP Mix (2.5 mM each)
to 47 μL Nuclease-free Water
2μL PCR primers (mixture of 10 μM each primer)
2unit thermostable DNA polymerase

Cells-to-cDNA™ II Kit
II.C.II. One-Step RT-PCR
14
NOTE
PCR components, with water substituted for the RT reaction ali-
quot. This control will verify that none of the PCR reagents are con-
taminated with DNA.
Thermal cyclers with very short
ramp times may require slightly
longer incubation times, whereas
machines with virtually no ramp
time, such as Stratagene’s
RoboCycler
®
, typically require 1 min
at each temperature in the cycle for
good results.
b. Cycle as follows:
C.II. One-Step RT-PCR
1. Negative Controls Include two negative controls. One is the minus-RT control with all the
reaction components except the reverse transcriptase, and the other is a
minus-template control where water is used instead of cell lysate.
2. Assemble the reaction Assemble the following on ice in thin-walled microfuge tubes, mix gen-
tly and then centrifuge briefly to collect the contents at the bottom of
the vessel:
Pilot experiment: Use 5 μL cell lysate, and use 1 μL of the Armored
RNA Primer Pair as the PCR primers.
denature: 94°C – 2 min
35 cycles: 94°C – 30 sec
annealing temp.* – 30 sec
*Pilot Experiment: Use 60°C annealing temperature.
Subsequent experiments: Start with the annealing temperature suggested by
your primer design software. An annealing temperature of ~55°C used with the
cycling times shown is often a reasonable starting point, but the optimal tem-
perature and cycling times for your primer and template combination may have
to be determined empirically.
72°C – 30 sec
final extension: 72°C – 5 min
Amount Component
1–5 μL cell lysate
(for the minus-template control add Nuclease-free Water)
2.5 μL 10X RT Buffer
4μL dNTP Mix (2.5 mM each)
1μL RNase Inhibitor
1μL M-MLV Reverse Transcriptase
(for the minus-RT control add Nuclease-free Water)
1μL PCR primers (mixture of 10 μM each primer)
2unit thermostable DNA polymerase
to 25 μL Nuclease-free Water

II.D. Analysis of the Data
Cells-to-cDNA II Procedure
15
3. Cycle as follows: One-step RT-PCR cycling program
D. Analysis of the Data
1. Run PCR products on an
agarose gel
To analyze the RT-PCR, run an aliquot (typically 10–20 μL) on a
native agarose gel in the presence of ethidium bromide, and visualize the
product under UV light. Any typical gels for DNA analysis can be used.
The amount and type of agarose used should be determined based on
the expected size of the reaction products. Generally 2% high resolution
agarose in 1X TBE works well. We typically stain nucleic acids by add-
ing ethidium bromide (0.5 μg/mL) to the running buffer.
The remaining RT-PCR can be stored at –20°C. If desired, the product
can be further purified, for example by gel electrophoresis and electroe-
lution, column filtration, organic extraction, or alcohol precipitation.
For many purposes, for example digestion with most common restric-
tion enzymes, or as transcription template, further purification of the
RT-PCR product is not required.
Negative controls
Both the minus-RT and the minus-template negative controls should
not produce visible PCR products. If bands appear in these lanes, see
section III.C on page 30, for troubleshooting suggestions.
2. Analysis of the pilot
experiment to determine
the optimal cell
concentration
The pilot experiment compares amplification of the Armored RNA
Control alone with its amplification in the presence of cell lysate from
increasing concentrations of cells. When looking at the gel from the
pilot experiment, identify the lane from the sample containing only the
Armored RNA Control (with no cells). The optimal cell concentration
for the type of cells tested will be the concentration used in the lane that
most closely resembles the Armored RNA Control-only lane. This will
typically not be the highest number of cells (containing the largest
amount of template RNA). At higher cell concentrations, the PCR
reverse transcription: 42°C – 15 min
denature: 94°C – 2 min
35 cycles: 94°C – 30 sec
annealing temp.* – 30 sec
*Pilot Experiment: Use 60°C annealing temperature.
Subsequent experiments: Start with the annealing temperature suggested by your
primer design software. An annealing temperature of ~55°C used with the cycling
times shown is often a reasonable starting point, but the optimal temperature and
cycling times for your primer and template combination may have to be deter-
mined empirically.
72°C – 30 sec
final extension: 72°C – 5 min

Cells-to-cDNA™ II Kit
II.D. Analysis of the Data
16
product (147 bp) may be less intense than the product at lower cell con-
centrations. This reduced amplification is attributable to two possible
causes.
• At higher cell concentrations, the RNase inactivation could have
been incomplete, causing some degradation of the control RNA.
• Also, at higher cell concentrations, the cell lysate could have inhib-
ited the reverse transcriptase.
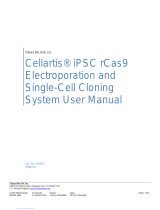
Figure 3. Pilot Experiment to Determine the Optimal Cell
Concentration for HeLa Cells
The indicated amounts of HeLa cells per μL Cell Lysis II Buffer were used in
the Cells-to-cDNA II pilot experiment to determine the optimal cell concen-
tration. Looking at the center gel showing amplification of the Armored RNA
Control, we see that at about 10,000 cells/μL Cell Lysis II Buffer the amplifi-
cation of the Armored RNA Control starts to suffer. The top and bottom gels
provide an idea of the cell concentration needed for amplification of the mes-
sage being studied. Using the Endogenous Primer Pair, amplification of the
Endogenous RNA Control is optimal with 100–2500 cells/μL Cell Lysis II
Buffer. Using primers for GAPDH, however, amplification is still very strong
even with 10,000 cells/μL Cell Lysis II Buffer. This experiment illustrated why
it is useful to do a pilot experiment with each set of PCR primers to identify the
best cell concentration for the most sensitive RT-PCR.
pUC19 Sau3A
10,000
5,000
2,500
1,250
500
100
20
1
0
minus-template
control
Endogenous RNA Control (actin)
Armored RNA Control
GAPDH

III.A. Positive Control Reactions
Troubleshooting
17
III. Troubleshooting
A. Positive Control Reactions
1. Armored RNA® Control Armored RNA Control
The Cells-to-cDNA II Kit includes an Armored RNA Control (US pat-
ents issued and pending). It is a control RNA sequence protected by a
multimeric formation of protein dimers to produce a bacteriophage-like
particle. The RNA is thereby “Armored”, and completely protected
from RNase degradation (Pasloske et al., 1998, DuBois et al., 1999). By
heating the Armored RNA to 75°C, the protein coat denatures, releas-
ing the RNA, which is can then serve as a template for reverse transcrip-
tion. The Armored RNA Control is ideal for the Cells-to-cDNA II Kit
because it can be used to monitor the efficiency of the RNase inactiva-
tion step, and any inhibitory effects of the cell lysate on reverse tran-
scription.
Armored RNA Primer Pair
An Armored RNA Primer Pair is also included with this kit to amplify
the Armored RNA Control. The Armored RNA should generate a
147 bp PCR product when amplified with the Armored RNA Primer
Pair.
2. Routine use of the
Armored RNA Control
The Armored RNA Control may be added to the Cell Lysis II Buffer
used to resuspend every test sample as a matter of routine to help trou-
bleshoot problems if they occur. (Use 1 μL Armored RNA Control for
every 100 μL Cell Lysis II Buffer.) If no PCR product is generated using
the experimental PCR primers, then try to amplify the Armored RNA
Control with the Armored RNA Primer Pair from another aliquot of
the treated lysate. Use the RT-PCR conditions outlined in step 3.d on
page 18. The Armored RNA should generate a 147 bp PCR product.
If the 147 bp control PCR product is amplified, it indicates that the cell
lysis and RT-PCR worked properly.
3. Use of the Armored RNA
Control to test RT-PCR
reagents
Use the Armored RNA Control alone (without any cell lysate) to verify
that the RT-PCR is functioning properly.
a. Add 1 μL of the Armored RNA Control to 100 μL of Cell Lysis II
Buffer.
b. Heat the mixture to 75°C for 10 min.
c. Continue with the DNase treatment and inactivation as described in
steps 4–6 on page 11.
/