Smeg LINEA SO6102S3PN STEKEOVN User manual
- Category
- Kitchen & houseware accessories
- Type
- User manual
This manual is also suitable for

PRECAUTIONS - 55914779559/B
e
PRECAUTIONS 55
General safety instructions 55
Appliance purpose 59
This user manual 59
Manufacturer’s liability 59
Identification plate 59
Disposal 60
To save energy 60
How to read the user manual 60
DESCRIPTION 61
General Description 61
Control panel 61
Other parts 62
Accessories 62
Optional accessories (can be purchased separately)
63
Advantages of steam cooking 64
USE 64
Preliminary operations 64
Using the accessories 64
Digital programmer 65
First use 65
Using the oven 66
Using the temperature probe (on some models only)
74
Cooking advice 76
Mini guide to accessories 78
Discover the recipes 78
Information for Supervisory Bodies 78
Special functions 78
Secondary functions 82
Settings 83
CLEANING AND MAINTENANCE 86
Cleaning the appliance 86
Cleaning the door 86
Cleaning the oven cavity 88
Special cleaning functions 89
Vapor Clean (on some models only) 89
Pyrolytic (on some models only) 90
Descaling 91
Cleaning the reservoir and the water circuit 95
Extraordinary maintenance 97
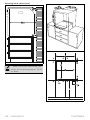
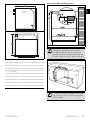
INSTALLATION 97
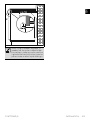
Electrical connection 97
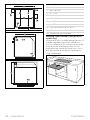
Positioning 98
We advise you to read this manual carefully, which contains all the instructions for maintaining the
appliance’s aesthetic and functional qualities. For further information on the product: www.smeg.com
PRECAUTIONS
General safety instructions
Risk of personal injury
• ATTENTION: during use, the
appliance and its accessible
parts become very hot.
Children must be kept away
from the appliance.
• ATTENTION: during use, the
appliance and its accessible
parts become very hot. Never
touch the heating elements
during use.
• Protect your hands by wearing
oven gloves when moving food
inside the oven.
• Never try to put out a fire or
flames with water: turn off the
appliance and smother the
flames with a fire blanket or
other appropriate cover.
• This appliance may be used by
children aged at least 8 and by
people of reduced physical,
sensory or mental capacity, or
lacking in experience in the use
of electrical appliances,
provided that they are
supervised or instructed by
adults who are responsible for
their safety.

56 - PRECAUTIONS 914779559/B
• Children must not play with the
appliance.
• Keep children under the age of
8 at a safe distance unless they
are constantly supervised.
• Keep children under the age of
8 away from the appliance
when it is in use.
• Cleaning and maintenance
must not be carried out by
unsupervised children.
• The cooking process must
always be monitored. A short
cooking process must be
continuously surveyed.
• Never leave the appliance
unattended during cooking
operations where fats or oils
could be released, as these
could then heat up and catch
fire. Be very careful.
• Do not pour water directly onto
very hot trays.
• Keep the oven door closed
during cooking.
• If you need to move food or at
the end of cooking, open the
door 5 cm for a few seconds,
let the steam come out, then
open it fully.
• Do not insert pointed metal
objects (cutlery or utensils) into
the slots in the appliance.
• Switch off the appliance
immediately after use.
• DO NOT USE OR STORE
FLAMMABLE MATERIALS
NEAR THE APPLIANCE.
• DO NOT USE AEROSOLS IN
THE VICINITY OF THIS
APPLIANCE WHILST IT IS IN
USE.
• DO NOT MODIFY THIS
APPLIANCE.
• Installation and servicing should
be carried out by qualified
personnel in accordance with
current standards.
• Do not try to repair the
appliance yourself or without
the assistance of a qualified
technician.
• Do not pull the cable to unplug
the appliance.
Risk of damaging the appliance
•Do not use abrasive or
corrosive detergents (e.g.
scouring powders, stain
removers and metallic
sponges), rough or abrasive
materials or sharp metal
scrapers on glass parts as this
could cause scratch the surface
and break the glass. Use
wooden or plastic utensils.
• Do not sit on the appliance.
• Do not use cleaning products
containing chlorine, ammonia
or bleach on parts made of
steel or that have metallic
surface finishes (e.g. anodizing,
nickel- or chromium-plating).
• Racks and trays should be
inserted as far as they will go
into the side guides. The
mechanical safety locks that
prevent them from being

PRECAUTIONS - 57914779559/B
e
removed must face downwards
and towards the back of the
oven cavity.
• Do not use steam jets to clean
the appliance.
• Do not spray any spray product
near the appliance.
• Do not obstruct ventilation
openings and heat dispersal
slots.
• Fire hazard: never leave
objects in the oven cavity.
• DO NOT FOR ANY REASON
USE THE APPLIANCE AS A
SPACE HEATER.
• Do not use plastic cookware or
containers when cooking food.
• Do not place sealed tins or
containers in the oven cavity.
• Remove all trays and racks
which are not required during
cooking.
• Do not cover the bottom of the
oven cavity with aluminium or
tin foil sheets.
• Do not place pans or trays
directly on the bottom of the
oven cavity. If necessary use
the rack for the tray.
•If you wish to use greaseproof
paper, place it so that it will not
interfere with the hot air
circulation inside the oven
cavity.
• Do not use the open door to
rest pans or trays on the internal
glass pane.
• Never use the oven door to
lever the appliance into place
when fitting.
• Avoid exerting too much
pressure on the door when
open.
• Do not use the handle to lift or
move this appliance.
For pyrolytic appliances
• When the pyrolitic function is in
use, the surfaces could reach
temperatures that are higher
than usual. Keep children at a
safe distance.
• Before starting the pyrolytic
cycle, remove any food
residues or large spills from
previous cooking operations
from the inside of the oven.
• Before starting the pyrolytic
cycle, remove all accessories
from the oven cavity.
• Before starting the pyrolytic
cycle, switch off the burners or
electric hot plates of the hob
installed above the oven.
Installation and maintenance
• THIS APPLIANCE MUST NOT
BE INSTALLED IN A BOAT OR
CARAVAN.
• The appliance must not be
installed on a pedestal.
• Position the appliance into the
cabinet cut-out with the help of

58 - PRECAUTIONS 914779559/B
a second person.
• To prevent any possible
overheating, the appliance
should not be installed behind
a decoration door or a panel.
• Installation and servicing should
be carried out by qualified
personnel in accordance with
current standards.
• Have the electrical connection
performed by authorised
technical personnel.
• The appliance must be
connected to ground in
compliance with electrical
system safety standards.
• Use cables withstanding a
temperature of at least 90 °C.
• The tightening torque of the
screws of the terminal supply
wires must be 1.5 - 2 Nm.
• If the power cable becomes
damaged, contact technical
support immediately to arrange
for it to be replaced in order to
avoid possible hazards.
• Always use any necessary/
required personal protective
equipment (PPE) before
performing any work on the
appliance (installation,
maintenance, positioning or
movement).
• Before performing any
operation on the appliance,
switch off the power supply.
• ATTENTION: ensure that the
appliance is switched off
before replacing the bulb, to
prevent electric shocks.
• Disconnect the appliance after
the installation, through an
accessible plug or switch in
case of fixed connection.
• Fit the power line with an all-
pole circuit breaker with a
contact separation distance
sufficient to provide complete
disconnection in category III
overvoltage conditions,
pursuant to installation
regulations.
• This appliance can be used up
to a maximum altitude of 2,000
metres above sea level.
For this appliance
• WARNING: ensure that the
appliance is switched off
before replacing the bulb, to
prevent electric shocks.
• Do not rest any weight or sit on
the open door of the
appliance.
• Take care that no objects are
stuck in the doors.
• Do not install/use the
appliance outdoors.
• (on some models only) Only
use the temperature probe
provided or recommended by
the manufacturer.
• For cooking with the Direct
Steam function, take great care
not to exceed the maximum
capacity of the tray (250 ml).
Temperature probe (if present)
• Do not touch the rod or the tip

PRECAUTIONS - 59914779559/B
e
of the temperature probe after
use.
• Wear oven gloves when
handling the temperature
probe.
• Take care not to scratch or
damage enamelled or chrome-
plated surfaces with the tip or
the plug of the temperature
probe.
• Do not insert the temperature
probe into openings and slots
on the appliance.
• When the temperature probe is
not in use, make sure that the
protective metal cap is properly
closed.
• Do not pull the cable to remove
the temperature probe from the
socket or from the food.
• Make sure that the temperature
probe or its cable do not get
caught in the door.
• Make sure that the temperature
probe or its cable do not come
into contact with heating
elements inside the oven.
• No part of the temperature
probe should be allowed to
come into contact with the walls
of the oven cavity, the heating
elements, the racks or the trays
when they are still hot.
• The probe should not be kept
inside the appliance.
• Do not use the temperature
probe during the pyrolytic
cycle.
Appliance purpose
This appliance is intended for
cooking food in the home
environment. Every other use is
considered inappropriate. It
cannot be used:
• in employee kitchens, shops,
offices and other working
environments.
• in farms/farmhouses.
• by guests in hotels, motels and
residential environments.
• In bed and breakfast
accommodation.
This user manual
• This user manual is an integral part of the
appliance and must therefore be kept in its
entirety and within the user's reach for the
whole working life of the appliance.
• Read this user manual carefully before using
the appliance.
• The explanations in this manual include
images, which describe all that regularly
appears on the display. However, it should
be kept in mind that the appliance may be
equipped with an updated version of the
system, and as such, all that appears on the
display may differ from those in the manual.
Manufacturer’s liability
The manufacturer declines all liability for
damage to persons or property caused by:
• use of the appliance other than that
specified;
• failure to comply with the instructions in the
user manual;
• tampering with any part of the appliance;
• use of non-original spare parts.
Identification plate
The identification plate bears the technical data,
serial number and brand name of the
appliance. Do not remove the identification
plate for any reason.

60 - PRECAUTIONS 914779559/B
Disposal
This appliance conforms to the WEEE
European directive (2012/19/EU) and
must be disposed of separately from
other waste at the end of its service life.
The appliance does not contain substances in
quantities sufficient to be considered hazardous
to health and the environment, in accordance
with current European directives.
To dispose of the appliance:
• Cut the power cable and remove it.
• Deliver the appliance to the appropriate
recycling centre for electrical and electronic
equipment waste, or return it to the retailer
when purchasing an equivalent product, on
a one for one basis.
Our appliances are packaged in non-polluting
and recyclable materials.
• Deliver the packing materials to the
appropriate recycling centre.
To save energy
• Only preheat the appliance if the recipe
requires you to do so. The preheating stage
can be disabled for all functions (see
chapter “Preheating”) apart from the PIZZA
(preheating cannot be disabled) and ECO
functions (no preheating stage).
• When using the functions (including the
ECO function), avoid opening the door
during cooking.
• Unless otherwise indicated on the package,
defrost frozen foods before placing them in
the oven.
• When cooking several types of food it is
recommended to cook the foods one after
the other to make the best use of the already
hot oven.
• Use dark metal moulds: They help to absorb
the heat better.
• Remove all trays and racks which are not
required during cooking.
• Stop cooking a few minutes before the time
normally used. Cooking will continue for the
remaining minutes with the heat which has
accumulated inside the oven.
• Reduce any opening of the door to a
minimum to avoid heat dispersal.
• Keep the inside of the oven clean at all
times.
How to read the user manual
This user manual uses the following reading
conventions:
Power voltage
Danger of electrocution
• Disconnect the mains power supply.
• Unplug the appliance.
Plastic packaging
Danger of suffocation
• Do not leave the packaging or any part of it
unattended.
• Do not let children play with the plastic
bags.
Warning/Caution
Information/Advice

DESCRIPTION - 61914779559/B
e
DESCRIPTION
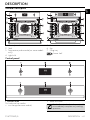
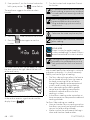
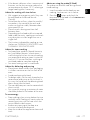
General Description
1 Control panel
2 Seal
3 Temperature probe socket (on some models
only)
4 Light bulb
5 Door
6 Fan
7 Filling tray
Frame shelf
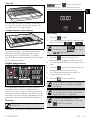
Control panel
1 Function knob
This knob can be used to:
• turn the appliance on and off;
• select a function.
Turn the Function knob to the position 0
to immediately complete any cooking
operation.

62 - DESCRIPTION 914779559/B
2 Digital programmer
Displays the current time, the selected cooking
temperature, power and function and any time
set.
3 Temperature knob
This knob can be used to set:
• the cooking temperature;
• the duration of a function;
• programmed cooking cycles;
• the current time;
• temporarily start or stop a function.
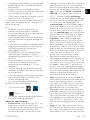
Other parts
Shelves
The appliance features shelves to position trays
and racks at different heights. The insertion
heights are indicated from the bottom upwards.
Cooling fan
The fan cools the appliance and comes into
operation during cooking.
The fan causes a steady outflow of air from
above the door which may continue for a short
period of time even after the appliance has
been turned off.
Oven lighting
The appliance’s interior lighting comes on:
• when the door is opened;
• when any function is selected, apart from the
- - - functions
(depending on the models).
Accessories
• Not all accessories are available on some
models.
• The accessories intended to come into
contact with food are made of materials that
comply with the provisions of current
legislation.
• Original supplied and optional accessories
can be requested to Authorised Assistance
Centres. Use only original accessories
supplied by the manufacturer.
Funnel
Used for filling the reservoir with water.
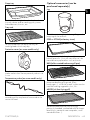
Rack
Used for supporting containers with food during
cooking.
Perforated tray
Useful for steaming fish and vegetables.
Steel baking tray
Useful when cooking cakes (with cooking times
of less than 25 minutes or without steam), rice,
beans and cereals. It is also essential for
collecting liquids produced by steaming or
defrosting foods contained in the perforated
tray above.
When the door is open, it is not possible
to turn off the interior lighting.

DESCRIPTION - 63914779559/B
e
Deep tray
Useful for collecting fat from foods placed on
the rack above and for cooking pies, pizzas,
baked desserts, biscuits, etc.
Tray rack
To be placed over the top of the tray; for
cooking foods which may drip.
Protective cover (on some models only)
Used to cover and protect the temperature
probe socket when the temperature probe is not
in use.
Temperature probe (on some models only)
With the temperature probe, you can cook
according to the temperature measured at the
centre the food.
Optional accessories (can be
purchased separately)
Jug
Useful for containing liquids during filling and
emptying of the reservoir.
PPR2 or STONE(refractory stone)
Ideal accessory for baking bread (pizza,
bread, focaccia...), but you can also use it for
more delicate preparations such as biscuits.
BBQ (teflon-coated barbecue grill pan)
Double-use accessory: the striped side is
recommended for grilling meat (fillets,
hamburgers...), while the smooth surface can be
used for cooking vegetables, fruit, fish...
AIRFRY (oil-free frying grill)
Recommended accessory for air-frying
previously breaded, precooked and/or frozen
food (chips, potato or meat croquettes, small
mozzarella bites...).

64 - USE 914779559/B
Advantages of steam cooking
The steam cooking system cooks any type of
food much smoother and faster and finds its
main applications for:
• Braising and stewing
•Cooking sauces
• Cooking au gratin
•Roasting
•Low temperature cooking
• Regenerating
• Multi-mode cooking
Variations in temperature and steam levels allow
the wished gastronomic result to be achieved.
The addition of steam allows the use of less fat in
favour of a healthier and more genuine cuisine.
It also minimizes the loss of weight and volume
in food while cooking.
Steam cooking is particularly suitable for
cooking meat: in addition to making it very soft,
it maintains it bright and makes it more succulent.
Also recommended for baking leavened and
bread dough. The humidity in fact lets the dough
grow and develop while cooking before
creating the outer crust. The result is a lighter and
more digestible dough, recognizable by thicker
pockets.
It is also ideal for defrosting food rapidly, for
heating up foods without hardening or drying
them out, and for naturally removing salt from
foodstuffs preserved with salt.
It is not recommended for short cooking times or
for foods that may produce a large amount of
moisture during cooking.
Cooking containers
• You may also use your own containers for
cooking, as long as they are resistant to high
temperatures.
• For steam cooking, the use of metal
containers is recommended. Metal
facilitates better distribution of heat to the
foods.
• It is normal for metal containers to deform
somewhat during high-temperature cooking,
but they will return to their original shape
when they cool down.
• Thick ceramic plates may require more heat
than normal. Longer cooking times may be
necessary.
USE
Preliminary operations
• Remove any protective film from the outside
or inside of the appliance, including
accessories.
• Remove any labels (apart from the technical
data plate) from the accessories and
shelves.
• Remove and wash all the appliance
accessories (see chapter "CLEANING
AND MAINTENANCE").
First heating
1. Set a cooking time of at least one hour (see
paragraph "Using the oven").
2. Heat the empty oven compartment at the
maximum temperature to burn off any
residues left by the manufacturing process.
When heating the appliance
•air the room;
•don't stay.
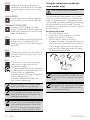
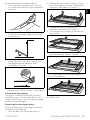
Using the accessories
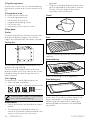
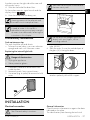
Racks and trays
Racks and trays have to be inserted into the side
guides until they come to a complete stop.
• The mechanical safety locks that prevent the
rack from being removed accidentally must
face downwards and towards the back of
the oven cavity.
See General safety instructions.
Gently insert racks and trays into the
oven until they come to a stop.
Clean the trays before using them for
the first time to remove any residues left
by the manufacturing process.

USE - 65914779559/B
e
Tray rack
The tray rack has to be inserted into the tray. In
this way fat can be collected separately from
the food which is being cooked.
Configuration for steam cooking
If you intend to use the perforated baking tray
for steam cooking, it must be placed on the
desired shelf taking care to place the steel
baking tray on the shelf below. This allows
liquids to be collected separately from the food
which is being cooked.
Digital programmer
The parameters and values for the currently
selected function will be indicated on the
display. To use it, simply turn the functions and
temperature knobs and/or press the buttons on
the lower part of the display, depending on the
operations to be performed by the appliance.
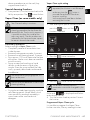
First use
On the first use, or after a long power failure,
and the button flash on the
appliance display. To be able to start any
cooking function, the current time must be set.
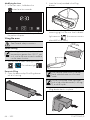
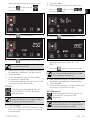
Time setting
1. Press the button.
2. Turn the temperature knob to select the time
format to display ( or ).
3. Press the button to confirm the
modification and go on to adjust the time.
4. Turn the temperature knob to set the current
time.
5. Press the button to set the current time
and go to the selection of minutes.
6. Turn the temperature knob to select the
minutes of the current time.
7. Press the button to confirm.
If the time is not set, the oven will not
switch on.
When the version is selected,
the display shows (morning) or
(afternoon).
It may become necessary to change the
current time, for example for daylight
saving time.
When the current time is visible, after 2
minutes from the last knob operation it is
displayed with low brightness.
To cancel the operation, turn the
function knob or hold down the button
for a few seconds.

66 - USE 914779559/B
Modifying the time
1. In the main menu, hold down the
button for a few seconds.
2. Modify the time as described in point 2 in
the previous chapter.
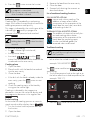
Using the oven
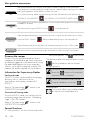
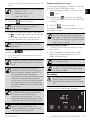
Steam cooking
1. Turn the knob to steam cooking function
+ . The indicator light
flashes.
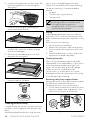
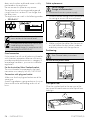
Reservoir filling
2. Open the door and pull the filling drawer
out of its housing.
3. Insert the funnel provided in the filling
drawer.
4. Pour the water (using a bottle or a
measuring jug) until the max. level indicator
light comes on (the reservoir contains
about 800 ml of water).
5. At the end, remove the funnel and place the
filling drawer back in its place.
See General safety instructions.
If cooking has just been performed with
temperatures greater than 100°C, you
must wait for the oven to cool in order to
use the steam function.
Use cold tap water which is not too
hard, softened water or still mineral
water.
Do not use distilled water, tap water
with a high chloride content (> 40 mg/
l), or other liquids.

USE - 67914779559/B
e
If there is too much water in the reservoir, the
excess water will drain into the cooking
compartment:
• in this case dry with a cloth or sponge
before a cooking.
• It is recommended to drain the 200 ml
reservoir through the reservoir drain function.
6. Close the door.
the wording and the
button flash to indicate that the function can be
started.
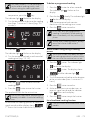
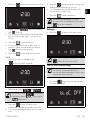
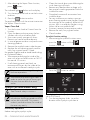
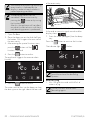
Steam cooking settings
1. Turn the temperature knob to set the cooking
temperature (from 30°C to 100°C) (for
example "90°C").
2. Press the button on the display. The
indicator light flashes.
3. Turn the temperature knob to set the cooking
time (from 1 minute to 13 hours) (e.g. "1
hour").
4. Press the button to start the function.
Preheating stage
Cooking itself is preceded by a preheating
stage, which allows the appliance to heat to the
cooking temperature more quickly.
This stage is indicated by the switching on of the
indicator light and by a progressive
increase in the temperature level reached
.
At the end of preheating:
• the indicator light switches off;
• the appliance beeps;
• cooking starts automatically.
Cooking phase
1. Open the door
2. Place the dish with the food to be cooked
into the oven cavity.
3. Close the door.
or
• If the dish with the food is already inside the
oven cavity, press the button to start
cooking.
4. Check the cooking status of the food by
turning on the internal light.
Cooking is indicated by the progressive
decrease in time on the numerical display and
the progressive decrease in the segment bar
.
End of cooking
At the end of the cooking process an acoustic
signal sounds and the display shows .
1. Turn the function knob to position 0 to exit
the function.
2. Open the door
3. Remove the food from the oven cavity.
4. Close the door.
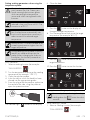
Reservoir draining
After cooking:
1. Open the door
2. Place the deep pan on the third shelf from
the bottom. Push it against the rear wall of
the oven cavity.
When the door is opened, the function
in progress is interrupted.
The function resumes automatically
when the door is closed.
Pre-heating cannot be bypassed when
steam cooking is used.
Before draining the reservoir, wait for
the oven to cool down, leaving the
door open. To make sure that the water
remaining in the reservoir is not too hot,
wait at least 40 minutes.

68 - USE 914779559/B
3. From position 0, turn the function knob to the
left by one position. The button flashes.
The appliance suggests the reservoir drain
function.
4. Press the button to confirm the function.
5. Press the button again to start the
function.
The water starts to flow into the deep pan from
the drain pipe on the right side of the rear wall
of the oven cavity.
6. Wait for the end of the drain flow.
At the end an acoustic signal sounds and the
display shows .
7. Turn the function knob to position 0 to exit
the function.
8. Drain the water from the deep pan.
Sous Vide cooking
Sous vide cooking in a steam oven is the best
way to cook food without altering its nutritional
properties and quality. It is also an extremely
healthy and natural type of cooking.
• The Sous vide technique allows the heat to
be transferred efficiently from the steam to
the food, preventing the loss of flavour
through the oxidation and evaporation of
nutrients and humidity during cooking.
• Sous vide cooking also allows greater
control over the cooking compared to
traditional methods and ensures that
cooking is uniform.
• It also allows cooking to be carried out at
lower temperatures compared to traditional
cooking methods.
For Sous Vide cooking you need to:
• Have a chamber vacuum packing machine
that allows you to achieve a better and safer
vacuum for solid and liquid foods.
• Make sure that the seal area of the bag is
clean and free from food residues.
It is recommended to drain at the end of
each cooking, to prevent any residue of
unused water from remaining inside the
reservoir.
After a long period of inactivity it is
recommended to make a reservoir
filling and draining cycle to rinse the
steam circuit.
Take care: the water may be very hot.
The drained water cannot be used for
other cooking.
SOUS VIDE
Steam function for perfect cooking
inside a sealed bag. The food’s flavours
are enhanced and no nutrients are lost.
The bag containing the food can be
placed on the perforated tray or on a
rack positioned on the first or second
shelf.

USE - 69914779559/B
e
• Hermetically seal the food in a special food
grade bag that can withstand the cooking
temperatures.
• Create a vacuum in the bag of at least
99.8% to prevent air bubbles forming inside
that could affect the cooking.
• If you have a Smeg vacuum drawer, use the
maximum vacuum level (level 3).
Once cooked, it is recommended to remove the
product from the bag and finish cooking it in a
pan or by grilling.
Tips:
• Preferably use fresh, high quality raw
materials well-preserved until cooked.
• To improve the cooking result, dressings can
be added inside the bag.
• Clean the food well from bones or fishbones
that could pierce the bag and damage the
cooking.
• Do not leave the food to be cooked for too
long at room temperature as the bag may
swell during cooking, losing all the
advantages of vacuum.
• The food to be vacuum-packed for Sous
Vide cooking or storage must be at a
refrigerator temperature (from 3°C to 7°C),
never hot.
• Keep the products in a vacuum (cooked
and then blast chilled) at a constant
temperature not exceeding 3°C in the
refrigerator.
• For even cooking, do not overfill the bags
and place the food in the best possible way
on a single layer.
• If you are cooking multiple bags at the same
time, place the bags on the same shelf
without overlapping them.
• Do not reuse the bags after cooking.
To select the Sous Vide cooking:
1. Turn the knob to the + +
function.
2. For settings, see the procedure described in
the "Steam cooking" paragraph.
Advice for steam cooking
•Pasta and rice: upon reaching 100°C, the
cooking time will be the same as with
cooking on a hob. Place the pasta or rice in
a metal tray and cover with around a
centimetre of water. For best results when
cooking rice, place a lid on the container or
cover with aluminium foil. This procedure
allows the rice to absorb all the water, and it
can then be served directly to the table.
•Eggs: these may be boiled, scrambled or
poached by using the steam function at
100°C. To obtain perfect boiled eggs,
place them on the perforated tray and cook
for 4-6 minutes for soft boiled eggs and 8-
10 minutes for hard-boiled eggs. For
scrambled eggs, place the beaten eggs in
a metal tray together with milk, butter and
seasoning. Cover the tray with aluminium
foil. Mix every couple of minutes using a
fork. For poached eggs, pour boiling water
into the metal tray with a drop of vinegar
and steam cook for around 4-5 minutes.
•Vegetables: steam cooking vegetables
gives excellent results. They maintain their
colour, flavour and nutritional properties. For
dense vegetables such as potatoes, turnips
and parsnips, cook at 100°C for the same
length of time you would boil them on a hob.
For broccoli and carrots, cook for 6 minutes
if you want them to remain firm, or 10
minutes if you want them to be softer.
•Fish: due to the delicate nature of fish,
steaming gives excellent results. For oily fish
such as salmon or trout, cook at 100°C for
around 5 minutes. For white fish such as cod
or haddock, cook at 80°C for around 5
minutes. If you are cooking different foods,
all fish must be cooked in the perforated tray
which must be placed on the bottom shelf of
the oven to avoid liquid from the fish
dripping onto other food products.
•Meat: casseroles and curries are ideal for
steam cooking. Prepare the casserole as for
normal oven cooking. Place it in a metal
tray, cover with a lid or aluminium foil, and
cook for between 45 minutes and 3 hours
depending on the cut of meat used.
•Thin soups: steam cooking allows flavours
to develop perfectly with minimum effort, as
the liquids will not boil over. For vegetable
soup with the correct consistency, first steam
the vegetables, then add broth and steam
cook at 100°C. The steam function is also
ideal for preparing large quantities for later
use.
•Soups: Thicker soups are also easy and
quick to prepare. Place the soup in a metal
tray, cover with a lid or aluminium foil and
steam cook at 100°F for the same time you

70 - USE 914779559/B
would cook it in a microwave oven. To
obtain a creamy texture stir halfway through
cooking.
•Reheating: the steam cooking function will
not dry foods out and gives a moister result.
A previously prepared home-cooked meal,
covered with aluminium foil, will take around
10-12 minutes to reheat. Ready meals will
require approximately double the time
indicated on the package.
•Defrosting: it is possible to use the steam
function to defrost foods. Times vary, but
defrosting with the steam cooking function
takes around half the time necessary for
covered foods left to defrost at room
temperature.
•Peeling peppers and tomatoes: this is very
easy to do when using the steam function.
Use a knife to cut a small cross in the skin of
the tomato, and steam cook for 1 minute.
Peppers have tougher skin, and may require
up to 4 minutes to soften it sufficiently for
peeling.
•Chocolate: this can be melted using the
steam cooking function. Place the chocolate
in a metal tray, cover with aluminium foil and
steam cook for 1 minute. Unlike other
methods, chocolate is unlikely to burn in the
steam oven.
•Hot towels: ideal for facial treatments, a
close shave or for use after a meal, these
are easy to prepare using the steam
cooking function. Moisten a towel with
water, roll it up and steam it for 1 minute.
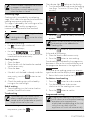
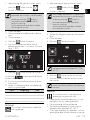
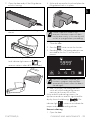
Combination cooking with steam
1. Turn the knob to the function with steam that
you want to use (e.g + ). The
indicator light flashes.
2. Proceed with reservoir filling as described
above.
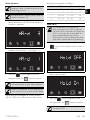
Setting a combined cooking with steam
1. Turn the temperature knob to set the cooking
temperature (from 100°C to 250°C) (for
example "190°C").
2. Press the button on the display. The
indicator light flashes.
3. Turn the temperature knob to set the cooking
time (from 1 minute to 13 hours) (e.g. "1
hour").
4. Press the button on the display. The
indicator light flashes.
5. Turn the temperature knob to set the cooking
steam percentage (from 20% to 70°C) (for
example "40°C").
25% - Cakes and bread
30% - Duck
40% - Beef, veal and lamb
50% - Chicken
70% - Whole fish

USE - 71914779559/B
e
6. Press the button to start the function.
Preheating stage
Cooking itself is preceded by a preheating
stage, which allows the appliance to heat to the
cooking temperature more quickly.
This stage is indicated by the switching on of the
indicator light and by a progressive
increase in the temperature level reached
.
At the end of preheating:
• the indicator light switches off;
• the appliance beeps;
• the words and the
button flash to indicate that the food can be
introduced into the oven cavity.
Cooking phase
1. Open the door
2. Place the dish with the food to be cooked
into the oven cavity.
3. Close the door.
or
• If the dish with the food is already inside the
oven cavity, press the button to start
cooking.
4. Check the cooking status of the food by
turning on the internal light.
Cooking is indicated by the progressive
decrease in time on the numerical display and
the progressive decrease in the segment bar
.
End of cooking
At the end of the cooking process an acoustic
signal sounds and the display shows .
1. Turn the function knob to position 0 to exit
the function.
2. Open the door
3. Remove the food from the oven cavity.
4. Close the door.
5. Proceed with draining the reservoir as
described above.
List of combined cooking functions
FAN ASSISTED+STEAM
THERMALLY FAN-ASSISTED STEAM
Traditional cooking
1. Turn the function knob to the right or to the
left to select the wished function (for
example "FAN-ASSISTED ").
The button and the text
start flashing.
2 Turn the temperature knob to the right or to
the left to select the wished temperature (for
example "200°C").
3. Press the button to start the function.
When the door is opened, the function
in progress is interrupted.
The function resumes automatically
when the door is closed.
You can skip the preheating phase by
holding down the button for a few
seconds.
Intense and uniform cooking. The
addition of steam allows better
preservation of the properties of the
food. Ideal for roast veal, roast duck
and cooking whole fish.
The addition of steam to thermally fan-
assisted cooking allows better
preservation of the properties of the
food. Ideal for preparing roasts,
chicken and baked goods like
leavened cakes and bread.
Cooking functions can be interrupted at
any time by turning the function knob to
the 0 position.

72 - USE 914779559/B
Preheating stage
Cooking itself is preceded by a preheating
stage, which allows the appliance to heat to the
cooking temperature more quickly.
This stage is indicated by the switching on of the
indicator light and by a progressive
increase in the temperature level reached
.
At the end of preheating:
• the indicator light switches off;
• the appliance beeps;
•the words and the
button flash to indicate that the food can be
introduced into the oven cavity.
Cooking phase
1. Open the door
2. Place the dish with the food to be cooked
into the oven cavity.
3. Close the door.
or
• If the dish with the food is already inside the
oven cavity, press the button to start
cooking.
4. Check the cooking status of the food by
turning on the internal light.
End of cooking
5. To end cooking, turn the function knob to
position 0 to exit the function.
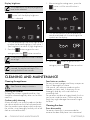
Timed cooking
1. After selecting a cooking function and
temperature, press the key.
The indicator light flashes on the display.
2. Turn the temperature knob to set the cooking
time (from 1 minute to 13 hours) (e.g. "25
minutes").
3. Press the button to modify the cooking
duration.
4. Press the button to start the function.
At the end of preheating:
5. Place the food inside the oven cavity.
6. Press the button to start cooking.
Timed cooking is indicated by the progressive
decrease in time on the numerical display and
the progressive decrease in the segment bar
.
At the end of the cooking process an acoustic
signal sounds and the display shows .
7. Return the function knob to the 0 position.
To delete a timed cooking
1. Press the button for a few seconds.
2. Turn the temperature knob counter-
clockwise until the cooking time is reset.
3. Press the button to confirm.
Programmed cooking
When the door is opened, the function
in progress is interrupted.
The function resumes automatically
when the door is closed.
You can skip the preheating phase by
holding down the button for a few
seconds.
Timed cooking is the function which
allows a cooking operation to be
started and then ended after a specific
length of time set by the user.
Bear in mind that a few minutes for oven
preheating must be added to the
cooking time.
Programmed cooking is the function
which allows a time-controlled cooking
operation to be stopped at an
established time depending on the time
set by the user, after which the
appliance will switch off automatically.

USE - 73914779559/B
e
1. After selecting a cooking function and
temperature, press the key.
The indicator light flashes on the display.
2. Turn the temperature knob to set the cooking
time (from 1 minute to 13 hours) (e.g. "25
minutes").
3. Press the button.
The indicator light flashes on the display.
4. Turn the temperature knob to set the end-of-
cooking time (e.g. "13:15").
5. Press the button to confirm end-of-
cooking time.
6. Press the button to start the function.
The appliance waits for the set start time.
At the end of the cooking process an acoustic
signal sounds and the display shows .
7. Return the function knob to the 0 position.
To delete a programmed cooking
1. Press the button for a few seconds.
The indicator light flashes on the
display.
2. Press the key shortly. The indicator light
flashes on the display.
3. Turn the temperature knob counter-
clockwise until the cooking time is reset.
4. Press the button to confirm.
Minute minder timing during a cooking
process
1. Press the button. The indicator light
flashes on the display.
1. Press the button. The display shows
and the indicator light
flashing.
2. Turn the temperature knob to set the duration
of the minute minder (from 1 minute to 13
hours).
3. Press the button to confirm.
4. At the end of the minute minder timer, an
acoustic signal sounds and the indicator
light flashes on the display.
5. Press the button to quit the function.
List of traditional cooking functions
For safety reasons, it is not possible to
set the end of cooking time by itself
without setting the cooking duration.
The minutes required for preheating are
already included in the end-of-cooking
time.
In this way, only the programmed
cooking is cancelled. Timed cooking
starts immediately with the preheating
phase.
To stop every cooking process, always
return the function knob to the 0
position.
The minute minder timer does not stop
the cooking operation but rather informs
the user when the set time has run out.
Not all functions are available on some
models.

74 - USE 914779559/B
STATIC
FAN-ASSISTED
THERMALLY-VENTILATED
GRILL
BASE
ECO
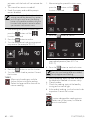
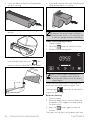
Using the temperature probe (on
some models only)
The temperature probe enables you to cook
roasts, loin steaks and other cuts and sizes of
meat with great precision. The probe ensures
that the food is perfectly cooked by monitoring
the core temperature of the food. The core
temperature is measured by a sensor inside the
tip of the probe.
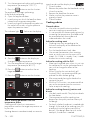
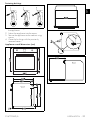
Positioning the probe
1. Place the food on a tray.
2. Insert the tip of the probe into the food
before you place it in the oven.
3. For best results, make sure that the
temperature probe is placed transversely in
the thickest part of the food and for least 3/
4 of its length. Make sure that it does not
touch the tray underneath and that it does
not protrude from the food.
Traditional cooking suitable for the
preparation of one dish at a time. Ideal
for cooking roasts, fatty meats, bread,
pies.
Intense and uniform cooking. Ideal for
biscuits, cakes and multilevel cooking.
The heat is distributed quickly and
evenly. Suitable for all dishes, ideal for
cooking on several levels without mixing
odours and flavours.
It allows to obtain excellent grilling and
grating results. Used at the end of
cooking, it gives a uniform browning to
the dishes.
The heat only comes from the bottom of
the cavity. Perfect for cakes, pies, tarts
and pizzas.
This function is particularly suitable for
cooking on a single shelf with low
energy consumption.
It is recommended for all types of food,
excluding those that can create a lot of
humidity (such as vegetables).
To obtain maximum energy savings and
reduce cooking times, it is
recommended to place food in the
oven without preheating.
When using the ECO function, avoid
opening the door during cooking.
In the ECO function cooking times (and
any preheating) are longer and may
depend on the amount of food in the
cooking compartment.
The ECO function is a delicate cooking
function and is recommended for food
withstanding temperatures lower than
210°C; in case of cooking at higher
temperatures, select another function.
See General safety instructions.
In order for the probe to measure the
core temperature of the food precisely,
its tip must not be in contact with bones
or fat.
The recommended minimum
temperature for cooking with the probe
is 120°C, with the exception of slow
temperature cooking.
Page is loading ...
Page is loading ...
Page is loading ...
Page is loading ...
Page is loading ...
Page is loading ...
Page is loading ...
Page is loading ...
Page is loading ...
Page is loading ...
Page is loading ...
Page is loading ...
Page is loading ...
Page is loading ...
Page is loading ...
Page is loading ...
Page is loading ...
Page is loading ...
Page is loading ...
Page is loading ...
Page is loading ...
Page is loading ...
Page is loading ...
Page is loading ...
Page is loading ...
Page is loading ...
Page is loading ...
Page is loading ...
Page is loading ...
-
 1
1
-
 2
2
-
 3
3
-
 4
4
-
 5
5
-
 6
6
-
 7
7
-
 8
8
-
 9
9
-
 10
10
-
 11
11
-
 12
12
-
 13
13
-
 14
14
-
 15
15
-
 16
16
-
 17
17
-
 18
18
-
 19
19
-
 20
20
-
 21
21
-
 22
22
-
 23
23
-
 24
24
-
 25
25
-
 26
26
-
 27
27
-
 28
28
-
 29
29
-
 30
30
-
 31
31
-
 32
32
-
 33
33
-
 34
34
-
 35
35
-
 36
36
-
 37
37
-
 38
38
-
 39
39
-
 40
40
-
 41
41
-
 42
42
-
 43
43
-
 44
44
-
 45
45
-
 46
46
-
 47
47
-
 48
48
-
 49
49


Smeg LINEA SO6102S3PN STEKEOVN User manual
- Category
- Kitchen & houseware accessories
- Type
- User manual
- This manual is also suitable for
Ask a question and I''ll find the answer in the document
Finding information in a document is now easier with AI
Related papers
-
Smeg CLASSIC SOP6302TX STEKEOVN User manual
-
-
-
-
-
-
-
-
-
Other documents
-
Samsung NV7B500 Series Built In Oven User manual
-
Signature SKSDR480SIS Owner's manual
-
Bertazzoni F6011MODVTX Owner's manual
-
Samsung NV7B44205AS User manual
-
Gaggenau BS 470 612 /471 612 Use & Care
-
Samsung NQ50T8939BK User manual
-
V-ZUG CSTXSLZ60Y User manual
-
Gorenje BO6727E03X Operating instructions
-
Gaggenau BS470612 Owner's manual
-
Asko OCS8487B User manual