07-18 JEEP WRANGLER JK/JKU
18+ JEEP WRANGLER JL/JLU
20+ JEEP GLADIATOR JT
FRONT BUMPER INSTALLATION INSTRUCTIONS
JFBST2, JFBMW
Thanks for purchasing a Reaper Off-Road
bumper for your Jeep Wrangler JK/JL or
Gladiator JT. Our team has worked to ensure
that this product is the premium in
performance, quality, and fitment. We are
proud to say that this product will enhance the
look and off-road performance of your
vehicle. We encourage you to read through
the following steps, and check the included Bill
of Materials before beginning. Please follow
these steps to ensure that your installation
goes as planned.
Our products are specifically designed with
ease of installation in mind. However, if you
are uncomfortable with the following
instructions please seek professional
assistance. Reaper Off-Road will not be held
liable for harm or injury to yourself or your
vehicle during installation or use of this
product.
Recommended Tool List
●Plastic fastener removal tool
●Flat head screwdriver
●Phillips screwdriver
●Ratchet
●Metric socket set
●Inch socket set
●Allen wrench set
●Blanket or towel
R1010
V02 - 6.18.20

07-18 WRANGLER JK/JKU
18+ WRANGLER JL/JLU
20+ GLADIATOR JT
FRONT BUMPER
PAGE 2
SECTION A
DISASSEMBLY - JK
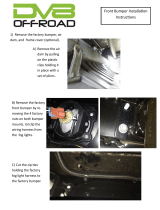
A1. Remove (4) push clips from the lower air
dam, along the front edge under the
bumper. The clips my pull up by hand, or use
a removal tool.
A2. Remove (2) push clips from behind the air
dam, where it connects to the crash bar.
A3. Unplug the foglights and free the wire looms
from the bumper.
A4. Use a ratchet and 19mm socket to remove
the (8) nuts that secure the bumper to the
frame.
A5. Remove the OEM bumper from the vehicle
and set it aside.
A6. Use a Phillips screwdriver to remove the
plastic filler panel just below the grille. If the
(2) screws do not turn, you may need to pry
them up or just pull up at each mounting
point to pop it loose.
A7. Remove the fog lights from the OEM
bumper. Use a Phillips screwdriver to
remove the (8) screws.
Detail 1: Remove lower push clips
R1010
V02 - 6.18.20
Detail 4: Remove (8) mounting nuts

07-18 WRANGLER JK/JKU
18+ WRANGLER JL/JLU
20+ GLADIATOR JT
FRONT BUMPER
PAGE 3
SECTION B
DISASSEMBLY - JL/JT
Steps may vary depending on trim level and optional
equipment.
B1. Remove the plastic skid plate by using an
8mm socket to remove (2) screws at the
bottom of the panel. You will also remove (8)
plastic retainer clips along the front edge
under the bumper. The clips my pull up by
hand, or you can use a removal tool.
B2. Remove (2) push clips from the top at the air
dam, where it connects down to the frame
near the tow hooks.
B3. Remove the brace that runs side to side. Use
a 16mm socket to remove (2) bolts. The
brace is tabbed into the frame and may feel
stuck. Use a mallet to tap it up and out.
B4. Disconnect the fog light harness at the
passenger side.
B5. Remove (8) nuts at the bumper mounting
pads using an 18mm deep socket. The
bumper will be loose at this point.
B6. Remove the bumper from the vehicle and
set it on the ground.
Detail 1: Remove lower push clips
R1010
V02 - 6.18.20
Detail 3: Remove bolts on brace
Detail 5: Remove (8) nuts

07-18 WRANGLER JK/JKU
18+ WRANGLER JL/JLU
20+ GLADIATOR JT
FRONT BUMPER
PAGE 4
SECTION B (cont.)
DISASSEMBLY - JL/JT
B7. Remove the plastic covers inside the corners
of the bumper to gain access to the fog
lights. Sport bumpers have (1) 7mm and (6)
Torx T25 screws per side.
Sahara/Overland/Rubicon plastic bumpers
have (6) push clips per side.
B8. Unplug the fog lights and remove any screws
holding the brackets in place. Sport bumpers
have (3) T20 screws per side.
Sahara/Overland/Rubicon plastic bumpers
have (4) 7mm screws per side.
B9. You will need to remove the fog light
harness from the OEM bumper. Sport
bumpers have (4) 13mm bolts holding the
metal bumper insert to the plastic cover,
Sahara/Overland/Rubicon plastic bumpers
have (6) nuts to remove.
B10. There will be several plastic harness clips
holding the wiring in place between the
layers of the bumper. For Sport bumpers,
you can use a large and small pry bar to
separate the layers enough to free the (9)
clips and pull the wire harness. For
Sahara/Overland/Rubicon plastic bumpers,
the fog light harness is between plastic
layers of the bumper - you can either free
the (14) clips by pushing them through or by
disassembling the layers for easier access.
B11. Remove the fog lights from the plastic
brackets by squeezing the black clips and
pushing them through.
Detail 7: Remove cover panel. Sport (top) Sahara (bottom)
R1010
V02 - 6.18.20
Detail 8: Remove fog lights. Sport (top) Sahara (bottom)

07-18 WRANGLER JK/JKU
18+ WRANGLER JL/JLU
20+ GLADIATOR JT
FRONT BUMPER
PAGE 5
SECTION C
ASSEMBLY -JK/JL/JT
C1. Install the provided washers onto the black
clips on the fog lights. Install the fog lights
into the adapter brackets. These brackets
are not needed for JK owners or JL/JT owners
who will be using JK style lights (with 4 bolt
holes).
C2. Assemble the fog lights into the bumper
using the (8) provided screws and a phillips
screwdriver
C3. Install the accent plate behind the Reaper
logo using ¼”-20 nuts and a 7/16” socket. If
you would like to customize the color of this
plate it should be done before this step.
C4. If you have purchased the optional bull bar,
install it now using the provided 5/16”
hardware using a 1/2" socket and wrench.
C5. The main plug for fog light harness may
need to be moved from the outside of the
frame to the inside of the frame. Use a
removal tool to free the retaining clip from
the vehicle and reinsert it into the inside of
the frame.
C6. Before installing the bumper, take a look at
the top outer studs. These are longer to
assist in aligning the bumper. It may also
help to check the alignment of L-brackets
behind the mounting pads. Loosen the bolts
if needed.
C7. Install the bumper to the mounting points
by aligning the studs and pushing the
bumper on fully.
C8. Use a 19mm socket and the supplied (8)
washers, (8) lock washers, and (8) nuts to
secure the bumper in place. Tighten the
bolts on the L-brackets if needed.
C9. Reinstall the fog light harness into the fog
lights and the main plug at the frame. Zip tie
the extra wiring as needed.
Detail 12: Install fog lights into adapter brackets
R1010
V02 - 6.18.20
Detail 15: Accent plate & bull bar installed
Completed install
/