
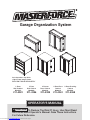
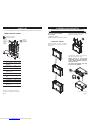
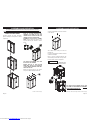
Garage Organization System
1-Door
Wall Cabinet
Mo de l#:
211-4381
2-Door
Wall Cabinet
Mo de l#:
211-4396
4-Drawer
Base Cabinet
Mo de l#:
211-4389
2-Door Base
Cabinet
Mo de l#:
211-4361
2-Door Stacking
Cabinet
Mo de l#:
211-4368
CAUTION:
To Reduce The Risk Of Injury, User Must Read
And Understand Operator’s Manual. Save These Instructions
For Future Reference.
OPERATOR’S MANUAL
Actual product may differ
slightly from image shown
EACH UNIT SOLD SEPARATELY
Downloaded from www.Manualslib.com manuals search engine

Page 2 Page 3
TABLE OF CONTENTS
Safety Symbols ......................................................................... 3
Safety Instructions ..................................................................... 4
Parts List
................................................................................... 5
Assembly and Operation
........................................................... 9
Maintenance and Safety .......................................................... 22
SAFETY SYMBOLS
Model #: _______________________________
Place of purchase: ______________________
Date of purchase:
_______________________
Receipt # of purchase:
__________________
CAU TIO N:
1. Read and follow all safety and assembly
instructions before using this product for
the first time.
2. Fill in the following information and retain
the manual for future reference:
Do not open more than one drawer at a time.
Do not step on drawers.
Do not allow children near the unit.
Lock drawers and doors before moving the unit.
Do not lift unit by yourself.
Downloaded from www.Manualslib.com manuals search engine

Page 4 Page 5
SAFETY INSTRUCTIONS
COMMON PARTS LIST
The purpose of safety symbols is to attract our attention to possible dangers. The safety
symbols, and the explanations with them, deserve your careful attention and understand-
ing. The symbol warnings do not by themselves eliminate any danger. The instructions and
warnings they give are no substitute for proper accident prevention measures.
WARNING:
Be sure to read and understand all safety instructions in this man-
ual, including all safety alert symbols such as “DANGER,” “WARNING,” and “CAUTION,”
before using this product. Failure to follow all instructions listed below may result in
electric shock, fire and/or serious personal injury.
SYMBOL MEANING
SAFETY ALERT SYMBOL: Indicates DANGER, WARNING, or CAUTION. May be
used in conjunction with other symbols or pictographs.
DANGER:
Failure to obey this warning WILL result in death or serious injury to
yourself or to others. Always follow the safety precautions to reduce the risk of personal
injury.
WARNING:
Failure to obey this safety warning CAN result in death or serious
injury to yourself or to others. Always follow the safety precautions to reduce the risk of
personal injury.
CAU TIO N:
Failure to obey this safety warning MAY result in personal injury to
yourself or others or property damage. Always follow the safety precautions to reduce
the risk of personal injury.
M6 x 16 Phillips Head Bolt
# 320174
M6 x 40 Hex Tapping Screw
#320328
Washer
#324050
Adjustable Feet
#110068
Shelf Support
#226078
M6 Hex Flange Nut
#323085
M6 x 65 Hex Tapping Screw
#320316
M6 x35 Hex Flange Bolt
#321208
IMPORTANT PART
FOR STACKING CABINET
Bracket
#234542
Downloaded from www.Manualslib.com manuals search engine

Page 6 Page 7
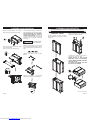
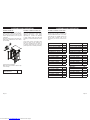
PARTS LIST
The keys are placed
inside the cabinet.
1
2
3
4
5
6
1
11
7
8
9
10
Ref# Description Part# Qty
1 M6 x 16 Phillips
Head Bolt
320174 21 pcs
2 Mounting
Bracket
233958 1 pc
3 M6 x 40 Hex
Tapping Screw
320328 2 pcs
4 Washer 324050 1 pc
5 M6 x 65 Hex
Tapping Screw
320316 1 pc
6 Gas Strut 303002 2 pcs
7 End Cup 314195 2 pcs
8 Lock and Key
(001)
304075 1 pc
9 Shelf 233955 1 pc
10 Shelf Support 226078 4 pcs
11 M6 Hex
Flange Nut
323085 1 pc
The keys are placed
inside the cabinet.
1
7
8
2
3
4
5
6
9
1
10
Ref# Description Part# Qty
1 M6 x 16 Phillips
Head Bolt
320174 21 pcs
2 Mounting
Bracket
233958 1 pc
3 M6 x 40 Hex
Tapping Screw
320328 2 pcs
4 Washer 324050 1 pc
5 M6 x 65 Hex
Tapping Screw
320316 1 pc
6 End Cup 314195 2 pcs
7 Lock and Key
(001)
304075 1 pc
8 Shelf 233955 1 pc
9 Shelf Support 226078 4 pcs
10 M6 Hex
Flange Nut
323085 1 pc
For service regarding parts, assembly or warranty information, please call: 1-800-459-4409.
1-DOOR WALL CABINET 2-DOOR WALL CABINET
These bolts
and nuts are
used to secure
the sides of
the cabinets
together
for a better
appearance.
These bolts
and nuts are
used to secure
the sides of
the cabinets
together
for a better
appearance.
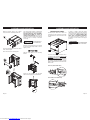
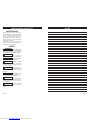
PARTS LIST
The keys are placed
inside the cabinet.
5
4
2
6
1
7
3
2
8
Ref# Description Part# Qty
1 Wor k Top 116219 1 pc
2 M6 x 16 Phillips
Head Bolt
320174 5 pcs
3 End Cup 314195 2 pcs
4 Adjustable Feet 110 0 68 4 pcs
5 Slide Set 30 0176 -
30 0177
4 pcs
6 Drawer Liner 55179 3 4 pcs
7 Lock and Key
(001)
304075 1 pc
8 M6 Hex
Flange Nut
323085 1 pc
For service regarding parts, assembly or warranty information, please call: 1-800-459-4409.
The keys are placed
inside the cabinet.
1
2
3
4
5
7
6
2
8
9
Ref# Description Part# Qty
1 Wor k Top 116219 1 pc
2 M6 x 16 Phillips
Head Bolt
320174 21 pcs
3 End Cup 314195 2 pcs
4 Lock and Key
(001)
304075 1 pc
5 Adjustable Feet 110 0 68 4 pcs
6 Shelf Support 226078 4 pcs
7 Shelf 116214 1 pc
8 M6 Hex
Flange Nut
323085 1 pc
9 Bracket 234542 2 pcs
4-DRAWER BASE CABINET 2-DOOR BASE CABINET
These bolts
and nuts are
used to secure
the sides of
the cabinets
together
for a better
appearance.
These bolts
and nuts are
used to secure
the sides of
the cabinets
together
for a better
appearance.
Not all parts are available under warranty.
Those parts not available may be purchased.
Not all parts are available under warranty.
Those parts not available may be purchased.
Downloaded from www.Manualslib.com manuals search engine

Page 8 Page 9
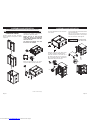
PARTS LIST
For service regarding parts, assembly or warranty information, please call: 1-800-459-4409.
The keys are placed
inside the cabinet.
1
5
2
3
4
6
8
9
7
1
10
Ref# Description Part# Qty
1 M6 x 16 Phillips
Head Bolt
320174 21 pcs
2 M6 x 35 Hex
Flange Bolt
321208 4 pcs
3 Washer 324050 1 pc
4 M6 x 65 Hex
Tapping Screw
320316 1 pc
5 End Cup 314195 2 pcs
6 Lock and Key
(001)
304075 1 pc
7 Adjustable Feet 110 0 68 4 pcs
8 Shelf Support 226078 4 pcs
9 Shelf 116214 1 pc
10 M6 Hex
Flange Nut
323085 1 pc
2-DOOR STACKING CABINET
These bolts
and nuts are
used to secure
the sides of
the cabinets
together
for a better
appearance.
This are the
longer bolts to
tie the cabinet
together.
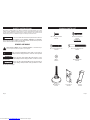
NECESSARY TOOLS REQUIRED
FOR ASSEMBLY
• Phillips head screwdriver
• Drill/driver optional to speed up the assembly
1-DOOR WALL CABINET
Carefully separate the front and back
panels, allowing the side panels to unfold
completely.
Attach the top panel to the cabinet using
eight M6 x 16 Phillips head bolts.
Carefully lay the cabinet on its back on a
soft surface to protect the finish.
INSERT THE LIP OF THE BOTTOM
PANEL INTO THE SLOT ON THE BACK
OF THE CABINET, MAKING SURE THAT
THE HOLES ALIGN.
TILT THE BOTTOM PANEL ONTO THE
BOTTOM OF THE CABINET.
ASSEMBLY AND OPERATION
Continue on the next page
Assembly is VERY EASY, however there are a few key steps that must be followed.
THESE KEY STEPS ARE HIGHLIGHTED IN BOLD CAPS. FOLLOW THESE TO EXPEDITE ASSEMBLY.
Not all parts are available under warranty.
Those parts not available may be purchased.
Downloaded from www.Manualslib.com manuals search engine

Page 10 Page 11
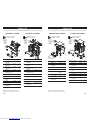
ASSEMBLY AND OPERATION
Attach the bottom panel to the cabinet
using eleven M6 x 16 Phillips head bolts.
Insert four shelf supports inside the cabinet
at the desired height.
Place the shelf on the shelf supports.
The cabinet weight capacity is determined
by the stability of the surface it is mounted to.
FOR BEST RESULTS, WALL CABINETS
SHOULD BE MOUNTED TO STUDS OR
OTHER SOLID SURFACES. Do not mount
to drywall as it will not support the required
weight and poses a danger if mounted
incorrectly.
Attach the mounting bracket to the wall at
the desired height using two M6 x 40 hex
tapping screws, making sure the bracket is
level.
Hang the wall cabinet on the mounting
bracket.
Fasten the wall cabinet to the wall with
a M6 x 65 hex tapping screw and washer.
ASSEMBLY AND OPERATION
2-DOOR WALL CABINET
Carefully separate the front and back
panels, allowing the side panels to unfold
completely.
Attach the top panel to the cabinet using
eight M6 x 16 Phillips head bolts.
Carefully lay the cabinet on its back on a
soft surface to protect the finish.
INSERT THE LIP OF THE BOTTOM
PANEL INTO THE SLOT ON THE BACK
OF THE CABINET, MAKING SURE THAT
THE HOLES ALIGN.
TILT THE BOTTOM PANEL ONTO THE
BOTTOM OF THE CABINET.
Continue on the next page
Assembly is VERY EASY, however there are a few key steps that must be followed.
THESE KEY STEPS ARE HIGHLIGHTED IN BOLD CAPS. FOLLOW THESE TO EXPEDITE ASSEMBLY.
The maximum shelf
capacity should be no more than 50 lbs
CAU TIO N:
Downloaded from www.Manualslib.com manuals search engine

Page 12 Page 13
The maximum weight
for each drawer should be no more than
100 lbs
ASSEMBLY AND OPERATION
Attach the bottom panel to the cabinet
using eleven M6 x 16 Phillips head bolts.
Insert four shelf supports inside the cabinet
at the desired height.
Place the shelf on the shelf supports.
The cabinet weight capacity is determined
by the stability of the surface it is mounted to.
FOR BEST RESULTS, WALL CABINETS
SHOULD BE MOUNTED TO STUDS OR
OTHER SOLID SURFACES. Do not mount
to drywall as it will not support the required
weight and poses a danger if mounted
incorrectly.
Attach the mounting bracket to the wall at
the desired height using two M6 x 40 hex
tapping screws.
Hang the wall cabinet on the mounting
bracket.
Fasten the wall cabinet to the wall with
a M6 x 65 hex tapping screw and washer.
ASSEMBLY AND OPERATION
4-DRAWER BASE CABINET
Carefully lay the cabinet on its back on a
soft surface to protect the finish. Screw the
four adjustable feet onto the bottom of the
cabinet.
To remove a drawer, pull the drawer out so
it is almost fully extended. PUSH UP ON
THE RIGHT hand black release lever, while
PULLING DOWN ON THE LEFT hand black
release lever. While holding the levers in
the positions as instructed above, pull the
drawer outward until it is released from the
drawer slide.
PUSH UP (RIGHT HAND SIDE)
PULL DOWN (LEFT HAND SIDE)
To replace a drawer, extend the drawer
slides from the cabinet. Insert the brackets
on each side of the drawer into the slots in
the cabinet slides, BEING CAREFUL THAT
THEY ARE POSITIONED PROPERLY.
Once properly inserted, completely close
the drawer to set the slides in their proper
positions.
CAU TIO N:
The maximum shelf
capacity should be no more than 50 lbs
CAU TIO N:
Downloaded from www.Manualslib.com manuals search engine

Page 14 Page 15
ASSEMBLY AND OPERATION
2-DOOR BASE CABINET
Carefully separate the front and back
panels, allowing the side panels to unfold
completely.
Carefully lay the cabinet on its back on a
soft surface to protect the finish.
INSERT THE LIP OF THE BOTTOM
PANEL INTO THE SLOT ON THE BACK
OF THE CABINET, MAKING SURE THAT
THE HOLES ALIGN.
TILT THE BOTTOM PANEL ONTO THE
BOTTOM OF THE CABINET.
Attach the bottom panel to the cabinet
using eleven M6 x 16 Phillips head bolts.
Up
Down
Continue on the next page
Assembly is VERY EASY, however there are a few key steps that must be followed.
THESE KEY STEPS ARE HIGHLIGHTED IN BOLD CAPS. FOLLOW THESE TO EXPEDITE ASSEMBLY.
ASSEMBLY AND OPERATION
Screw four adjustable feet into the bottom
of the cabinet.
Attach the work top to the cabinet using
four M6 x 16 Phillips head tapping bolts.
Install two brackets to the inside top of
the cabinet side and work top using four
M6 x 16 Phillips head bolts. The brackets
will make the side panels stronger.
Hole
Insert four shelf supports inside the cabinet
at the desired height.
Note: to use the locking mechanism, the
shelf must be placed in the center position.
Place the shelf on the shelf supports.
The maximum shelf
capacity should be no more than 150 lbs
CAU TIO N:
Downloaded from www.Manualslib.com manuals search engine

Page 16 Page 17
ASSEMBLY AND OPERATION
Carefully separate the front and back
panels, allowing the side panels to unfold
completely.
NOTE: IF YOU ARE STACKING TWO
CABINETS, YOU NEED TO PICK ONE
CABINET TO BE ON THE TOP AND ONE
CABINET TO BE ON THE BOTTOM.
ASSEMBLE THE BOTTOM CABINET
FIRST. Start by turning the cabinet on its
top and attaching the bottom as shown
below.
TILT THE BOTTOM PANEL ONTO THE
BOTTOM OF THE CABINET.
INSERT THE LIP OF THE BOTTOM
PANEL INTO THE SLOT ON THE BACK
OF THE CABINET, MAKING SURE THAT
THE HOLES ALIGN.
Attach the bottom panel to the cabinet
using eleven M6x16 Phillips head bolts.
2-DOOR STACKING CABINET
Continue on the next page
Assembly is VERY EASY, however there are a few key steps that must be followed.
THESE KEY STEPS ARE HIGHLIGHTED IN BOLD CAPS. FOLLOW THESE TO EXPEDITE ASSEMBLY.
ASSEMBLY AND OPERATION
Screw four adjustable feet into the bottom
of the cabinet.
Turn cabinet over, setting it on the four
leveling feet.
Insert four shelf supports inside the cabinet
at the desired height.
Note: to use the locking mechanism, the
shelf must be placed in the center position.
Place the shelf on the shelf supports.
For the top cabinet, assembly continued on the next page
The maximum shelf
capacity should be no more than 150 lbs
CAU TIO N:
FOR THE BOTTOM CABINET, PLACE THE
TOP PANEL ON THE CABINET, BUT
DO NOT
ATTACH WITH THE BOLTS.
Downloaded from www.Manualslib.com manuals search engine

Page 18 Page 19
ASSEMBLY AND OPERATION
FOR THE TOP CABINET, ATTACH THE
TOP PANEL TO THE CABINET USING
EIGHT M6 X 16 PHILLIPS HEAD BOLTS.
Turn the cabinet over and assemble the
bottom panel as shown below.
TILT THE BOTTOM PANEL ONTO THE
BOTTOM OF THE CABINET.
INSERT THE LIP OF THE BOTTOM
PANEL INTO THE SLOT ON THE BACK
OF THE CABINET, MAKING SURE THAT
THE HOLES ALIGN.
Assembly is VERY EASY, however there are a few key steps that must be followed.
THESE KEY STEPS ARE HIGHLIGHTED IN BOLD CAPS. FOLLOW THESE TO EXPEDITE ASSEMBLY.
Attach the bottom panel to the cabinet
using eleven M6x16 Phillips head bolts.
ASSEMBLY AND OPERATION
STACKING CABINETS REVIEW
To stack two cabinets, you first need to
assemble two cabinets.
BOTTOM CABINET (A): Install the
bottom panel, adjustable feet and shelf.
PLACE THE TOP PANEL IN PLACE.
DO NOT USE BOLTS, THEY WILL
INTERFERE WITH STACKING.
TOP CABINET (B): Install the top panel,
bottom panel and shelf.
Place your top cabinet (B) on top of your
bottom cabinet (A).
A B
B
A
Assembly is VERY EASY, however there are a few key steps that must be followed.
THESE KEY STEPS ARE HIGHLIGHTED IN BOLD CAPS. FOLLOW THESE TO EXPEDITE ASSEMBLY.
CONNECT THE CABINETS USING FOUR
LONG M6 X 35 HEX FLANGE BOLTS.
Fasten the top cabinet to the wall using one
M6 x 65 hex tapping screw.
A
B
A
B
Downloaded from www.Manualslib.com manuals search engine

Page 20 Page 21
ASSEMBLY AND OPERATION ASSEMBLY AND OPERATION
OPTIONAL: WORK TOP
The taller "stacking cabinet" can also be
used as a base cabinet. You can replace
the metal top that comes with the unit
with an optional stainless steel top (sold
separately).
This base cabinet and top will match the
height of any of Masterforce roller cabinet
(72" excluded).
Optional work top available.
NOTE: Do not stack another cabinet on top
of the work top.
OPTIONAL: LAMINATE COUNTER TOP
Masterforce cabinets are built to the
same size specification as most kitchen
cabinetry. This offers a very unique
opportunity to combine the durability
of metal cabinets with the beauty and
versatility of Customcraft laminate counter
tops.
Choose from over 200 colors and 12 edge
profiles to finish off your workspace in
style. These beautiful tops also allow you
to integrate undercounter free space into
your design for more versatility and variety.
OPTIONAL: DIFFERENT COLORS TRIM
Door and drawer trim is available in six
different colors to further customize your
design. Traditional silver, blue, red, orange,
gold and pink are available through our
Special Order catalogue and can be
delivered to your store in less than seven
days!
BLUE PULLS
SKU
2 DOOR BASE CABINET 211- 4362
2 DOOR STACKING CABINET 211-4371
1 DOOR WALL CABINET 211- 4377
2 DOOR WALL CABINET 211- 438 3
4 DRAWER BASE CABINET 211-4391
RED PULLS
SKU
2 DOOR BASE CABINET 211- 436 3
2 DOOR STACKING CABINET 211-4373
1 DOOR WALL CABINET 211- 4378
2 DOOR WALL CABINET 211- 4382
4 DRAWER BASE CABINET 211-4394
SILVER PULLS
SKU
2 DOOR BASE CABINET 211- 436 4
2 DOOR STACKING CABINET 211- 4374
1 DOOR WALL CABINET 211- 438 0
2 DOOR WALL CABINET 211- 438 6
4 DRAWER BASE CABINET 211-4395
GOLD PULLS
SKU
2 DOOR BASE CABINET 211- 436 5
2 DOOR STACKING CABINET 211-4372
1 DOOR WALL CABINET 211- 4379
2 DOOR WALL CABINET 211- 438 4
4 DRAWER BASE CABINET 211-4393
ORANGE PULLS
SKU
2 DOOR BASE CABINET 211-4366
2 DOOR STACKING CABINET 211-43 69
1 DOOR WALL CABINET 211- 4375
2 DOOR WALL CABINET 211-4385
4 DRAWER BASE CABINET 211-4390
PINK PULLS
SKU
2 DOOR BASE CABINET 211- 4367
2 DOOR STACKING CABINET 211-4370
1 DOOR WALL CABINET 211- 4376
2 DOOR WALL CABINET 211- 4387
4 DRAWER BASE CABINET 211-4392
30" X 24" STAINLESS
STEEL WORK TOP
211-4388
Downloaded from www.Manualslib.com manuals search engine

Page 23
NOTES
Page 22
MAINTENANCE AND SAFETY
MAINTENANCE
Lubricate the slides (twice a year) with a
product like WD40 or other quality lubricant.
This is especially true as the temperature
decreases, the bearing can become stiff.
Periodically the drawer fronts, drawer trim,
and other surfaces should be cleaned with
mild detergent and water.
Grease and oil can be removed with most
standard cleaning fluids. For safety, use a
nonflammable cleaning fluid.
SAFETY
WARNING:
Close and lock the
drawers and doors before moving this
product. The drawers could come open
and make the product unstable and tip.
WARNING:
Do not stack a
4-drawer cabinet on top of another cabinet.
WARNING:
DO NOT stand on
this product or lean on the drawers.
WARNING:
WEAR SAFETY
GLASSES when removing or repositioning
the slides. The tool could slip which may
cause personal injury.
WARNING:
DO NOT alter this
product in any manner. For example, do not
weld external lockbars or attach electrical
equipment.
CAU TIO N:
BE CAREFUL when
opening more than one drawer. The
product may become unstable and tip.
CAU TIO N:
Keep the product on
level surfaces. The product may become
unstable and tip if stored or moved on an
uneven surface.
CAU TIO N:
The maximum weight
for each drawer should be no more than
100 lbs.
Downloaded from www.Manualslib.com manuals search engine

Page 24 Page 25
SAVE YOUR RECEIPTS
THIS WARRANTY IS VOID WITHOUT THEM
Page #
Garage Organization System
LIMITED LIFETIME WARRANTY
MASTERFORCE
®
Tool Cabinets and Chests have been manufactured to the
highest standards of quality and workmanship and are warranted to be free from
defects in materials and workmanship under normal use for the lifetime that you
own the product. If any part of the product is found to be defective during normal
use, the defective product or part will be replaced at our discretion. This warranty
does not cover products that are damaged through accident, abuse, misuse,
commercial/industrial applications or neglect. This warranty also does not
cover any losses, injuries or costs including indirect, incidental or consequential
damages. This warranty may not be transferred or sold. When requesting warranty
service please have the model number, cash register receipt and the date of
purchase available when you call. If the product is defective, we will replace
the defective part at no cost to you. Some states do not allow the exclusion or
limitation of incidental or consequential damages, so the above limitations or
exclusions may not apply to you. This warranty gives you specific legal rights and
you may have other rights, which vary from state to state.
For questions / comments, technical assistance or repair parts,
call toll free: 1-800-459-4409 (M–F, 8am–5pm, CST)
©2016 Menard, Inc., Eau Claire, WI 54703 10/2016
Downloaded from www.Manualslib.com manuals search engine
-
 1
1
-
 2
2
-
 3
3
-
 4
4
-
 5
5
-
 6
6
-
 7
7
-
 8
8
-
 9
9
-
 10
10
-
 11
11
-
 12
12
-
 13
13


Arkla 563490 Owner's manual
- Type
- Owner's manual
- This manual is also suitable for
Ask a question and I''ll find the answer in the document
Finding information in a document is now easier with AI
Other documents
-
Heartland Cabinetry 8000405P Operating instructions
-
Husky TB-303B Operating instructions
-
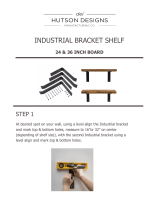 Del Hutson Designs DHD2019dw Operating instructions
-
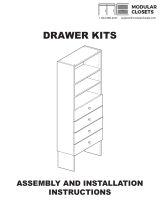 Modular Closets Vista Drawer Kit Assembly And Installation Instructions
-
Saber Compact SB-16 Assembly Instructions Manual
-
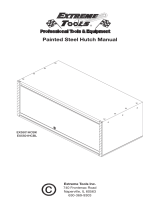 Extreme Tools EX5501HCBL Operating instructions
-
Montezuma 3005UC Owner's manual
-
 Montezuma BK3005UC Owner's manual
-
-
BLUE SKY OKCSST26 Owner's manual


