Page is loading ...

Installation Guide
Self-Rimming/Undercounter Lavatories
M product numbers are for Mexico (i.e. K-12345M)
Los números de productos seguidos de
M corresponden a México (Ej.
K-12345M)
Français, page “Français-1”
Español, página “Español-1”
K-2600 K-2602, K-2603
K-2605 K-2610
K-2611 K-2612
1018896-2-C

Thank You For Choosing Kohler Company
We appreciate your commitment to Kohler quality. Please take a few
minutes to review this manual before you start installation. If you
encounter any installation or performance problems, please don’t
hesitate to contact us. Our phone numbers and website are listed on
the back cover. Thanks again for choosing Kohler Company.
Tools and Materials
Before You Begin
WARNING: Risk of personal injury. Metal surfaces are sharp
and can cause severe cuts. Use gloves and handle lavatory
edges carefully.
Observe all local plumbing and building codes.
Prior to installation, unpack the new lavatory and inspect it for
damage. Return the lavatory to its protective carton until you are
ready to install it.
Inspect the drain and supply tubing. Replace if necessary.
Do not substitute another sealant if one is supplied with this
lavatory.
Use the template supplied with the lavatory.
For replacement installations, make sure the existing cutout is the
same size or smaller than needed for the new lavatory.
Pencil
Drill
Screwdriver
Keyhole Saw
Template
(supplied)
Safety
Glasses
Adjustable
Wrench
Tape
Measure
Plus:
• 1/2" drill bit
• Ruler
• Hole Saw
• Gloves
1018896-2-C 2 Kohler Co.

1. Preparation
Install the water supplies and drain piping according to the
roughing-in information.
Determine the faucet centerline location. Consider the faucet and
handle escutcheon diameters, the length of the spout, and the
clearance between the spout and the lavatory rim.
Calculate the faucet centerline measurement by first dividing the
escutcheon diameter by 2, and then adding 1/4″ (6 mm) to the
result. If necessary, round the calculation up to the nearest 1/16″
(2 mm).
Carefully draw the calculated faucet centerline on the cut-out
template. Choose the most suitable location based upon the
following factors:
•
compliance with all local plumbing codes
•
minimum 2″ (5.1 cm) distance from the water stream to the
lavatory rim edge. This is important to ensure adequate clearance
for hand washing
•
a minimum 1/4″ (6 mm) distance between the faucet spout and
the lavatory rim
Redraw the faucet centerline as needed to meet these
requirements.
Draw a line on the cut-out template a minimum of 2″ (5.1 cm)
behind the final faucet centerline. This is the minimum
backsplash locator line.
Handle
Escutcheon
Calculated Faucet
Centerline Distance
2" (5.1 cm)
Min.
Backsplash
Countertop
Template
Rim Outline
Centerline
2" (5.1 cm) Min.
1/4" (6 mm) Min.
Kohler Co. 3 1018896-2-C

Preparation (cont.)
NOTE: Some Kohler faucets require a minimum of 2-1/2″ (6.4 cm)
behind the final faucet centerline.
Cut along the backsplash locator line on the template.
Cut out the template along the inside of the template cutting line.
Position the template on the countertop to ensure clearance
between the lavatory, faucet, and backsplash.
Verify cabinet clearance beneath the countertop.
Use a pencil to trace the template on the countertop.
Mark the faucet and handle centerline on the countertop.
1018896-2-C 4 Kohler Co.

2. Self-Rimming Installation
WARNING: Risk of personal injury. Metal surfaces are sharp
and can cause severe cuts. Use gloves and handle lavatory
edges carefully.
Cut out the opening by carefully following the pencil line traced
from the template.
Temporarily position the lavatory in the countertop to check fit.
Remove the lavatory.
Drill the faucet holes according to the faucet installation
instructions.
Install the faucet to the countertop according to the
manufacturer’s instructions.
Install the drain to the lavatory according to the drain
manufacturer’s instructions.
NOTE: When installing the K-7702 drain, use the tapered gasket
supplied with the lavatory instead of the gasket supplied with the
drain.
CAUTION: Risk of product damage. Overtightening the wing
nuts may cause irreparable damage to the lavatory.
Apply bead of sealant around entire underside of lavatory rim
between stud and rim edge.
Place the lavatory into the cut-out hole and position.
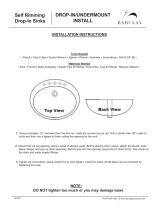
Self-Rimming Installation
Lavatory
Sealant
Stud
Kohler Co. 5 1018896-2-C

Self-Rimming Installation (cont.)
Assemble the clip and wing nut to the stud and carefully
finger-tighten to remove any gaps between the lavatory rim and
the countertop. Do not overtighten the wing nuts.
Remove any excess sealant using damp cloth.
Allow sealant to set for 30 minutes before proceeding.
Proceed to the Complete the Installation section.
1018896-2-C 6 Kohler Co.

3. Undercounter Installation
Cut-Out Dimensions
AB C
K-2610 Round Lav. 10-1/8″ (25.7
cm)
10-1/8″ (25.7 cm) N/A
K-2612 Round Lav. 13-1/2″ (34.3
cm)
13-1/2″ (34.3 cm) N/A
K-2611 Oval Lav. 9-3/4″ (24.8 cm) 11-3/4″ (29.8 cm) N/A
K-2602 Elliptical 13-3/4″ (34.3
cm)
12″ (30.5 cm) 23-5/8″
(60 cm)
Cut out the opening by carefully following the pencil line traced
from the template.
Install Wood Countertop
Mark and pre-drill the wood screw holes at the locations shown
on the previous table.
Waterproof any exposed areas of wood.
Install Marble/Stone Countertop
Position the countertop upside down on foam padding to protect
the surface.
Wood Countertop
Lavatory
Sealant
Undercounter Installation
Marble Slab / Solid Surface
Countertop
Lavatory
Insert
Sealant
Reference Hole
Location
A
C
B
Kohler Co. 7 1018896-2-C

Undercounter Installation (cont.)
Mark and drill 3/8″ holes 5/8″ (1.6 cm) deep at the locations
shown on the previous table.
Use a setting tool and hammer to secure the anchors.
For All Undercounter Installations
WARNING: Risk of personal injury. Metal surfaces are sharp
and can cause severe cuts. Use gloves and handle lavatory
edges carefully.
If the countertop has not been installed, install it at this time.
Drill the faucet holes according to the faucet installation
instructions.
Install the faucet to the countertop according to the faucet
manufacturer’s instructions.
Install the drain to the lavatory according to the drain
manufacturer’s instructions.
NOTE: When installing the K-7702 drain, use the tapered gasket
supplied with the lavatory instead of the gasket supplied with the
drain.
Apply a continuous bead of quality sealant to the top surface of
the lavatory rim where it will contact the countertop.
NOTE: The screws provided should be used on countertops with a
minimum 1″ (2.5 cm) thickness. For thinner countertops, use
appropriate anchors and fasteners (not provided).
For wood, wood composite, and marble countertops, install the
lavatory to the countertop with the clamps and screws provided.
For other countertop materials, refer to the countertop
manufacturer’s instructions for recommended fasteners.
CAUTION: Risk of product damage. Overtightening the nuts
may cause irreparable damage to the lavatory.
Position the lavatory squarely under the cutout before tightening
the clamps. Draw the lavatory rim up against the countertop until
it is snug. Do not overtighten.
Immediately wipe away any excess sealant, and fill any voids as
needed.
Allow the sealant to set for 30 minutes before proceeding.
Proceed to the Complete the Installation section.
1018896-2-C 8 Kohler Co.

4. Complete the Installation
Assemble the adjustable drain pop-up linkage.
Apply plumbers putty to the underside of the drain flange.
Insert the drain flange into the drain hole of the lavatory.
From underneath the lavatory, apply plumbers putty to the
underside of the drain area.
Slide the gasket, tapered side down, followed by the chrome
plated brass tube on to the drain flange.
Slide the other gasket, tapered side up, onto the drain flange and
push the gaskets and tube up against the underside of the
lavatory.
Slide the flat washer onto the drain flange and up against the
bottom gasket.
Secure the assembly with the locknut.
Connect and tighten the trap to the drain, and complete the water
supply connections to the faucet according to the instructions
packed with the faucet.
Run water into the lavatory and check for leaks.
Clean up with a non-abrasive cleaner.
Turn the water supplies on and check for leaks.
Drain Flange
(Purchased)
Apply
plumbers
putty.
Tapered Gasket
Tapered Gasket
Flat Washer
Locknut
Chrome Plated
Brass Tube
Kohler Co. 9 1018896-2-C
/