EqualLogic PS4000E

Dell EqualLogic PS4000E, EqualLogic PS4000X, EqualLogic PS4000XV Owner's manual

  • Hello! I am an AI chatbot trained to assist you with the Dell EqualLogic PS4000E Owner's manual. I’ve already reviewed the document and can help you find the information you need or explain it in simple terms. Just ask your questions, and providing more details will help me assist you more effectively!
PS4000 Storage Arrays
Rack Mount Instructions
Part Numb
er: F464T Rev. A00
Copyright 2009 Dell, Inc. All rights reserved.
Dell is a trad
emark of Dell, Inc.
EqualLogic is a registered trademark.
All trademarks and registered trademarks mentioned herein are the property of their respective owners.
Information in this document is subject to change without notice.
Reproduction in any manner whatsoever without the written permission of Dell is strictly forbidden.
April 2009
PS4000 Rack Mount Instructions
PS4000 Rack Mount Instructions iii
Table of Contents
Introduction ......................................................................................................................................1
Before You Begin ............................................................................................................................1
Installation Safety Precautions ...................................................................................................1
Installation Environmental Requirements..................................................................................1
Rack Requirements ....................................................................................................................2
Rail Kit Parts ..............................................................................................................................3
Tool Requirements .....................................................................................................................4
Steps for Mounting an Array in a Rack ...........................................................................................4
Step 1: Change the Mounting Rail Hardware ............................................................................4
Step 2: Determine Where to Place the Mounting Rails in the Rack ..........................................5
Step 3: Attach the Mounting Rails to the Rack Poles ................................................................5
Step 4: Slide the Chassis into the Rack ......................................................................................7
Step 5: Attach the Chassis to the Mounting Rails ......................................................................8
Step 6: Install the Bezel .............................................................................................................9
Where to Go Next ..........................................................................................................................10
Technical Support ..........................................................................................................................10
Introduction
For proper operation, a PS4000 storage array must be installed in a rack. See your PS Series support
provider for
information about supported racks.
Before You Begin
Before you begin to mount an array in a rack, you must:
Read the installation safety precautions. See Installation Safety Precautions.
Make sure the rack location meets the array’s environmental requirements. See Installation
Environmental Requirements.
Make sure your rack meets the rack requirements. See Rack Requirements.
Unpack the rail kit and make sure you have all the necessary parts and tools. The rail kit is located in
the array shipping box. You must supply your own tools. See Rail Kit Parts and Tool Requirements.
Installation Safety Precautions
Follow these safety precautions:
It is recommended that only individuals with rack mounting experience install a
PS4000 array in a
rack.
Make sure the array is fully grounded at all times to prevent damage from electrostatic discharge.
When handling the array hardware, you must use the electrostatic wrist guard shipped with the array
or a similar form of protection.
You need at least two people to lift the array chassis from the shipping box.
Installation Environmental Requirements
The rack location must meet the following environmental requirements:
Only operate an enclosure from a power source with a voltage range of 100 to 240 VAC.
Make sure your power source has sufficient electrical overload protection.
In North America, connect the enclosure to a source of power with over-current protection provided
by a double pole 20A or less device (UL 489 circuit breakers). In Europe, the over-current protection
must be provided by a 20A or less device (IEC circuit breakers).
Make sure there is sufficient space for air flow in front of and behind the array.
Make sure the location is properly vented.
Make sure the rack installation meets the array technical specifications in Table 1.
PS4000 Rack Mount Instructions 1
Table 1: PS4000 Array Specifications
Specification Value
Weight of fully loaded array 35 kg (77.6 lb)
Operating temperature 5 to 35 °C (41 to 95 °F)
Storage temperature -30 to 60 °C (-22 to 140 °F)
Maximum operating altitude 3048 meters (10,000 feet)
Operational relative humidity 20% to 80% noncondensing
Storage relative humidity 5% to 80% noncondensing
Thermal output (fully-loaded array) 1700 BTU/hour (SAS disks)
1550 BTU/hour (SATA disks)
Operational shock 5g peak 1/2 sin, for 10ms
Operational vibration .21 G
rms
5 to 500 Hz Random
Input voltage 100 to 240 VAC (auto-sensing)
Input frequency 48 – 62 Hz
System input power 530 VA (maximum)
Each power supply 450 watts DC output
Maximum input power: 0.7 KVA
Input current: 7 – 3.5A
Chassis dimensions
13 cm by 48.26 cm by 55.1 cm
(5.12 in. by 19 in. by 21.7 in.)
Rack Requirements
Make sure the rack and the array installation meet the following requirements:
Use an industry-standard (for example, CEA-310-E), four-pole, 19 inch (48.3 cm) rack.
The rack must be rated for 540 kg (1200 pounds) static load or greater.
The minimum rack depth is 100 cm (40 inches) from the front of the rack to the rear of the rack.
The distance between the inside of the front and rear rack poles (the mounting surfaces) must be
61 cm (24 inches) to 90 cm (36 inches).
Secure the rack to the floor for added stability.
Load a rack with arrays from the bottom to the top.
There must be at least 4.1 cm (1.6 inches) between the rack door and the front of the array to
accommodate the array front bezel.
The rack (with installed arrays) must meet the safety requirements of UL 60950-1 and IEC 60950-1.
Mount the array in a horizontal position, or you will void your array warranty and support contract.
2 PS4000 Rack Mount Instructions
Rail Kit Parts
The rail kit includes the parts described in Table 2. Not all parts are used in all racks.
Parts for round racks are included in bag labeled ROUND.
Parts used in multiple racks are included in the bag labeled COMMON.
No additional parts are required for tapped racks.
Table 2: Rail Kit Parts (Images Not to Scale)
Item Graphic Quantity Description
1
1 each LH Rail Assembly
RH Rail Assembly
2
2 M5 x 8 Posi pan head screw
with patchlock (COMMON bag)
3
4 Large O/D plain washer
(COMMON bag)
4
4 Spring washer (COMMON bag)
5
4 #10-32 x 25 Phillips head NO2
pan head screw (COMMON
bag)
7
8 Locator pins for round hole rack
(ROUND bag)
Tool Requirements
You need the following tools to mount an array in a rack. These tools are not provided in the array
shipping box.
#2 Phillips screwdriver
#2 pozidriv® screwdriver
(Optional) Torque wrench. The torque specification for the supplied screws is 5.69 N m (4.2 foot
pounds).
PS4000 Rack Mount Instructions 3
Steps for Mounting an Array in a Rack
Follow these steps to mount a PS4000 array in a rack:
1. Change
the mounting rail hardware, if necessary.
2. Determine where to place the mounting rails in the rack.
3. Attach the mounting rails to the rack.
4. Slide the chassis into the rack.
5. Attach the chassis to the brackets on the mounting rails and to the front of the mounting rails.
6. Install the bezel.
These steps are described in detail in the following sections. After you mount the array in the rack, see the
Installation and Setup manual for information about completing the array hardware installation.
Step 1: Change the Mounting Rail Hardware
The mounting rails are shipped with hardware pre-installed for mounting in a rack with square holes. If
you have a square-hole rack, no changes are necessary. Proceed with Step 2: Determine Where to Place
the Mounting Rails in the Rack.
If your rack has round or tapped holes, change the hardware as follows.
For round hole racks:
- On the front and back of both mounting rails, remove the pre-installed locator pins and replace
them with the locator pins from the bag labeled ROUND. Insert the locator pins from the front,
using the same orientation as the pre-installed pins.
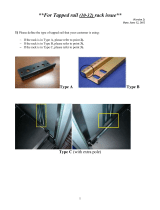
For tapped hole racks:
1. On the front and back of both mounting rails, remove the pre-installed locator pins.
2. Re-install the same locator pins from the opposite side of the holes you removed them from, so
that the pin protrudes from the front and rear of the mounting rail flanges.
Step 2: Determine Where to Place the Mounting Rails in the Rack
Make sure there is enough space in the rack for a 3U chassis. In a standard rack, the height of a 3U
chassis will span 9 holes.
Figure 1 shows the location of the top and bottom of the chassis relative to the location of the screws used
to attach the rail and the array to the rack’s front right and left poles.
4 PS4000 Rack Mount Instructions
Figure 1 Front Pole Screw Locations
Figure 1 Description
Indicates the top of the PS4000 array chassis.
Location of the upper mounting rail screw.
Location of the captive chassis thumbscrew (between the two locator pins).
Indicates the bottom of the PS4000 array chassis. The array rests on the lip of the mounting rails.
Step 3: Attach the Mounting Rails to the Rack Poles
The rail kit includes two mounting rails, one for the left rack pole and one for the right rack pole when
viewed from the front of the rack.
Guidelines for Attaching the Mounting Rails
Follow these guidelines when attaching the mounting rails to the rack poles:
Attach the mounting rail flanges to the inside of the rack pole flanges.
Insert the screws from the outside of the rack.
Use the markings on the rack poles (if present) to make sure the rails are level, or use a level.
Attaching the Mounting Rails to the Rack Poles
To attach the mounting rails to the rack poles:
1. Collect the necessary hardware and tools:
- One #2 Phillips screwdriver and one #2 pozidriv screwdriver. See Tool Requirements.
- The left and right rails.
- For all rack types, the contents of the COMMON BAG.
PS4000 Rack Mount Instructions 5
2. Orient the mounting rail in its proper position. Each rail is stamped with either “LH Front” or “RH
Front.” When the rails are properly positioned, the brackets are closer to the rear of the rack and
pointing up. See Figure 2.
Figure 2 Adjusting the Length of a Mounting Rail
3. Attach the front of the rail to the inside of the front pole (Figure 3, callout ) using one Phillips head
screw, one spring washer, and one plain washer from the COMMON bag.
4. Pull the rear flange until it meets the inside surface of the rear rack pole. See Figure 2.
Make sure the locator pins go through the rack holes at the same height (in the same relative holes on
the front and rear poles), according to the pole markings, if present. Use a level to make sure the rails
are level.
5. Attach the rear of the rail to the rear pole (Figure 3, callout ) using one Phillips head screw, one
spring washer, and one plain washer from the COMMON bag.
Figure 3 Attaching a Mounting Rail to the Front and Rear Poles
6 PS4000 Rack Mount Instructions
Step 4: Slide the Chassis into the Rack
Caution: Be careful when lifting the chassis.
1. With assistance, lift the chassis and slide it into the mounting rails. Keep the chassis level.
See Figure 4.
2. Make sure the chassis captive fasteners on the front of the array line up with the lower clip nuts in the
front of the mounting rails.
Figure 4 Sliding the Chassis into the Rack
PS4000 Rack Mount Instructions 7
Step 5: Attach the Chassis to the Mounting Rails
Secure the chassis to the mounting rails as follows:
1. On both sides, tighten the captive fasteners on the front of the chassis into the lower clip nuts. See
Figure 5.
2. On both sides, attach the rear of the chassis to the brackets on the left and right rails using the Posi
screws from the COMMON bag. Insert the screws from the inside of the rack, as shown in Figure 5
(shows only one side for clarity). You must secure the array to the rear brackets.
Caution: Failure to attach the array to the brackets can affect the stability of the array and reduce the
life of the drives.
Figure 5 Attaching the Chassis to the Mounting Rails
8 PS4000 Rack Mount Instructions
Step 6: Install the Bezel
1. Facing the front of the rack, fit the right side of the bezel into the right side of the chassis.
See Figure 6.
Figure 6 Attaching the Bezel to the Chassis
2. Push the bezel toward the chassis until the left side of the bezel engages with the chassis.
3. Insert the bezel key (attached to the bezel) and turn it counter-clockwise to lock the bezel to the
chassis. See Figure 7. Make sure you store the key in a safe location.
Figure 7 Locking the Bezel
PS4000 Rack Mount Instructions 9
10 PS
4000 Rack Mount Instructions
Where to Go Next
See the Installation and Setup manual for information about completing the array hardware installation.
Technical Support
Dell's support service is available to answer your questions about PS Series arrays. If you have an Express
Service Code, have it ready when you call. The code helps Dell's automated-support telephone system
direct your call more efficiently.
Dell provides several online and telephone-based support and service options. Availability varies by
country and product, and some services may not be available in your area.
For customers in the United States, call 800-945-3355.
If you do not have an Internet connection, you can find contact information on your purchase invoice,
packing slip, bill, or Dell product catalog.
To contact Dell for sales, technical support, or customer service issues:
1. Visit support.dell.com.
2. Verify your country or region in the Choose A Country/Region drop-down menu at the bottom of the
window.
3. Click Contact Us on the left side of the window.
4. Select the appropriate service or support link based on your need.
5. Choose the method of contacting Dell that is convenient for you.
You can learn about Dell products and services on the following websites:
www.dell.com/
www.dell.com/ap/ (Asian/Pacific countries only)
www.dell.com/jp (Japan only)
www.euro.dell.com (Europe only)
www.dell.com/la (Latin American countries)
www.dell.ca (Canada only)
You can access Dell Support through the following websites:
support.dell.com
support.dell.com/EqualLogic
support.jp.dell.com (Japan only)
support.euro.dell.com (Europe only)
/