
Revison 0.8.6 Document No. 01424
Mobile Cardiac Monitor
Operator Manual

Revison 0.8.6 Document No. 01424
Page 2
Table of Contents
1. Description…………………………………………………………….. 3
2. Indications for Use……………………………………………………
4
3.
Contraindications for Use……………………………………………
4
4.
Precautions……………………………………………………………. 5
5.
Parts……………………………………………………………………..
6
5.1 RhythmStar Monitor……………………………………………….. 6
5.2 ECG Cable…………………………………………………………
8
5.3 Batteries……………………………………………………………. 8
5.4 Battery Charger……………………………………………………. 9
6.
Electrode Application-Connecting the ECG……………………..
9
6.1 Connecting the ECG cable to the patient……………………….
.
9
6.1.1 2-Channel (3-lead) Electrode Placement……………………..
10
6.1.2 3-Channel (5-lead) Electrode Placement…………………….. 11
6.2 Connecting the patient ECG lead cable to the monitor………..
12
7.
Using the Monitor……………………………………………………..
12
7.1 Powering on the monitor………………………………………….. 12
7.2 Checking ECG signal quality………………………………………
14
7.3 Recording a cardiac event…………………………………………
15
7.4 Entering symptoms and activi
ty level associated with
the cardiac event……………………………………………………….. 16
7.5 Recharging the battery…………………………………………….
17
8.
Maintenance and Service……………………………………………
18
8.1 Cleaning……………………………………………………………. 18
8.2 Service………………………………………………………………
18
8.3 Troubleshooting……………………………………………………
19
8.4 Disposal of Battery…………………………………………………
20
9.
Medical Device Symbols and Safety Signs………………………
21
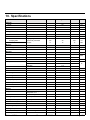
10.
Specifications………………………………………………………….
22
1
1 RhythMedix Limited Warranty……………………………………… 23
12 Obtaining Warranty Service………………………………………… 23
13.
Wireless Compliance…………………………………………………
24
14.
Arrhythmia Detection Performance……………………………….
26
15.
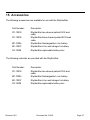
Accessories…………………………………………………………….
27
Appendix A - Handling Instructions for Lithium Ion Battery…. 28

Revison 0.8.6 Document No. 01424 Page 3
1. Descripon
Caution: US Federal law restricts this device to sale by or on the order of a
physician.
The RhythmStar device is a portabl
e, battery powered, wireless cardiac monitor
which may be worn by a patient to record ECG and activity level data for up to 30
consecutive days. The device can capture patient activated and auto-triggered
cardiac events such as Bradycardia, Tachycardia, and Atrial Fibrillation as identified
by an embedded arrhythmia detection algorithm. The device is capable to
automatically deliver the data to the server. The data can be delivered to the server
wirelessly by using a built-in wireless data modem or via USB connection. A medical
professional, using the server, can adjust and program the device configuration and
auto-triggering parameters.
The RhythmStar device consists of a monitor, a patient ECG lead cable, an
externally rechargeable battery, and a wall battery charger. The RhythmStar device is
intended to be used with 3rd party lead electrodes supplied to a patient by a physician
or a monitoring enter. High quality FDA approved lead electrodes should be used.
The RhythmStar system supports USB connectivity that can be used to send and
receive data from/to RhythmStar and other devices. The server can deliver
configuration parameters to the device, such as monitoring duration, pre/post
activation recording duration, auto-trigger rate and duration limits, user interface
preferences, and requests for additional data stored in the device memory.
The device receives continuous ECG signal from lead electrode sensors attached to
the patient’s body, analyzes the data and stores it in the on-board flash memory.
Activity level data that represents the patient's activity related to the physical motion is
measured by a built-in accelerometer and also stored in the device memory.

Revison 0.8.6 Document No. 01424
Page 4
2. Indications for Use
The
RhythmStar System is intended for use by patients who either have or are at risk
of having cardiac disease and those that demonstrate intermittent symptoms
indicative of cardiac disease and require cardiac monitoring on a continuing
basis. The device continuously records ECG data and upon detection by an ECG
analysis algorithm or manually initiated by the patient, automatically delivers the
recorded cardiac activity to the server where it is presented and can be reviewed by a
medical professional.
The data received from RhythmStar device can be used by another device for
arrhythmia analysis, reporting and signal measurements. The RhythmStar system is
not intended to sound any alarms.
The device does not deliver any therapy, administer any drugs, provide interpretive or
diagnostic statements or provide for any life support. RhythmStar is for prescription
use only (Part 21 CFR 801 Subpart D).
3. Contraindications for Use
The RhythmStar system is
not intended for use under the following conditions:
Patients with potentially life-threatening arrhythmias who require inpatient
monitoring.
Patents who the attending physician believes should be hospitalized.
Infants weighing less than 10 kg. (22 lbs.).

Revison 0.8.6 Document No. 01424 Page 5
4. Precautions
Use only patient ECG lead cables provided by Rhythmedix with RhythmStar.
Disconnect patient ECG lead cable before using a defibrillator.
When viewing the ECG data, the presence of pacemaker signals in the ECG trace
should
not be considered true representations of the actual pacemaker stimulus
amplitude.
To avoid unintended battery discharge, do not leave the battery in RhythmStar
when it is not in use.
To receive the best recording results, instruct patients to stay away from heavy
electrical
equipment or other sources of electromagnetic interference. Equipment
such as electric blankets and heating pads are included in this group.
Avoid exposing RhythmStar or RhythmStar battery to water or excessive moisture.
Do not expose RhythmStar or RhythmStar battery to extreme temperatures
beyond the limits shown in the environmental specifications.
PLEASE NOTE: No Computerized information is completely reliable and
physicians should review all ECG results.

Revison 0.8.6 Document No. 01424
Page 6
5. Parts
RhythmStar is shi
pped with the following components:
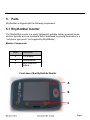
5.1 RhythmStar monitor
The RhythmStar monitor is a small, li
ghtweight, portable, battery powered device
which is typically worn on a patient’s belt or waistband by placing the monitor in a
“cell phone type pouch” (not supplied by RhythMedix).
Monitor Components
Letter Description
A LCD display
B Record Button
C Menu Selection
Buttons
A
C
B
Front view of the RhythmStar Monitor

Revison 0.8.6 Document No. 01424 Page 7
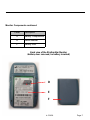
Monitor
Components continued
Letter Description
D Battery Compartment
E Serial Number
F Battery Door
Back view of the RhythmStar Monitor
(battery door removed, no battery inserted)
D
E
F

Revison 0.8.6 Document No. 01424
Page 8
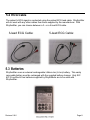
5.2 ECG Cable
The patient’s ECG signal
is conducted using the patient ECG lead cable. RhythmStar
will not work with any other cables than those supplied by the manufacturer. With
RhythmStar, you can choose between a 3– or a 5-lead ECG cable.
5.3 Batteries
RhythmStar uses an external rechargeable Lithium-Ion (Li
-Ion) battery. This easily
removable battery must be recharged with the supplied battery charger. Only IEC
62133 certified Li-Ion batteries supplied by RhythMedix are to be used with
RhythmStar.
3-lead ECG Cable:
5-lead ECG Cable:

Revison 0.8.6 Document No. 01424 Page 9
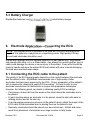
5.3 Battery Charger
RhythmStar batteries must be charged with the included battery charger.
6. Electrode Application—Connecting the ECG
RhythmStar operates with the supplied patient ECG lead cables only! RhythmStar
can operate with either a 3 or a 5-lead cable. Any attempt to connect another type of
cable could damage the device or cause injury to the patient. Every effort should be
made to handle and store the patient ECG lead cables with care to avoid damaging
the lead wires and lead wires snaps.
6.1 Connecting the ECG cable to the patient
The quality of the ECG signal greatly depends on the contact between the electrode
and the patient’s skin. RhythMedix recommends use of high-quality, Holter
electrodes that have been approved by the FDA. Proper preparation of the patient’s
skin is required for obtaining a quality ECG recording. It is best to refer to your
electrode manufacturer for instructions on proper skin preparation techniques.
However, the following points can assist in obtaining quality ECG recordings:
If necessary, shave hair from the areas on the chest where the electrodes are to
be placed.
At each location where an electrode is to be placed, clean the skin with water or
rubbing alcohol
and let the skin dry.
To avoid applying excessive pressure to the patient’s body, attach the snaps of the
ECG cabl
e to the electrodes prior to placing them on the patient’s skin.
Generally, electrodes should be placed over bone structures. Artifact and noise
result from placem
ent of electrodes over large muscles or fatty tissue.
NOTE: RhythmStar device is intended to be used with 3rd party lead electrodes
supplied to a patient by a physician or a monitoring center. High quality FDA ap-
proved lead electrodes should be used.

Revison 0.8.6 Document No. 01424
Page 10
STEP 1: Connect the patient ECG lead cable snap to the electrode.
STEP 2: Remove the protective backing from the electrode.
STEP 3: Apply the electrode to the patient’s skin. Apply each electrode to match
Figures 1 or 2 in this manual or as instructed by the physician.
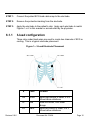
6.1.1 3-lead configuration
Three color-coded lead wires are used to create two channels of ECG re
cording. This is a typical electrode placement:
Figure 1—3-Lead Electrode Placement
# Color Location
RA White Upper-right portion of chest, 2 to 3
inches below collarbone
LL Red Below left breast, over lower
ribcage
LA Black Upper-left portion of chest, 2 to 3
inches below collarbone

Revison 0.8.6 Document No. 01424 Page 11
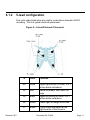
6.1.2 5-lead configuration
Five color-coded lead wires are used to create three channels of ECG
recording. This is a typical electrode placement:
Figure 2—5-Lead Electrode Placement
# Color Location
RA White Upper-right portion of chest, 2 to 3
inches below collarbone
LL Red Below left breast, over lower rib-
cage
LA Black Upper-left portion of chest, 2 to 3
inches below collarbone
RL Green Lower right rib margin over bone
V1 Brown Fourth intercostal space at the
right boarder of the sternum

Revison 0.8.6 Document No. 01424
Page 12
6.2 Connecting the patient ECG lead cable to the
monitor
The cabl
e has a metal connector which can only be inserted one way into the cable
receptacle opening on the top portion of the RhythmStar monitor. Once aligned, firmly
insert the cable connector into the cable receptacle as pictured below:
7. Using the monitor
7.1 Powering on the monitor
RhythmStar does not contai
n a separate On/Off power button. When you are ready
to begin using RhythmStar, insert a charged battery into the monitor as pictured on
the following page.

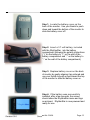
Revison 0.8.6 Document No. 01424 Page 13
Step 1: Loca
te the battery cover on the
back of the monitor. Use your thumb to push
down and toward the bottom of the monitor to
slide the battery cover off.
Step 2: In
sert a 3.7 volt battery, included
with the RhythmStar, into the battery
compartment following the polarity instructions
(“+” on the battery to “+” on the wall of the
battery compartment and “-” on the battery to
“-” on the wall of the battery compartment).
Step 3: Replace battery cover on the back
of monitor by gently aligning it as pictured and
use your thumb to push up and toward the top
of the monitor to slide the battery cover on.
Step 4: If the battery was successfully
installed, after a few seconds, the screen
should show the RhythmStar name and logo
as pictured. RhythmStar is now powered and
ready for use.

Revison 0.8.6 Document No. 01424
Page 14
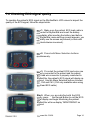
Step 1: Mak
e sure the patient ECG lead cable is
connected to RhythmStar and insert the battery.
Immediately after inserting the battery (and before
the RhythmStar name and logo screen appears, you
will briefly see the screen as pictured (a circle with
counterclockwise movement).
Step 2:
Press both Menu Selection buttons
simultaneously.
Step 3: Provided the patient ECG lead wires are
properly connected to the patient and the patient
ECG lead wire connector is properly connected to
RhythmStar, the patient’s ECG signal will display as
pictured. Use the Menu Selection buttons to select
Ch1, Ch2 and Ch3. (Ch3 only available when using
the 5-lead ECG cable)
Step 5: When you are satisfied with the ECG
quality, press the Record Button to exit the ECG
signal display and begin Monitoring the patient.
RhythmStar will now display “MONITORING” as
pictured.
7.2 Checking ECG signal quality
T
o visualize the patient’s ECG signal on the RhythmStar’s LCD screen to inspect the
quality of the ECG signal, follow the steps below:

Revison 0.8.6 Document No. 01424 Page 15
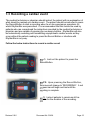
7.3 Recording a cardiac event
The medical technician or physician should instruct the patient with an explanation of
what should be m
arked as a cardiac event. The patient should be instructed to press
the Record Button to start a recording when he or she experiences symptoms for
which RhythmStar was prescribed. It is recommended that this feature be used by
patients who can comprehend the instructions provided by the medical technician or
physician and are capable of pressing the necessary buttons. RhythmStar will also
be automatically recording and transmitting asymptomatic cardiac events as they
occur without the patient needing to press the Record Button or interface with
RhythmStar in any way.
Follow the below instructions to record a cardiac event:
Step 1: In
struct the patient to press the
Record Button.
STEP 2: U
pon pressing the Record Button,
the screen will change to “RECORDING”. A red
progress bar will begin and last until the
recording is complete.
NOTE: Instruct patients to remain as still as
possible for the duration of the recording.

Revison 0.8.6 Document No. 01424
Page 16
7.4 Entering symptoms and activity level associated
with the cardiac event
After a recording is completed, RhythmStar will then prompt the patient to select the
symptom or symptoms and the level of acti
vity that he or she was feeling and doing at
the time of pressing the Record Button.
Follow the below instructions to enter symptom(s) and activity level associated
with the cardiac event:
Step
1: After each time a patient
activated event recording is completed,
RhythmStar will then display the “Select
Symptoms” screen. The patient should be
instructed to use the Menu Selection
buttons to highlight the symptom selection
(s) that best represent the reason for the
event. By pressing the Record Button of a
highlighted symptom, the empty circle
next to the selection will fill. The patient
can repeat this step to select more than
one symptom if appropriate. Once
symptom(s) are properly selected, the
patient should highlight the “NEXT”
selection and then press the Record But-
ton to move on to the next screen.
Step 2: R
hythmStar will next display
the “Select Activity” screen. The patient
should be instructed to use the Menu
Selection buttons to highlight the activity
level that best represents their activity
level at the time that the Record Button
was pressed. Only one activity level
selection may be selected. Once the
activity level is properly selected, the
patient should highlight the “SUBMIT”
selection and then press the Record
Button. RhythmStar is now ready to
record additional events.

Revison 0.8.6 Document No. 01424 Page 17
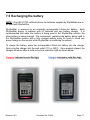
7.5 Recharging the battery
NOTE: Only IEC 62133 certified Lithium-Ion batteri
es supplied by RhythMedix are to
be used with RhythmStar.
RhythmStar is powered by an externally rechargeable Lithium-Ion battery. Each
RhythmStar device is supplied with (2) batteries and one battery charger. It is
recommended that while one battery is being used in the RhythmStar monitor, the
other battery is being charged. We recommend replacing the battery being used in
the RhythmStar monitor with a fully charged battery every 24 hours to avoid any
power outage on the monitor while RhythmStar is monitoring the patient.
To charge the battery, place the rechargeable Lithium-Ion battery into the charger.
Next, plug the charger into the wall outlet (110 or 220V). Once properly placed, the
charger will show either a solid red or blue indication light as shown below:
Charging—Indicated by solid Red light: Charged—Indicated by solid Blue light:

Revison 0.8.6 Document No. 01424
Page 18
8. Maintenance and Service
8.1 Cleaning
T
o clean RhythmStar:
1.
Remove the battery from the monitor (DO NOT ATTEMPT TO CLEAN BATTERY
):
2.
Dampen
a soft cloth with a mild detergent and water mixture.
An example of a
mild detergent is an al
cohol-free hand soap or sodium hypochlorite
(bleach)
solution 10% in water
.
3.
C
lean the monitor and patient ECG lead cables.
4.
Remove any remaining adhesives from the patient ECG lead cables with
an
adhesi
ve tape remover solution
or swab of mild detergent.
NOTE:
Do not use alcohol or acetone to clean the lead wires as this can cause
the wires to stiffen and the insulating plastic to crack.
Do not immerse the monitor in water or any other cleaning solution.
Store the patient ECG lead cables suspended when possible.
Avoid kinking the patient ECG lead cables.
8.2 Service
If there is a problem with the monitor
, review the Troubleshooting section for a listing
of problems and solutions. If additional assistance is required, contact RhythMedix
customer support via phone at (856) 282-1080. Be prepared to provide the following
information:
Serial number of the monitor
Description of the problem
Call customer support before returning a recorder to make shipping arrangements.

Revison 0.8.6 Document No. 01424 Page 19
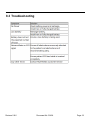
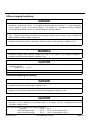
8.3 Troubleshooting

Revison 0.8.6 Document No. 01424
Page 20
8.4 Disposal of Battery
Storage and Disposing of Lithium-Ion (Li-Ion) batteries instru
ctions:
The RhythmStar monitor and battery should be stored at room temperature in a dry
area. Make sure that the battery is removed from the monitor while in storage.
In the event that a battery becomes damaged or no longer holds its charge, the
battery should no longer be used and should be recycled.
To locate a Rechargeable Battery Recycling Corporation (RBRC) collection point
within the US, visit the website listed below and type in your postal or zip code. The
closest drop off points in many stores such as Wal-Mar, Home Depot, Radio Shack,
Best Buy will display.
http://www.call2recycle.org/locator/
Place the batteries that you wish to recycle into a box or bag and take them to the
collection point. Hand the batteries over to the RBRC representatives at the collection
point for recycling.
Page is loading ...
Page is loading ...
Page is loading ...
Page is loading ...
Page is loading ...
Page is loading ...
Page is loading ...
Page is loading ...
Page is loading ...
Page is loading ...
Page is loading ...
Page is loading ...
-
 1
1
-
 2
2
-
 3
3
-
 4
4
-
 5
5
-
 6
6
-
 7
7
-
 8
8
-
 9
9
-
 10
10
-
 11
11
-
 12
12
-
 13
13
-
 14
14
-
 15
15
-
 16
16
-
 17
17
-
 18
18
-
 19
19
-
 20
20
-
 21
21
-
 22
22
-
 23
23
-
 24
24
-
 25
25
-
 26
26
-
 27
27
-
 28
28
-
 29
29
-
 30
30
-
 31
31
-
 32
32


Ask a question and I''ll find the answer in the document
Finding information in a document is now easier with AI
Other documents
-
 BioTel Heart MCOT OS Patient Education Manual
-
 Instramed I.ON Quick Reference Manual
-
Midmark IQecg 12-Lead Resting ECG User guide
-
Hill-Rom Expert Holter Software PCH-200 Reference guide
-
-
QOLSYS QS1231-840 Quick start guide
-
TOA BP-900 UL User manual
-
 Medicomp TelePatch PM750 User manual
-
 Lohman Technologies AfibAlert User manual
-
ZOLL R Series User manual


