ANZZI TL-MBSRN201WH User manual

Type
User manual

This manual is also suitable for

05/30/2022
2
V1.2-This version supersedes all previous versions as of 05/30/2022
INSTALLATION
Need help? For technical support call 305-614-4070 or visit us at www.ANZZI.com
Order or Purchase # SKU or Model #
B=5.3”[136mm]~6.9”[174mm]
≥14.6”[370mm]
≥20.5”[520mm]
A=16.9”[430mm]~18.7”[474mm]
11.2”[285mm]
≥14.6”[370mm]
14.1”[357mm]
2.3”[58mm]
8.3”[210mm]
19.7”[500mm]
0.2”[5mm]
2.4”[62mm]
18.9”[480mm]
0.2”[5mm]
2.4”[62mm]
A=16.1”[410mm]~17.9”[454mm]
≥14.6”[370mm]
14.1”[357mm]
10.7”[271mm]
8.3”[210mm]
2”[52mm]
B=5.3”[136mm]~6.9”[174mm]
≥13.8”[350mm]
≥19.5”[490mm]
Water Inlet(left)
Release Button
Toilet Lid
Toilet (not provided)
Toilet Seat
Nozzle
Hose
Knob
T-Connector
Supply Hose
1.Toilet Seat
3.Fix Components
4.T-Connector 5.Hose
Filter
Washer
6.Installation Guide
/User Manual
Screw (2)
Adjusting Plate (2)
Anchor (2)
Nut (2)
(Suitable for Bottom Mount)
(Suitable for Top Mount)
Base Plate (1)
2.Template
Note:There are two installation ways for this product. Use Anchor for the top mount installation
and Nut for the bottom mount installation.
Please read and and follow the installation and operation instructions carefully to ensure the seat's long
life and reliable operation. FAILURE TO DO SO COULD CAUSE PROPERTY DAMAGE AND SERIOUS
INJURY. Please keep this manual for future reference.
1.Water pressure range: 0.07-0.8MPa(10~116PSI).
2.Do not connect to a hot water supply. Providing water temperature above 104°F / 40°C will
damage the product and void your warrnty.
Installation Guideline
Installation Steps
1.Remove the old toilet seat. 2A-1.Press the Anchors into the toilet bowl
holes. If the anchor does not fit the bowl,
proceed to Step 2B, otherwise, skip Step 2B
and continue with Step 3.
toilet seat
2A-2.Position and adjust the Template on the
bowl. Place and align the Base Plate to the
slotted area of the Template and then place the
2B. Position and adjust the Template on the
bowl. Place and align the Base Plate to the
slotted area of the Template and then place the
Plate and Screws as shown. Secure the Base
Plate by tighten the Nuts.
Plate and Screws as shown. Secure the Base
Plate by tighten the Screws.
Plate
Base plate
Nut
Bolt
Template
Template
Screw
Plate
Base plate
3. Slide the Toilet Seat across the Base Plate
until you hear a click sound to make sure the
Toilet Seat is secured.
4. Turn off the supply stop, then disconnect
the supply hose from the water tank. If you are
using a rigid supply line you will need to
purchase a flexible supply hose to install the
toilet seat.
Installation Steps
Supply
Hose Hose
5. Install T-Connector to the Inlet and Supply
Hose as shown. Connect the other point of
Supply Hose to the supply stop if you're
replacing the rigid supply with a new hose.
Connect the included Hose on to the
T-Connector and the toilet seat inlet with filter
between the T-Connector and the Hose, washer
on the other side.
Inlet
T-Connector
Washer
6. Make sure the Knob on the toilet seat is at
the off position with lever pointing upward.
Turn the supply stop back on and check
connections at arrows for leaks. Retighten if
necessary, but do not overtighten.
Knob
Operation Instruction
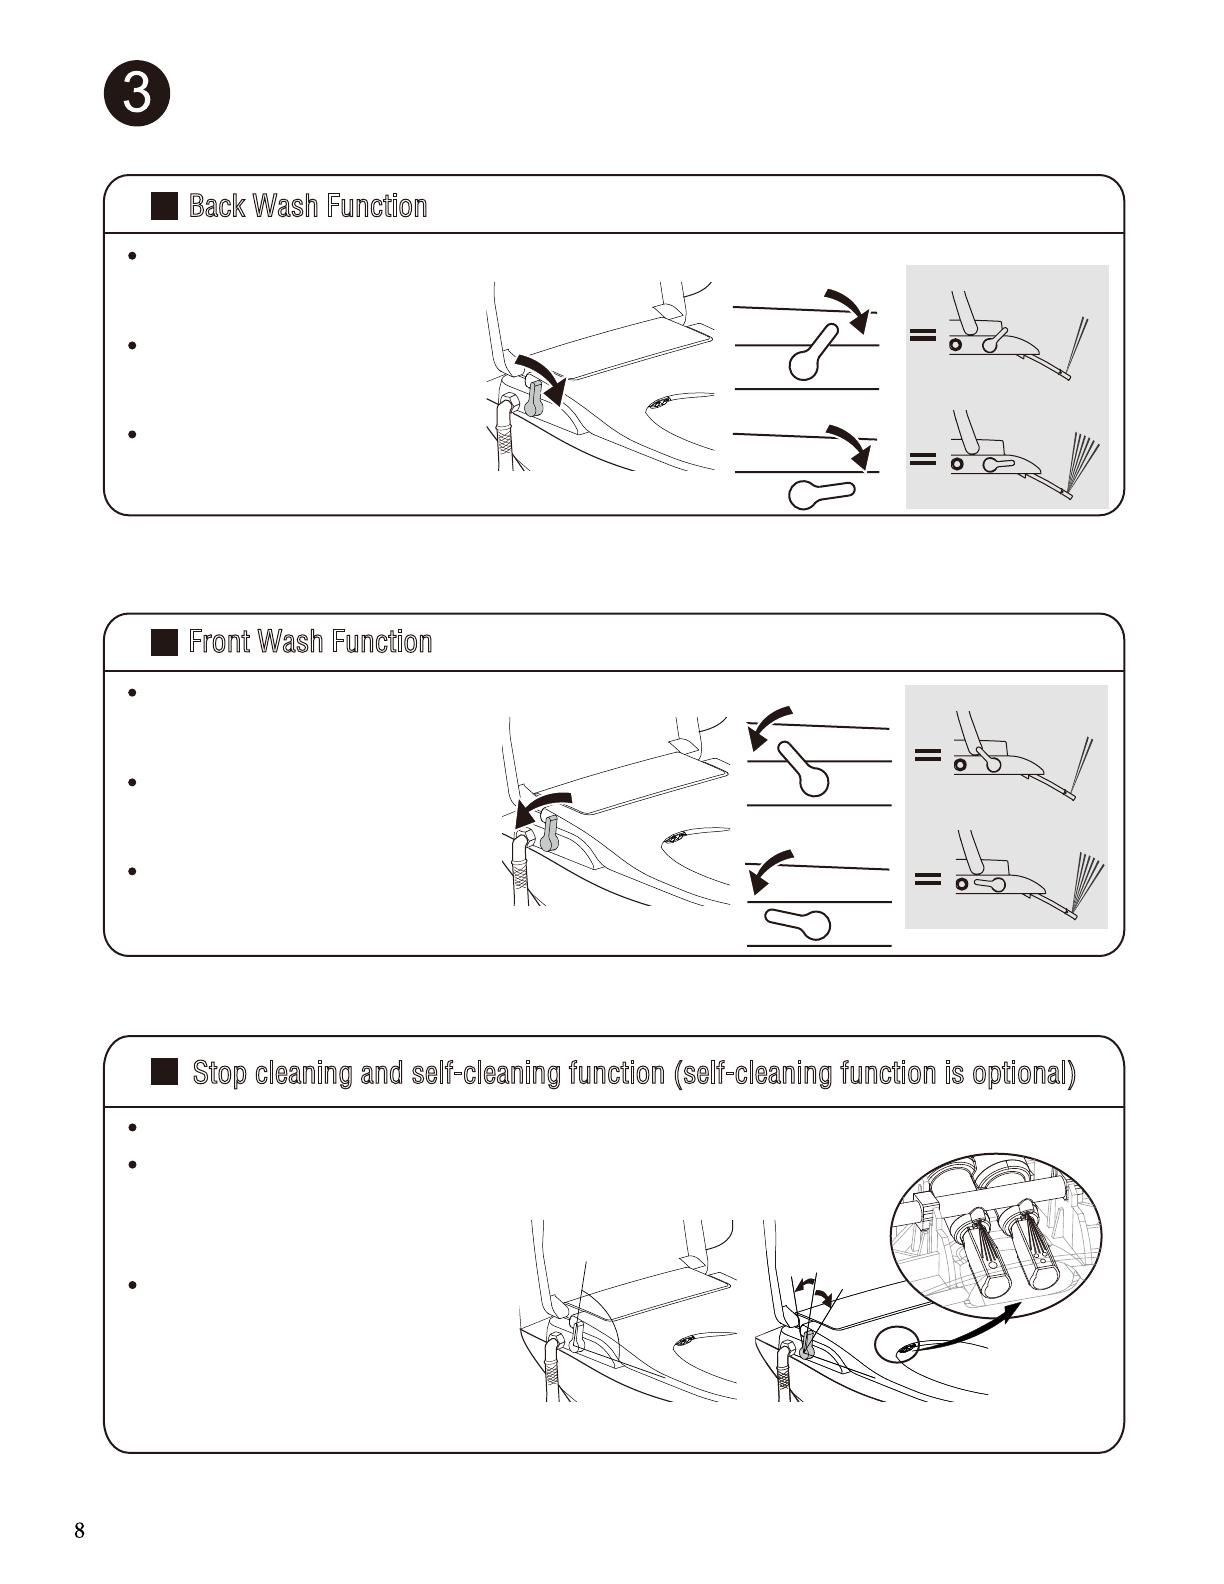
Stop cleaning and self-cleaning function (self-cleaning function is optional)
25˚
25˚
25˚
25˚
90˚
Back Wash Function
Front Wash Function
Turn the knob forward from the
vertical position as the figure shows.
The nozzle extends.
Turn the knob backward to the
vertical position to stop the
cleaning and retract the nozzle.
Continuing to turn the knob forward
will increase the flow rate of the
nozzle.
Turn the knob backward from the
vertical position as the figure shows.
The nozzle extends.
Turn the knob forward to the
vertical position to stop the
cleaning and retract the nozzle.
Continuing to turn the knob backward
will increase the flow rate of the
nozzle.
Low flow
High flow
Low flow
High flow
Turn the knob to the vertical (90°) position to turn off the cleaning function.
Before each use, the knob can be turned to the 25° gear and hold for a
few seconds to clean the nozzle. When the toilet seat is connected with
warm water, it can also play a role in
emptying cold water.
After each use, the nozzle can clean
itself. If additional cleaning is needed
for the nozzle, please turn the knob
to the 25° gear and hold for a few
seconds, then turn back to the vertical
(90°) gear to turn off the self-cleaning function.
Cleaning and Maintenance
3.Clean Filter and Flow Restrictor. 4.Remove the Toilet Seat.
(If you feel that the water flow is less than
normal, plesae close the supply stop.)
Close the Toilet Lid of the product, press the
Release Button and slide the seat forward
as shown.This enables you to be able to clean
more thoroughly around the toilet. If necessary,
disconnect the Hose before you do this.
a. Remove the Hose and clean the Filter with a
toothbrush.
b. Remove the Flow Restrictor with a needle-nose
plier and clean the sediment with a toothbrush.
c. Reinstall the Flow Restrictor. Make sure it’s
installed in the correct orientation.
d. Reinstall the Hose. Turn on the supply stop
and check for leaks. Retighten if necessary, but
do not overtighten.
1.Clean the outside parts of the product. 2.Clean the nozzle
Use a soft sponge or cloth with a non-abrasive
cleaner to clean the product. Never use hydrogen
chloride cleaner, diluent, benzene sandpaper,
polishing agent, perfume, pesticide and other
clenaing products.
Gently pull out the nozzle and use a soft
toothbrush to cleaner the nozzle.
Release Button
Toilet Lid
Hose
Filter Flow Restrictor
Symptoms
Water is too low
during Front/Back
wash
Probable Causes
1. Low water pressure of the unit During Front/Back wash, turn the knob to a
higher setting
Raise the water supply pressure higher than
0.07 MPa (10 psi)
Turn on the water supply stop
Clean the filter of T-Connector
Clean the filter of water inlet hose
Take off and clean the nozzle head
Increase external water pressure
The maximum water pressure of the unit is
0.8 MPa (115 psi). If water supply pressure
is higher than that, please use pressure
reducing valve.
2. Low water pressure of water supply
1. Water shut-off valve is turned off
2. Filter of T-Connector is blocked
3. Filter of water inlet hose is blocked
4. Nozzle head is blocked
5. External water pressure is low
External water pressure is too high
Water dropping
from bowl when
using the unit
No water comes
out during
Front/Back wash
Recommended Action
Trouble Shooting
If the previous steps did not help to resolve your issue please contact us at 305-614-4070 or email us at
Warning : It is highly recommended to not disassemble,
repair or modify the unit. Doing so risks further damage
to the product and voiding the warranty.
  • Page 1 1
  • Page 2 2
  • Page 3 3
  • Page 4 4
  • Page 5 5
  • Page 6 6
  • Page 7 7
  • Page 8 8
  • Page 9 9
  • Page 10 10
  • Page 11 11
  • Page 12 12

ANZZI TL-MBSRN201WH User manual

Type
User manual
This manual is also suitable for

Ask a question and I''ll find the answer in the document

Finding information in a document is now easier with AI