Page is loading ...

www.ledisons.com
Rendementstraat 5
8094 RA Hattemerbroek
The Netherlands
MANUAL / HANDLEIDING / ANLEITUNG / INSTRUCTIONS
LED SPOT MONTI
INSTALLATION / INSTALLATIE
LDN50
EN:
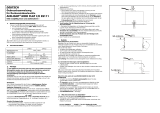
1. Cut a hole (not bigger than 80mm)
2. Open the connector by squeezing both ends together.
3. Push the power wires (230V) into the connector.
Phase, neutral and ground all have two ports. If you
want to link multiple lights, you can use the second port.
4. Close the connector.
5. Turn the GU10 light into the connector (230V).
6. Put the GU10 light into the fixture.
7. Install the middle buckle of the bracket into the spring
gap from left to right to fix the wire.
8. While lifting both spring clips, place the light into the
ceiling, than release.
DE:
1. Sägen/bohren Sie ein Loch (nicht größer als 80mm).
2. Öffnen Sie den Stecker, indem Sie beide Enden
zusammendrücken.
3. Stecken Sie das Stromkabel (230V) in den Connector.
Phase, Null und Erde haben jeweils zwei Anschlüsse.
Wenn Sie mehrere Leuchten anschließen möchten,
können Sie den zweiten Anschluss verwenden.
4. Schließen Sie den Anschluss.
5. Schalten Sie den GU10-Spot in den Anschluss (230 V).
6. Setzen Sie den GU10-Spot in die Halterung.
7. Setzen Sie die mittlere Schnalle der Halterung von
links nach rechts in den Federspalt ein, um den Draht
zu fixieren.
8. Halten Sie beide Federklammern nach oben, während
Sie die Leuchte durch das Loch schieben. Lassen Sie die
Klammern nun los um der Leuchte zu fixieren.
NL:
1. Snijdt een gat (niet groter dan 80mm).
2. Open de connector door beide uiteinden samen te
drukken.
3. Duw de stroomdraden (230V) in de connector. Fase,
neutraal en aarde hebben allemaal twee poorten. Wil
je meerdere lampen koppelen, dan kun je de tweede
poort gebruiken.
4. Sluit de connector.
5. Draai de GU10 spot in de connector (230V).
6. Plaats de GU10 in de armatuur.
7. Monteer de middelste gesp van de beugel van links
naar rechts in de veeropening om de draad vast te
zetten.
8. Terwijl u beide veerklemmen optilt, plaatst u de lamp
in het plafond en laat u de veerklemmen los.
FR:
1. Découpez un trou (pas plus grand que 80 mm)
2. Ouvrez le connecteur en pressant les deux
extrémités ensemble.
3. Poussez les câbles d’alimentation (230V) dans le
connecteur. La phase, le neutre et la terre ont tous
deux ports. Si vous souhaitez relier plusieurs lumières,
vous pouvez utiliser le deuxième port.
4. Fermez le connecteur.
5. Tournez la lumière GU10 dans le connecteur (230V).
6. Mettez la lumière GU10 dans le luminaire.
7. Installez la boucle centrale du support dans l’espace
du ressort de gauche à droite pour fixer le fil.
8. Tout en soulevant les deux pinces à ressort, placez la
lumière dans le plafond, puis relâchez.
1. 2.
3. 4.
5. 6.
7. 8.
5-15mm
80mm
REPLACING THE SPOTLIGHT / HET SPOTJE VERVANGEN / DER SPOT ERSETZEN / REMPLACEMENT DU PROJECTEUR
1. 2. 3. 4. 5.
6. 7. 8. 9. 10.

WARNINGS / WAARSCHUWINGEN / WARNUNGEN / AVERTISSEMENTS
EN:
1. Retain for future reference.
2. The fixing point(s) selected must be capable of supporting the full weight of the light
fitting.
3. All fittings must be installed by a competent person in accordance with local regulation.
4. The product is not suitable for covering with thermally insulating material.
5. This product is suitable for indoor use only and not for areas constantly subject to
moisture such as bathroom.
6. Always refer to the installation drawing for the orientation of the product.
7. Wiring diagram is for reference only. Always refer to the terminal marking for wiring and
ensure that all electrical connections are tight and that no loose strands are left out of
the terminal block.
8. Never put anything on the product or hang anything on any part of this product.
9. Never use the terminal cables to bear the product weight.
10.
What to do if the product does not light up after installation? 1: Ensure there is no
electricity failure. 2: Ensure all the connections are secured.
11.
If you have any doubt about installation/use of this product, consult a qualified
electrician.
12.
Always disconnect the product from mains at least 10 minutes allowing it to cool down
before any maintenance or adjustment.
13.
It is recommended to have a regular schedule of care and maintenance to keep the
surface condition well.
DE:
1. Für zukünftige Referenz aufbewahren.
2. Die gewählten Befestigungspunkte müssen das volle Gewicht der Leuchte tragen
können.
3. Alle Armaturen müssen von einer sachkundigen Person gemäß den örtlichen
Vorschriften installiert werden.
4. Das Produkt ist nicht zum Abdecken mit Wärmedämmstoff geeignet.
5. Dieses Produkt ist nur für den Innenbereich geeignet und nicht für Bereiche, die ständig
Feuchtigkeit ausgesetzt sind, wie z.B. Badezimmer.
6. Bei der Installation immer diese Bedienungsanleitung verwenden.
7. Stellen Sie sicher, dass alle elektrischen Verbindungen fest sind.
8. Legen Sie niemals etwas auf das Produkt und hängen Sie auch nichts daran.
9. Verwenden Sie niemals die Anschlusskabel, um das Produktgewicht zu tragen.
10.
Was zu tun ist wenn das Produkt nach der Installation nicht leuchtet? 1: Stellen Sie
sicher, dass kein Stromausfall vorliegt 2: Stellen Sie sicher, dass alle Verbindungen
gesichert sind.
11.
Wenn Sie Zweifel bezüglich der Installation/Verwendung dieses Produkts haben,
wenden Sie sich an einen qualifizierten Elektriker.
12.
Trennen Sie das Produkt immer mindestens 10 minuten vom Stromnetz und lassen Sie
es abkühlen, bevor Sie Wartungsarbeiten oder Einstellungen vornehmen.
13.
Es wird empfohlen, eine regelmäßige Pflege und einen Wartungsplan zu haben, um den
Oberflächenzustand gut zu erhalten.
NL:
1. Bewaar deze informatie voor toekomstige raadpleging.
2. De gekozen bevestigingspunten moeten het volledige gewicht van de armatuur kunnen
dragen.
3. Alle fittingen moeten worden geïnstalleerd door een competent persoon in overeen-
stemming met de lokale regelgeving.
4. Het product is niet geschikt om te bekleden met thermisch isolerend materiaal.
5. Het product is alleen geschikt voor gebruik binnenshuis en niet voor ruimtes die
constant onderhevig zijn aan vocht, zoals badkamers.
6. Gebruik altijd deze handleiding voor de installatie.
7. Zorg ervoor dat alle elektrische aansluitingen goed vast zitten en vermijdt loszittende
draden.
8. Plaats nooit iets op het product en hang nooit iets op aan enig onderdeel van dit product.
9. Gebruik nooit de aansluitkabels om het gewicht van het product te dragen.
10.
Wat te doen als het product niet oplicht? 1: Zorg ervoor dat er geen stroomstoring is.
2: Zorg ervoor dat alle verbindingen veilig en goed aangesloten zijn.
11.
Als u twijfelt over de installatie of het gebruik van dit product, raadpleeg dan een
gekwalificeerde elektricien.
12.
Koppel het product altijd ten minste 10 minuten los van het elektriciteitsnet en laat het
afkoelen voordat u onderhoud of aanpassingen uitvoert.
13.
Het wordt aanbevolen om regelmatig onderhoud uit te voeren om de conditie van het
oppervlak goed te houden.
FR:
1. Conservez ces informations pour référence future.
2. Les points de fixation choisis doivent pouvoir supporter tout le poids du luminaire.
3. Tous les raccords doivent être installés par une personne compétente conformément
aux réglementations locales.
4. Le produit n’est pas adapté au revêtement avec un matériau thermiquement isolant.
5. Le produit ne convient qu’à une utilisation en intérieur et non aux zones soumises à une
humidité constante, telles que les salles de bains.
6. Utilisez toujours ce manuel pour I´installation.
7. Assurez-vous que toutes les connexions électriques sont bien serrées et évitez les fils
lâches.
8. Ne placez jamais rien sur ou ne suspendez rien à aucune partie de ce produit.
9. N’utilisez jamais les câbles de connexion pour supporter le poids du produit.
10.
que faire si le produit ne s’allume pas ? 1: Assurez-vous qu’il n’y a pas de panne de
courant. 2: Assurezvous que toutes les connexions sont sécurisées et bien connectées.
11.
En cas de doute sur l’installation ou l’utilisation de ce produit, consultez un électricien
qualifié.
12.
Débranchez toujours le produit du secteur pendant au moins 10 minutes et laissez-le
refroidir avant d’effectuer tout entretien ou réglage.
13.
Il est recommandé d’effectuer un entretien régulier pour maintenir l’état de surface.
www.ledisons.com
Rendementstraat 5
8094 RA Hattemerbroek
The Netherlands
/