Shimano SM-CI300 Dealer's Manual
- Category
- Bicycle accessories
- Type
- Dealer's Manual
This manual is also suitable for

(English)
DM-CIDECK1-02
Dealer's Manual
ROAD MTB Trekking
City Touring/
Comfort Bike
URBAN SPORT E-BIKE
CI-DECK
Cycle Computer
SC-CI300
Analog Compass
ID-CI400
Bracket
SM-CI300
Cowling
SM-CI301
Gear Position Indicator
ID-CI300
ID-CI300-LC

2
CONTENTS
IMPORTANT NOTICE .............................................................................................. 3
TO ENSURE SAFETY ............................................................................................... 4
LIST OF TOOLS TO BE USED .................................................................................. 7
INSTALLATION ....................................................................................................... 9
Recommended dimensions of handlebars and stems ................................................................................ 9
Installing the bracket ...................................................................................................................................9
Cycle computer ........................................................................................................................................... 12
ADJUSTMENT ...................................................................................................... 15
Settings (cycle computer) ...........................................................................................................................15
MAINTENANCE .................................................................................................... 21
Replacing the inner cable of the gear position indicator ........................................................................21
Replacement of the lens cover (gear position indicator plate) <From spare parts package>...............24

3
IMPORTANT NOTICE
IMPORTANT NOTICE
•
This dealer’s manual is intended primarily for use by professional bicycle mechanics.
Users who are not professionally trained for bicycle assembly should not attempt to install the components themselves using the dealer’s manuals.
If any part of the information on the manual is unclear to you, do not proceed with the installation. Instead, contact your place of purchase or a local
bicycle dealer for their assistance.
•
Make sure to read all instruction manuals included with the product.
•
Do not disassemble or modify the product other than as stated in the information contained in this dealer’s manual.
•
All dealer’s manuals and instruction manuals can be viewed on-line on our website (http://si.shimano.com).
•
Customers who do not use the internet may have to contact their place of purchase to receive a hard copy of the user's manual.
You may print out a user's manual to hand to your customer or you may need to ask the nearest SHIMANO sales office for a hard copy of the user's
manual.
•
Please observe the appropriate rules and regulations of the country, state or region in which you conduct your business as a dealer.
For safety, be sure to read this dealer’s manual thoroughly before use, and follow it for correct use.
The following instructions must be observed at all times in order to prevent personal injury and physical damage to equipment and surroundings.
The instructions are classified according to the degree of danger or damage which may occur if the product is used incorrectly.
DANGER
Failure to follow the instructions will result in death or serious injury.
WARNING
Failure to follow the instructions could result in death or serious injury.
CAUTION
Failure to follow the instructions could cause personal injury or physical damage to equipment and surroundings.

4
TO ENSURE SAFETY
TO ENSURE SAFETY
WARNING TO PARENT / GUARDIAN
•
USE OF THIS PRODUCT IN ACCORDANCE WITH THESE DEALER’S MANUALS IS ESSENTIAL FOR YOUR CHILD'S SAFETY. MAKE SURE YOU AND YOUR
CHILD UNDERSTAND THESE DEALER’S MANUALS. FAILURE TO FOLLOW THESE DEALER’S MANUALS MAY RESULT IN SERIOUS PERSONAL INJURY.
WARNING
•
When installing components, be sure to follow the instructions that are given in the instruction manuals.
It is recommended that you use only genuine Shimano parts. If parts such as bolts and nuts become loose or damaged, the bicycle may suddenly fall
over, which may cause serious injury.
In addition, if adjustments are not carried out correctly, problems may occur, and the bicycle may suddenly fall over, which may cause serious injury.
•
Be sure to wear safety glasses or goggles to protect your eyes while performing maintenance tasks such as replacing parts.
•
After reading the dealer’s manual thoroughly, keep it in a safe place for later reference.
Be sure to also inform users of the following:
•
Keep used batteries out of the reach of children, and dispose of them in accordance with local waste regulations. If batteries are swallowed by
mistake, seek medical advice immediately.
< ID-CI400 >
•
The analog compass may not always point to the right direction if it is installed to the bicycle in a place where it is affected by metal such as brake
cables. When checking the direction, stop the bicycle and remove the compass from the bicycle. If you try to check the compass while the bicycle is
moving, the bicycle may become unstable because of being ridden with one hand, and this may cause a fall.
< SC-CI300 >
•
Be careful not to pay excessive attention to the computer data while riding and do not change the display while riding, otherwise you might have an
accident.
NOTICE
Be sure to also inform users of the following:
•
Be sure to keep turning the crank during the lever operation.
•
Do not use thinner or other solvents to clean parts such as the cycle computer and speed sensor, as such chemicals may dissolve the part casings.
•
To clean these parts, wipe them with cloth soaked in a weak mixture of neutral detergent and water.
< SC-CI300 >
•
If there is no signal from the speed sensor for 120 seconds, the power save function will operate and the LCD will turn off.
•
Never disassemble the cycle computer, as it cannot be reassembled.
•
The cycle computer is fully waterproofed to withstand wet weather conditions; however, do not deliberately place it into water.
•
Avoid leaving the cycle computer exposed to extreme hot weather conditions as much as possible, because if the cycle computer is left exposed to high
temperatures or direct sunlight for long periods of time, the LCD may become darkened. If this happens, place the cycle computer in the shade to let it
cool down. It will then return to normal.
•
The ambient operating temperature range for the cycle computer is −10°C to 50°C. If the temperature is outside this range, the movement of the data
display may become sluggish or data may not be displayed.
•
Handle the cycle computer carefully, and avoid subjecting it to any shocks.
•
The battery which is included when the product is purchased is for the display computer, so the battery life may be shorter than expected.
•
Insert the battery so that the (+) side is visible. If the battery is inserted the other way around, the initial setting data will be cleared.

5
TO ENSURE SAFETY
< ID-CI400 >
•
The analog compass may not always point to the right direction if it is in a place that is affected by magnetism, even if it has been removed from the
bicycle. The direction indicted by the compass should be used only as a reference.
•
If the analog compass becomes damaged or starts leaking, stop using it immediately.
•
Use the analog compass in a place which is free from steel and sources of magnetic fields.
•
This analog compass is classed as a toy for simplified indication of directions. It should not be used for serious applications such as mountain climbing.
•
Do not leave the analog compass in places which may reach temperatures of −20°C or lower or 50°C or higher.
•
Products are not guaranteed against natural wear and deterioration from normal use and aging.
•
For maximum performance we highly recommend Shimano lubricants and maintenance products.
For Installation to the Bicycle, and Maintenance:
< ID-CI300 / ID-CI300-LC >
•
For smooth operation, use the specified outer casing and the bottom bracket cable guide.
•
Use an outer casing which still has some length to spare even when the handlebars are turned all the way to both sides. Furthermore, check that the
shifting lever does not touch the bicycle frame when the handlebars are turned all the way.
•
Because the high cable resistance of a frame with internal cable routing would impair the SIS function, this type of frame should not be used.
•
Grease the inner cable and the inside of the outer casing before use to ensure that they slide properly.
•
If gear shifting adjustment cannot be carried out, check the degree of parallelism at the rear end of the bicycle. Also check if the cable is lubricated
and if the outer casing is too long or too short.
The actual product may differ from the illustration because this manual is intended mainly to explain the procedures for using
the product.

LIST OF TOOLS TO BE USED

7
LIST OF TOOLS TO BE USED
LIST OF TOOLS TO BE USED
The following tools are required to assemble the product.
Tool Tool
Screwdriver[#1] Screwdriver[#2]

INSTALLATION

9
INSTALLATION
Recommended dimensions of handlebars and stems
To be continued on next page
INSTALLATION
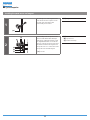
Recommended dimensions of handlebars and stems
The handlebar should have a minimum length of 85 mm in the straight section for mounting.
The platform will protrude 100 mm from the handlebar. Ensure that it does not interfere with the
front bracket.
(u)
Stem width ≤ 55 mm
(v)
Stem nut protrusion portion ≤
15 mm
(w)
85 mm or more
(x)
Handlebar length: 520 - 580 mm
(y)
100 mm
(z)
Handlebar: Ø22.2 - 25.4 mm
(y)
(z)
(w)
(x)
(u)
(v)
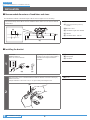
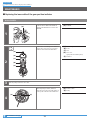
Installing the bracket
1
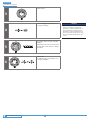
<SM-CI300>
Handlebar diameter:
In the case of 22.2 / 25.4 mm
(C)(B)(A)
Depending on the handlebar diameter,
you may need to insert a plastic adapter
in between the clamp band and the
handlebar.
(A)
Plastic adapter
(B)
Clamp band
(C)
Handlebar
2
Push the bracket cover in a downward direction with the bracket connected to the bicycle,
and then remove it.
It may be difficult to remove the cover, so use gloves while performing the task.
(A)
Cover
(A)

10
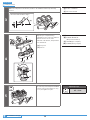
INSTALLATION
Installing the bracket
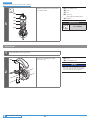
3
Widen the clamp band of the bracket, install it to the handlebar and then provisionally
secure it.
(y)
Center of handlebar
(z)
40° from horizontal
(y)(y)
(z)
<Recommended installation angle>
4
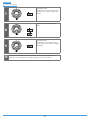
(A)
(B)
(C)
(D)
(z)
(y)
Align the cycle computer/analog
compass/projection on the gear indicator
with the concave section on the
underside of the bracket, and push them
in to install them.
(y)
Projection
(z)
Groove
(A)
SM-CI300 (Bracket)
(B)
ID-CI300 / ID-CI300-LC
(Gear position indicator)
(C)
SC-CI300 (Cycle computer)
(D)
ID-CI400 (Analog compass)
5
Sit on the bicycle and adjust the CI-DECK
so that it is in a position where it is easy
to see, then tighten it in place.
Tightening torque
0.5 - 1 N·m
To be continued on next page

11
INSTALLATION
Installing the bracket
6
Follow the procedure in the illustration to install the cowling (SM-CI301), and then fasten it
with the screw.
(A)
SM-CI301 (Cowling)
Tightening torque
0.3 - 0.5 N·m
3
4
1
2
(A)
TECH TIPS
When checking the direction, turn the analog compass counterclockwise to unlock it, and
then remove it from the bracket.
After checking, align the projections on the analog compass with the hollows in the
bracket, and turn the analog compass clockwise to lock it onto the bracket.
Unlock
Lock

12
INSTALLATION
Cycle computer
Cycle computer
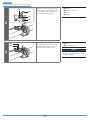
Installing the speed sensor and magnet
1
(A)
Hook the groove of the magnet holder
onto the intersection of spokes on the
left side of the front wheel and
provisionally secure it there.
(A)
Magnet
2
(A)
(B)
(C)
(z)
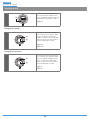
Provisionally secure the speed sensor to
the front fork with double-sided tape
and a zip tie, adjust the magnet so that
it is aligned with either one of the two
grooves on the speed sensor and so that
the distance between the magnet and
the speed sensor is 1 - 5 mm. Then secure
the speed sensor and the magnet.
(z)
1-5 mm
(A)
Groove
(B)
Speed sensor
(C)
Double-sided tape

13
INSTALLATION
Cycle computer
Securing the speed sensor cable
1
(A)
Use EZ cable clamps to secure the sensor
cable.
(A)
EZ cable clamp A: Cable outside
diameter 5 mm
2
(A)
Use a cable length adjuster to take up
any slack in the cable and to secure it to
the cable clamp on the bracket.
(A)
Cable length adjuster
NOTICE
Secure the cable tightly so that it does not
stick out from the frame. Be particularly
careful to secure the cable where it runs near
the crank arm.
For the front suspension, allow enough extra
length for the suspension stroke when
adjusting the length of the cable.
When routing the cable near the bottom
bracket, pass the cable over the bottom
bracket shell.
EZ cable clamps

ADJUSTMENT

15
ADJUSTMENT
Settings (cycle computer)
To be continued on next page
ADJUSTMENT
Settings (cycle computer)
Names of parts
(A)
(B)
(C)
(D)
(E)
(F)
Front Back
(A)
Current speed or odometer
(B)
Current speed bar format
(1 segment: 1 km/h / 1 mile/h)
(C)
Clock (always displayed)
(D)
Speed Sensor
(E)
Battery cover
(F)
Button
NOTICE
Tighten the battery cover securely so that it is
oriented as shown in the illustration to the
left.
Mode selection
You can switch between speed and cumulative distance displays by pressing the button on the underside of the cycle computer.
Data input
Use the buttons at the back to change the display. If you do not press anything for 5 seconds while the display is flashing, the current settings will be
confirmed and the display will change to the next item.
1
Check the tire size.
2
(A)
(y)
(z)
Insert the battery (CR2032).
(y)
Close
(z)
Open
(A)
CR2032

16
ADJUSTMENT
Settings (cycle computer)
3
"km/h" flashes.
4
For mile display, press the button once
to change the display.
NOTICE
The SC-CI300 are available with either km
display or mile display. If using the km
speedometer, settings should be made in
terms of kilometers, and if using the mile
speedometer, settings should be made in
terms of miles. If the wrong units are used,
the numerical values displayed will not be
correct.
5
The numbers flash. ("22 inch" will flash
initially.)
To display the size of the tire being used,
press the button several times to change
the display.
6
"AM" flashes.
For "PM" display, press the button once
to change the display.
To be continued on next page

17
ADJUSTMENT
Settings (cycle computer)
7
The numbers flash.
To display the 1st clock digit (hour), press
the button several times to change the
display.
8
Repeat step 7 for 2nd and 3rd clock
digits.
9
The numbers flash.
To display the last clock digit (minutes),
press the button several times to change
the display.
10
If you press and hold the button for 5 seconds or if you do not press anything for one
minute, the clock setting will be confirmed, and this will complete the setting.

18
ADJUSTMENT
Settings (cycle computer)
Resetting settings
(z)
To reset the settings, press the button
once to start the cycle computer. Then
remove the battery, wait 30 seconds, and
then follow the data input procedure.
(z)
Press
< Changing clock setting >
(z)
(y)
To change the setting, press the button
once to start the cycle computer. Switch
the cycle computer to Speed mode
("km/h" or "mile/h"). Press and hold the
button for at least 5 seconds, and then
follow the data input procedure.
(y)
km/h
(z)
mile/h
< Changing tire size setting >
(z)
(y)
To change the setting, press the button
once to start the cycle computer. Switch
the cycle computer to Odometer mode
("km" or "mile"). Press and hold the
button for at least 5 seconds, and then
follow the data input procedure.
(y)
km
(z)
mile

19
ADJUSTMENT
Settings (cycle computer)
< Low battery information >
When the battery level is low, the following display will appear, replace the battery.
(1)
Blink "LB" for 20 times in the display.
(2)
Back to normal mode.
(3)
Turns off in sleep mode.
(1) (2) (3)

MAINTENANCE
Page is loading ...
Page is loading ...
Page is loading ...
Page is loading ...
Page is loading ...
-
 1
1
-
 2
2
-
 3
3
-
 4
4
-
 5
5
-
 6
6
-
 7
7
-
 8
8
-
 9
9
-
 10
10
-
 11
11
-
 12
12
-
 13
13
-
 14
14
-
 15
15
-
 16
16
-
 17
17
-
 18
18
-
 19
19
-
 20
20
-
 21
21
-
 22
22
-
 23
23
-
 24
24
-
 25
25


Shimano SM-CI300 Dealer's Manual
- Category
- Bicycle accessories
- Type
- Dealer's Manual
- This manual is also suitable for
Ask a question and I''ll find the answer in the document
Finding information in a document is now easier with AI
Related papers
-
Shimano SL-8S31 User manual
-
Shimano SL-C7000-5 User manual
-
Shimano SM-TX36 Dealer's Manual
-
Shimano AI-3S10 Service Instructions
-
-
Shimano SM-TX32 Service Instructions
-
Shimano FC-M8050 Dealer's Manual
-
Shimano SM-RT800 Dealer's Manual
-
Shimano SM-EWC2 Dealer's Manual
-

