Henny Penny OFE-321 Operating instructions

Category
Deep fryers
Type
Operating instructions

This manual is also suitable for

Model OFE/OFG-321,322,323,324
SECTION 3. OPERATION
3-1. OPERATING COMPONENTS Reference Figure 3-1.
C1000 CONTROLS
Fig. Item Description Function
No. No.
3-1 1 Digital Display Shows the shortening temperature, the timer countdown in
the Cook Cycle, and the selections in the Program Mode; the
temperature of the shortening can be shown by pressing
once, or twice to view set-point temperature;
if shortening temperature exceeds 425F (218C), the display
reads “E-5, FRYER TOO HOT”
3-1 2 This LED lights when the shortening temperature is within 5
of the setpoint temperature, signaling the operator that the
shortening temperature is now at the proper temperature for
dropping product into the frypot
3-1 3 The timer buttons are used to start and stop Cook Cycles
3-1 4 The idle buttons are used to start an Idle Mode which reduces
the temperature of the shortening during non-use periods;
press and hold to exit the Idle Mode
3-1 5 The program button is used to access the Program Modes;
also, once in the Program Mode, it is used to advance to the
next parameter
3-1 6 & 7 Used to adjust the value of the currently displayed setting
in the Program Mode and to change set-point temperature for
the left frypot, or basket
3-1 8 & 9 Used to adjust the value of the currently displayed setting
in the Program Mode and to change set-point temperature for
the right frypot, or basket
Proceed onto Section 3-4, Filling or Adding Shortening
108 3-1
Model OFE/OFG-321,322,323,324
Figure 3-1
3-2 108
1
4
3
3
2
2
6
4
7 5 8 9
Model OFE/OFG-321,322,323,324
3-2. OPERATING COMPONENTS Figure 3-2 shows the function of the 12 button timer control,
6 & 12 BUTTON CONTROLS and Figure 3-3 shows the function of the 6 button timer control.
Fig. Item Description Function
No. No.
3-1 1 This LED lights when the control calls for heat,
3-2 and the burners come on and heat the shortening
3-1 2 Digital Displays Shows the shortening temperature, the timer countdown in
3-2 the Cook Cycle, and the selections in the Program Mode; the
temperature of the shortening can be shown by depressing
the INFO button; if the temperature exceeds 425F (218C),
the display reads “E-5, FRYER TOO HOT”
3-1 3 WAIT LED Once the open fryer is out of the Melt Cycle, this LED lights,
3-2 signaling the operator that the shortening temperature is not
at the
proper temperature for dropping product into the frypot
3-1 4 READY LED This LED lights when the shortening temperature
3-2 is within 5 of the setpoint temperature, signaling the
operator that the shortening temperature is now at the proper
temperature for dropping product into the frypot
3-1 5 Press to display the following fryer information and status:
3-2 a. The temperature of the shortening
b. The temperature setpoint
c. Filter status
d. The number of times filtered today
e. The average no. of filters per day
f. No. of times Cook Cycle was stopped early today
g. No. of times Cook Cycle was stopped early in past week
e. Date and time
3-1 6 & 7 Used to adjust the value of the currently displayed setting
3-2 in the Program Mode
3-1 8 Used to access the Program Modes; also, once in the
3-2 Program Mode, it is used to advance to the next parameter
3-1 9 START/STOP Used to start and stop Cook Cycles; also de-activates
3-2 Button the quality timer at the end of a Hold Mode
3-1 10 Menu Card Displays the food product associated with each product
3-2 Window selection button below; the menu card strip is located
behind the decal
3-1 11 Product Select Used to select which food products are to be cooked
3-2 Buttons (on auto-lift open fryers, the 6 and 12 product buttons are basket
lift buttons)
1005 3-3
Model OFE/OFG-321,322,323,324
1 2 3 4 5 6 7 8
9 10 11 9
Figure 3-2
3-4 103
Model OFE/OFG-321,322,323,324
1 2 3 4 5 6 7 8
9 10 11 9
Figure 3-3
103 3-5
Model OFE/OFG-321,322,323,324
3-3. CLOCK SET
Upon initial start-up or PC board replacement, if
“CLOCK SET” automatically appears in the display,
skip steps 1, 2 and 3.
1. Press and hold for 5 seconds until “LEVEL 2”
shows in display.
2. Release , then press twice. “CLOCK SET”
then “ENTER CODE” shows in display.
3. Press .
4. Display shows “CS-1” then “SET” then “MONTH”,
with the month flashing.
5. Press to change the month.
6. Press . Display shows “CS-2” then “SET” then
“DATE”, with the date flashing.
7. Press to change the date.
8. Press . Display shows “CS-3” then “SET” then
“YEAR”, with the year flashing.
9. Press to change the year.
10. Press . Display shows “CS-4” then “SET” then
“HOUR”, with the hour and “AM” or “PM”
flashing.
11. Press to change the hour and AM/PM
setting.
12. Press . Display shows “CS-5” then “SET” then
“MINUTE”, with the minutes flashing.
3-6
306
Model OFE/OFG-321,322,323,324
3-3. CLOCK SET 13. Press to change the minutes.
(Continued)
14. Press . Display shows “CS-6” then “CLOCK
MODE”, along with “1.AM/PM”.
15. “1.AM/PM” is 12 hour time, “2.24-HR” is 24 hour
time. Press to change.
16. Press . Display shows “CS-7” then “DAYLIGHT
SAVINGS ADJ”, along with “2.US”.
17. Press to change to the following:
a. “1.OFF” = No automatic adjustments for Daylight
Savings Time.
b. “2.US” = Automatically applies United States Daylight
Saving Time adjustment. For 2006 & earlier: DST starts
on first Sunday in April, and ends on last Sunday in
October. For 2007 & later: DST starts on second Sunday
in March, ends on first Sunday in November.
c. “3.EURO” = Automatically applies European (CE)
Daylight Savings Time adjustment. DST activated on the
last Sunday in March. DST de-activated on the last
Sunday in October.
d. “FSA” = Old “First Sunday in April” schedule, in case
US ever goes back to old schedule. DST starts on the
first Sunday in April. DST ends on the last Sunday in
October.
18. Clock Set is now complete. Press and hold to
exit.
306 3-7
Model OFE/OFG-321,322,323,324
3-4. FILLING OR
ADDING SHORTENING The shortening level must always be above the heating
elements when the fryer is heating and at the frypot
level indicators on the rear of the frypot. Failure to
follow these instructions could result in a fire and/or
damage to the fryer.
When using solid shortening, it is recommended to melt
the shortening on an outside heating source before
placing it in the frypots. The heating elements or
burner tubes must be completely submerged in
shortening. Fire or damage to the frypot could result.
1. It is recommended that a high quality frying shortening
be used in the open fryer. Some low grade shortenings
have a high moisture content and will cause foaming
and boiling over.
Wear gloves to avoid severe burns when pouring hot
shortening into frypot. Shortening and all metal
parts that are in contact with the shortening are
extremely hot, and take care to avoid splashing.
2. The full frypots require 65 lbs. (29.5 kg) of shortening,
while the split frypot requires 25 lbs. (11.3 kg.). All
gas frypots, and some electric frypots, have 2 level
indicator lines inscribed on the rear wall of the
frypot which shows when the heated shortening is at the
proper level. Some electric models only have 1 level
indicator line on the frypots.
3. Cold shortening should be filled to the lower indicator
when the frypot has 2 indicator lines, and a ½ inch
(12.7 mm) below a single indicator line.
3-8 208
Model OFE/OFG-321,322,323,324
The Computron 1000 controls are available on both split
electronic controls frypot and full frypot fryers. The following is a brief description
of the operating procedures for fryers with these controls.
1. Be sure the drain valve is in the closed position.
2. Place basket support inside of frypot.
3. Make sure frypot is filled with shortening to the proper
level.
4. Display shows “OFF” until power switch is turned to the
ON position. Display now shows the cook time and the unit
automatically goes into the Melt Cycle until the
shortening temperature reaches 250F (121C). The
control then automatically exits the Melt Cycle.
The OFG-320 series open fryer has several safety devices
which shuts-down the gas supply when they are activated.
The above procedures should be followed to restart the open
fryer and if the shut down is repeated, a qualified technician
should be notified.
The Melt Cycle may be bypassed, if desired, by pressing
and holding for 3 seconds.
Do not bypass the Melt Cycle unless enough shortening
on gas fryers and elements on electric fryers. If Melt
Cycle is bypassed before all burner tubes or elements
are covered, excessive smoking of the shortening, or a
fire will result.
5. Once out of the Melt Cycle, the shortening is heated
until lights and the cook time is displayed.
Thoroughly stir shortening to stabilize the temperature
throughout the frypots.
6. Before loading product into the baskets, lower baskets
into the hot shortening to keep the product from
sticking to the baskets.
7. Once the shortening temperature has stabilized at the
setpoint temperature, lower the basket with product into
the frypot.
208 3-9
3-5. C1000 OPERATIONS
AND PROCEDURES
Model OFE/OFG-321,322,323,324
Do not overload, or place product with extreme
moisture content into the basket. 12.5 lbs. (5.7 kg)
is the maximum amount of product per frypot
(6.25 lbs. (2.8 kg) maximum for the split frypot
fryers). Failure to follow these directions can result
in shortening overflowing the frypot. Serious burns
or damage to the unit could result.
9. If the right basket was dropped into the shortening, then
press the right .
If the left basket was dropped, then press the left .
10. The timer on the appropriate side (right or left) starts
counting down.
The timing operation of the two sides of the control
is entirely independent of each other. One may be set,
started, or stopped without affecting the other.
11. At the end of the Cook Cycle a tone will sound and the
display flashes “DONE”. Press button and lift the
basket from the shortening.
Timer Programming
1. Anytime the cook time is displayed, press
under the appropriate display to change the cook time.
Set-Point Temperature Programming
1. Press once to view the actual shortening
temperature and press again to view the set-point
temperatue.
2. While the set-point temperature is in the display, press
to change the set-point temperature.
If “LOCK” shows in display when pressing ,
the controls are locked and must be unlocked before
changing the time or set-point temperature. See C1000
Special Programming Section.
3-10 208
3-5. C1000 OPERATIONS
AND PROCEDURES
(Continued)
3-6. C1000 PROGRAMMNG
INSTRUCTIONS
Model OFE/OFG-321,322,323,324
Special Programming is used to set the items below:
Fahrenheit or Celsius
Initialize System
Lock or Unlock Controls
Fryer Type – Open or Pressure
Heat SourceElectric; Gas w/standing pilot;
Gas w/electronic ignition; Gas-Induced Draft
Vat Type - Split or Full Vat (frypot)
Oil Type - Solid or Liquid
1. To enter Special Programming, turn off power switch
(either side). Press and hold and turn the power
switch back on.
2. “SPEC” “PROG” followed by, “DEG” “°F” or “°C”. Use
to choose “°F” or “°C”.
3. Press and “INIT” shows in the display.
Press and hold the right and display shows “In-3”,
“In-2”, “In-1” followed by “Init Sys” “DONE DONE”. The
controls now are reset to factory parameters, the time set to
0:00 and temperature 190°F or 88°C.
4. Press and “LOCK” or “UNLOCK” shows in the
displays. Use to choose “LOCK” or
“UNLOCK”.
5. Press and “FRYR” shows in left display and the right
display should show “OPEN”. Use to change
from “PRES” to “OPEN” if needed.
6. Press and “FRYR” shows in the display. Use
to change the fryer type: “ELEC” for electric
models; “GAS” for units with standing pilot; SSI for units
with solid state ignition; IDG for units with induced draft gas
burners.
7. Press and “VAT” shows in the display. Use
to choose “SPLIT” or FULL” vat (frypot) type.
8. Press and “MELT” and “Solid” or “LIQD” shows in
the displays. Use to choose “Solid”, if using
solid shortening, or “LIQD”, if using liquid shortening.
9. Press and hold to exit Special Programming at any
time.
1209 3-11
3-7. C1000 SPECIAL
PROGRAMMING
Model OFE/OFG-321,322,323,324
The Henny Penny Open Fryer has electronic controls
for each frypot. The following is brief description of the
operating procedures for controls with 6 product buttons.
1. Be sure the drain valve is in the closed position.
2. Place basket support inside of frypot.
3. Make sure frypot is filled with shortening to the proper level
4. Move power switch to the ON position. Unit automatically
goes into the Melt Cycle until the shortening temperature
reaches 230F (110C). The control then automatically exits
the Melt Cycle.
The OFG-320 series open fryer has several safety devices
which shuts-down the gas supply when they are activated.
The above procedures should be followed to restart the open
fryer and if the shut down is repeated, a qualified technician
should be notified.
The Melt Cycle may be bypassed, if desired, by pressing a
product button and holding it for five seconds.
Do not bypass the Melt Cycle unless enough shortening
has melted to completely cover all of the burner tubes
on gas fryers and elements on electric fryers. If Melt
Cycle is bypassed before all burner tubes or elements
are covered, excessive smoking of the shortening, or a
fire will result.
5. Once out of the Melt Cycle, the WAIT LED flashes
until the setpoint temperature has been reached. Then
the READY LED lights, and the selected product
displays on the left and right side of the display.
The timing operation of the two sides of the control
is entirely independent. They may be set, started, or
stopped without affecting each other.
If the Energy Save Mode is activated for gas fryers, the pilot
light goes out and the blower turns off, if the fryer is idle for
2 minutes with the READY LED lit. Starting a Cook Cycle
exits the Energy Save Mode, or if the shortening temperature
drops to where the READY LED goes out, the fryer resumes
normal heat-up mode until the READY LED comes back on.
(See SP-19).
3-12 306
3-8. BASIC OPERATIONS
AND PROCEDURES
(6 Product Controls)
Model OFE/OFG-321,322,323,324
6. Thoroughly stir shortening to stabilize the temperature
throughout the frypots.
7. Before loading product into the baskets, lower baskets
into the hot shortening to keep the product from
sticking to the baskets.
8. Once the shortening temperature has stabilized at the
setpoint temperature, the operator can then lower the
basket with product into the frypot.
Do not overload, or place product with extreme
moisture content into the basket. 12.5 lbs. (5.7 kg)
is the maximum amount of product per frypot
(15.0 lbs. (6.8 kg) maximum for auto-lift open
fryers). Failure to follow these directions can result
in shortening overflowing the frypot. Serious burns
or damage to the unit could result.
9. If the right basket was dropped into the shortening, then
the right START/STOP button should be pressed. If the
left basket was dropped, then the left START/STOP button
should be pressed.
10. Once the START/STOP button has been pressed, the timer
on the appropriate side (right or left) will start counting
down.
11. At the end of the Cook Cycle a tone will sound and the
display will flash “DONE”. Press the START/STOP
button and lift the basket from the shortening.
12. The display will show which product it is ready to time
down. If a hold time was programmed, the controller
automatically starts the hold timer. The display
alternately shows the product selected and the quality
time remaining in minutes. If a different product is
selected during the Hold Cycle, the display only shows
the product selected. To view the hold time remaining,
push the INFO button.
13. At the end of the Hold Mode, a tone will sound and the
display will flash QUALITY and the product it was timing.
Press and release the START/STOP button. The display
shows the product it is ready to start timing for frying
.
703 3-13
3-8. BASIC OPERATIONS
AND PROCEDURES
(6 Product Controls)
(Continued)
Model OFE/OFG-321,322,323,324
3-9. BASIC OPERATIONS Henny Penny Open Fryer models OFE/OFG are available
AND PROCEDURES
with 12 product button controls. Also, models OEA/OGA
(12 Product Controls/Auto-lift)
are available with 12 button controls, equipped with auto-lift
features. The auto-lift controls, allow the baskets to be
automatically lowered into the shortening, at the beginning of
the cook cycle, and raised from the shortening at the end of
the cycle.
1. Be sure the drain valve is in the closed position.
2. Fill the frypot with shortening.
3. Move POWER switch to the ON position. Unit
automatically goes into the Melt Cycle. When the
temperature reaches 250F (121C), the control exits
the Melt Cycle and heats the shortening until the
temperature setting is reached.
The OFG-320 series open fryer has several safety devices
which shuts down the gas supply when they are activated.
The above procedures should be followed to restart the
fryer and if the shut down is repeated, a qualified
technician should be notified.
The Melt Cycle may be bypassed if desired, by pressing
a product button and holding it for five seconds.
Do not bypass the Melt Cycle unless enough shortening
on gas fryers and elements on electric fryers. If Melt
Cycle is bypassed before all burner tubes or elements
are covered, excessive smoking of the shortening, or a
fire will result.
4. Once out of the Melt Cycle, the WAIT LED flashes
until the setpoint temperature has been reached. Then
the READY LED illuminates.
If the Energy Save Mode is activated for gas fryers, the
pilot light goes out and the blower turns off, if the fryer
is idle for 2 minutes with the READY LED lit. Starting
shortening temperature drops to where the READY
LED goes out, the fryer resumes normal heat-up mode
until the READY LED comes back on. (See SP-19).
3-14 306
Model OFE/OFG-321,322,323,324
The timing operation of the two sides of the control
can be programmed entirely independent from each
other for 2 half baskets, or as one timer for a single full
sized basket which will set on both lifts. The default
setting from the factory is for two half sized baskets.
To change to a single full size basket setting, push and
hold the #1 product button while turning on the
POWER switch. To change back to the two basket
mode, push and hold the #2 product button while
turning on the POWER switch.
5. Thoroughly stir shortening to stabilize the temperature
throughout the frypots.
6. Before loading product into the baskets, lower baskets
into the hot shortening to keep the product from
sticking to the baskets.
7. Once the shortening temperature has stabilized at the
setpoint temperature, the operator may now place the
baskets into the shortening (or for auto-lift open fryers,
lift basket onto the hangers). Place product into the
basket.
Do not overload, or place product with extreme
moisture content into the basket. 12.5 lbs. (5.7 kg)
is the maximum amount of product per frypot (15.0
lbs. (6.8 kg) maximum for auto-lift open fryers).
Failure to follow these directions can result in
shortening overflowing the frypot. Serious burns or
damage to the frypot could result.
8. If the right basket is to be lowered into the shortening,
then one of the right product buttons should be pressed.
If the left basket is to be lowered, then one of the left
product buttons should be pressed.
9. The timer on the appropriate side will start counting
down. (On auto-lift open fryers, the basket will
automatically lower into the shortening.)
703 3-15
3-9. BASIC OPERATIONS
AND PROCEDURES
(12 Product Controls/Auto-Lift)
(Continued)
Model OFE/OFG-321,322,323,324
10. At the end of the Cook Cycle, a tone sounds and the
display shows “DONE”. Lift the basket from the
shortening. (On auto-lift open fryers, the basket
automatically rises out of the shortening.) To stop the
“DONE” beeper, either press the timer button, or
the product button.
A different product can be selected during the first
minute of cooking.
11. The display will show which product it is ready to time
down. If a hold time was programmed, the controller
will automatically start the hold timer. The display will
alternately show the product selected and the hold
time remaining in minutes. If a different product is
selected during the Hold Cycle, the display will only
show the product selected.
12. At the end of the Hold Cycle, a tone sounds and the
display flashes “QUALITY”, and the product it was
timing. Press and release the TIMER button.
In the Cook Mode, when “FILTER SUGGESTED”
shows in the display, the operator has the option to
filter at this time, or to continue cooking. But, if the
operator continues cooking, a filter lockout occurs
within the next Cook Cycle, or two.
When “FILTER LOCKOUT”, thenYOU *MUST* FILTER
NOW........” shows in the display, the PROG button is the
only button that will function, until the unit is filtered.
FOLLOW THE INSTRUCTIONS BELOW TO
AVOID SHORTENING OVERFLOWING THE
FRYPOT, WHICH COULD RESULT IN SERIOUS
BURNS, PERSONAL INJURY, FIRE, AND/OR
PROPERTY DAMAGE.
1. Maintain the shortening at the proper cooking level.
Add fresh shortening as needed.
3-16 703
3-9. BASIC OPERATIONS
AND PROCEDURES
(12 Product Controls/Auto-Lift)
(Continued)
3-10. CARE OF SHORTENING
Model OFE/OFG-321,322,323,324
3-10. CARE OF SHORTENING 2. To protect and get the maximum life out of the
(Continued)
shortening, lower the temperature to 275° F (135° C) or
lower when the fryer is not in immediate use.
Deteriorated shortening smokes badly, even at lower
temperatures.
3. Taste the cold shortening daily for signs of bad flavor.
Discard any shortening which has a bad flavor or shows
signs of excessive foaming or boiling. Keep the frypot
clean.
WITH PROLONGED USE, THE FLASHPOINT OF
SHORTENING IS REDUCED. DISCARD SHORTEN-
ING IF IT SHOWS SIGNS OF EXCESSIVE
SMOKING OR FOAMING. SERIOUS BURNS,
PERSONAL INJURY, FIRE, AND/OR PROPERTY
DAMAGE COULD RESULT.
1. Turn the main switch to the OFF position. Remove and
clean the fry basket in soap and water. Rinse thoroughly.
Best results are obtained when shortening is filtered at the
normal frying temperature.
2. Use a metal spatula to remove any build up from the sides
of the frypot. Do not scrape burner tubes on the gas
models, or heating elements on electric models.
Scraping the electric fryer elements, or burner tubes
of the gas frypot, produces scratches in these surfaces
causing breading to stick and burn.
The filter drain pan must be as far back under fryer as
it will go and the cover in place. Be sure the hole in the
cover lines up with the drain before opening the drain.
Failure to follow these instructions causes splashing of
shortening and could result in personal injury.
Surfaces of fryer and baskets will be hot. Use care
when filtering to avoid getting burned.
703 3-17
3-11. FILTERING OF
SHORTENING
Model OFE/OFG-321,322,323,324
3-11. FILTERING 3. Open door(s) under unit, and slowly turn drain
OF SHORTENING valve handle a half turn. Leave for a few minutes, then
(Continued) slowly, fully open drain valve. This prevents much
splashing of the hot shortening as it drains.
4. As the shortening drains from the frypot, use brushes
to clean the sides of the frypot and the burner tubes or
heating elements. If the drain fills with breading, use
straight white brush to push excess breading into the filter
drain pan.
5. When all of the shortening has drained, scrape or brush the
sides and the bottom of the frypot.
6. Rinse the frypot as follows:
Standard 322, 323, & 324 Open fryers
a. Close the drain valve.
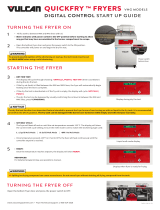
DRAIN VALVE HANDLE FILTER VALVE HANDLE b. Position return line over empty frypot.
c. Move the pump switch to the pump position.
d. Fill the frypot 1/3 full, then turn off pump.
e. Wash down and scrub the sides of the frypot with
the brushes.
f. After the sides and bottom are cleaned, open the
drain valve.
321 Open fryers-After April, 2002
a. Close the drain valve. Figure 3-3.
b. Open the filter valve. Figure 3-3.
c. Move the pump switch to the pump position.
d. Fill the frypot 1/3 full, then turn off pump.
e. Wash down and scrub the sides of the frypot with
the brushes.
FILTER UNION FEMALE QUICK- f. After the sides and bottom are cleaned, open the
DISCONNECT drain valve.
Figure 3-3
IF THERE ARE AIR BUBBLES COMING UP
IN THE SHORTENING BEFORE ALL
SHORTENING IS PUMPED UP, IT’S POSSIBLE
THAT THE FILTER CONNECTION AT THE
UNION ON THE FILTER TUBE IS NOT
TIGHTENED PROPERLY. IF SO, TURN
OFF THE PUMP AND WEAR PROTECTIVE
GLOVES OR CLOTH WHEN TIGHTENING
THE UNION. THIS UNION WILL BE HOT.
SEVERE BURNS COULD RESULT.
3-18 703
Model OFE/OFG-321,322,323,324
3-11. FILTERING With Optional Filter Rinse Hose
OF SHORTENING a. Open the door and pull the collar back on the female
(Continued) quick-disconnect. Attach the male quick disconnect
on the filter rinse hose, onto the female fitting.
Figure 3-3.
b. Point the hose nozzle down into the frypot, close the
filter valve, and move the PUMP switch to the PUMP
position. Hold nozzle carefully to avoid excessive
splashing. Figure 3-4.
Use caution to prevent burns from splashing
hot shortening.
c. Rinse the frypot interior, especially hard to clean areas
like the frypot bottom and heating elements.
d. After sufficient rinsing, close the drain valve.
Figure 3-4 e. Turn the PUMP switch to the OFF position.
ONLY CONNECT AND DISCONNECT THE
FILTER RINSE HOSE WHEN THE PUMP
SWITCH IS IN THE OFF POSITION. FAILURE
TO DO THIS WILL RESULT IN SEVERE
BURNS FROM HOT SHORTENING SPRAYING
FROM THE FITTINGS. USE A DRY CLOTH OR
PROTECTIVE GLOVE TO AVOID BURNS.
f. Detach hose, and raise the fitting end of the hose high
FILTER HANDLE for a minute to allow remaining shortening in the hose
to drain back into the frypot.
Autolift Open fryers
a. Close the drain valve.
b. Turn filter handle to the on position. Figure 3-5.
c. Fill the frypot 1/3 full.
d. Turn filter handle to the OFF position.
Figure 3-5
Use care when reaching across a frypot of hot
shortening. Severe burns could result.
703 3-19
Model OFE/OFG-321,322,323,324
e. Wash down and scrub the sides of the frypot with
the brushes.
f. After the sides and bottom are cleaned, open the drain
valve.
On 322, 323 and 324 open fryers, if shortening flow
is slow from faucet, use cloth or protective gloves to
tighten the filter union. This union will be hot.
Severe burns could result.
7. Pump all of the shortening out of the filter drain pan and
back into the frypot.
8. When the pump is pumping air only, move the pump switch
from PUMP to OFF, or on auto-lift open fryers, turn filter
handle to OFF.
321 Open fryers – When the pump is pumping air only, the
shortening in the frypot appears to be boiling. Close the
filter valve first, and then move the pump switch to the OFF
position. This keeps the filter pump and lines from filling
up with shortening.
9. Check the level of the shortening in the frypot. Add fresh
shortening if necessary, until it reaches the top level
indicator line on the rear wall of the frypot.
About 10 to 12 filterings can be made with one filter
paper envelope, depending on:
the quantity and type of product fried and
filtered
the type of breading used
the amount of crumbs left inside the filter drain
pan. When the filter screen assembly and filter
paper become clogged, and the pumping flow
slows, clean the filter screen assembly and
change the filter envelope.
10. To continue cooking, move the main POWER switch to
the ON position, and shortening reheats.
3-20 703
3-11. FILTERING
OF SHORTENING
(Continued)
  • Page 1 1
  • Page 2 2
  • Page 3 3
  • Page 4 4
  • Page 5 5
  • Page 6 6
  • Page 7 7
  • Page 8 8
  • Page 9 9
  • Page 10 10
  • Page 11 11
  • Page 12 12
  • Page 13 13
  • Page 14 14
  • Page 15 15
  • Page 16 16
  • Page 17 17
  • Page 18 18
  • Page 19 19
  • Page 20 20
  • Page 21 21
  • Page 22 22
  • Page 23 23
  • Page 24 24
  • Page 25 25
  • Page 26 26
  • Page 27 27
  • Page 28 28

Henny Penny OFE-321 Operating instructions

Category
Deep fryers
Type
Operating instructions
This manual is also suitable for

Ask a question and I''ll find the answer in the document

Finding information in a document is now easier with AI