Page is loading ...

BV10.2AI


1
Contents
SafetyInformation..................................................................................……2
DVDPlayerFeatures……..........................................................................…4
DVDVideoFeatures..................................................................................4
Controls.........................................................................................................5
MonitorStowedView
.................................................................
……….....5
MonitorOpenView
.....................................................................
……….....6
RemoteControl
..........................................................................
……….....7
BasicOperation
...........................................................................
……….....9
Openthemonitor
.......................................................................
……….....9
Stowthemonitor
........................................................................
……….....9
Handlingdisc
..............................................................................
…..….......9
Turntheplayeron
......................................................................
…..….......9
Turntheplayeroff
......................................................................
…..….......10
Adjustthedisplay
.......................................................................
…..….......10
CareandMaintenance...............................................................................10
Usetheremotecontrol...............................................................................11
Replacethebatteryintheremotecontrol
..................................
……….....11
UsetheiPod/iPhone
..................................................................
……….....12
Play...............................................................................................................13
PlayDVDdisc
............................................................................
……….....13
PlayAudioCDdisc
.....................................................................
……….....15
PlayMP3disc
.............................................................................
……….....15
PlayUSBdeviceandSD/MMCcard
..........................................
……….....16
PlayiPod/iPhone
........................................................................
……….....16
InstallationandWiring
................................................................
…........….17
What'sinthebox
........................................................................
……….....17
Beforeyoubegin
........................................................................
……….....17
MountingandWiringPrecautions
..............................................
……….....18
Installationprocedure
.................................................................
……….....19
Wiringdiagram
...........................................................................
……….....20
SystemSetup
...............................................................................
…........….21
Specifications
...............................................................................
…........….22
Troubleshooting
...........................................................................
....……….23
Legal notice ................................................................................................24

2
SafetyInformation
v
ThankyouforbuyingtheRoofMountLCDMonitorwithDVDplayer.
Pleasereadthismanualcarefullybeforeusingtheplayerinordertoget
themostoutofallthefeaturesandfunctions.Keepthismanualinasafe
place,asitcanbeavaluabletoolinhelpingyoutounderstandallthe
featuresandfunctions.
v
Donotoperatetheunitinanywayotherthandescribedwithinthismanual.
Failuretofollowtheinstructionswithinthemanualwillinvalidateyour
warranty.
v
SAFETYFIRST!Donotinstallthedisplaywhereitmay(i)obstructthe
driver’svision,(ii)impairtheperformanceofanyofthevehicle’soperating
systemsorsafetyfeatures,includingairbags,or(iii)impairthedriver’s
abilitytosafelyoperatethevehicle.
v
Whenusingthesystem,makesureyouarefirmlysecuredbyyourseat
belttoensureyoudonotaccidentallyhityourheadonthescreenduring
suddenbrakingorotherincidents.Ifyouareeverinanaccident,injuries
canbemoresevereiftheseatbeltisnotproperlybuckled.
v Donotattempttoinstallorserviceyourdisplaybyyourself.Installationor
servicingofthedisplaybypersonswithouttrainingandexperiencein
electronicequipmentandautomotiveaccessoriesmaybedangerousand
couldexposeyoutotheriskofelectricshockorotherhazards.
v
Becarefulnottodrainthecarbatterywhileusingtheunitwiththecar
enginestopped.Toavoiddrainingthebattery,itissuggestedthatthe
vehicleenginealwaysisrunningwhileusingtheunit.
v
Donotdisassembleoraltertheunitinanyway.Failuretodosocancause
damagetotheunitandinvalidthewarranty.
v Nevercleanthesurfaceofthescreenwithchemicalsolventorcorrosive
detergent,whichmaycausepermanentdamagetotheTFTLCDscreen.
v
Avoidinstallingtheunitwhereverisunderdirectsunlightornearhotair
vent.Pleasenotethatthenormalworkingtemperatureoftheunitis
between-5℃ to+50℃.Iftheinternaltemperatureofthevehicleis
extremelyhigh,ashortcoolingdownperiodisnecessarybeforeoperating
theunit.
v
Ifthetemperatureinsidethecarisverylowandthemonitorisusedsoon
afterswitchingontheheater,moisturemayformonthepaneloftheunit.
Turnofftheunitimmediately!Failuretodosomaycausetheinternal
componentstoshort.Allowtheunittorestforaboutonehourtoallowthe
condensationtodisappearbeforecontinueoperation.
v Inextremelycoldtemperatures,themovementofthepicturemaybeslow
andthepicturemaybedark.Itisnotamalfunction.Theunitwillwork
normallyonceitreachesitsoperatingtemperature.
v DonotdroporhittheLCDpanelwithahardobject,asitmaycause

3
permanentdamagetotheLCDpanel.ShouldLCDpanelbreak,avoid
touchingglassandfluid.Ifdo,pleasecleanitwithplentyofwaterandask
formedicalattentionimmediately.
v Duetodifferentcarspecifications,pleasekindlyensuethatthedisplay
monitorisproperlylocatedandnotobstructingtheair-conditioningvent.
v
AvoidinsertinganyforeignobjectsintotheslotofthediscPlayer.Failure
toobservethismaycausemalfunctionduetotheprecisemechanismof
thisunit.
v
Protectyourdisc.Whenyouleavethecar,besuretoejectthediscfrom
thisunitandstoreitseparatelyawayfromdirectsunlight.
v Heatandhumiditymaydamagethediscandyoumaynotbeabletoplayit
again.
v UsethesuppliedscrewstofixthemonitorMetalMountingPlate.

4
DVDPlayerFeatures
ThisplayerisaRoofMount10.2"TFT-LCDColorDisplaywithDVDplayer
thatcanbeusedasastand-alonedisplay,orcanbeintegratedintoamobile
multimediasystem.Thisplayerhasthefollowingfeatures:
²
10.2"TFT-LCDcolormonitor(16:9)
² RoofMountingApplication
² Pixel(dots):1152x234
²
WideViewingangle(up/down/left/right):45/65/65/65
² NTSCandPALCompatible
² AdjustableContrast/Brightness/Color/Tint
²
ManualViewingAngleAdjustment
² VerticalAngleAdjustable:up/down<120°
² WhiteLEDDomeLight
²
AutomotiveStartupProtection
² Built-inIRTransmitter
² IRRemoteControl
²
OnScreenDisplay
² 2xAVInput
² 1xAVOutput
²
Slot-inDVDmechanism
² SupportSD/MMCcardandUSB
² Built-iniPod/iPhone
Note: Madefor:iPod touch(4thgeneration);iPod touch(3rd generation);
iPodclassic;iPod nano (5thgeneration);iPodnano(3rd generation);
iPod nano(1st generation);iPhone4;iPhone3GS.
² Capabilitytoread:DVDFormat/DVD-ROM/DVD±R/DVD±RW/CD-DA/CD-
RW/CD-R/CD-ROM(XA)/MP3/WMA/VCD/SVCD/JPEG/DIVX/MPEG4.
Note:Multi-sessionCDsand320kbpsWMAfilescan'tbeplayed.
²
FMTransmitterforlisteningtheaudiofromyourcaraudiosystemviaFM
radioreceiver(settingfrequency:87.5MHz--108.0MHz).
DVDVideoFeatures
DVDdrivethatsupportsthefollowingformats:
DVDs(12cm),videoCDs(12cm),audioCDs(12cm),MP3CDs(12cm)
•
PlaybackofCDswithtworecordedsessions(oneaudioandonedata)
• Multi-sound:DVDaudiothatsupportsuptoseven languagesperfilm
• Subtitles:support up to 7 languges
•
TheplaybackofMP3musicfilesstoredonaCD-R/CD-RWdiscorUSB
SD or MMC or Card device

5
Controls
Monitor Stowed View
Item Name FunctionorControl
1 MENU
Touch
and
hold
to
d
isplay
the
OSD
menu
,
touch
again
to
close
the
OSD
menu
.
On
DVD
mode
,
touch
to
display
DVD
list,
touch
again
to
close
the
DVD
list
;
On
iPod/iPhone
mode
,
touch
to
display
the
current
list
,touch
again
to
enter
the
main
menu
.
2
Play
or
pause
.
3
Previous
Chapter
or
Track
/
Navigation
Left
;
Press
and
hold
to
fast
reversef
at
2x,4x,8x,16x
,
32x
and
normal
speed.
4 ▲
Navigation
Up
.
5
Next
Chapter
or
Track
/
Navigation
Right
;
Press
and
hold
to
fast
forward
at
2x,4x,8x,16x
,
32x
and
normal
speed.
6 ▼
Navigation
Down
.
7 SOURCE
Selects
the
video
input
source:
AV
1
,
AV
2,
or
DVD
;
On
DVD
mode
,
touch
and
hold
to
switch
the
mode
between
SD/MMC
and
USB
.
iPod/iPhone

6
Monitor Open View
8 IRWindow
Receives
IR
signals
from
the
remote
control
or
s
ends
IR
signals
to
IR
wireless
headphone.
9
E
ject
the
disc.
10 Panelopenswitch
Press
to
release
the
monitor
Panel
.
11
Discslot
Insert
the
disc
.
12 ENT.
Enter
/
Confirm
choose.
13 Domelight
To
illuminate
in
the
car.
14 DomelightSwitch
Turns
on/off
the
dome
light
.
When
the
switch
is
set
to
AUTO
,
the
dome
light
turns
on
when
the
door
is
open
.
15 SD/MMCcardslot
Insert
the
SD
card
or
MMC
card.
16 USBsocket
Connect
USB
device.
17 AV1INsocket
External
equipment
audio/video
in
socket.
Screw hole
Screw hole
Reset hole
Power off
Screw hole
Screw hole


8
10
Fastreverse
Press
to
fast
reverse
playback
at
2x,
4x,
8x,16x
and
32x
speeds.
11
RANDOM
Press
to
play
chapters
or
tracks
in
random
order.
12
A-B
Press
to
repeat
playback
from
point
A
to
point
B.
13
AUDIO
For
a
DVD:
Change
the
language
during
play
.
For
a
VCD/CD:
Change
audio
channel
(left,
right,
stereo)
during
playback
.
14
RETURN
Press
to
return
the
main
menu,
press
again
to
return
the
last
position
of
playback.
15
ANGLE
Press
to
select
a
different
filming
angle.
T
his
feature
only
works
if
the
DVD
is
recorded
with
multiple
angles.
16
ZOOM
Press
to
set
the
zoom
for
movie
viewing.
17
REPEAT
Press
to
repeats
the
track
or
the
entire
disc.
18
SUBTITLE
Press
to
select
and
turn
on
subtitles
during
playback.
19
Fastforward
Press
to
fast
forward
playback
at
2x,
4x,
8x,16x
and
32x
speeds.
20
TITLE
Press
to
view
the
DVD
disc
’
s
title
menu.
21
■ Stop
Press
to
stop
playback,
press
or
ENTER
button
to
start
playing
at
the
last
position;
Press
this
button
twice
to
fully
stop
playback,
p
ress
or
ENTER
button
to
start
playing
at
the
beginning
of
DVD.
22
Press
to
go
to
the
next
chapter
or
track.
23
Play
or
pause
.
24
VOL-/+
Press
to
decrease
/
increase
the
volume.
25
DISPLAY
Presstodisplaytheplaybackinformation(suchas
title,chapter,trackandtime).
26
GOTO
Presstostartplaybackataselectedchapter,track
ortime.

9
BasicOperation
Open
the
monitor
1.
PressthePanelopenbuttontolower
theoverheadmonitorscreen.
2.GentlyswingtheLCDdownandadjust
theangleforviewing.
CAUTION:TheLCDopenstoamaximum
angleof120° degrees.Donotattempttoopenitfurther.
Stow
the
monitor
Gentlypushthebacksideofthedisplaypaneluntilitclicksintotheoverhead
housing.Themonitorturnsoffautomaticallywhenyoureturnittotheclosed
position.
Note:Whenclosingthedisplaypanel,donotletcordsorotheritemsget
caughtbetweenthedisplayandtheoverheadhousing.Doingsocan
seriouslydamagethescreen.
Foryoursafety,closetheLCDpanelwhenyouarenotusingit.
Handling
disc
l Tokeepadiscclean,donottouchtheplayside
(non-labelside).
l Donotattachstickynotestoorputtapeonadisc.
l Keepdiscsawayfromdirectsunlightandheat.
l Storediscsinaprotectivedisccase.
l Tocleanthedisc,wipethediscoutwards
fromthecenterwithacleancloth.
Turn the player on
1.Usethesystemwiththevehiclerunningorwiththeignitionkeyswitchin
the"accessory"position.
2.
Tolowerthescreen,pressthePanelOpenbuttonandmovethescreen
intoaviewingposition.Thesystemwillpoweronautomatically.
3.Touch SOURCE icontoswitchthemode.
Note:YoucannotinsertaDVDintotheslotifyouhaveselectedan
alternateaudio-videosource(AV 1 IN AV 2 IN oripod/iPhone).

10
Turn the player off
Close the monitor or press the power button on the remote control to turn the
player off .
If a disc is playing when you turn the power off and back on again, the player
continues playback from where you stopped.
Note: Once the player is turned off, you cannot eject a disc in the player.
Adjust the display
1.
Touch and hold the MENU button to display adjust menu (OSD).
2. In the OSD MENU , press or ▲
▲
▲
▲
button to sequentially select each menu
item .
Contrast Adjusts the differences between the light and dark areas of
the image
Brightness Makes the whole image lighter or darker
Color Adjusts color based on the
Tint Adjusts the intensity of the color when in NTSC mode (to play
back DVDs recorded in the United States)
Wide Screen Selects the aspect ratio of the image wide, normal .
FMT Freq Select the frequency for FM transmitter : 87.5MHz--108.0
MHz.
Beep Select the beep sound when touch each icon or button .
Reset Returns all menu values to their default settings.
3. Press the or button to change the values of selected option.
Care and Maintenance
Cleaning the monitor
Use a clean, soft, dry cloth to gently wipe dust and dirt from the screen.
Do not use benzene, thinner, car c leaner, or other cleaners. These
substances may damage the monitor system or cause the paint to peel.
The surface of the LCD can be easily scratched. Do not rub it with
anything abrasive.
AV1/AV2 mode.

11
Servicingthemonitor
Intheeventthattroublearises,neveropenthemonitorcase,disassemblethe
playerorattempttorepairityourself.Theinternalpartsarenotserviceableby
user.Openinganycomponentswillvoidthewarranty.
CAUTION:
Changesormodificationstothisproductnotapprovedbythe
manufacturermayvoidthewarranty.
Cleaningtheremotecontrol
Useonlyaclean,soft,dampclothtocleantheremotecontrol.Donotuse
lighterfluid,methylalcoholorothersolvents.
Cleaningdiscs
Beforeplayingadisc,wipeitoutwardsfromthecenterwithaclean,softcloth.
Use the remote control
l
Usetheremotecontrolonlyinsidethevehicle.
l Usetheremotecontrolnofurtherthantenfeet(threemeters)fromthe
sensor.
l
Directsunlight(oraverybrightlight)reducessensitivitytoremotesignals.
Donotusetheplayerindirectsunlight.
l Anyobjectthancomesbetweentheinfraredsensorandtheremote
controlmaydisruptreception.
Replace the battery in the remote control
Thebatteryneedschangingwhenthebuttonsontheremotestopworkingor
whenyouhavetomoveclosetoplayerfortheremotetowork.
Precautions
l
Disposeofusedbatteriesproperty.
l Donotdisposeofusedbatteriesthrowingthemintofire.Ifyoudoso,they
mayexplode.
l
Donotshortthepositive(+)andnegative(-)terminals.
l Keepthebatteryanditsholderawayfromyoungchildren.Theymay
chokeonthebatterywhileattemptingtoswalloworchewonit.
N
ote:
ThebatterytypemustbeCR2025.Donotreplacewithanyother
batterytype.
Procedure
1.Turntheremoteup-side-down.
2.Simultaneouslyslidethebatterylatchinthedirectionofthearrowandpull
thebatteryholderoutoftheslot.

12
3.Removetheoldbattery.
4.Placethenewbatteryintheslotwiththeplus(+)sideup.
5.Pushthebatteryholderbackintotheslotuntilitlocksinplace.
Use the iPod/iPhone
Press OPEN iconontheiPod/iPhoneplacedboardtolowertheiPod/iPhone
placedboard.
GentlyswingtheboardandadjusttheangleforconnecttheiPod/iPhone.

13
Play
1.
OnDVDmode,insertadiscintothediscslotwhenthescreendisplay"NO
DISC".Whenthediscwasinserted,“LOADING” displayed,thesystem
willreadandplaythediscautomatically.
2.
Pressthe
EJECT
buttontoejectthedisc.
3.Ifthedischavenotbeentakeawayin10seconds,thesystemwillslotitin
automaticallyandplayagain.
Play DVD disc
Accesstherootmenu
ADVDisdividedintotitlesandchapters.Therootmenushowsthecontents
ofthedisc.SomeDVDdisconlyallowyoutoselectdiscplaybackoptions
fromtheDVDrootmenu.
ToaccesstherootmenuoftheDVD,pressthe
RETURN
or
TITLE
buttonon
theremotecontrolduringplayback.
Statusinformation
Toviewstatusinformationaboutthecurrentviewingsession,pressthe
DISPLAY
buttoncontinuouslytocyclethroughthefollowinginformation.
Changlanguages
Note:
Allaudiblelanguagesmustbepre-recordedontheDVD.SomeDVDdisc
onlyallowlanguageaccessthroughtheDVDmenu.
l Tochangetheaudiblelanguage,pressthe AUDIO buttonontheremote
control.Theplayerdisplaysthecurrentlanguagenumberandname,and
thetotalnumberoflanguagesavailable.
l Tocyclethroughallavailablelanguages,continuepressingthe
AUDIO
buttonontheremotecontrol.Theaudioinformationwilldisappears
automaticallyafterthreeseconds.


15
•
Tozoomin(enlarge)theimagewhenwatchingaDVD,pressZOOMduring
playback.
AsyoupressZOOMontheremote,theplayeralternatesamongthe
availablezoomsettings(2x,3x,4x,1/2,1/3,1/4).
•
Tozoominwhenviewingphotographs(JPEG/JPGimages)storedona
disc,pressZOOMontheremote,theplayeralternatesamongthe
availablezoomsettings:ZOOM100%,ZOOM125%,ZOOM150%,ZOOM
200%,ZOOM75%,ZOOM50%.
Play Audio CD disc
DisplayCDinformation
InsertaCDdisc,thescreenwilldisplaySINGLEELAPSED.Continue
pressing
DISPLAY
buttontoviewSINGLEELAPSED,SINGLEREMAIN,
TOTALELAPSED,TOTALREMAIN,DISPLAYOFF.
RepeatCDtracks
TorepeatatrackortheentireCD,press
REPEAT
buttonontheremoteduring
playback.
Tocyclethroughtheavailableoptions,continuepressing
REPEAT
.
• TRACK---Repeatplaythecurrentmusic
• ALL---Cyclesplayallmusic
• REPEATOFF---Resumenormalplayback
Repeatfavoritesections
Torepeatafavoritesectionyoumustfirstmarkwhereitbeginsandends.
1.PlaybacktheCD.
2.Toidentifythebeginningofyourfavoritesection(pointA),presstheA-B
buttonontheremotewhenthesectionstartsplayingback.
3.Toidentifytheendofyourfavouritesection(pointB),presstheA-Bbutton
againwhenplaybackreachestheendofthesection.
Tocanceltherepeatplaybackandresumenormalplayback,presstheA-B
buttonagain.
Play MP3 disc
MP3isaformatforstoringdigitalaudio,compresseseachaudiotrackwith
littlelossofaudioquality.Theresulttakesupmuchlessdiscspacethanthe
trackwouldwithoutMP3compression.
1.InsertaCDthatcontainsMP3filesintotheplayer.Theplayerdisplaythe
MP3menu.
2.
Toselectthefoldersandtrackstoplay,pressthe
ENTER
button.The
playerdisplaysthefolderstructure.

16
3.Tochooseafolderfromthelist,pressthe ▲
/
▼ button.
4.Pressthe
ENTER
button,theplayerdisplaysthecontentsoftheselected
folder.
5.ToselecttheMP3file,pressthe ▲
/
▼ button.
6.Pressthe
ENTER
buttontoplaythefile.
MP3controls
l ToplaybacktothenextMP3file,pressthenextbutton( ).
l ToplaybackthepreviousMP3file,pressthepreviousbutton( ).
RepeatMP3
TorepeatasingleMP3file,pressthe REPEAT buttonontheremote.Tocycle
through allthefollowingsettings,continuetopress REPEAT.
l REPEATONE---repeatsthecurrentfile.
l REPEATALL---cyclesplayallcurrentofthedisc.
l REPEATFOLDER---repeatsthecurrentthefolder.
● REPEATOFF---turnsoffrepeatandresumesnormalplayback.
Play USB device and SD/MMC card
1.
InsertaUSBdeviceintotheUSBsocketofthemainunit.
2.OnDVDmode,touch
SOURCE
buttononthepanelorpress
SRC
button
ontheremotecontrolformorethan2secondstoswitchtotheUSBmode.
ThesystemwillplayUSBdeviceautomatically.
3.Usethearrowbuttonstoselectafiletypeandpressentertoplayit.
4.
PlayingSD/MMCcardisthesameoperationofUSBdevice,pleaserefer
tothestepsofplayingUSBdevice.
Play iPod/iPhone
OnDVDmode,opentheiPod/iPhonedoor,connectiPod/iPhonecorrectly.
ThenthesystemwillswitchtotheiPod/iPhonemodeautomatically.There
threekindsofmodetochoose:MUSIC,VIDEO,PHOTO.
1.Selectamodeiconandpress ENTER toenterthemode.Thesystemwill
playiPod/iPhoneautomatically.
2.
Usethearrowbuttonstoselectafileandpressentertoplay.
3.Duringplay,press MENU buttontwicetoreturntotheiPod/iPhonemenu.
Note : BeforeenterthePHOTOmode,mustsettheiPod/iPhonetothephoto
modeandplaystarts.

17
Installation
and
Wiring
Donotattempttoinstallorserviceyourplayerbyyourself.Installationand
servicinginelectronicequipmentandautomotiveaccessories.Ifyoudonot
haveknowledgeorexperiencethisinstallationmaybedangerousandcould
exposeyoutotheriskofelectricshockorotherhazards.
Readtheseinstructionsandprecautionscarefully.Improperinstallationcan
damagethemonitorandthevehicle.
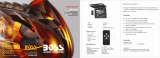
What's in the box
Inadditiontothismanual,theboxcontains:
Note:Useonlythecontentsofthispackagetoinstallandusethesystem.
Usingaccessoriesnotprovidedwiththisplayermaydamagetheplayer.
Before you begin
1. Verifythatthevehicleelectricalcomponentsfunction,includingpower
windows,powerdoorlocks,airconditioning,lights,etc.
2. Identifythepolarityofthedomelightcircuitandsettheswitchonthe
bottomoftheoverheadmonitorhousing.
3.
Testfitthelocationoftheoverheadmonitorsystemtoensureitwillnot
PartsName Quantity
Player 1
IRremotecontrolwithbattery 1
Powercable 1
AV1INcable 1
AV2INcable 1
AVOUTcable 1
ST4.2x16screw 8
TB2.6x6screw 7
PM4x8screw 4
InstallationBracket 1
TrimRing
1
Usermanual 1

18
interferewiththeoperationofthevehicle.
4. Ifapplicable,verifythatthemonitor,whenmounted,willnotinterferewith
theoperationofthesunroof.
5. Carefullymarkthelocationwithmaskingtape.
6. Lowerthevehicle’sheadlinerdowntoseeifaroofsupportbeamis
availabletoscrewthemountingbracketto.
Ifasupportbeamisnotavailable,usea3/4-inchpieceofplywoodcutto
theappropriatesize.Attachtheplywoodtotheroofofthevehicleusing
silicone.Allowforadequatedryingtime.
7. Determinethelocationofanyadditionalaudio/videosources.
8. Disconnectthenegativebatteryterminalbeforemakinganywiring
connections.
Caution:Donotopenthecase.Therearenoserviceablepartsinside.If
youdropanythingintotheunitduringinstallation,consultwithyourBoss
DealeroranauthorizedBossservicecenter.
Mounting and Wiring precautions
l
Thisunitisexclusivelyforvehicleswithanegativeground,12Vpower
supply.
l
Thisunitmaybeinstalledwithadditionalmobileaudiocomponents,such
asadigitalcamera.
l Alwaysusegreatcarewhenattachinganythingtoavehicle.Check
clearancesonbothsidesoftheplannedinstallationbeforedrillingany
holesorinstallinganyscrews.
l Agoodchassisgroundconnectioniscriticaltominimizeresistanceand
avoidnoiseproblems.Usetheshortestwirepossibleandsecurely
connectittothecarchassis.
l WhenroutingRCAcables,keepthemawayfromthepowercablesand
outputspeakerwires,engine,exhaustsystem,ect.Heatmaydamage
wires.
l Ifthefuseshouldblow,makesurethatallconnectionsarecorrect,the
cableshavenotcausedashortcircuit,andnowiresaredamaged.Then
replacethefusewithanewfuseofthesameamperagevalueasthe
originalfuse.Whenreplacingafuse,neverletthepowercabletouchany
metalpartorotherwire.
l Neverletdisconnectedcablesorterminalstouchmetalonthecarorany
otherconductingmaterial.
l Topreventshortcircuit,donotremovethecapsfromunusedterminalsor
fromtheendsofunconnectedcables.
/