Whirlpool AWOC 7221 Installation guide

Type
Installation guide

Whirlpool AWOC 7221 is a washing machine designed to make laundry day easier and more efficient. With its user-friendly features, you can customize wash cycles, save energy, and keep your clothes looking their best.

Whirlpool AWOC 7221 is a washing machine designed to make laundry day easier and more efficient. With its user-friendly features, you can customize wash cycles, save energy, and keep your clothes looking their best.

GB
INSTALLATION GUIDE
Read this “INSTALLATION GUIDE” before operating.
Keep this “INSTALLATION GUIDE” for future reference.
Read the general recommendations about disposing of
packaging in the Instructions for use.
NOISE, EXCESSIVE VIBRATIONS AND WATER
LEAKAGES CAN BE CAUSED BY INCORRECT
INSTALLATION.
NEVER MOVE THE APPLIANCE BY CARRYING
IT AT THE WORKTOP.
10200448.fm Page 1 Monday, July 14, 2008 3:04 PM
Black process 45.0° 130.0 LPI
2
PARTS SUPPLIED
Package with small items
Instruction for use
4 plastic caps (for certain models, the plastic caps
are attached to the back of the appliance)
Wrench
Inlet hose (inside the machine or already installed)
“U”-bend (inside the machine or already installed)
A
B
OR
C
D
E
10200448.fm Page 2 Monday, July 14, 2008 3:04 PM
Black process 45.0° 130.0 LPI
3
REMOVE TRANSPORT BOLTS!
Important: - Not removed transport bolts cause damages to the appliance!
- If your washer model has the drain hose inside the appliance (see “Connect
the Drain Hose”, picture 10 / II), pull out the drain hose BEFORE removing the
transport bolts, otherwise you risk to damage the drain hose inside the
washer while moving the appliance to its final position.
- Keep the transport bolts and the wrench for further transporting of the
appliance; in this case refit the transport bolts in reverse order (for “Version
II” see additional instructions under
.
VERSION I
VERSION II
2
10200448.fm Page 3 Monday, July 14, 2008 3:04 PM
Black process 45.0° 130.0 LPI
4
Unscrew the 4 screws with the wrench supplied.
Move the screws to the center of the holes
and remove them.
Pull out the screws together with the black
rubber parts and red plastic parts.
VERSION I VERSION II
1
2
10200448.fm Page 4 Monday, July 14, 2008 3:04 PM
Black process 45.0° 130.0 LPI
5
Or:
First remove all 4 screws, and then
remove the black rubber parts by means of a
screwdriver or similar. Make sure that the red
plastic parts do not remain stuck in the holes -
if so, push them with a screwdriver so that
they fall down towards the inside of the
washer. Tilt the washer slightly to the front, so
that a 2nd person can pick up the red plastic
parts. Put the black rubber and the red plastic
parts back on the removed screws again and
keep the transport bolts for any further
transporting of the washer.
10200448.fm Page 5 Monday, July 14, 2008 3:04 PM
Black process 45.0° 130.0 LPI
6
To close the holes, insert the supplied plastic
caps in the wide part of the holes and slide
them into the direction of the arrow until they
click into place.
To close the holes, push the plastic caps
(which are either attached on the back of the
appliance or contained in the bag supplied)
on the holes.
ADJUSTMENT OF THE FEET
The appliance must be installed on a solid and level floor surface (if necessary use a spirit
level). If the appliance is to be installed on a wooden or floating floor, distribute the weight by
placing it on a sheet of plywood measuring at least 60 x 60 cm and thickness of at least 3 cm
which is secured to the floor. If the floor is uneven, adjust the 4 levelling feet as required; do
not insert pieces of wood etc. under the feet.
3
10200448.fm Page 6 Monday, July 14, 2008 3:04 PM
Black process 45.0° 130.0 LPI
7
Slacken the locknut clockwise (see arrow) using the wrench
C
supplied.
Lift slightly the machine and adjust the height of the foot revolving it.
Important:
tighten the locknut by turning it anti-clockwise towards the appliance casing.
4
C
5
6
10200448.fm Page 7 Monday, July 14, 2008 3:04 PM
Black process 45.0° 130.0 LPI
8
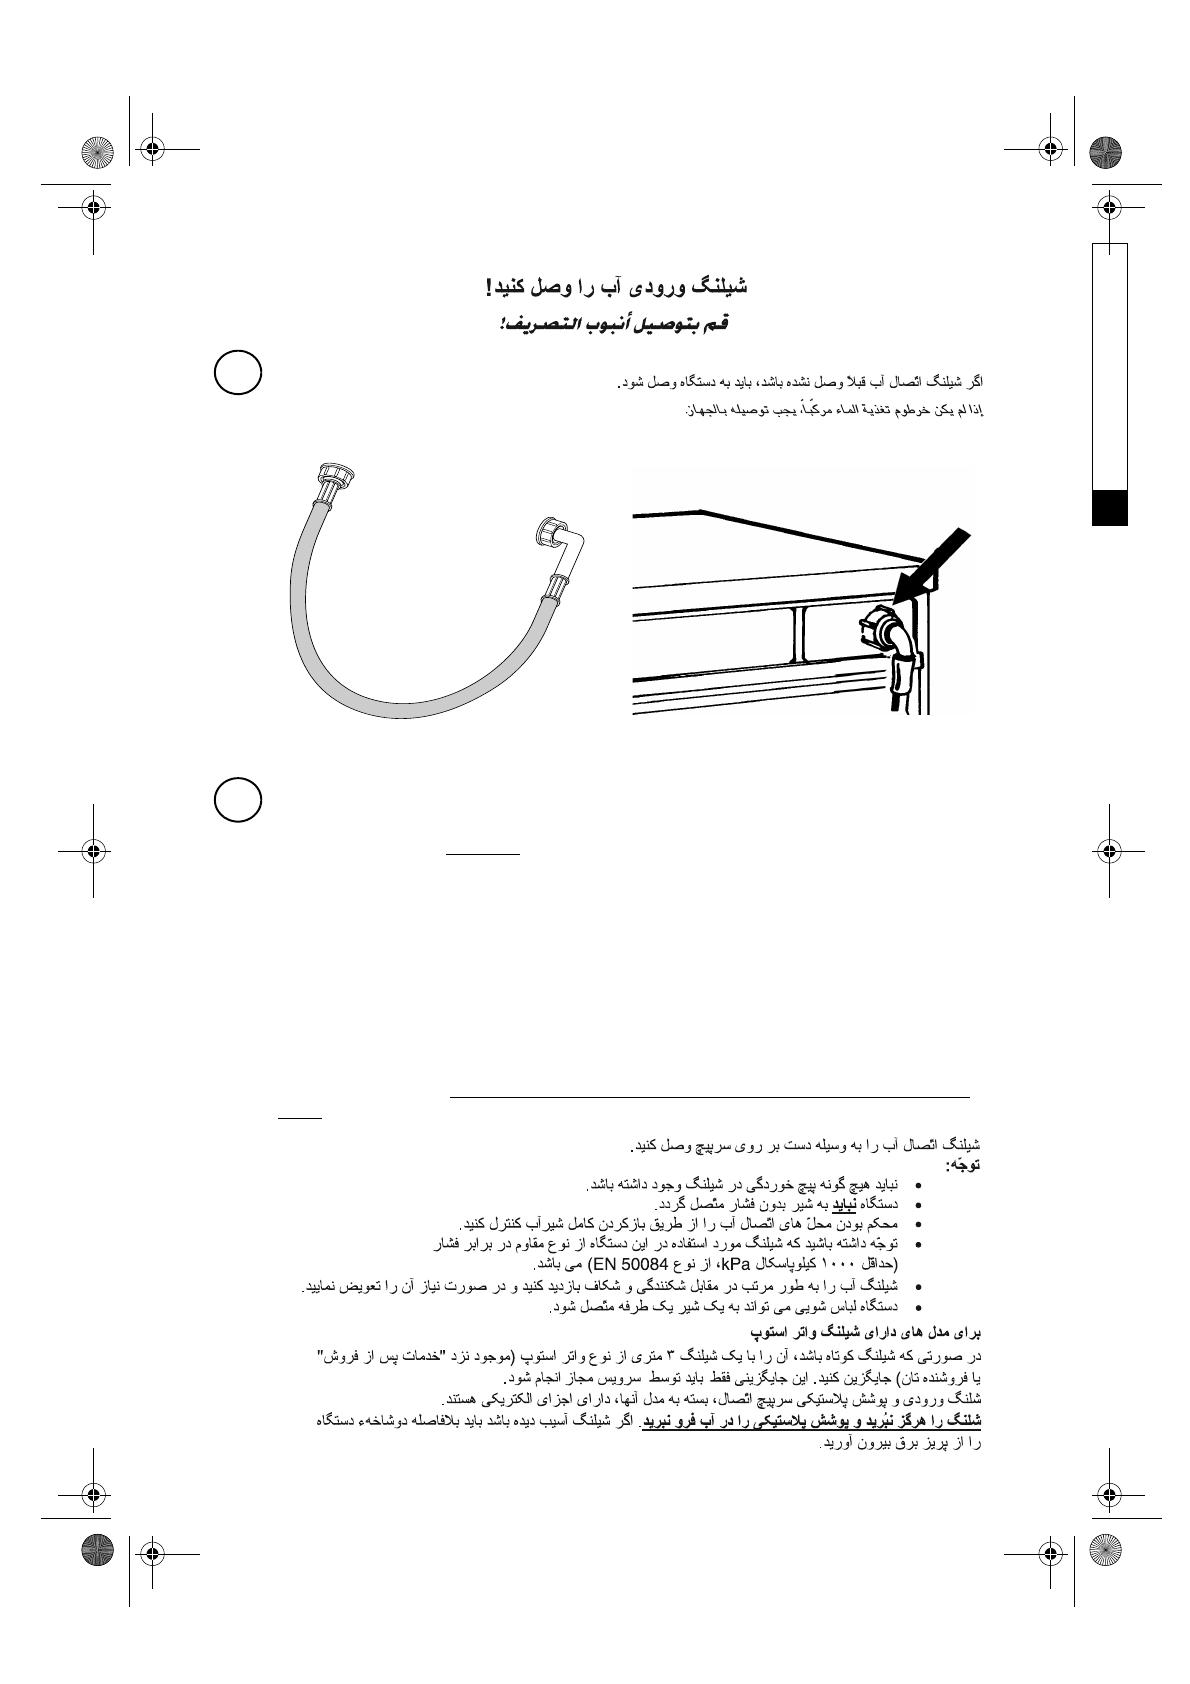
CONNECT THE WATER SUPPLY INLET HOSE
If the water inlet hose is not already installed, it must be screwed to the appliance.
Screw by hand the inlet hose
onto the tap tightening the nut.
Attention:
no kinks in the hose!
The appliance
must not
be connected to the mixing tap of an un-pressurized water
heater.
Check water-tightness of connections by turning the tap completely on.
If the hose is too short, replace it with a suitable length of pressure resistant hose
(1000 kPa min, EN 50084 approved type).
Check the inlet hose regularly for brittleness and cracks and replace if necessary.
The washing machine can be connected without a non-return valve.
For models with Water Stop hose:
If the flexible hose is too short, replace it with a 3 m Water Stop hose (available from After-Sales
Service or from your dealer). This replacement is only to be carried out by a trained electrician.
Depending on the model, the inlet hose and the plastic enclosure at the tap connection contain
electrical components.
Do not cut the hose and do not immerse the plastic enclosure in
water
. Isolate the appliance from the mains immediately if the hose is damaged.
7
8
10200448.fm Page 8 Monday, July 14, 2008 3:04 PM
Black process 45.0° 130.0 LPI
9
CONNECT THE DRAIN HOSE
I. In case the drain hose is installed as shown on the models below:
Unclip it from the holders marked with arrows.
9
10200448.fm Page 9 Monday, July 14, 2008 3:04 PM
Black process 45.0° 130.0 LPI
10
II. In case the drain hose is installed inside the washing machine:
Pull the hose completely out of the holder and close the opening with cap
a
.
DO NOT START THE WASHING MACHINE BEFORE HAVING PULLED OUT AND
CONNECTED THE DRAIN HOSE!
III. In case the drain hose is installed in the upper part of the washing machine:
Unclip it from both holders marked by the arrows (see below, depending on the model).
1
2
a
10200448.fm Page 10 Monday, July 14, 2008 3:04 PM
Black process 45.0° 130.0 LPI
11
I. If your washing machine is a built-in model:
Connect the drain hose to the siphon.
Notes:
Make sure there are no kinks in the drain hose.
Height for siphon - drain hose connection must be minimum 70 cm and maximum 125 cm
To make an extension, use a hose of the same type and secure the connections with clips.
Maximum overall drain hose length: 2,50 m (in this case, the maximum height for
fixation to siphon is 90 cm).
II. If your washing machine is NOT a built-in model:
Connect the drain hose to the siphon or hook it over the edge of a sink by means of the “U” bend.
Fit the “U” bend
E
, if not already installed,
at the very end of the drain hose
.
Important:
Do not fix the “U” bend to another position of the drain hose, otherwise there
might be the risk of simultaneous filling and draining of the machine (“siphoning effect”).
10
E
10200448.fm Page 11 Monday, July 14, 2008 3:04 PM
Black process 45.0° 130.0 LPI
12
Notes:
Make sure there are no kinks in the drain hose.
Secure the hose so that it cannot fall down.
Small hand basins are not suitable.
To make an extension, use a hose of the same type and secure the connections with clips.
Max. Overall drain hose length: 2,50 m (in this case, the maximum height for fixation -
see picture below - is 90 cm).
10200448.fm Page 12 Monday, July 14, 2008 3:04 PM
Black process 45.0° 130.0 LPI
5019 102 00448
ELECTRICAL CONNECTION
Use a socket with an earth connection.
Do not use extension leads or multi sockets.
The electrical power cable must be replaced exclusively by a licensed electrician.
Electrical connections must be made in accordance with local regulations.
10200448.fm Page 13 Monday, July 14, 2008 3:04 PM
Black process 45.0° 130.0 LPI
  • Page 1 1
  • Page 2 2
  • Page 3 3
  • Page 4 4
  • Page 5 5
  • Page 6 6
  • Page 7 7
  • Page 8 8
  • Page 9 9
  • Page 10 10
  • Page 11 11
  • Page 12 12
  • Page 13 13

Whirlpool AWOC 7221 Installation guide

Type
Installation guide

Whirlpool AWOC 7221 is a washing machine designed to make laundry day easier and more efficient. With its user-friendly features, you can customize wash cycles, save energy, and keep your clothes looking their best.

Ask a question and I''ll find the answer in the document

Finding information in a document is now easier with AI