Lindy WLAN 11n HDMI & VGA Projector Server User manual
- Category
- AV extenders
- Type
- User manual
This manual is also suitable for

© LINDY - FIRST EDITION (Sep 2013)
For Home and Office Use
Tested to Comply with
FCC Standards
HDMI & VGA Wireless Projector Server
User Manual English
LINDY No. 32701
www.LINDY.com
Manual
English
2
Introduction
Thank you for choosing the LINDY HDMI & VGA Wireless Projector Server. This product quickly
turns your existing wired projector into a high-end wireless projector.
A split screen multicasting feature allows up to four users to use a single projector at once, with
multiple users simultaneously logged onto the server; perfect for meetings and presentations.
Users simply need to enable their WiFi and connect to the Wireless Projector Server using the
Wireless Projector Server Utility to start begin projecting.
These features save you time swapping cables between computers or loading storage media
onto a separate computer helping make your projector part of an easier, simpler and more
professional presentation system.
Package Contents
LINDY Wireless Projector Server
Multi-country 5V 2.5A PSU (UK, Europe, USA, Australia, China)
2x Wireless dipole Antenna with SMA connectors
4 Pozidrive, 2 slot screws & wall mounting bracket
USB memory stick
Software CD includes:
Software for Windows & Mac OS
VAC.exe (for audio projection)
VDD.exe (for virtual extended display)
PtG Converter (for converting PowerPoint files for use with MobiShow)
SNMP Manager (for Wireless Projector Server device management)
This Manual
Features
Supports Windows 2000, XP, Vista & Windows 7, 8, Mac OSX 10.5 and later
4-to-1 split screen projection - connect four computers to one projector
1-to-4 screen projection - connect one computer to four Wireless Projector Servers
Conference Control - allows moderators to control access to projectors
Session security login IEEE standard 64/128 bit WEP, WPA, WPA2 key & Gatekeeper
High Performance screen projection with audio & multimedia playback.
Supports HD video streaming
Supports OSD (On-Screen Display) image uploading
Supports SNMP (Simple Network Management Protocol) device management
Supports AP (Access Point) Client Mode
Compatible with MobiShow - make presentations from your Smartphone

Manual
English
3
Specification
Standards - IEEE 802.11b/g/n (2.4 GHz), 802.3/3u (10BASE-T/100BASE-TX)
IP Address Configuration – Automatic & Manual DHCP
Channels - 11 US/Canada , 13 Europe , 14 Japan
Wireless Encryption/Key - IEEE standard 64/128bit WEP/WPA/WPA2-PSK
Operating Frequency - 2.4 GHz 300Mbps LAN 10/100Mbps
Wireless Range (Maximum) - 100m (300ft)*
Maximum Output Resolution – VGA:1440x900, 32 bit color depth, HDMI: 720p (HD Ready)
Dimensions 13.9 x 10.8 x 3.7 cm (WxDxH) / Weight - 0.5 kg
* The actual operational distances depends on the surrounding environment
Installation
Important
BEFORE STARTING AN INSTALLATION ENSURE ALL DEVICES ARE POWERED OFF
The Wireless Projector Server is capable of receiving separate audio & video signals up to
100m from a transmission source. Actual operational distances depend on the construction of
the surrounding building and any walls or floors that are situated between the transmitting
computer and the Wireless Projector Servers receiving antenna.
Quick Setup
These steps follow an installation using HDMI or VGA equipment with Windows 7
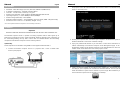
1. Connect the Wireless Projector Server to a projector with a VGA or HDMI cable.
Power up the projector
Manual
English
4
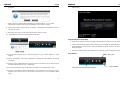
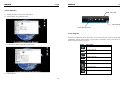
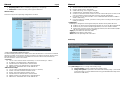
2. Power on the Wireless Projector Server. The Power LED will turn from Red to Green and
the projector screen will show the default menu screen as below. The Wireless Projector
Server is now ready to use
3. Enable your computers WiFi and connect your computer to the Wireless Projector Server
WLAN via Windows Control Panel > Network Settings
4. Open your preferred web browser. If you use WiFi to connect to the internet this should
redirect automatically to the Wireless Projector Server Management page. If not enter
the default IP address of the Wireless Projector Server 192.168.100.10 or refer to the IP
address shown in the bottom left corner of the projector screen
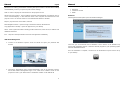
5. Unless you already installed the OS utility from the software disc, download the required
OS Utility for your Computers OS and follow its Installation Wizard. Ensure your firewall
allows the Wireless Projector Server software to pass through. After installation you will
see the Wireless Projector Server shortcut on your desktop

Manual
English
5
6. Run the Wireless Projector Server Utility, the following Warning message will be
displayed
7. Select Cancel to continue without adjusting your system settings. You can make
adjustments to display settings later via Windows Control Panel > Display
8. Select the Wireless Projector Server you require - identified by the IP Address shown on
the projector screen
9. Enter the Login Code is shown in the top left of the projector screen
10. The Wireless Projector Server user Interface will open
11. Click the Play button to start a mirrored projection of your current desktop or active
program
12. Select the different split screen quadrants by clicking the 1/2/3/4 buttons around the
Play button
13. Select & login to multiple Wireless Projector Servers in the Device List to project to up to
four different projectors at once – multicasting
14. Click the Stop button to stop a presentation and return to the default menu screen
15. Click the Pause button to hold a presentation on its current frame. Any Changes on your
desktop screen will not show on the projector screen until you click the Pause button
again
Manual
English
6
16. Closing the Wireless Projector Server Utility will return the projector screen to the default
menu screen
Using the Windows Client Utility
1. Install all the software & drivers included on the software disc and turn on your WLAN
2. Click on the Wireless Projector Server desktop icon. The Utility will automatically search
for the Wireless Projector Server. When the Wireless Projector Server is found a Login
dialog will appear
3. Enter the four digit Login Code is shown in the upper left corner of the projector screen
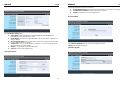
User Interface
Menu Area
Status Indicator
Control Area for Screen Projection Feature

Manual
English
7
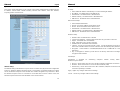
Button
Description
Full Screen projection
Project to Split #1
Project to Split #2
Project to Split #3
Project to Split #4
Stop projecting
Pause projecting
Enable the Windows Magnifier function
Show Login Code
Clicking the four digit code icon in the upper-right corner of the user Interface will display a
Login Code in the upper-left corner of your desktop. This display will close automatically after
10 seconds. Clicking anywhere on the desktop during this time will cancel this display
Manual
English
8
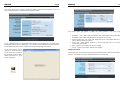
Utility Menu
Clicking the Utility Menu icon in the top right of the user Interface will open the Utility Menu Drop
Down
Show Receiver Information - displays the Login Code in the same way as clicking the four digit
code in the user Interface
Web Admin - opens the Web Admin Management Page, described later
Search Server - refreshes the Wireless Projector Server list
Projection Quality - gives options to choose between Normal for a faster projection speed with
lower image quality or Best for clearer screen image quality, but slower projection speed
Projection Source - after installing the VDD.exe driver, you can select to project a Virtual
Extended Screen across up to four Wireless Projector Servers. Use Windows Control Panel >
Display to make changes to your Display settings, screen setup and arrangement
Send Audio to Display - after installing the VAC.exe driver you can choose to playback audio
through the Wireless Projector Server’s 3.5mm audio output. For best results it is
recommended that audio is played back via the audio output otherwise there will be noticeable
sync issues with the video
Auto WiFi Connect - automatically connects to a previously used Wireless Projector Server

Manual
English
9
Auto Power Management - changes your computer's power management scheme to the highest
performance for making presentations. Selecting this option enables or disables these settings
and immediately restores your previous power scheme settings.
Hide UI - hides or displays the user Interface on the projection screen
Advanced Screen Capture - see tip windows and other layered windows, including the main UI
on the connected display. In this mode the mouse cursor may blink from time-to-time on the
projector screen - for the best results it is recommended this feature is disabled
Repeat - plays back the current audio / video file
Make Plug&Show Token - opens the Plug & Show Token wizard, described later
Copy Application to desktop - copies the application to your desktop
About - shows system information including product model name, client version, IP address and
additional information
Exit - stops the current presentation and closes the application immediately
Web Admin Management
1. Connect to the Wireless Projector Server via WLAN and open your preferred web
browser
2. Clicking the Web Admin option should automatically open to the Wireless Projector
Server Web Admin Management Page. If not, enter the IP address shown on the
projection screen in your web browser. The default IP address is 192.168.100.10
Manual
English
10
The Web Admin Management Page consists of three sections;
Download
Conference Control
Admin
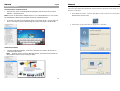
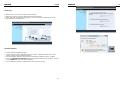
Download
Selecting the Download option opens the download dialogue
From here you can download and run Windows or Mac versions of the Wireless Projector
Server Utility installation program. Select the relevant program for your Operating System and
follow the Installation Wizard
Once the installation is complete, a shortcut icon for the Wireless Projector Server will appear
on your desktop

Manual
English
11
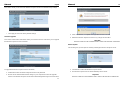
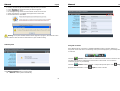
Conference Control
This function allows you to host multiple presentations without swapping connection cables
between computers. Up to 4 users can project at once, with multiple users logged in.
The default User Name and Password are moderator.
After login you will see three columns user List. This shows the current status information of all
the users connected to the Wireless Projector Server:
Computer Name
Play Control
IP Address
In the Play Control column six buttons indicate & control each user’s status on the
projection screen;
Play Full screen
Play on Split #1
Play on Split #2
Play on Split #3
Play on Split #4
Stop Presentation
Manual
English
12
Admin
This section allows you to view and set various settings for the Wireless Projector Server
The default User Name and Password are admin.
After login you will see several options;
System Status
Network Setup
OSD Setup
Projection Setup
Change Passwords
Reset to Default
Firmware Upgrade
Reboot System

Manual
English
13
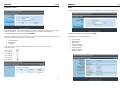
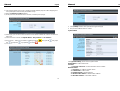
System Status
This section shows information on the current system status; Model Name, Firmware Version,
IP Address, Subnet Mask, Default Gateway, Wireless Mac Address, Wire Mac Address,
Projecting Status and Total users.
Network Setup
The default setting of the Wireless Projector Server is DHCP Auto (Dynamic Host Configuration
Protocol). When the Wireless Projector Server is connected to a LAN that already has a DHCP
server, the Wireless Projector Server will take an IP address assigned to it by that server. When
the Wireless Projector Server is connected to a LAN that does not have a DHCP server, the
Wireless Projector Server becomes the DHCP server in that network.
Manual
English
14
If you do not require the DHCP function it is recommended to select Disable
IP Setup:
Select Obtain IP address automatically or Use the following IP address
IP Address - the default value is 192.168.100.10
Subnet Mask - the default value is 255.255.255.0
Default Gateway - the default value is 192.168.100.10
DNS Server - the default value is 192.168.100.10
DHCP Server Setup:
Select Auto/Disable Enable
Start IP - the start IP address of the DHCP Server
End IP - the end IP address of the DHCP Server
Subnet Mask - the default value is 255.255.255.0
Default Gateway - the default value is 192.168.100.10
DNS Server - the default value is 192.168.100.10
Wireless Setup:
Wireless LAN - the default value is Enable
Connect to Existing AP - input the SSID of the Wi-Fi AP you want to connect to
Region - the default value is Worldwide
SSID - SSID string, max. Length is 32 bytes
SSID Broadcast - the default value is Enable
Channel - use this to set Fixed Channel or Auto. In Auto the Wireless Projector Server
will scan all available wireless channels and select one automatically when powered on
Encryption - select Disable or set WEP/WPA/WPA2 in 64 or 128bit with an ASCII or
HEX string
Key - if Encryption is enabled, you will have to set the key value here according to the
encryption mode selected
Gatekeeper:
Gatekeeper is designed for maintaining enterprise network security within the
Wireless Projector Server
All Pass - allows Guest users to access all office networks and Internet connections
All Block - blocks Guest users to access all office networks (LAN)
Internet Only - blocks Guest users from office networks (LAN) but still reserves Internet
connection capability, if available
Apply - applies any changes made to these settings
Cancel - cancels any changes made to these settings

Manual
English
15
OSD Setup
This section allows you to change or restore the default projector screen background. You can
also set what information is displayed on the projector screen
To use a different image as a background it first needs to be converted into a .ib image using
the IB Maker utility from the software disc. This can then be uploaded to the Wireless Projector
Server by Browsing to the new .ib images location and clicking Image File Upload
To use the IB Maker click the
desktop icon and follow the on
screen instructions. Images to
be converted should be 800 x
600px and saved as a .jpg or
bitmap images first
Manual
English
16
Projection Setup
This section gives you options to adjust the visual qualities of the your projection
Resolution – VGA: 1440 x 900, XGA (1024 x 768), WXGA(1280 x 768, 1280 x 800) and
SVGA(800 x 600); HDMI: 720p HD Ready. The default value is XGA.
Screen Refresh Rate - this is the VGA output refresh rate and provides 60Hz and 75Hz
rates for different kinds of projectors.
Login Code - select Disable, Random or Use the following code to set a specified
4-character Login Number
Apply - applies any changes made to these settings
Cancel - cancels any changes made to these settings
Change Passwords
This section gives you the option to change the passwords for both Conference and Admin
Controls. Passwords can be up to eight alphanumeric characters long

Manual
English
17
Reset to Default
This section allows you to restore the Wireless Projector Server to its’ default factory settings
• Click Apply to restore the factory default settings
Firmware Upgrade
This section shows further information about your Firmware Version and allows you to upgrade
the Wireless Projector Servers Firmware
To upgrade the Wireless Projector Servers Firmware;
1. Download the latest Firmware Image file from the Lindy Web site
2. Browse for the downloaded Firmware Image on your computer and click the Upgrade
button in the Wireless Projector Server Web Admin Management Page to start the install
Manual
English
18
3. A warning message will show with a countdown
4. After a few minutes, a complete message will be shown on screen
5. Restart the Wireless Projector Server for any changes to take effect
Important
DO NOT TURN OFF THE POWER SUPPLY UNTIL THE RESTART COMPLETES
Reboot System
This section gives you the option of remotely rebooting the Wireless Projector Server
1. Click Reboot to reboot the Wireless Projector Server
2. The Wireless Projector Server with immediately start to reboot
Important
DO NOT TURN OFF THE POWER SUPPLY UNTIL THE RESTART COMPLETES

Manual English
19
Additional Software
Launch SidePad -> SidePad Receiver
1 Open the main menu of the WPS application(Win/Mac), and choose the item, “Launch
SidePad -> Sidepad Receiver”
Note: You have to download the “SidePad receiver” on your Android/iOS device, then connect
the Android/iOS to WPS device through WiFi and Launch “‘SidePad Receiver”.
2 In seconds, you shall see the PC desktop shown on the mobile device. Use two fingers to
pinch or one finger to pan the desktop image and control it by single or double clicks!
Enable BrowserSlides
1 Click the “Enable BrowserSlides”, it will start to broadcast your slides to the browser on
connected mobile devices.
Note: Audience need to connect to WPS WiFi Network, open the browser and click the
“BrowserSlides” button to start receiving the slides.
Manual
English
20
Making a Plug&Show (PnS) Token
The PnS Token USB Auto Setup Wizard copies the Wireless Projector Server Utilities and
drivers to a USB-drive
1. Select Make PnS Token… from the Utility Menu or click on the Pns icon in the WPS-
MultiMediaPlus desktop folder
2. Follow the on screen instructions to copy files to a USB-drive

Manual English
21
MobiShow
The MobiShow App is a FREE third party application that allows your Android, BlackBerry,
iPhone to connect to the Wireless Projector Server through a WiFi connection. The following
instructions are for the Android v2.0 / BlackBerry -v2.0 / iPhone - v2.1 of the App. Graphics may
vary from those shown
1. Download & install the MobiShow App from the App Store / App World / Google Play
2. Enable WiFi and connect to the Wireless Projector Server WLAN
3. Launch the MobiShow App
4. MobiShow will search for the Wireless Projector Server
5. When prompted enter the Login Code shown in the upper left corner of the projection
screen to connect to the Wireless Projector Server
Making a PC-less Presentation
To make a PC-less presentation from your Smartphone using MobiShow select;
PhotoSender to send still photos from your phone to the projector screen
PtG to show a PowerPoint presentations .ptt from your Smartphone. Before using PtG
you will need to convert the .ptt using the PtG converter.exe from the software disc
MediaCenter to stream & control multimedia files from your phone
Button Descriptions
Go to previous photo file
Go to previous page
Go to previous media file
Start/Pause slide show
Go to previous step
Go to next media file
Stop slide show
Go to next step
Decrease the volume level
Go to next photo file
Go to next page
Increase the volume level
Rotate to left-90 degree
Play
Mute/Un-mute
Rotate to right-90 degree
Stop
Manual
English
22
Using the PtG Converter
The PtG Converter converts PowerPoint files for use with MobiShow
After installing the PtG Converter from the software disc the PtG Converter icon will appear on
your desktop
After opening the PtG Converter the following UI will display on your desktop
PtG Converter UI
Click the Convert button to select a PowerPoint file .ppt to convert
The Preview button allows you to expand or collapse the conversion preview
Click the Play button to playback a selected PtG file
Click the Open button to open a select a file for playback
Convert
Preview
Play
Open

Manual
English
23
Mac Client Utility
Launch Application
1) Enable your WiFi and connect to WPS device.
2) Execute WPS client software for Mac.
3) Launch WPS software and enter the login code.
4) Start Projection.
Manual
English
24
Main User Interface
Screen Projection
Click the “Play” button for full or split screen, you can project the main screen on to the display
immediately, click the “Pause” button, you can freeze you projection screen, and click the “Stop”
button to stop projecting your screen.
Button Description
Full Screen projection
Project to Split #1
Project to Split #2
Project to Split #3
Project to Split #4
Stop projecting
Pause projecting
Enable the Windows Magnifier function
Control Area for Screen
Status Indicator
Menu Area

Manual
English
25
Web Management
Home Page
1. Make sure your PC connect to WPS box successfully
2. Open your browser, it will enter WPS home page automatically
3. If not, enter your IP address on the browser, you can see the IP on the projector screen
4. The default IP is 192.168.100.10
Download Software
1. Select “Download software” function
2. Please select the “Win 7 / Windows Vista / XP / 2000” or “Windows Mobile 5/6” or “Mac
Utility” and execute the installation program
3. Follow Installation Wizard instructions to proceed till the installation process complete
4. If pop up “Windows Security Alert” because Windows firewall block this program. You just
press “Unblock” button to continue installation
5. Once installation complete, a utility shortcut come out on the screen
Manual
English
26

Manual
English
27
Conference Control
1) This function allows you to host a meeting smoothly without projector cable swapping and
each participant can show their presentation easily.
2) Select “Conference Control” function.
1) Enter password, the default value is “trainer”, and then press [Login].
2) After login, you can see a User List on the screen which indicates all of users connected to
WPS box.
3) There are three columns, “Computer Name”, “Play Control” and “IP Address”.
4) Play Control,There are six buttons, including Play(Full) , Play Split #1 , Play Split
#2 ,Play Split #3 , Play Split #4 and Stop .
5) User List
Manual
English
28
Login Web Admin
1. Click [Admin] and then enter password to login web page.
2. The password default value is “admin”.
System Status
Click [System Status], shows current system status.
Model Name: Product model name
Versions:
1. Firmware version no.: Product firmware version number.
Network Status:
1. IP address:
::
:IP address of WPS device.
2. Subnet Mask:
::
:subnet mask
3. Default Gateway:
::
:default gateway
4. Wireless MAC address:
::
:wireless MAC address
5. Wire MAC address:
::
:wired MAC address

Manual
English
29
Connection Status:
1. Projecting status: which is “Waiting for projecting” or “Projecting”
2. Total Users: It shows how many users login into WPS box.
Network Setup
There are many kinds of operating configurations as below.
<
Auto-Configuration Network Setup
>
The default setting of the WPS box is DHCP client. When the WPS box is connected to a LAN that
already has a DHCP server present, the WPS box takes an IP address assigned to it by the server.
When the WPS box is connected to a LAN that does not have a DHCP server, the WPS box
becomes the DHCP server in the network.
< IP Setup>
♦ You can select “obtain IP address automatically” or “Use the following IP address”
♦ IP Address: The default value is 192.168.100.10.
♦ Subnet Mask: The default value is 255.255.255.0
♦ Default Gateway: The default value is 192.168.100.10
♦ DNS Server: The default value is 192.168.100.10
<DHCP Server Setup>
♦ You can select “auto(Enable/Disable DHCP Server” or “Disable”)
♦ Start IP: The start IP address of DHCP Server.
♦ End IP: The end IP address of DHCP Server
♦ Subnet Mask: The default value is 255.255.255.0
♦ Default Gateway: The default value is 192.168.100.10
♦ DNS Server: The default value is 192.168.100.10
Manual
English
30
< Wireless Setup>
♦ Wireless LAN: The default value is “Enable”
♦ Region: default value is “Worldwide”.
♦ SSID: SSID string, max. Length is 32 bytes.
♦ SSID Broadcast: The default value is “Enable”
♦ Channel: to set fixed channel or Auto. The “Auto” means after power on
WPS
, it will
scan all of wireless channel and select clear one channel automatically.
♦ Encryption: you can select “Disable” or one of WEP/WPA/WPA2 64bit or 128bit in
ASCII or HEX string.
♦ Key: If Encryption is enabled, you have to set key value according to the encryption
mode you selected.
< Gatekeeper>
Gatekeeper is designed for ensuring the enterprise network security within
WPS
box
♦ All Block can block Guest Users(through wireless) to access all office network(LAN),
♦ All Allow can pass Guest Users(through wireless) to access all office network
♦ Internet Only can block Guest Users (through wireless) from office network (LAN) but
still reserve internet connection capability.
<Apply >: press button to select this mode.
<Cancel>: press button to abort action.
<Back>: Back to Operating mode main menu.
OSD Setup
Click [OSD Setup] button, to change OSD standby image.
♦ <Restore Initial>: Restore to default OSD standby image.
♦ <Image File Upload>: Upload the customized OSD standby image. (You need to
convert the image to system defined format using provided IB Maker utility which is
stored in the USB token.)

Manual
English
31
Projection Setup
Click [Projection Setup] button
♦ <Resolution>: SWXGA(1440*900), XGA(1024*768), WXGA(1280x800) and
SVGA(800*600). The default value is XGA.
♦ <Color Depth>: provide
WPS
output with 16bit or 32 bit color depth. It depends on
your PC settings.
♦ <Screen Refresh Rate>: This is VGA output refresh rate, provides 60 Hz and 75Hz
to suit for different kinds of projectors.
♦ <Login Code>: You can select “Disable”, “Random”, or “Use the following code” to
set a specified 4-characters Number.
♦ <Apply>:Confirmation and Save modifications
♦ <Cancel>: Cancel all the modifications
Change Passwords
Manual
English
32
Click [Change Password] button, to change password value.
The length of password is up to 8 characters.
♦ <Enter New Password>: enter new password you want to change for each category.
♦ <Confirm New Password>: double confirm new password.
♦ <Apply>: Confirmation and Save modifications.
Reset to Default
Click [Reset to Default] button to restore factory default settings.
<Apply>: Confirmation and action.
Firmware Upgrade

Manual English
33
Click [Firmware Upgrade] button to upgrade firmware.
1. Firstly, you have to get latest firmware image file from your vendor.
2. Click <Browse> to specify file name you want to upgrade.
3. Click <Upgrade> to start.
4. A warning message shown and count down counter on the screen.
5. After a few minutes, a complete message shown on the screen.
6. Restart WPS box to take effect.
Warning: Don’t power off WPS while firmware upgrade in progress, otherwise will cause
your Box doesn’t work and have to return device to your vendor for fixing.
Reboot System
Click [Reboot System] button, to restart system
♦ <Reboot>: reboot system automatically.
Manual
English
34
Logout
Using PtG Converter
Open "MobiShow PtG Converter" in "MobiShow\MobiShow PtG Converter" folder from
"Programs" in the Start menu. The following control panel is displayed on your Desktop when it
is launched.
Click the “ Convert” button to select a PowerPoint PPT file and start conversion. PtG
Converter will open the PowerPoint file and convert it to PtG format. You can see the
conversion process on your Desktop.
Click the “ Preview” button to expand or collapse the preview pane. Click “ Play” to
playback selected PtG file, or click “ Open” to select a PtG file.

Radio Frequency Energy, Certifications
Radio Frequency Energy, Certifications
FCC Warning
This device complies with part 15 of the FCC Rules. Operation is subject to the following two conditions:
1. This device may not cause harmful interference, and
2. This device must accept any interference received, including interference that may cause undesired operation
LINDY Herstellergarantie- Hinweis für Kunden in Deutschland
LINDY gewährt für dieses Produkt über die gesetzliche Regelung hinaus eine zweijährige Herstellergarantie ab Kaufdatum. Die
detaillierten Bedingungen dieser Garantie finden Sie auf der LINDY Website aufgelistet bei den AGB.
WEEE (Waste of Electrical and Electronic Equipment),
Recycling of Electronic Products
In 2006 the European Union introduced regulations (WEEE) for the collection and recycling of all waste electrical and electronic
equipment. The wheelie bin symbol shown indicates that this product must not be disposed of with household waste. Instead
the product must be recycled in a manner that is environmentally friendly. For more information on how to dispose of this
product, please contact your local recycling centre or your household waste disposal service. Each individual EU member state
has implemented the WEEE regulations into national law in slightly different ways. Please follow your national law when you
want to dispose of any electrical or electronic products.
More details can be obtained from your national WEEE recycling agency.
Germany / Deutschland
Die Europäische Union hat mit der WEEE Direktive umfassende Regelungen für die Verschrottung und das Recycling von
Elektro- und Elektronikprodukten geschaffen. Diese wurden von der Bundesregierung im Elektro- und Elektronikgerätegesetz –
ElektroG in deutsches Recht umgesetzt. Dieses Gesetz verbietet vom 24.März 2006 an das Entsorgen von Elektro- und
Elektronikgeräten über die Hausmülltonne! Diese Geräte müssen den lokalen Sammelsystemen bzw. örtlichen Sammelstellen
zugeführt werden! Dort werden sie kostenlos entgegen genommen. Die Kosten für den weiteren Recyclingprozess übernimmt
die Gesamtheit der Gerätehersteller.
France
En 2006, l'union Européenne a introduit la nouvelle réglementation (DEEE) pour le recyclage de tout équipement électrique et
électronique.
Chaque Etat membre de l' Union Européenne a mis en application la nouvelle réglementation DEEE de manières légèrement
différentes. Veuillez suivre le décret d'application correspondant à l'élimination des déchets électriques ou électroniques de
votre pays.
Italy
Nel 2006 l'unione europea ha introdotto regolamentazioni (WEEE) per la raccolta e il riciclo di apparecchi elettrici ed elettronici.
Non è più consentito semplicemente gettare queste apparecchiature, devono essere riciclate. Ogni stato membro dell' EU ha
tramutato le direttive WEEE in leggi statali in varie misure. Fare riferimento alle leggi del proprio Stato quando si dispone di un
apparecchio elettrico o elettronico.
Per ulteriori dettagli fare riferimento alla direttiva WEEE sul riciclaggio del proprio Stato.
LINDY No. 32701
1
st
Edition, September 2013
www.lindy.com
-
 1
1
-
 2
2
-
 3
3
-
 4
4
-
 5
5
-
 6
6
-
 7
7
-
 8
8
-
 9
9
-
 10
10
-
 11
11
-
 12
12
-
 13
13
-
 14
14
-
 15
15
-
 16
16
-
 17
17
-
 18
18


Lindy WLAN 11n HDMI & VGA Projector Server User manual
- Category
- AV extenders
- Type
- User manual
- This manual is also suitable for
Ask a question and I''ll find the answer in the document
Finding information in a document is now easier with AI
Related papers
Other documents
-
Mitsubishi XD530E User manual
-
-
Acer P7200i User manual
-
Acer U5300W Troubleshooting guide
-
Barco FS70-4K6 Quick start guide
-
Optoma WPS2-Dongle User manual
-
 Awind mobishow ms-200 Quick Installation Manual
-
Infocus LiteShow III User manual
-
Intellinet 524759 User manual
-
Optoma TX765W User manual
